


accompanying the In-Box review, this will be an extensive build review, including my visit to a restored 170 V at Sinsheim museum and official Mercedes-Benz documents. Sources of various restored vehicles, information and forum suggestions will follow along the way. Feel free to add content


_____
The Mercedes-Benz 170 V, or Baureihe W 136 by its company designation, which was built from 1935-1952, was a passenger car and a best seller of Mercedes-Benz before, during and after World War two. The designation V (Vorne front) differentiates the vehicle from the 170 H (Hinten rear) in terms of the engine placement. The 170 D was a post-war Diesel engine variation. The 170 V Saloon, going by the German name of 170 V Innensteuer-Limousine had a 38 HP M136 gasoline engine with 1.69l displacement, 4 cylinders, a gearbox with 4 forwards and 1 reverse gear and a 43l fuel tank that could get the vehicle as far as 400km. 70,000 vehicles were produced between 1936 and 1942, and about another 71,000 between 1946 and 1953. Also noticeable is that the vehicle has a front-engine, rear-wheel-drive layout (FR layout). Vehicle variations included amongst others, a van, police car, pickup, Kübelsitzfahrzeug, 2 and 4-door limousine and cabriolet versions and a roadster.
Vehicles produced after 1950 had wider rear axles, the bumpers received major modifications and the displacement of the engine was increased. The kit is thus eligible for vehicles produced 1950 or earlier. The Bosch dynamo regulator RJH130 of later vehicles was also different and engine detailers may enjoy doing some modifications to it for post-1950 vehicles. The Build feature will include further sources for the interested modeller. This kit will enable the construction of police, mail, imperial railway administration or civilian car variants, all 4 door saloons.
____
Before building the vehicle, you must decide about the production run you wish to represent. As I will be depicting a late A run (early 1937). The A refers to the "Ersatzteilliste Ausführung", or spare parts list, of which there were quite a few (A,B,C,...,H) *,**
- A until mid March 1937
- B until late April 1938
- C verious updates in '41, '43.... (Note that post-war they were renamed from "Ersatzteilliste Ausführung ?" into "Katalog ?" and starting again at A) as such, do not confuse post-war and pre-war list A , B....
- Katalog A 1946? Nachkriegsgeneration ****
- Katalog H after 1948
The production batch based on "Ersatzteilliste Ausführung A", has the old style Star mounting and the oil cap further to the back, see the official Eratzteilliste from June 1936 below:
 ***
***Part 2383-3318 (the one to the right of the star) is the radiator screwed sealing cap.
Bear in mind that later models had the radiator cap mounted directly below the Mercedes star, and not shifted to the rear!
Apart from potential deviations regarding this, the cars varied depending on their respective use. This will alter the appearance, especially of the rear of the vehicles. I have chosen the Reichsbahn version.
Before starting the assembly, a major confusing part's switch is in the instructions. Part A28 on page 6 (step 13) needs to be turned before glueing it to the chassis, otherwise your steering rods will be on the wrong side. Be careful here.
This shows the correct location as do the instructions. You can also see the oil cap location again.
 ***
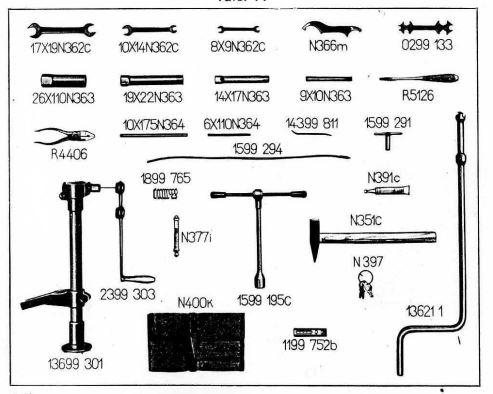
***The tools on page 7 (Step 20) could be adjusted a bit, based on original photos.
 *
*This shows the placement and support system for the tools. The spares part's list also suggests that there are more tools than the ones MiniArt added:
 ***
***The interior remains to be analysed, my visit at Sinsheim was too short, will need to inspect the interior next time. This restored vehicle gives you an idea, however.
 *****
*****1) Seat adjustment latch.
2) Space underneath the seat (not sure if all had this, but I found no vehicle without it so far)
3) padded roof (note that not all had this)
1 and 2) I need to add putty to hide the latch on the back-rest, as it was underneath the padding, not on top of it. Also notice that there is no space underneath the seats!

3) Beginning to pad the roof:

Below sme progress shots:
Notice how I had the steering rods on the wrong side... Big FAIL (t is fixed now)

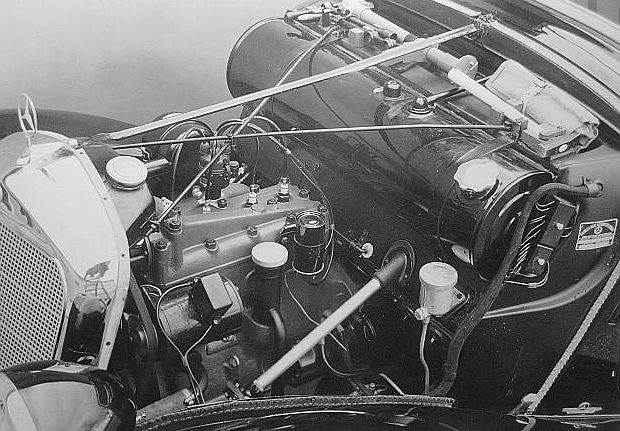
I have added the fuel and electricity wiring, as there are plenty of official documents showing where they go.

Here for example:
*The brake tubes (silver wire) are included. I added them according to the MiniArt instructions and then adjusted them based on the looks of the catalogue pictures from 1936/1937
The engine with the Bosch Dynamo RJH 90/6 1800 RS 189 and the voltage regulator (the two left-most silver wires are attached to the regulator). Look how ugly the tools are there, this needs fixing. Actually one of the only not so good parts of the kit.

Look at the bumpers...

and compare them:
 ***
***And my photo of the Sinsheim vehicle (built in 1948 however, the mercedes star mounting is different):
Well, that's it for the beginning. More to come along the way.
Have a good day.
Sources:
* http://www.inverso.pt
** Oldtimerliteratur https://www.oldtimerteileww.de/literatur/
*** Ersatzteilliste A Mercedes-Benz Juni 1936 (found here:)
http://www.mercedes-jelinek.de
http://www.inverso.pt
**** Niemoeller http://bit.ly/2sQhiDo
***** Team-BHP http://bit.ly/2sgCeGv


