_GOTOBOTTOM
Armor/AFV: Modern Armor
Modern armor in general.
Hosted by Darren Baker
Takom M47/G build
ptruhe
Visit this Community
Texas, United States
Joined: March 05, 2003
KitMaker: 2,092 posts
Armorama: 1,607 posts
Posted: Saturday, August 05, 2017 - 11:22 AM UTC


I've always wanted to build a M47 in the Bundeswehr but never felt like picking up the Italeri M-47 kit. The Takom M47/G was worth the wait. The G is not an official designation and only indicates you can build a German version of the M47.

Nice crisp detail and plastic that is not brittle. The clear periscopes are big plus as well. Haven't tried link and length tracks before but still a vast improvement over the Italeri tracks I've experienced.

6 decal options for US, German, Pakistani, South Korean, Jordanian and Croatian. There are all 4 muzzle type included and 2 different turret handrail types included. Modern German smoke launchers are included as well but most of the photos I've seen do not show these mounted.

Tankograd #5002 The Early Years of the Modern German Army is the best reference I've got. Tankograd #5102 covers the M41 and M47 but I'm going to proceed without putting any more money into this build. The biggest question remaining is what color to paint it as most photos are B/W. Delivered by the US with no markings, I'm unsure when they were repainted in gelboliv.

Even though it had a short life in the Bundeswehr, the M47 was the first heavy tank when the German army was rebuilt starting in 1956. The M48 A1 started being deployed in 1957 and the M47s moved to reserve units over time as the M48s were upgraded and the first Leopard 1s appeared.

ptruhe
Visit this Community
Texas, United States
Joined: March 05, 2003
KitMaker: 2,092 posts
Armorama: 1,607 posts
Posted: Saturday, August 05, 2017 - 11:29 AM UTC
The sprues:


RobinNilsson
Staff MemberTOS Moderator
KITMAKER NETWORK
Visit this Community
Stockholm, Sweden
Joined: November 29, 2006
KitMaker: 6,693 posts
Armorama: 5,562 posts
Posted: Saturday, August 05, 2017 - 01:46 PM UTC
I'm not able to tell from the sprue images above if the single links have the end connectors at an angle or in line with the surface of the link itself.
If they are not angled you will need to spend some work on them.
When two track links in a double pin track are at an angle (at the first and last road wheel, the sprocket wheel and the idler wheel) the connectors will be angled against both of the links. This happens naturally with model tracks where the end connectors are separate pieces but not when the end connectors are molded in one piece with a track link. "Rubber band" tracks do not suffer from this since the end connectors bend/flex

Solution: Carefully slice off the end connectors, glue the correct number of links, looks like 6 or 7 on the boxart, to the sprocket and the idler, glue the separated end connectors to the links.
The other option is to get aftermarket tracks where the end connectors are separate parts.

Getting the tracks to look right with the end connectors at the wrong angle is almost impossible, a ton of mud might help ...

/ Robin


The end connectors are not shown in this diagram but the would be in a straight line between the pins in adjacent track links. Recurdyn.com

Leclerc ? Wikimedia


M113 ? Unrealengine.com


M47 sprocket, Prime Portal
ironhull
Visit this Community
Venezia, Italy
Joined: November 23, 2013
KitMaker: 134 posts
Armorama: 134 posts
Posted: Saturday, August 05, 2017 - 02:51 PM UTC
In my opinion the front shape of MG bowl is wrong, never seen such stepped profile instead of the usual smooth joint. Even in early TAKOM's cad image it was different and more similar to the real tank.
Bravo1102
Visit this Community
New Jersey, United States
Joined: December 08, 2003
KitMaker: 2,864 posts
Armorama: 2,497 posts
Posted: Saturday, August 05, 2017 - 02:56 PM UTC
Look carefully at the M47 sprocket. The end connectors aren't at that acute an angle that the pieces couldn't be bent with a pair of pliers as each link is laid around the sprocket.

Think of it in motion and bend each end connector on each link as you lay it around the sprocket. Simple really. Lay the track the way it lays itself.

I have an ancient Dragon M50 I'm doing now and it just takes a little twisting to get the end connectors to look right. Though of course I have been known to leave one or two out of sorts so people could play "find the dead end connector"

I also remove occasional center guide to portray a crew who really needs to do some maintenance on that track.
RobinNilsson
Staff MemberTOS Moderator
KITMAKER NETWORK
Visit this Community
Stockholm, Sweden
Joined: November 29, 2006
KitMaker: 6,693 posts
Armorama: 5,562 posts
Posted: Saturday, August 05, 2017 - 04:44 PM UTC
A little gentle violence with pliers will do the trick,
except in those cases where the plastic is too soft so the end connectors get squashed by the jaws of the plier
or
when the plastic is too hard and brittle and ends up as broken splinters.
I have experienced both ....

When it works the plier method is a lot easier though ...
barkingdigger
Staff MemberAssociate Editor
ARMORAMA
#013
Visit this Community
England - East Anglia, United Kingdom
Joined: June 20, 2008
KitMaker: 3,981 posts
Armorama: 3,403 posts
Posted: Saturday, August 05, 2017 - 04:51 PM UTC
The new Takom kits look nice, although I still have some Italeri ones that will get built because they are still quite good. (For me, the biggest improvements from Takom are the tracks and the mantlet cover, in my opinion. Italeri was at its zenith with the M47 all those years ago...)

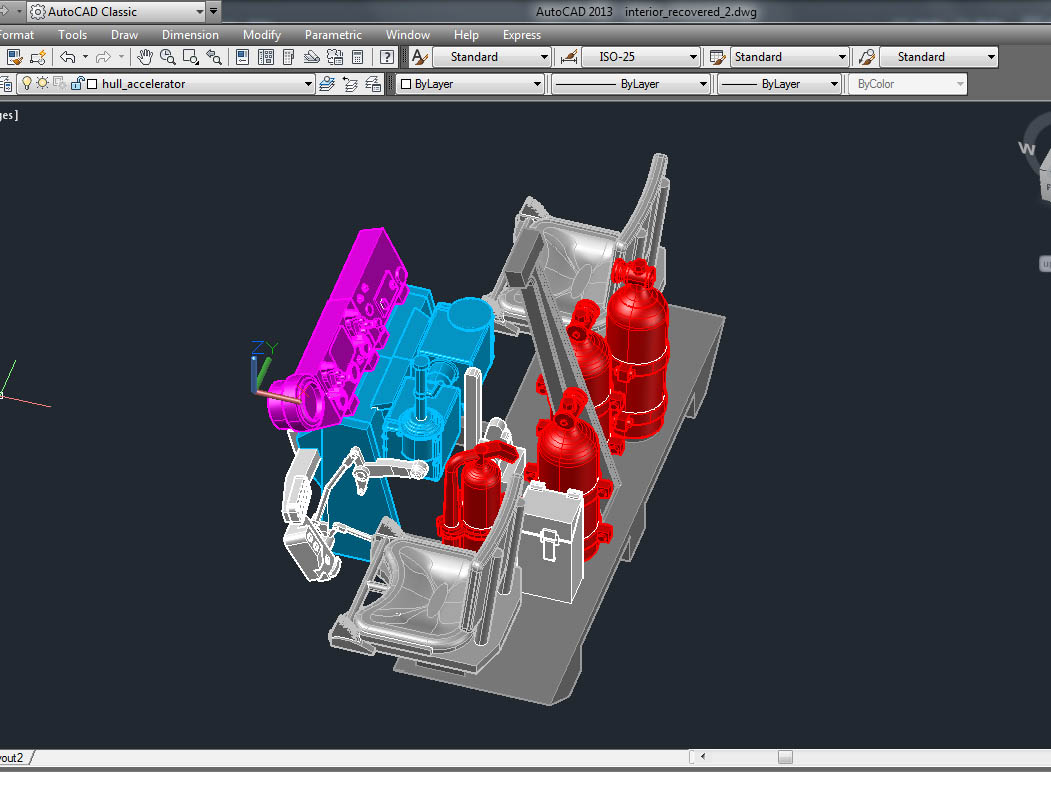
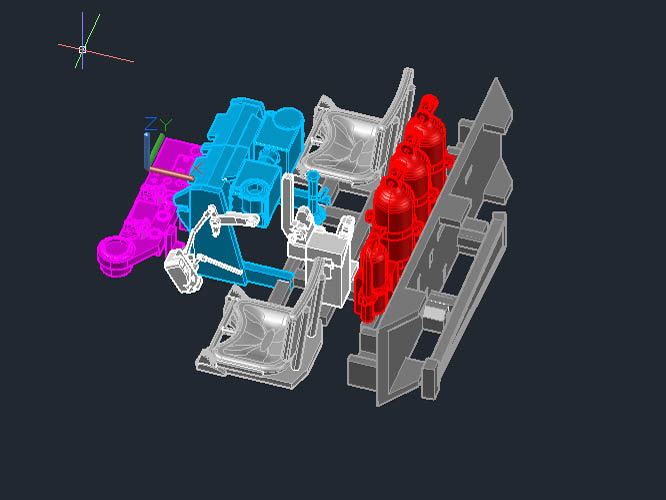
I'm designing some interior parts to print at Shapeways, and am currently waiting on a test-print of the driver's section to arrive. It will drop into the Italeri kit, but you'll need to remove the forward pair of "stiffeners" Takom moulded inside its hull. Once I'm happy with it I'll be making them available for purchase.


It is a kit of parts, sprued, that will come like this:


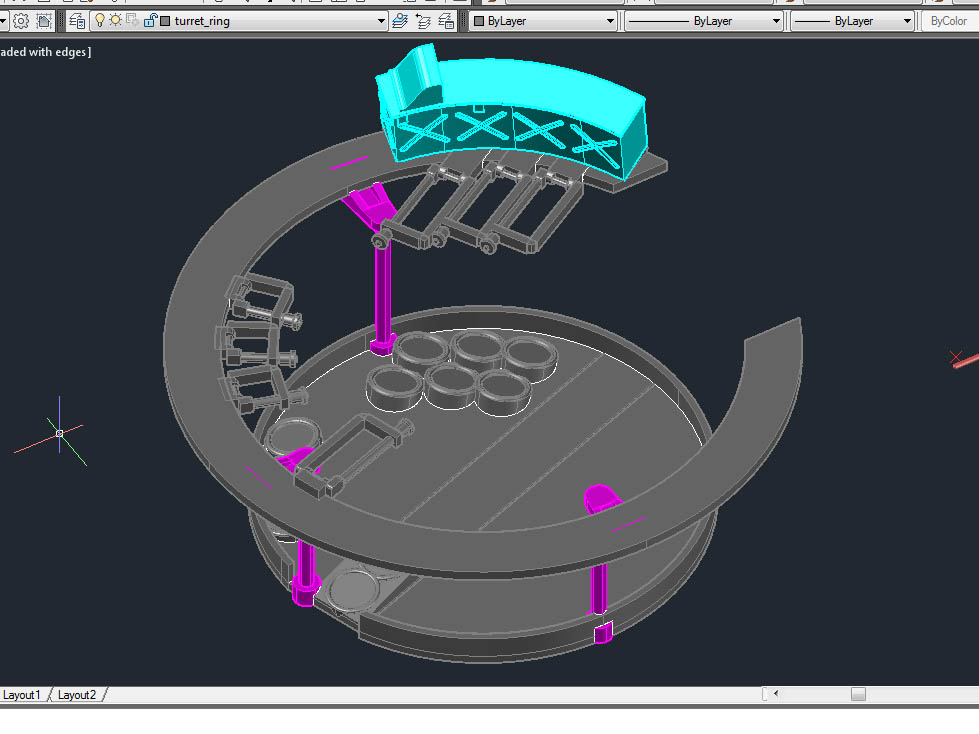
I'm also working on a turret interior, but that may take a couple weeks longer to finish:

Some trimming of the Takom shell is required at the front (where they added a "shelf" under the gun mount), but otherwise it will be a drop-fit in either manufacturer's kits. (The ready clamps are sized for the excellent AFV Club 90mm ammo set.) For Takom I'll need to make the gun breach, since they offer nothing to fill the turret.
JSSVIII
Visit this Community
Massachusetts, United States
Joined: March 28, 2007
KitMaker: 1,169 posts
Armorama: 1,067 posts
Posted: Saturday, August 05, 2017 - 05:36 PM UTC
Tom that is a great idea! I have already built an Italeri M47, so I probably won't be getting this one, but I really hope it sells well, so maybe you will do interiors for other vehicles as well.
GTDeath13
Visit this Community
Attica, Greece / Ελλάδα
Joined: June 12, 2015
KitMaker: 921 posts
Armorama: 919 posts
Posted: Saturday, August 05, 2017 - 06:32 PM UTC
Regarding the end connectors, if the M47 kit has the same track design as the T29 and T30-34 kit, then there are single links with the end connectors straight and single links with angled end connectors for use around the sprocket and the idler.

Also, the jig provided may seem a good idea but it actually is not. You can assemble the tracks much easier without it...

Here is my T-29, notice the front track links around the idler.


Will be looking into this build, I want to build one too, but with the smoke grenade launchers on each side.
barkingdigger
Staff MemberAssociate Editor
ARMORAMA
#013
Visit this Community
England - East Anglia, United Kingdom
Joined: June 20, 2008
KitMaker: 3,981 posts
Armorama: 3,403 posts
Posted: Saturday, August 05, 2017 - 06:54 PM UTC

Quoted Text

Tom that is a great idea! I have already built an Italeri M47, so I probably won't be getting this one, but I really hope it sells well, so maybe you will do interiors for other vehicles as well.


I'm thinking of driver's cockpits for M48s and M60s, as well as turret interiors, but most kit turrets have ludicrously small turret mountings - some plastic surgery will be required.

As for the Takom kit, I'm keen to see how those tracks go together! Definitely will be following this build.
Maki
Staff MemberSenior Editor
ARMORAMA
Visit this Community
Croatia Hrvatska
Joined: February 13, 2002
KitMaker: 5,579 posts
Armorama: 2,988 posts
Posted: Saturday, August 05, 2017 - 07:26 PM UTC
Will be following mate... but why the boring Bundeswehr monochrome vehicle and not Croatian funky camo scheme?

Mario
JSSVIII
Visit this Community
Massachusetts, United States
Joined: March 28, 2007
KitMaker: 1,169 posts
Armorama: 1,067 posts
Posted: Saturday, August 05, 2017 - 08:00 PM UTC

Quoted Text


Quoted Text

Tom that is a great idea! I have already built an Italeri M47, so I probably won't be getting this one, but I really hope it sells well, so maybe you will do interiors for other vehicles as well.


I'm thinking of driver's cockpits for M48s and M60s, as well as turret interiors, but most kit turrets have ludicrously small turret mountings - some plastic surgery will be required.

As for the Takom kit, I'm keen to see how those tracks go together! Definitely will be following this build.


In my opinion, I think anyone interested in a turret interior would rather do little surgery compared to scratch building the entire thing.
ptruhe
Visit this Community
Texas, United States
Joined: March 05, 2003
KitMaker: 2,092 posts
Armorama: 1,607 posts
Posted: Sunday, August 06, 2017 - 01:30 AM UTC

Quoted Text

Will be following mate... but why the boring Bundeswehr monochrome vehicle and not Croatian funky camo scheme?


It is definitely interesting but it looks like it was added on the green (JNA?) with spray cans and I don't have the skills or equipment to duplicate that well. If it was brush painted then I would give it a try.
jasegreene
Visit this Community
Florida, United States
Joined: October 21, 2013
KitMaker: 751 posts
Armorama: 751 posts
Posted: Sunday, August 06, 2017 - 02:28 AM UTC
Oh yeah,I do love those "funky" colors of Croatian and others tanks from the former Yugoslav Wars in the 90's.Some of them looked if they had drove through a paint store .
ptruhe
Visit this Community
Texas, United States
Joined: March 05, 2003
KitMaker: 2,092 posts
Armorama: 1,607 posts
Posted: Wednesday, August 09, 2017 - 05:57 AM UTC
A bit of progress with lower hull done. Overall fit good and minor seams to clean up on roadwheel arms. Some cleanup on the rear hull. Instructions are short on words which is ok in most areas but will surprise you in some.

Learned that I should have assembled the final drive unit and cleaned up the seam gaps before gluing to the hull. A bit of a nitpick in that the final drive drain plugs are missing. Final drive mount bolts are flush instead of out slightly which seems required for the safety wire attaching the two bolts in reference photos.


There is lettering on the lower front glacis plate that seems to bear out with one picture that I found online.
http://data4.primeportal.net/tanks/david_lueck/m47_patton_tank/images/m47_patton_tank_080_of_187.jpg


Now it's on to a lot of this:

That is a nasty bit of flash in the middle of the sprocket. Strange.
urumomo
Visit this Community
Texas, United States
Joined: August 22, 2013
KitMaker: 675 posts
Armorama: 667 posts
Posted: Wednesday, August 09, 2017 - 07:00 AM UTC
2-piece barrel is pretty disappointing
Bravo1102
Visit this Community
New Jersey, United States
Joined: December 08, 2003
KitMaker: 2,864 posts
Armorama: 2,497 posts
Posted: Wednesday, August 09, 2017 - 07:23 AM UTC

Quoted Text

2-piece barrel is pretty disappointing


There are actually two gun barrels. There is a one piece one without the shroud and the two piece with the shroud. I doubt the hanging shroud could be done one piece in a standard mold. I would rather have it in plastic two piece than some kind of vinyl/DS plastic thing.
urumomo
Visit this Community
Texas, United States
Joined: August 22, 2013
KitMaker: 675 posts
Armorama: 667 posts
Posted: Wednesday, August 09, 2017 - 07:37 AM UTC

Quoted Text


Quoted Text

2-piece barrel is pretty disappointing


There are actually two gun barrels. There is a one piece one without the shroud and the two piece with the shroud. I doubt the hanging shroud could be done one piece in a standard mold. I would rather have it in plastic two piece than some kind of vinyl/DS plastic thing.


Mmm - I think they could have done the shroud portion separate , in 2 pieces if necessary , then the barrel could just plug into it .
Yeah ?
I'm looking at the B&W pic up top
ptruhe
Visit this Community
Texas, United States
Joined: March 05, 2003
KitMaker: 2,092 posts
Armorama: 1,607 posts
Posted: Wednesday, August 09, 2017 - 07:57 AM UTC
I'll see when the time comes if the one piece barrel fits in the shroud piece and then the barrel part of the shroud could be done in putty. Still sounds better than fixing a seam the whole length of the barrel x 2.
Bravo1102
Visit this Community
New Jersey, United States
Joined: December 08, 2003
KitMaker: 2,864 posts
Armorama: 2,497 posts
Posted: Wednesday, August 09, 2017 - 08:37 AM UTC

Quoted Text


Quoted Text


Quoted Text

2-piece barrel is pretty disappointing


There are actually two gun barrels. There is a one piece one without the shroud and the two piece with the shroud. I doubt the hanging shroud could be done one piece in a standard mold. I would rather have it in plastic two piece than some kind of vinyl/DS plastic thing.


Mmm - I think they could have done the shroud portion separate , in 2 pieces if necessary , then the barrel could just plug into it .
Yeah ?
I'm looking at the B&W pic up top


Right. You would think that would be easier than two whole gun barrels.

By the way don't forget the adjustable screw clamp that holds the shroud in place on the gun barrel. It is often plain dull metal (aluminum?) and not painted. Never saw one totally rusted so I assume aluminum or stainless steel. Identical to the one used on my pool filter.
barkingdigger
Staff MemberAssociate Editor
ARMORAMA
#013
Visit this Community
England - East Anglia, United Kingdom
Joined: June 20, 2008
KitMaker: 3,981 posts
Armorama: 3,403 posts
Posted: Wednesday, August 09, 2017 - 03:40 PM UTC

Quoted Text

I'll see when the time comes if the one piece barrel fits in the shroud piece and then the barrel part of the shroud could be done in putty. Still sounds better than fixing a seam the whole length of the barrel x 2.


It might be easier to cut the solid barrel short and mate it to the plastic shroud. I'd use a length of plastic rod on the inside to act as a peg to hold it all together.
ptruhe
Visit this Community
Texas, United States
Joined: March 05, 2003
KitMaker: 2,092 posts
Armorama: 1,607 posts
Posted: Thursday, August 31, 2017 - 12:24 AM UTC


The two part outer roadwheels leave a bit of seam but it's on the inside so not cleaning that up.


The individual links made to go around the sprockets and roadwheels do have angled connectors so no need to cut and glue end connectors. The part identification on the sprue is a bit maddening for similar shaped parts as you've got to make assumptions.

There are pin marks on the tracks that take a slight amount of cleanup. Slight seam across the connectors but not worth the trouble considering you might slice off the end of the pin. Some of the pins are attachment to the sprue so careful snipping required.


The jig was helpful for me to ensure that I had spacing right on the individual links since the length sections had locator pins.


Finished one run. The instructions want you to assemble the bottom length section attached but I've never painted a vehicle with the track on and I needed that section to make sure the individual links on both end were spaced appropriately. I don't see any issue mounting after the hull is painted. Can't get the sprocket out to paint with the rest of the hull!
JSSVIII
Visit this Community
Massachusetts, United States
Joined: March 28, 2007
KitMaker: 1,169 posts
Armorama: 1,067 posts
Posted: Thursday, August 31, 2017 - 04:17 AM UTC
Its great to hear that Takom took the time to angle the end connectors, nice little detail there! Good progress Paul.
skyshark
Visit this Community
North Carolina, United States
Joined: November 16, 2005
KitMaker: 703 posts
Armorama: 499 posts
Posted: Thursday, August 31, 2017 - 06:21 AM UTC
Which M47 would be the US version?
ptruhe
Visit this Community
Texas, United States
Joined: March 05, 2003
KitMaker: 2,092 posts
Armorama: 1,607 posts
Posted: Thursday, August 31, 2017 - 08:21 AM UTC
I think the E/M and the /G kits could both be used for US versions but the /G kit has markings for one US vehicle. There are 4 muzzle brake types and two turret rail types supplied.

The early German version was from US stocks. The "G" parts, of which the kit really just has the smoke launchers, weren't added till later.
 _GOTOTOP