

Hi all
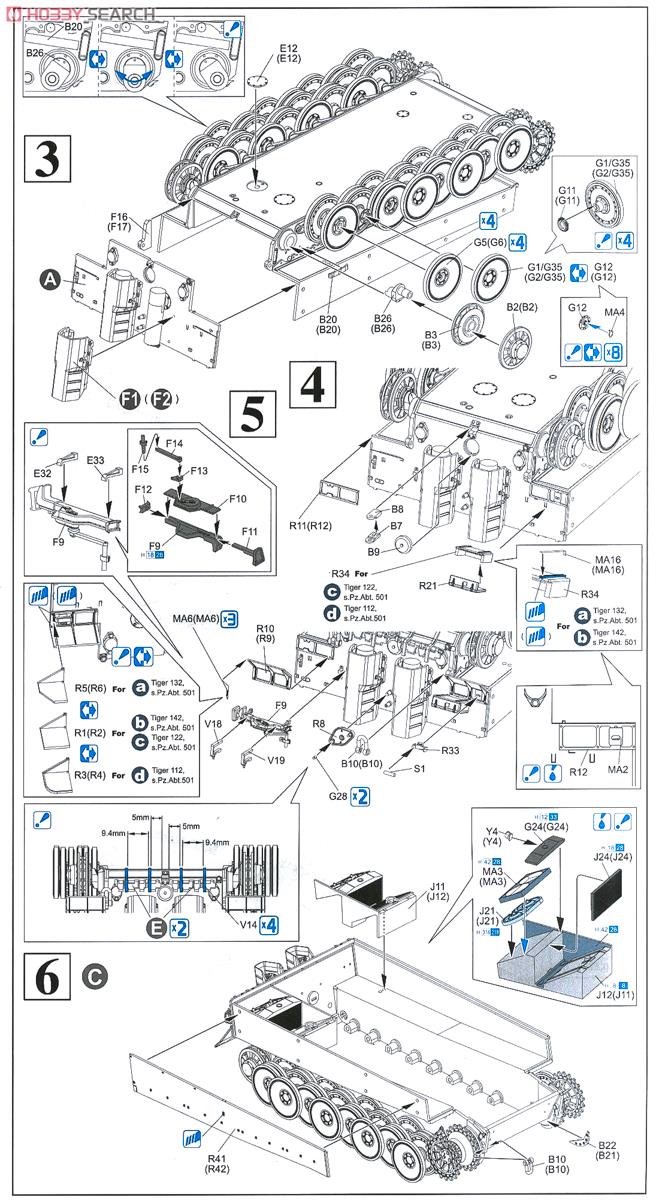
Need a bit of help with the outer roadwheel of my Tiger 1 kits - DML 6608 (Tiger131) & 6820 (Tunisian Tiger). Both kit instructions are basically the same at steps 2 & 3. Step 2 shows the outer wheel to be parts G7/G8 yet Step 3 shows these same wheels as G5/G6. Any ideas which way I should go here?
Thanks in advance
Hosted by Darren Baker
Tiger 1 roadwheel help

chauvel

Joined: February 14, 2015
KitMaker: 155 posts
Armorama: 154 posts
Posted: Saturday, August 05, 2017 - 07:11 PM UTC

Byrden

Joined: July 12, 2005
KitMaker: 2,233 posts
Armorama: 2,221 posts
Posted: Saturday, August 05, 2017 - 08:50 PM UTC
No, it doesn't show that at all. There is a wheel attached to another wheel at that point.
David
David

easyco69

Joined: November 03, 2012
KitMaker: 2,275 posts
Armorama: 2,233 posts
Posted: Saturday, August 05, 2017 - 09:03 PM UTC
I was gonna say..David Byrden is the man to ask.

PvtMutt

Joined: July 01, 2006
KitMaker: 614 posts
Armorama: 601 posts
Posted: Saturday, August 05, 2017 - 09:09 PM UTC
Right on David

cabasner
Joined: February 12, 2012
KitMaker: 1,083 posts
Armorama: 1,014 posts
Posted: Sunday, August 06, 2017 - 09:16 AM UTC
Shaun,
If you have any way of getting the page in the instructions posted here (scanned page, or photograph the page), I might be able to help (though Mr. Byrden is THE expert)! I've built several DLM Tiger Is, and I'm sure I will be able to help you, IF I see the instructions. It turns out that I am going to buy both the Tiger models you mention in your post, but I don't have them yet, hence my need to see the instructions for those models.
If you have any way of getting the page in the instructions posted here (scanned page, or photograph the page), I might be able to help (though Mr. Byrden is THE expert)! I've built several DLM Tiger Is, and I'm sure I will be able to help you, IF I see the instructions. It turns out that I am going to buy both the Tiger models you mention in your post, but I don't have them yet, hence my need to see the instructions for those models.

11Bravo_C2
Joined: May 12, 2015
KitMaker: 475 posts
Armorama: 394 posts
Posted: Sunday, August 06, 2017 - 09:57 AM UTC
Quoted Text
Shaun,
If you have any way of getting the page in the instructions posted here (scanned page, or photograph the page), I might be able to help (though Mr. Byrden is THE expert)!
Curt,
You can look here:
Tiger I Tunisian Initial s.Pz,Abt.501 and Pz.Rgt.7

RobinNilsson

Joined: November 29, 2006
KitMaker: 6,693 posts
Armorama: 5,562 posts
Posted: Sunday, August 06, 2017 - 11:26 AM UTC
Hi Shaun,
First of all take a close look at step 3 and count the layers of road wheels. There are two different groups, one "inner" and one "outer". If you count the layers of wheel discs there is first a single disc, then a pair, another pair and finally a single disc. This comes to 1 + 2 + 2 + 1 = 6 layers of discs. I haven't had the misfortune to have to replace one of the innermost discs but I think it requires removing the wheel discs from up to 6 axles (an expert may tell me that I am wrong ....Edit: see next post by David, looks like one or more discs need to be removed from up to 7 axles, even the idler and half the sprocket in some cases ...)
The "inner" has two discs close together near the inner half of the track and one disc at the outer edge of the track.
The "outer" has two discs close together at the outer half of the track and one disc close to the hull side.
Step 2 assembles the closely spaced discs of the "inner" group and the lonely and one of the close discs of the "outer" group.
Step 3 assembles the lonely disc of the "inner" group and the second of the two closely spaced discs of the "outer" group.
Now check the part numbers and follow the arrows.
Step 2: First assemble the innermost single disc (layer 1), then assemble the innermost pair of discs (layer 2 and 3), then the innermost disc of the outer pair (layer 4).
Step 3: First assemble the second/outer disc of the outer pair (layer 5), then assemble the lonely disc on the axle of the inner pair (layer 6).
/ Robin
Edit:
Added images for ease of reference.
Step 2

Step 3
First of all take a close look at step 3 and count the layers of road wheels. There are two different groups, one "inner" and one "outer". If you count the layers of wheel discs there is first a single disc, then a pair, another pair and finally a single disc. This comes to 1 + 2 + 2 + 1 = 6 layers of discs. I haven't had the misfortune to have to replace one of the innermost discs but I think it requires removing the wheel discs from up to 6 axles (an expert may tell me that I am wrong ....Edit: see next post by David, looks like one or more discs need to be removed from up to 7 axles, even the idler and half the sprocket in some cases ...)
The "inner" has two discs close together near the inner half of the track and one disc at the outer edge of the track.
The "outer" has two discs close together at the outer half of the track and one disc close to the hull side.
Step 2 assembles the closely spaced discs of the "inner" group and the lonely and one of the close discs of the "outer" group.
Step 3 assembles the lonely disc of the "inner" group and the second of the two closely spaced discs of the "outer" group.
Now check the part numbers and follow the arrows.
Step 2: First assemble the innermost single disc (layer 1), then assemble the innermost pair of discs (layer 2 and 3), then the innermost disc of the outer pair (layer 4).
Step 3: First assemble the second/outer disc of the outer pair (layer 5), then assemble the lonely disc on the axle of the inner pair (layer 6).
/ Robin
Edit:
Added images for ease of reference.
Step 2
Step 3
Byrden
Joined: July 12, 2005
KitMaker: 2,233 posts
Armorama: 2,221 posts
Posted: Sunday, August 06, 2017 - 02:58 PM UTC
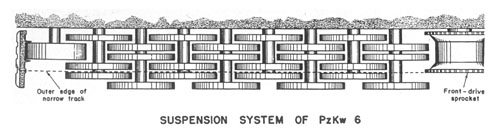
Study this diagram:
David
David

Tojo72
Joined: June 06, 2006
KitMaker: 4,691 posts
Armorama: 3,509 posts
Posted: Sunday, August 06, 2017 - 03:06 PM UTC
Now compare that to the T-34 suspension,and you wonder why they came up eith such a PITA set up.
Byrden
Joined: July 12, 2005
KitMaker: 2,233 posts
Armorama: 2,221 posts
Posted: Sunday, August 06, 2017 - 03:08 PM UTC
Because the Tiger was twice as heavy and they didn't know how to design stronger wheels.
There, you can stop wondering.
David
There, you can stop wondering.
David
RobinNilsson
Joined: November 29, 2006
KitMaker: 6,693 posts
Armorama: 5,562 posts
Posted: Sunday, August 06, 2017 - 03:09 PM UTC
Quoted Text
Because the Tiger was twice as heavy and they didn't know how to design stronger wheels.
There, you can stop wondering.
David


m4sherman
Joined: January 18, 2006
KitMaker: 1,866 posts
Armorama: 1,808 posts

Posted: Sunday, August 06, 2017 - 06:57 PM UTC
Quoted Text
Because the Tiger was twice as heavy and they didn't know how to design stronger wheels.
And all this time I thought they were the best of the best, and just liked making simple things as complex as possible!
G7(G8) are the inner wheel of a pair, G5(G6) are the outer wheel of a pair. In David's diagram the pairs of wheels with the line through them. I had a look at the instructions on Hobby Search.

TopSmith
Joined: August 09, 2002
KitMaker: 1,742 posts
Armorama: 1,658 posts

Posted: Sunday, August 06, 2017 - 09:53 PM UTC
Anthony, it was a way to get more tortion bars in the chassis and to spread the load more evenly across the track. However you are right. Just because it is designed to work doesn't mean it is designed for easy maintenance. Kind of like changing spark plugs in a big block 76 trans am.
chauvel
Joined: February 14, 2015
KitMaker: 155 posts
Armorama: 154 posts
Posted: Monday, August 07, 2017 - 05:25 PM UTC
Thank you gentlemen for all the replies. I appreciate everyone's assistance.
Shaun
Shaun
 |

WEB HOSTING BY


Copyright ©2021 Armorama and Kitmaker Network, a subsidiary of Silver Star Enterprises
All Rights Reserved. Please read our Conditions of Use and Privacy Policy.
All Rights Reserved. Please read our Conditions of Use and Privacy Policy.