_GOTOBOTTOM
Яusso-Soviэt Forum: Cold War Soviet Armor
For discussions related to cold war era Russo-Soviet armor.
MiniArt 1/35 T-54-1 build review
Szmann
Visit this Community
Netherlands Antilles
Joined: September 02, 2014
KitMaker: 1,977 posts
Armorama: 305 posts
Posted: Monday, August 28, 2017 - 01:46 AM UTC
Hello, Guys!

I have received the MiniArt kit from Armorama for build review. With my Heinkel 112B crossing the finishing line and with the inbox review published (see review section of the site http://armorama.kitmaker.net/review/13377), I am now ready for this challenge.

I know already is going to be a rather slow build, with no spectacular progress, because the parts count is quite big (over 1000)...

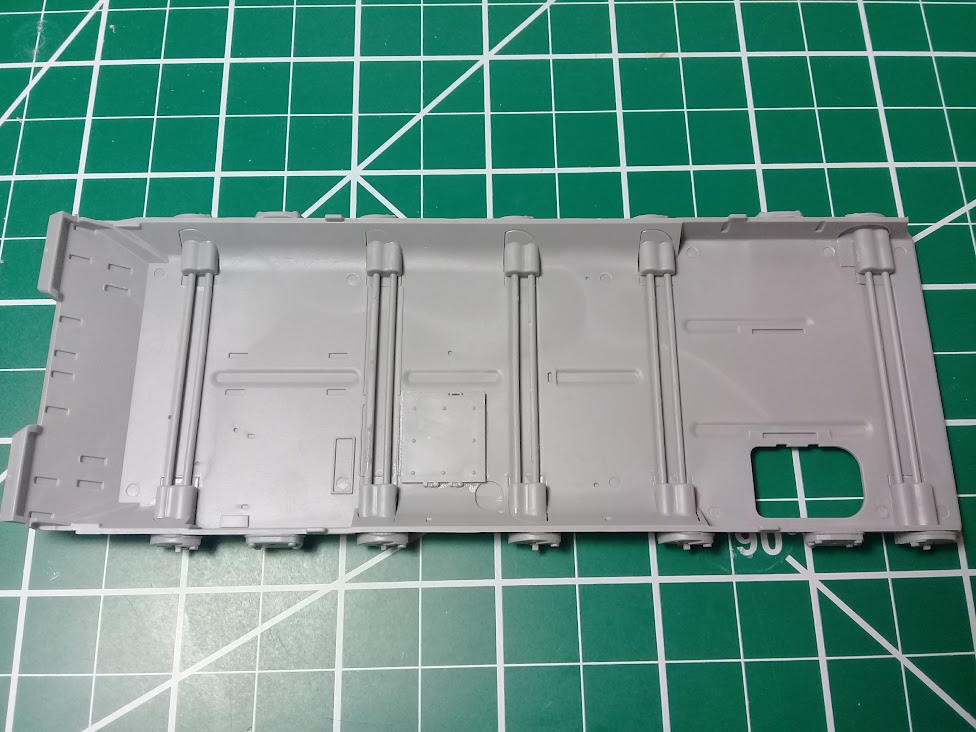
Here are the first 5 steps of the build:


... and this one is the result:


First impressions:

The plastic is on the soft side, very easy to gouge with a new blade. On the other hand, Tamiya extra thin works perfectly on it an you have instantly the perfect weld.

The fit is very good - I have just a couple of hairline gaps in the assembly for which the primer shall be enough - no putty needed.

The instructions look a little overwhelming but as soon you grasp the logic of the build, everything goes smooth. No errors encountered yet, with a single minor exception (part Hd6 x2) on step 5.

Detail is superb - I'm not sure if my camera makes justice.

I'll do my best to finish this build in the shortest time possible and I'm going to post regularly small updates.

Thank you for following

Cheers!
Gabriel
Szmann
Visit this Community
Netherlands Antilles
Joined: September 02, 2014
KitMaker: 1,977 posts
Armorama: 305 posts
Posted: Tuesday, August 29, 2017 - 03:50 AM UTC
Hi, Guys!

UPDATE:
I attached all suspension arms and articulated ends, the escape and inspection hatches on the lower plate. At times the assembly is fiddly, but no other expectations here.
At this point, the instructions manual is asking for painting the inner assembly with gray, which is going to be my next step.


Thank you for following,
Gabriel
TigerTiger
Visit this Community
England - East Anglia, United Kingdom
Joined: January 19, 2017
KitMaker: 50 posts
Armorama: 31 posts
Posted: Tuesday, August 29, 2017 - 10:16 AM UTC
I'm following Gabriel, can you tell me if this is the kit with or without interior?

Also what is the issue with part Hd6 that you mentioned above?
Szmann
Visit this Community
Netherlands Antilles
Joined: September 02, 2014
KitMaker: 1,977 posts
Armorama: 305 posts
Posted: Tuesday, August 29, 2017 - 03:18 PM UTC
Thank you for following, Tiger!
No, not full interior, (MiniArt #37014).
Part Hd6 it's called twice (x2). There are indeed 2 Hd6 on the same side, but the second one it's called on its on right. It's rather confusing than mistaken.
Since we talk about mistakes, there is one on step 9, where part Kd11 it's called instead Kd4. Those parts are virtually identical, but for opposite sides - easy to solve puzzle!

Cheers!
Gabriel
JSSVIII
Visit this Community
Massachusetts, United States
Joined: March 28, 2007
KitMaker: 1,169 posts
Armorama: 1,067 posts
Posted: Tuesday, August 29, 2017 - 03:58 PM UTC
Thanks for pointing out those areas to watch out for Gabriel.
Szmann
Visit this Community
Netherlands Antilles
Joined: September 02, 2014
KitMaker: 1,977 posts
Armorama: 305 posts
Posted: Wednesday, August 30, 2017 - 12:40 AM UTC
I'm glad to be of help, John.
Thank you for take time to leave a comment,
Gabriel
Szmann
Visit this Community
Netherlands Antilles
Joined: September 02, 2014
KitMaker: 1,977 posts
Armorama: 305 posts
Posted: Wednesday, August 30, 2017 - 07:35 AM UTC
Hi, Guys!

UPDATE:
1. I brewed the interior colors, using enamel paints. I used as base satin white (center spoon). The bluish gray (left side spoon) I mixed it much lighter than instructions suggest, based on a T55 walk-around from YT. The plain white requested by manual I made it off white by adding a little sand color (right hand spoon). I hope the picture is good enough for you to make an idea.


I sprayed the entire bottom plate with bluish gray:


then I went ahead of the instructions order of assembly just to test the color combo:


The contrast looks good to me, bearing in mind that a oil wash (probably transparent brown or medium gray) will be applied later.

Thank you for following and leaving a comment

Cheers!
Gabriel
Szmann
Visit this Community
Netherlands Antilles
Joined: September 02, 2014
KitMaker: 1,977 posts
Armorama: 305 posts
Posted: Thursday, August 31, 2017 - 05:44 AM UTC
Hello, Guys!

UPDATE:
I finished the assembly of all fiddly parts on the suspensions


I have assembled the sides:


and painted the inside side with blueish gray (not required by the instructions, but I have learnt in the hard way from other buildings that letting bare plastic behind it might not be a brilliant idea)


Thank you for following,
Cheeres!
Gabriel
Szmann
Visit this Community
Netherlands Antilles
Joined: September 02, 2014
KitMaker: 1,977 posts
Armorama: 305 posts
Posted: Sunday, September 03, 2017 - 07:31 AM UTC
Hello, Guys!

UPDATE:

I painted yesterday the insides of the lower hull and readied them for assembly:


After approx. 24 hours they were well dried and I put them together. The right side interior panel was a little warped, no major issues:

I was tempted to pick up some details, but none of this is to be seen at the end, so I decided to save time.

The fit of the parts it is just the tiniest bit short of perfection - hairline gaps in impossible to see spots - very well done MiniArt!


The complete lack of the power plant is bothering me a little, the transverse engine being the real improvement of T-54-1 over T-34 tank:


The bottom of the tank is equally well detailed as the upper sides:


Again, couple of mistakes in the instructions manual, both of them in step 15:
- part Hd2 is called four times; in reality just one is needed;
- part B3 is called in, but sprue B does not exist and there is no match of the part on any other sprue.


Thank you for following, comments and questions.
Cheers!
Gabriel
TigerTiger
Visit this Community
England - East Anglia, United Kingdom
Joined: January 19, 2017
KitMaker: 50 posts
Armorama: 31 posts
Posted: Sunday, September 03, 2017 - 09:33 AM UTC
Thanks for pointing these mistakes out Gabriel, I'll have to dig my kit out and see if the version without interior shares the same mistakes.
Szmann
Visit this Community
Netherlands Antilles
Joined: September 02, 2014
KitMaker: 1,977 posts
Armorama: 305 posts
Posted: Sunday, September 03, 2017 - 10:18 AM UTC
Hi, Tiger!

I think we have the same kit. I edited the answer to your first question but I guess you missed it. The kit 37014 has no complete interior. I just got confused by the fact that they use common sprues and there are some interior parts (mostly unused) and by the high parts number count. I apologize for the confusion, The full interior kit is 37003.

Gabriel
Szmann
Visit this Community
Netherlands Antilles
Joined: September 02, 2014
KitMaker: 1,977 posts
Armorama: 305 posts
Posted: Wednesday, September 27, 2017 - 09:04 PM UTC
HURRICANE IRMA AFTERMATH:

Hi guys!

Unfortunately my island was into direct path of hurricane Irma. Although my house survived miraculously almost intact, my whole neighborhood is trashed. It will take months to recover. Furthermore I have to put on hold this building until at least the electricity will be restored (estimated for January).

Gabriel
TigerTiger
Visit this Community
England - East Anglia, United Kingdom
Joined: January 19, 2017
KitMaker: 50 posts
Armorama: 31 posts
Posted: Wednesday, September 27, 2017 - 09:34 PM UTC
Sorry to hear this Gabriel, I hope you and your family are all safe.
Szmann
Visit this Community
Netherlands Antilles
Joined: September 02, 2014
KitMaker: 1,977 posts
Armorama: 305 posts
Posted: Wednesday, September 27, 2017 - 09:55 PM UTC

Quoted Text

Sorry to hear this Gabriel, I hope you and your family are all safe.


Yes, we're all safe. It's just annoying not to have all the things we're taking for granted, especially communications.

Gabriel
JSSVIII
Visit this Community
Massachusetts, United States
Joined: March 28, 2007
KitMaker: 1,169 posts
Armorama: 1,067 posts
Posted: Thursday, September 28, 2017 - 02:36 AM UTC
Glad to hear you made it through safe Gabriel, things (yes even models) can be replaced, people can't. I hope you can get power before January. Heck, we were without power for 7 days when hurricane Irene hit us head on, and they still talk about that here, six years later. Good luck sir!
Szmann
Visit this Community
Netherlands Antilles
Joined: September 02, 2014
KitMaker: 1,977 posts
Armorama: 305 posts
Posted: Thursday, September 28, 2017 - 03:06 AM UTC
Thank you for the good wishes, John! Only one model in progress was partly damaged - relatively easy to fix. Other than that it's all fine. I just cannot assemble and paint my models without light, let alone taking pictures

Gabriel.
Szmann
Visit this Community
Netherlands Antilles
Joined: September 02, 2014
KitMaker: 1,977 posts
Armorama: 305 posts
Posted: Friday, October 20, 2017 - 10:07 PM UTC
UPDATE:

Hi, guys!

Back to my modeling table after Irma's passing. I did some good progress the day before: all the road wheels, driving sprockets and the back end of the lower hull.


Now going a little slower because scores of small parts tangled with PE, but the result is worthy. More updates soon.

Cheers!
Gabriel
JSSVIII
Visit this Community
Massachusetts, United States
Joined: March 28, 2007
KitMaker: 1,169 posts
Armorama: 1,067 posts
Posted: Saturday, October 21, 2017 - 05:29 AM UTC
Nice to see you back up and running Gabriel!
Szmann
Visit this Community
Netherlands Antilles
Joined: September 02, 2014
KitMaker: 1,977 posts
Armorama: 305 posts
Posted: Sunday, October 22, 2017 - 09:24 PM UTC
@ John: thank you, mate! I'm very pleased with the rapid revival of the island

UPDATE:

I started working with the "juicy" bits and bobs. Cursing alot, of course:


I don't know for how long that light it's going to remain in place, but for now it's there:


I offered the first sacrifice to the carpet monster: part Ca4


I looked over the sprue map and found the part Ke10 which it's not identical, but can be used (the part it's not required for the build):


And this is the way my "field modification" looks like:


Another incident: the middle rear deck plate it's warped. I abused the liquid glue and clamped it down. The result was not perfect, but acceptable:


This hatch will remain closed:


The engine cover is a four layer business, with very delicate screens and frames and microscopic travel locks and what's not but the result is spectacular:


With this, basically the lower hull is finished, except the jettisonable fuel tanks which are again a fishy affair.

Thanks for following,
Gabriel
Szmann
Visit this Community
Netherlands Antilles
Joined: September 02, 2014
KitMaker: 1,977 posts
Armorama: 305 posts
Posted: Sunday, October 29, 2017 - 08:36 PM UTC
UPDATE:

Hi, guys!

I summoned all my patience to deal with tiny plastic and PE. The fuel tank at the back of the vehicle are not easy:


Eventually I managed to complete the two steps. The final assembly it's not as fragile as it looks and the detail stands out:


Next I moved to the tracks. Their detail it is again very good, but the attachment points to the sprue are inconveniently placed and they need a very good cleaning to avoid fitting issues:


The tracks and running gear are only temporarily attached on place with white glue because I need to take them out and paint them separately

I moved further to the fenders and (more!) gas tanks. Again little fiddly bits, but by no means as nerve raking like the other ones:


Thank you for following!

More updates soon!
Cheeers!
Gabriel
Szmann
Visit this Community
Netherlands Antilles
Joined: September 02, 2014
KitMaker: 1,977 posts
Armorama: 305 posts
Posted: Tuesday, October 31, 2017 - 09:23 PM UTC
Hi, Guys!

UPDATE:
I fought even more small fiddly parts and finished the fender MGs. It might look simple, but there is a mistake in the instructions and the armored boxes are full of microscopic PEs. I would strongly recommend that the whole assembly of the plastic parts to be done in "one go," to avoid any further problems. I also had to drill out the muzzles, because MiniArt left them as "sticks"


The part K25 it is not called in the instructions and it is instrumental for the correct alignment of the MG inside its protective box

The result is good looking and rewarding:


Even the front skirt of the fender has 5 PEs:


Eventually I almost completed one full fender - still missing the towing cable and the un-ditching beam - shown here below from three angles:


I re-call an image posted earlier already, to suggest that parts D15(16) shoul not be added to this stage, but later on, together with the back skirt of the fender for proper alignment.


That concludes my present update. More coming soon. Thanks for looking!
Gabriel
JSSVIII
Visit this Community
Massachusetts, United States
Joined: March 28, 2007
KitMaker: 1,169 posts
Armorama: 1,067 posts
Posted: Wednesday, November 01, 2017 - 03:56 AM UTC
Nice work Gabriel, thanks for the heads up with the fender MG's. I have seen a photo and a drawing of them with the lid open looking down showing the firing mechanism etc... I was not really interested in Soviet armor at the time, so I paid no attention to it then, and now I cannot remember where I saw it. It is really too bad because I would like to open them up on mine.
Szmann
Visit this Community
Netherlands Antilles
Joined: September 02, 2014
KitMaker: 1,977 posts
Armorama: 305 posts
Posted: Thursday, November 02, 2017 - 09:35 PM UTC

Quoted Text

Nice work Gabriel, thanks for the heads up with the fender MG's. I have seen a photo and a drawing of them with the lid open looking down showing the firing mechanism etc... I was not really interested in Soviet armor at the time, so I paid no attention to it then, and now I cannot remember where I saw it. It is really too bad because I would like to open them up on mine.


Hi, John. Thanks for following. The fender MGs have enough detail to be displayed open: complete gun, actuators, two ammunition boxes and detail on the interior of the lid. If you want to go even further, you should add lengths of ammo belts and wiring (the exterior wiring is present on the tank's hull).

Cheers!
Gabriel

UPDATE:

I reached a milestone last night: completed 50 steps on the build (30 to go) and with that the whole lower half of the AFV. Here below the result:


Thank you for following!
Cheers! Gabriel
Pongo_Arm
Visit this Community
British Columbia, Canada
Joined: January 27, 2017
KitMaker: 147 posts
Armorama: 147 posts
Posted: Friday, November 03, 2017 - 12:19 AM UTC
Great work, I have the early T44 kit and am enjoying this build.
Szmann
Visit this Community
Netherlands Antilles
Joined: September 02, 2014
KitMaker: 1,977 posts
Armorama: 305 posts
Posted: Friday, November 03, 2017 - 12:25 AM UTC
Thank you, Greg!
It seems to me that MiniArt did a fantastic job with their T-series. The fit is spot on, only the instructions need minimum tune-up. I really enjoy the build.

Cheers!
Gabriel
 _GOTOTOP