
#247
Nordjylland, Denmark
Joined: January 03, 2008
KitMaker: 1,102 posts
Armorama: 1,018 posts
Posted: Wednesday, October 04, 2017 - 07:09 PM UTC
"I never apologize - Sorry, that's just the way I am" Homer Simpson
Texas, United States
Joined: April 07, 2009
KitMaker: 1,063 posts
Armorama: 1,049 posts
Posted: Wednesday, October 04, 2017 - 07:47 PM UTC
Looks great! I love the grubby/dusty overall appearance,, just like one you'd see on Saipan or Okinawa. Are those duckbill tracks an AM set?? They look great.
Even my pick-up is panzer grey.
Skåne, Sweden
Joined: May 14, 2010
KitMaker: 749 posts
Armorama: 743 posts
Posted: Wednesday, October 04, 2017 - 07:53 PM UTC
Fantastic job my friend.
Love the whole look, and the PSP plate on the suspension! :-)
I hope I will see this one (and many of your other masterpieces) at C4 at the end of the month.
#247
Nordjylland, Denmark
Joined: January 03, 2008
KitMaker: 1,102 posts
Armorama: 1,018 posts
Posted: Wednesday, October 04, 2017 - 09:02 PM UTC
Jack: It's indi tracks from the old Dragon offerings, which I actually like a lot.
Svend: I'll bring it to Malmø, don't worry my friend 😉
"I never apologize - Sorry, that's just the way I am" Homer Simpson
Alabama, United States
Joined: August 07, 2003
KitMaker: 60 posts
Armorama: 47 posts
Posted: Wednesday, October 04, 2017 - 09:25 PM UTC
Jacob,
Extremely good job! Looks great, can almost see it rumbling toward a Japanese pillbox.
Rio de Janeiro, Brazil
Joined: October 11, 2010
KitMaker: 194 posts
Armorama: 173 posts
Posted: Wednesday, October 04, 2017 - 09:33 PM UTC
Impressive!

Member of IPMS/Rio de Janeiro - Brazil
#417
Ontario, Canada
Joined: March 01, 2004
KitMaker: 3,123 posts
Armorama: 2,539 posts
Posted: Wednesday, October 04, 2017 - 09:52 PM UTC
Like the effect of the wood armour.
You might want to bring some of the dirt weathering seen on the tracks up the sides of the tank and onto the suspension. The tracks are looking too brown and the vehicle too green, there should be some(a lot?) of crossover.
If I may make a comment on the track armour on the hull front? Having it with the track face inwards is quite rare, but you do see it in Pacific Theatre vehicles, as you have here. However, I haven't seen a photo with the track face inwards and all the track connected with end connectors. The photos I've seen show the turret track with and without end connectors, but the glacis track is all without connectors.
This makes sense when you think it through as, with connectors in place, it is almost impossible to access the metallic edges of the track chevrons where they contact the hull to weld them to the hull. The end connectors sit off the surface, so they can't be welded there. Without the connectors, you can weld them on one by one having access to the top edge of the chevrons on each track pad as you attach them.
On the turret applications with the connectors outwards, either the radius of the turret curves away from the tracks, leaving room to access weld points on each pad, or in a couple of examples brackets are fabricated and welded to the turret to support the track runs. But this access isn't there when welding the track to the glacis.
Just a thought.
Paul
Paul Roberts
Past Editor, Boresight
Armor Modeling and Preservation Society
#247
Nordjylland, Denmark
Joined: January 03, 2008
KitMaker: 1,102 posts
Armorama: 1,018 posts
Posted: Wednesday, October 04, 2017 - 10:38 PM UTC
Thank you all for the nice comments
Paul: Thanks for pointing out the issue with the connectors, I guess I didn't pay enough attention to that detail, when looking at the real things in the pictures. I'll certainly have this in mind, if/when I do my next Sherman. I really appriciate such information, because it'll help me out in my future projects.
Jacob

"I never apologize - Sorry, that's just the way I am" Homer Simpson
#417
Ontario, Canada
Joined: March 01, 2004
KitMaker: 3,123 posts
Armorama: 2,539 posts
Posted: Thursday, October 05, 2017 - 08:21 PM UTC
Jacob,
No problem.
If doing another Sherman with track armour, especially in Europe, the vast majority have the end connectors facing in and the tips of the connectors are what is welded to the hull. Just something to watch for.
All the best.
Paul
Paul Roberts
Past Editor, Boresight
Armor Modeling and Preservation Society
Rhode Island, United States
Joined: December 08, 2002
KitMaker: 833 posts
Armorama: 601 posts
Posted: Friday, October 06, 2017 - 09:43 AM UTC
Wow. Great job. I particularly like the wood "armor". Very realistic.
----Nothing is "idiot proof" because they will always build a better idiot.------
----Never try to teach a pig to whistle. It wastes your time and it annoys the pig.----
New Jersey, United States
Joined: December 08, 2003
KitMaker: 2,864 posts
Armorama: 2,497 posts
Posted: Friday, October 06, 2017 - 03:17 PM UTC
Quoted Text
Jacob,
No problem.
If doing another Sherman with track armour, especially in Europe, the vast majority have the end connectors facing in and the tips of the connectors are what is welded to the hull. Just something to watch for.
All the best.
Paul
Each end connector is held on the track pins by a wedge bolt. It's a heavy metal wedge with a bolt through it that holds the end connector on. If one is missing you have to replace it or the end connector could rattle off and you shed a track.
All that said, you weld the wedge to the hull front and using longer bolts, put the wedge in the end connector and effectively bolt the track to the tank.
It's nearly impossible to see in pictures because who would be taking detail shots of a wedge bolt?
It should be noted you really only have to weld a couple of the track blocks and just let the rest hang.
"The only thing a man should take seriously is the fact that nothing should be taken seriously."
Samuel Butler, Victorian satirist
Steve Willoughby
Canelones, Uruguay
Joined: December 27, 2006
KitMaker: 773 posts
Armorama: 765 posts
Posted: Friday, October 06, 2017 - 07:16 PM UTC
Well done Jacob, love the weathering job
Regards from the south
Álvaro
JPTRR
 Managing Editor
#051
Tennessee, United States
Joined: December 21, 2002
KitMaker: 7,772 posts
Armorama: 2,447 posts
Posted: Friday, October 06, 2017 - 09:55 PM UTC
Jacob,
you missed one very important PTO Sherman item.
Every well dressed M4 had its own Type 94.


What little I know of PTO US armor is that they had few markings, but there are folks with far more knowledge about that on the site.

I am very impressed with your finish, the soft blending of the paint and weathering. The rear with the wire and jerry cans are particularly impressive.
Personally, I think you're subtle washes are excellent.
Use of real wood is excellent.
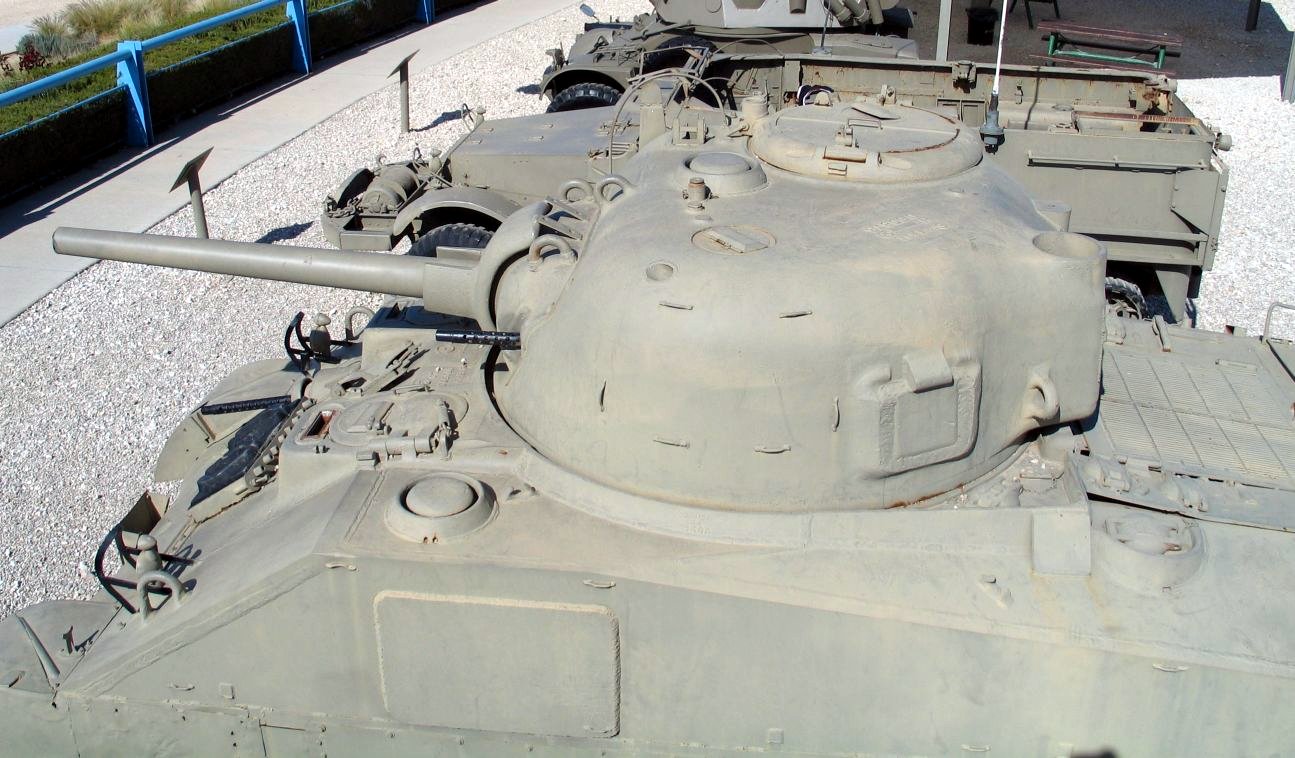
What is that big hole in the front left turret? If you explained it, I missed it.
If they demand your loyalty, give them integrity; if they demand integrity, give them your loyalty.--Col John Boyd, USAF
Any plan where you lose your hat is a bad plan.
New Jersey, United States
Joined: September 22, 2006
KitMaker: 1,081 posts
Armorama: 1,066 posts
Posted: Friday, October 06, 2017 - 10:04 PM UTC
I think its an excellent job !! one question what are the spikes for ? Ive never seen them before .
United States
Joined: September 12, 2017
KitMaker: 13 posts
Armorama: 7 posts
Posted: Friday, October 06, 2017 - 10:17 PM UTC
The spikes and cages were to keep satchel charges up off the hatch. The hatches were the weak point and it was easy enough to throw a satchel charge on top and blow the hatch in on the crew. Sounds funky but it worked.
#247
Nordjylland, Denmark
Joined: January 03, 2008
KitMaker: 1,102 posts
Armorama: 1,018 posts
Posted: Friday, October 06, 2017 - 10:36 PM UTC
Mr Boucher: Ha Ha, didn't know about such kind of "spaced armor" being used

The hole in question is for an anti infantry weapon, much like the ones the Germans used. I actually had to ask someone more knowlegable in this vehicle the same question. From what I heard, some crews actually plugged it shot.
And thanks again to you all for all the nice comments
Jacob
"I never apologize - Sorry, that's just the way I am" Homer Simpson
New Jersey, United States
Joined: September 22, 2006
KitMaker: 1,081 posts
Armorama: 1,066 posts
Posted: Saturday, October 07, 2017 - 02:10 AM UTC
Quoted Text
The spikes and cages were to keep satchel charges up off the hatch. The hatches were the weak point and it was easy enough to throw a satchel charge on top and blow the hatch in on the crew. Sounds funky but it worked.
thanks. you learn something new everyday !!
#247
Nordjylland, Denmark
Joined: January 03, 2008
KitMaker: 1,102 posts
Armorama: 1,018 posts
Posted: Saturday, October 07, 2017 - 09:50 PM UTC
Lou: Yes, that's the beauty of this forum. Lots of sharing knowledge.
Jacob
"I never apologize - Sorry, that's just the way I am" Homer Simpson
New Jersey, United States
Joined: September 22, 2006
KitMaker: 1,081 posts
Armorama: 1,066 posts
Posted: Saturday, October 07, 2017 - 10:36 PM UTC
Quoted Text
Lou: Yes, that's the beauty of this forum. Lots of sharing knowledge.
Jacob
I totally agree ! from all over the world too very cool !!!
New Jersey, United States
Joined: September 22, 2006
KitMaker: 1,081 posts
Armorama: 1,066 posts
Posted: Saturday, October 07, 2017 - 10:38 PM UTC
You did an excellent job ! I like the way the wood came out , great work !
Florida, United States
Joined: November 02, 2010
KitMaker: 32 posts
Armorama: 10 posts
Posted: Saturday, October 07, 2017 - 10:53 PM UTC
#417
Ontario, Canada
Joined: March 01, 2004
KitMaker: 3,123 posts
Armorama: 2,539 posts
Posted: Monday, October 09, 2017 - 09:28 PM UTC
Quoted Text
The hole in question is for an anti infantry weapon, much like the ones the Germans used.
Actually this isn't quite true.
The hole is where the 2" smoke mortar is supposed to go. It is a breach loading small mortar used to project smoke shells to provide cover for the tank to , generally, withdraw. It would technically take standard 2" HE rounds, but they were not generally issued to tank crews as it was not supposed to be used as an anti-infantry weapon, smoke only. Crews couldn't hit anything with them and they were not set up to lob at very close ranges.
It was added to Shermans at the behest of the Brits who, prior to its inclusion used grenade launchers on the side of the turret, and then adopted by the Yanks.
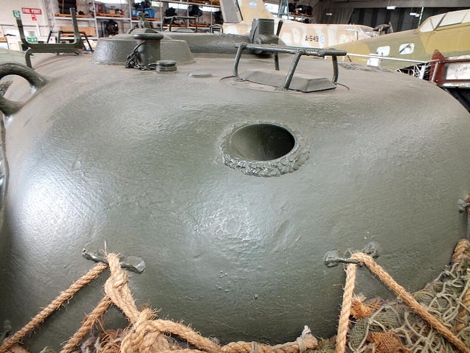
Also, I didn't notice this before, but that hole is exceptionally large for the 2" smoke bomb thrower. The hole should only be .057" (1.45mm) in diameter and very visibly set off at an angle under the turret surface, like the turret below.
and
I think you make have missed a part here.
Paul
Paul Roberts
Past Editor, Boresight
Armor Modeling and Preservation Society
Iowa, United States
Joined: May 12, 2014
KitMaker: 542 posts
Armorama: 539 posts
Posted: Monday, October 09, 2017 - 09:52 PM UTC
absolutely superb work!! looks very realistic
Indiana, United States
Joined: August 19, 2007
KitMaker: 2,184 posts
Armorama: 1,468 posts
Posted: Tuesday, October 10, 2017 - 08:30 AM UTC
Hi Jacob. Just saw your post and I will say it is one of the best PTO Sherman I have seen. Love the weathered out paint job, just screams I've been used and abused but still kickin. I'm building the Dragon PTO M4AA2 kit right now and can't figure what that hole is for as in my kit there is no hole? Looking at your Sherman makes me think it's another Dragon kit as the driver and M.G./radio positions were direct vision plated over with the periscopes added on top later. There are a few other slight differences too. Anyone who knows better than me can chime in with the correct one at any time. This does not take away the nice job you have done on this kit. The reason for the add on wood armor was to defeat the magnetic mines the Japanese used so the PSP guarding the wheels and suspension should be wood also. On the Sherman I am doing I added the wood armor also, but I think I like how yours turned out, looks better than mine. I really like the hatch protectors, they came out real good. They were welded nails in reality and you caught the look dead on. I can only hope that my paint job will turn out as good as yours. Bob D.
There is no return policy on time spent
#247
Nordjylland, Denmark
Joined: January 03, 2008
KitMaker: 1,102 posts
Armorama: 1,018 posts
Posted: Tuesday, October 10, 2017 - 12:39 PM UTC
Paul: Once again I stand corrected

Bob: The PSP plates were added solely to make something different. I've never seen such a thing in any pictures, but I sort of thought it would be plausable, and I do think it looks cool.
Jacob
"I never apologize - Sorry, that's just the way I am" Homer Simpson


