Scratch-Built Container Handling Unit (CHU)

#521
Kentucky, United States
Joined: April 13, 2011
KitMaker: 9,465 posts
Armorama: 8,695 posts
Posted: Monday, November 06, 2017 - 02:22 AM UTC
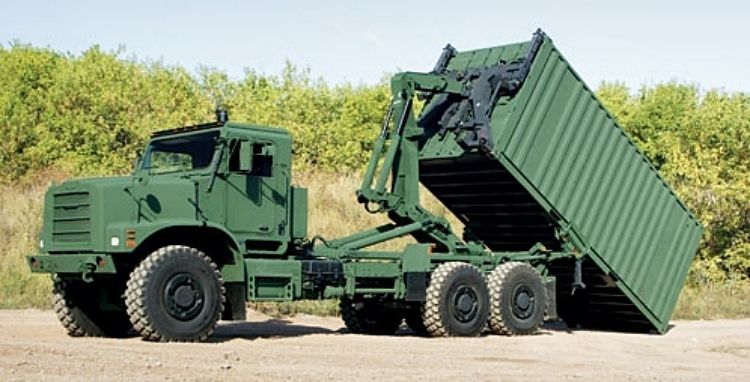
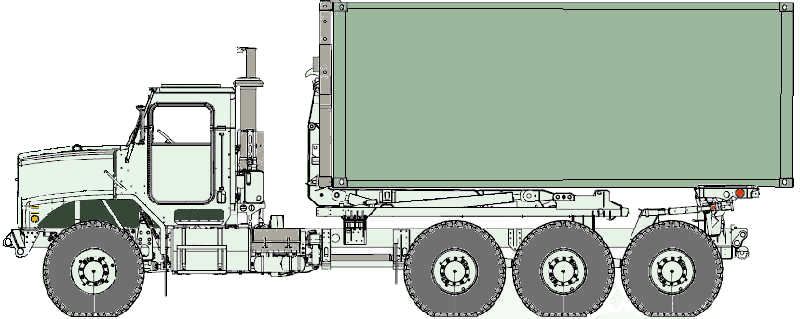
Shown here is a PLS 10x10 vehicle using the Container Handling Unit (CHU), you might call it "the Claw". It grabs and can handle a standard ISO 20' foot freight container:
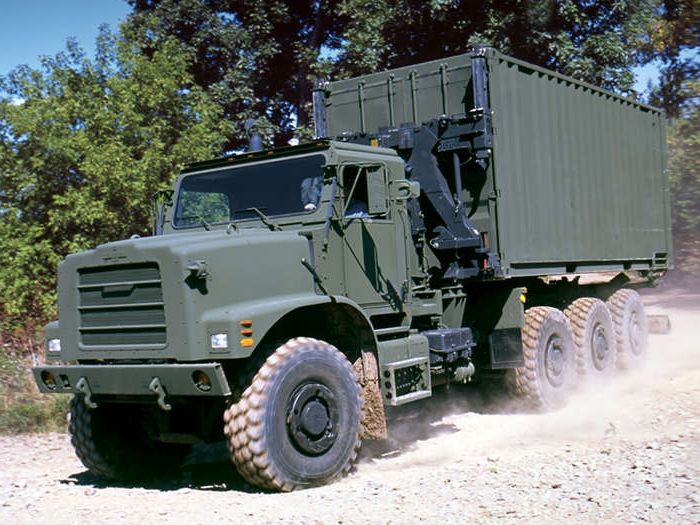
(Below that, the experimental Oshkosh 6x6 and 8x8 Load Handling Systems.)
______________________________________________________________________________________________
Trumpeter recently teased us with an announcement of their new HEMTT with LHS to compete with the somewhat less detailed Italeri offering. In the teaser they hinted that they (Trumpeter) were going to offer their vehicle WITH the Container Handling Unit.
Here is the original teaser photo as posted by Trumpeter: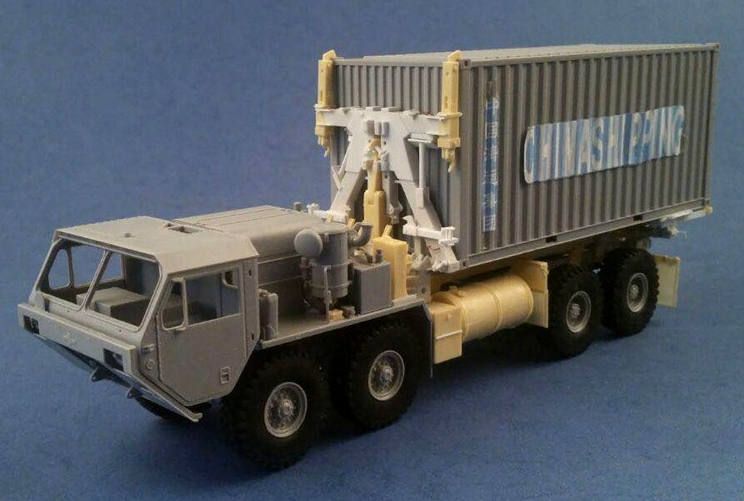
Unfortunately when the new HEMTT model was finally introduced there was no CHU included in the kit. This proved frustrating to many modelers. This frustration fueled my determination to take my best shot at scratch building one of my own.
#521
Kentucky, United States
Joined: April 13, 2011
KitMaker: 9,465 posts
Armorama: 8,695 posts
Posted: Monday, November 06, 2017 - 02:24 AM UTC
A somewhat tongue in cheek posting I made elsewhere here on the Armorama site some months ago:_______________________________________________________________________________________________
Dear Trumpy:
Dang it, make the freak'n CHU device available! -
You prototyped it, you showed it to us, you teased us with it,
NOW SELL IT TO US!
. . . .
Here take my money!Frustrated in Lex.
#521
Kentucky, United States
Joined: April 13, 2011
KitMaker: 9,465 posts
Armorama: 8,695 posts
Posted: Monday, November 06, 2017 - 02:25 AM UTC
So . . . . . . . Got tired of waiting for Trumpeter to come through with their CHU and decided to give it a try myself.
The only dimensions I had to go by were the width and height of the container itself. Fortunately I tend to approach my scratch projects more like an artist would approach a portrait painting rather then as an engineer would a technical drawing. Example would be; "if the eyes are so far apart then the nose looks to be .8 times as long as the width between the eyes." I took this same approach to the proportioning of the details on the CHU.


#521
Kentucky, United States
Joined: April 13, 2011
KitMaker: 9,465 posts
Armorama: 8,695 posts
Posted: Monday, November 06, 2017 - 02:26 AM UTC
EUREKA! The CHU works as designed (by the manufacture!)
Shown here is my CHU still under construction being used on my kit bashed Oshkosh 8x8, 16.5 ton LHS prototype.


p.s. On this model of the CHU the bottom attachments are fixed pins and the top are movable hooks held in place by friction. This scale CHU is easily removed (it is not glued on) and when completed will also
(hopefully) work with the shorter half and three-quarter tall containers.
#521
Kentucky, United States
Joined: April 13, 2011
KitMaker: 9,465 posts
Armorama: 8,695 posts
Posted: Monday, November 06, 2017 - 02:26 AM UTC
I had to test it. I had to know.
So I blocked up the bottom of the CHU and slid a needle file down thru one of the hollow square tube legs of the CHU. I wanted to see if it would hold up the container like the real thing does. SUCCESS!

#521
Kentucky, United States
Joined: April 13, 2011
KitMaker: 9,465 posts
Armorama: 8,695 posts
Posted: Monday, November 06, 2017 - 02:27 AM UTC
First two images show the cutting plan for the 3/16" square tubing and for the front & rear gusset plates - then weld the CHU frame together. (I mean glue together.) - - - - -
Line drawings not to scale.

_____________________________________________________________________________________________


I needed large gauge square tubing - had none - so started by taking some Evergreen 3/16" "ELL" I had on hand and gluing up the needed square tubes.
#521
Kentucky, United States
Joined: April 13, 2011
KitMaker: 9,465 posts
Armorama: 8,695 posts
Posted: Monday, November 06, 2017 - 02:27 AM UTC
Left and Right on-truck, ISO container lock downs now added to my CHU:


These two structures down low on the legs of the CHU are actually holding fixtures for several accessories used with the CHU. The hook shaped object is actually for holding a half-height container.
The outboard end of these fixtures holds the container lock down to be used with the transporting vehicle.
#521
Kentucky, United States
Joined: April 13, 2011
KitMaker: 9,465 posts
Armorama: 8,695 posts
Posted: Monday, November 06, 2017 - 02:28 AM UTC
Construction of the upper container hook arms and finished upper details of the model CHU:


Unfortunately there were not very many technical drawings of the CHU available.
#521
Kentucky, United States
Joined: April 13, 2011
KitMaker: 9,465 posts
Armorama: 8,695 posts
Posted: Monday, November 06, 2017 - 02:29 AM UTC

F.Y.I. - I intentionally spaced the lower container connection pins just slightly on the narrow side. When I attach the CHU to the container this means I have to force the lower legs open just slightly. Doing this, the lower pins pinch the container attachment fixtures. This improves the physical connection between the CHU and the container.
#521
Kentucky, United States
Joined: April 13, 2011
KitMaker: 9,465 posts
Armorama: 8,695 posts
Posted: Monday, November 06, 2017 - 02:31 AM UTC


A three-quater-height container, the water carrier; called the "Hippo". This is a model I hope to also build in the very near future.
#521
Kentucky, United States
Joined: April 13, 2011
KitMaker: 9,465 posts
Armorama: 8,695 posts
Posted: Monday, November 06, 2017 - 02:33 AM UTC
#521
Kentucky, United States
Joined: April 13, 2011
KitMaker: 9,465 posts
Armorama: 8,695 posts
Posted: Monday, November 06, 2017 - 02:34 AM UTC
Miscellaneous reference photos on the CHU - sorry the quality is so poor - they are all I could find!

. . . .


. . . .


Jake leg that allows CHU to be stored on the ground but
in an upright standing position.
#521
Kentucky, United States
Joined: April 13, 2011
KitMaker: 9,465 posts
Armorama: 8,695 posts
Posted: Monday, November 06, 2017 - 02:34 AM UTC
Much nicer/clearer/sharper reference photos of the CHU provided by Pascal Bausset can be viewed over on the Prime Portal website at:
http://www.primeportal.net/m1120_walk_pb.htm#521
Kentucky, United States
Joined: April 13, 2011
KitMaker: 9,465 posts
Armorama: 8,695 posts
Posted: Monday, November 06, 2017 - 02:35 AM UTC
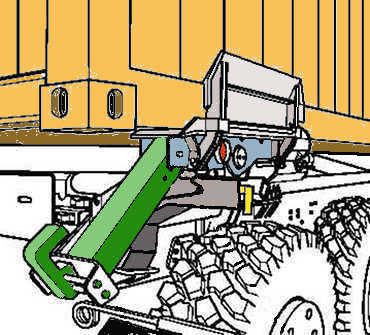
Plan drawing for construction of the two CHU hook assemblies: (Remember to also leave the gap indicated by the red arrow.)


Hooks (Blue) - Top hook is fixed (glued) - Bottom hook is pinned (hinged) and rotates 90 degrees.
Friction spacer side bars (Green) are narrower and thinner than main bars. (Orange)
Center bar (Gray) has the same cross section as the main bars but is shorter to allow for hooks.
Hex nuts were added later and serve only as decoration.


Bottom two drawings are from the TM. Including this gap in the vertical hook arms will give you, first of all, an additional detail on the movable hooks. However if in the end you find you want to deal with multiple containers of different heights, adding this item now will allow you to keep your options open for the future.
#521
Kentucky, United States
Joined: April 13, 2011
KitMaker: 9,465 posts
Armorama: 8,695 posts
Posted: Monday, November 06, 2017 - 02:42 AM UTC
Recent progress on this project:
Those two vertical poles stored one under each "arm pit" are the two pieces that form the standing support jake leg. This is used when storing the CHU in the upright position.


Just a few more minor details to add to my CHU and then PAINT and done!
#521
Kentucky, United States
Joined: April 13, 2011
KitMaker: 9,465 posts
Armorama: 8,695 posts
Posted: Monday, November 06, 2017 - 02:42 AM UTC
Some info into how the lower "Rotalock" locking pins work:
. . . . . . . . . . . . . . .

Lift that spring loaded retainer plate (Blue) and shift the handle (Green) to the vertical position. You now have the Rotalock in the locked position. Finally turn that star shaped knob (Gray) to tighten the lock and take any slack out of the connection.
#521
Kentucky, United States
Joined: April 13, 2011
KitMaker: 9,465 posts
Armorama: 8,695 posts
Posted: Monday, November 06, 2017 - 02:43 AM UTC
#521
Kentucky, United States
Joined: April 13, 2011
KitMaker: 9,465 posts
Armorama: 8,695 posts
Posted: Monday, November 06, 2017 - 03:42 AM UTC
More background research and in-depth coverage of this construction project as well as the building of this Oshkosh 8x8 LHS truck can be found at:
https://armorama.kitmaker.net/forums/252818&ord=&page=12#259
Massachusetts, United States
Joined: October 23, 2011
KitMaker: 2,265 posts
Armorama: 180 posts
Posted: Monday, November 06, 2017 - 05:38 AM UTC
wow, beautiful piece of work!

nicely crafted thread too

#521
Kentucky, United States
Joined: April 13, 2011
KitMaker: 9,465 posts
Armorama: 8,695 posts
Posted: Monday, November 06, 2017 - 08:07 AM UTC
Thank you Jonathan.
p.s. - I really enjoyed your flying boat campaign - got me back into doing some aircraft!
Colorado, United States
Joined: February 24, 2014
KitMaker: 3,033 posts
Armorama: 2,492 posts
Posted: Monday, November 06, 2017 - 09:04 AM UTC
Congrats, Michael!
That is one fine piece of scratch-building 🛠 ... and concise presentation too!📚
Suggestion: You should submit this piece to Features.
Cheers!🍺
mike
#521
Kentucky, United States
Joined: April 13, 2011
KitMaker: 9,465 posts
Armorama: 8,695 posts
Posted: Monday, November 06, 2017 - 09:20 PM UTC
Mike - thanks for the compliment - how does the "Features" section work? Who do I submit it to? Would that be Darren?
England - North West, United Kingdom
Joined: September 19, 2006
KitMaker: 262 posts
Armorama: 251 posts
Posted: Monday, November 06, 2017 - 09:44 PM UTC
Armed Forces Europe, United States
Joined: December 27, 2015
KitMaker: 290 posts
Armorama: 249 posts
Posted: Monday, November 06, 2017 - 10:49 PM UTC
Mike, your Scratch building is out of this world! You make everything look easy. You should do a how to Manual, for others to follow. Thanks for your work.

Colorado, United States
Joined: February 24, 2014
KitMaker: 3,033 posts
Armorama: 2,492 posts
Posted: Monday, November 06, 2017 - 11:23 PM UTC
Quoted Text
... how does the "Features" section work? Who do I submit it to?
Heres the
Submit your feature to us! link which can also be accessed on the Home Page. Note: Unlike threads, which tend to get buried, features stand out and they are more easily referenced down the road. HTH.
mike


