Pzkpfw II Ausf. F Beute (El Guettar) Tamiya
Wojewodztwo Pomorskie, Poland
Joined: May 26, 2003
KitMaker: 1,208 posts
Armorama: 1,023 posts
Posted: Tuesday, February 06, 2018 - 05:55 AM UTC
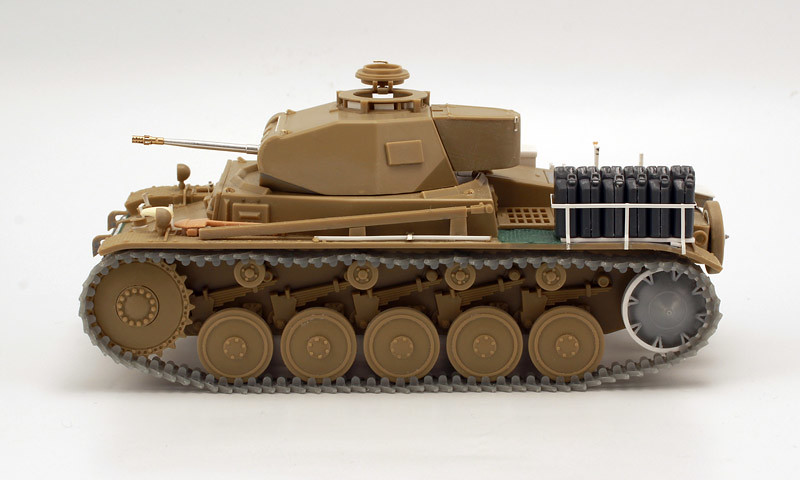
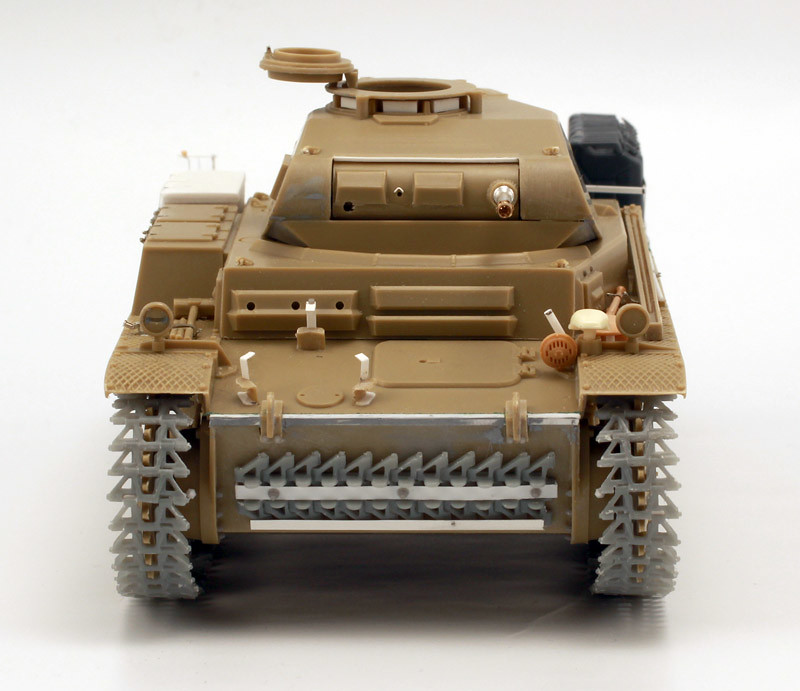
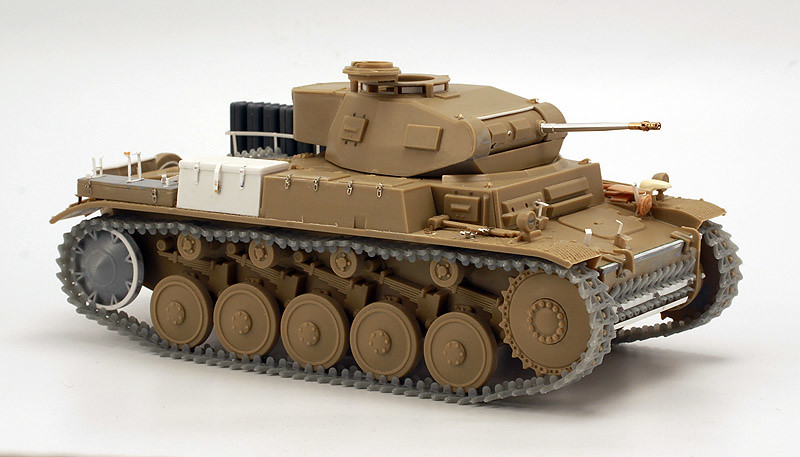
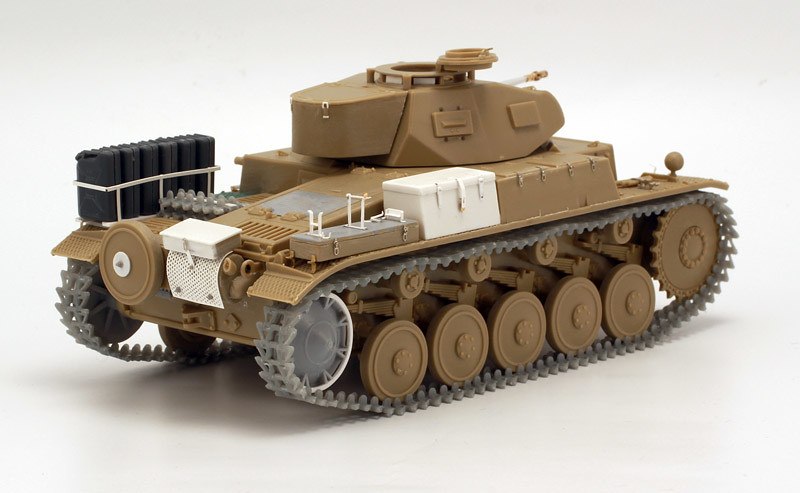
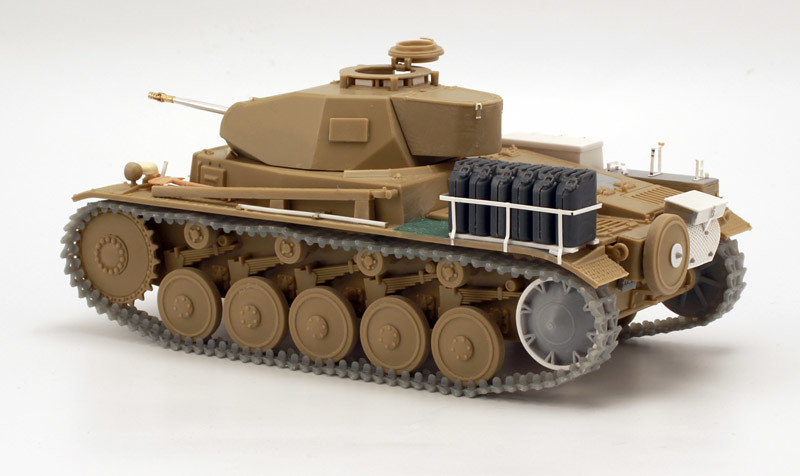
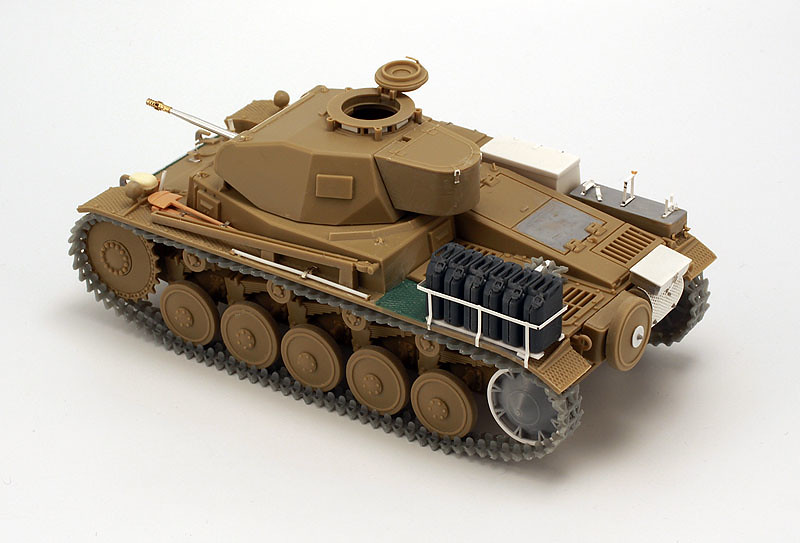
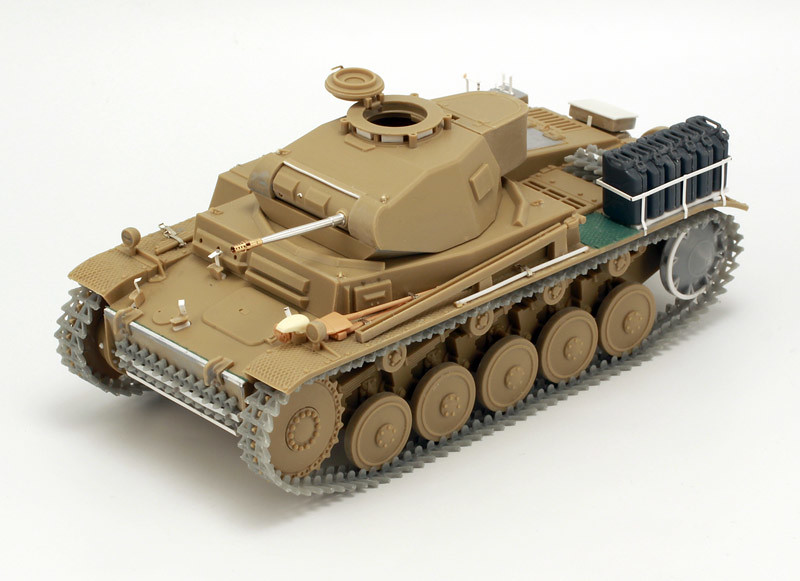
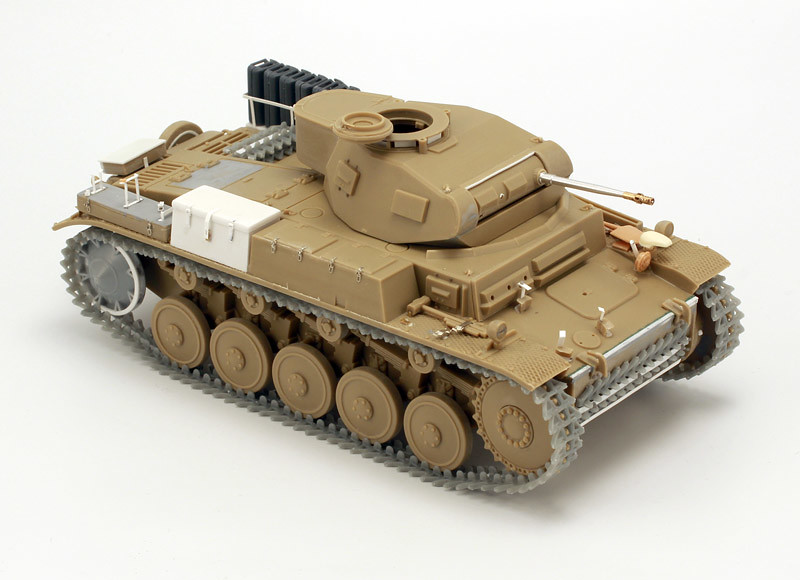
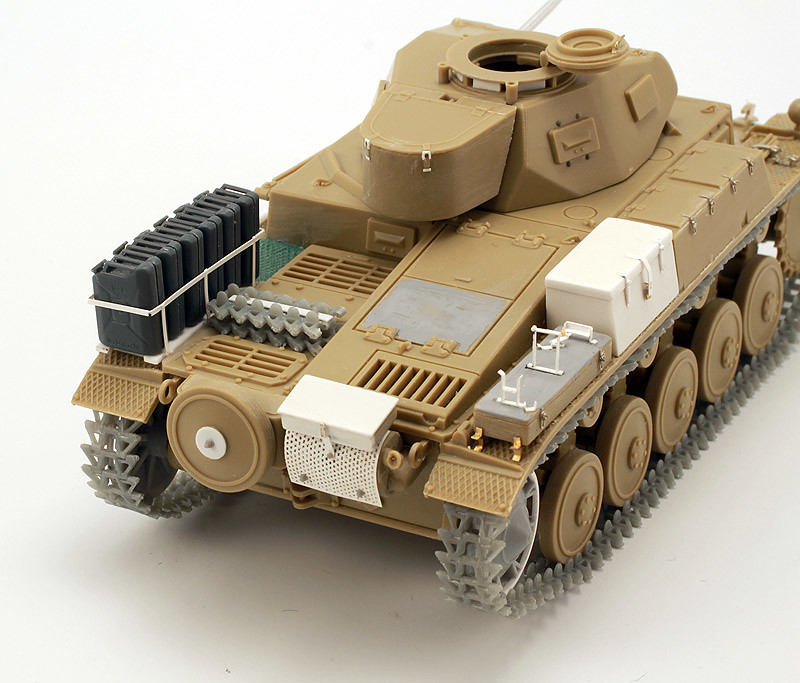
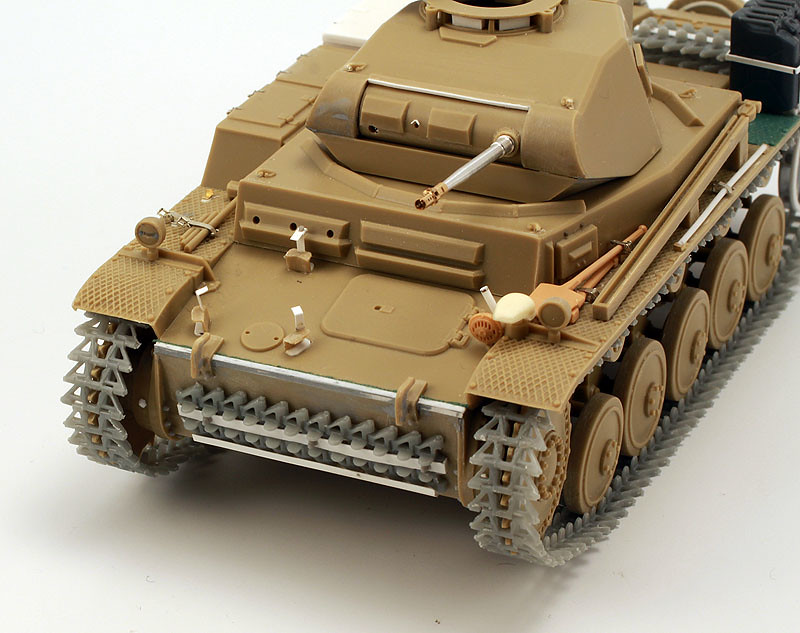
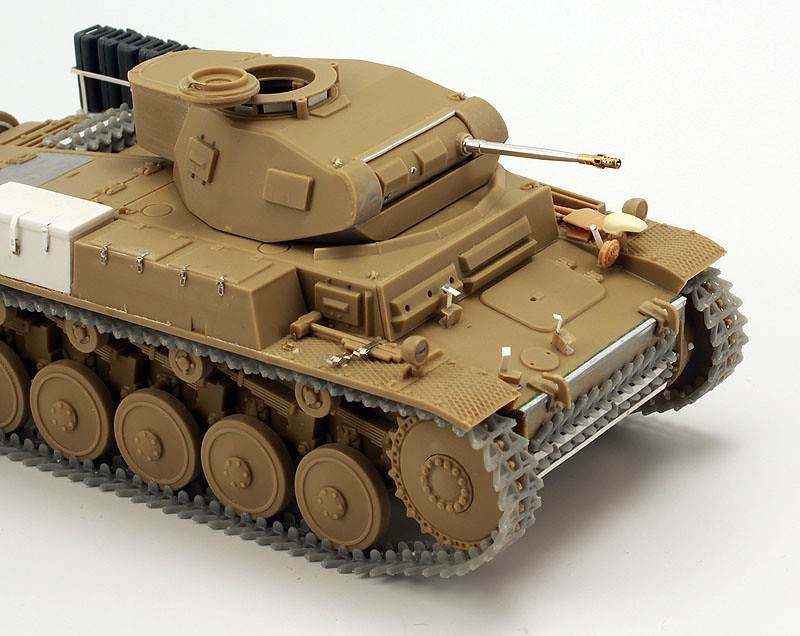
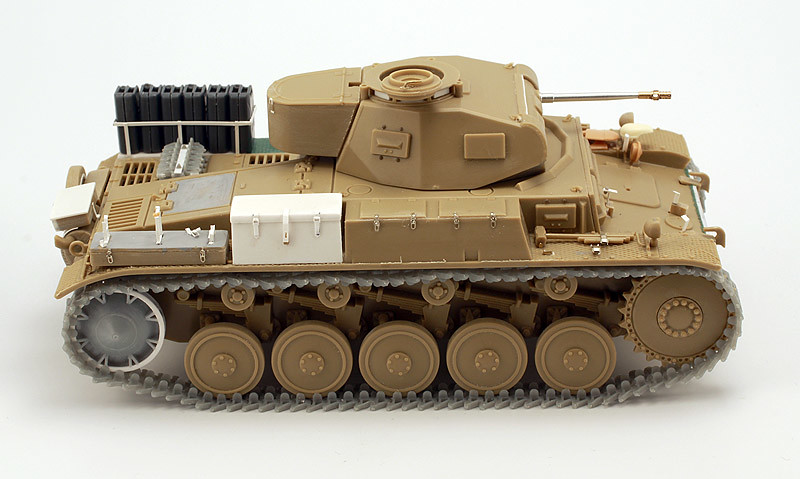
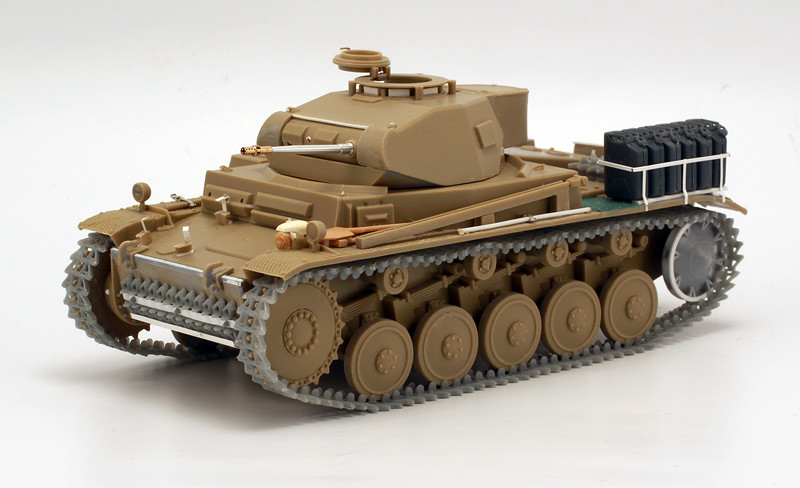
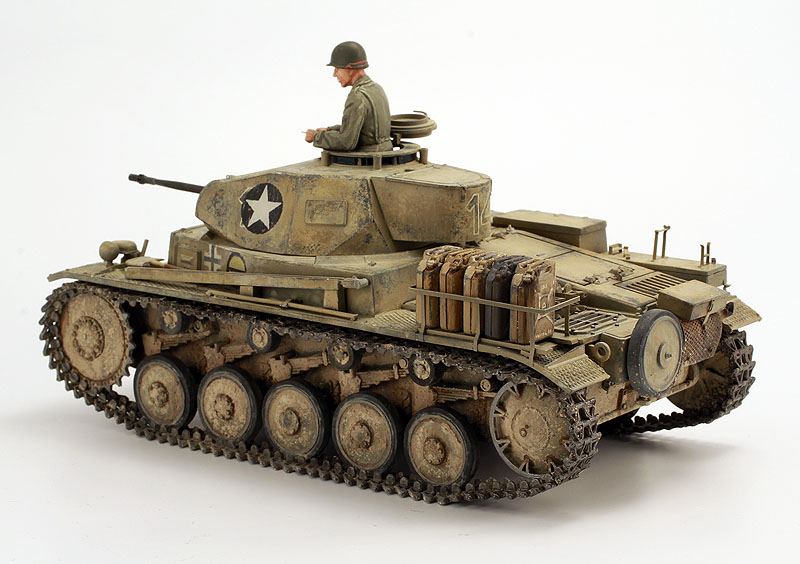
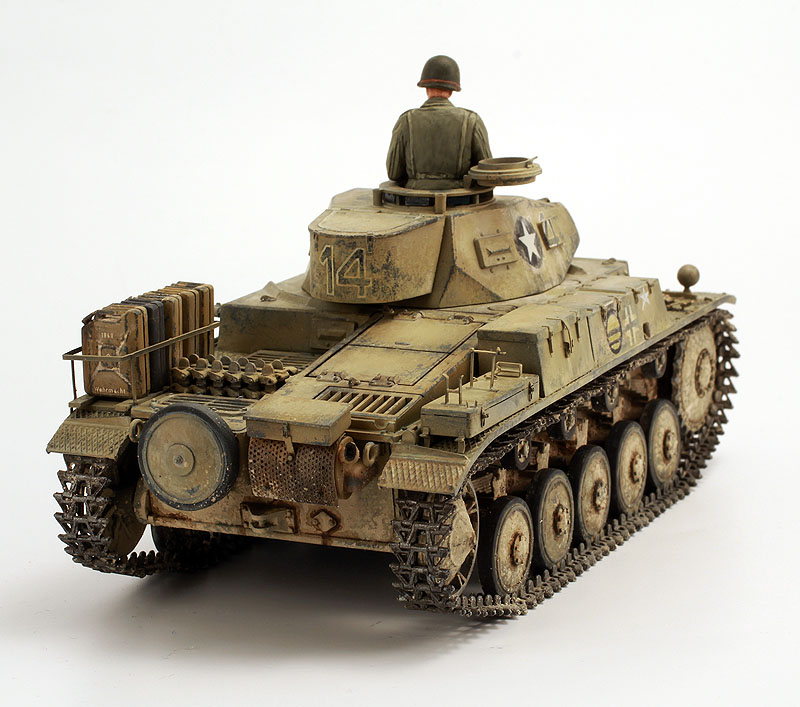
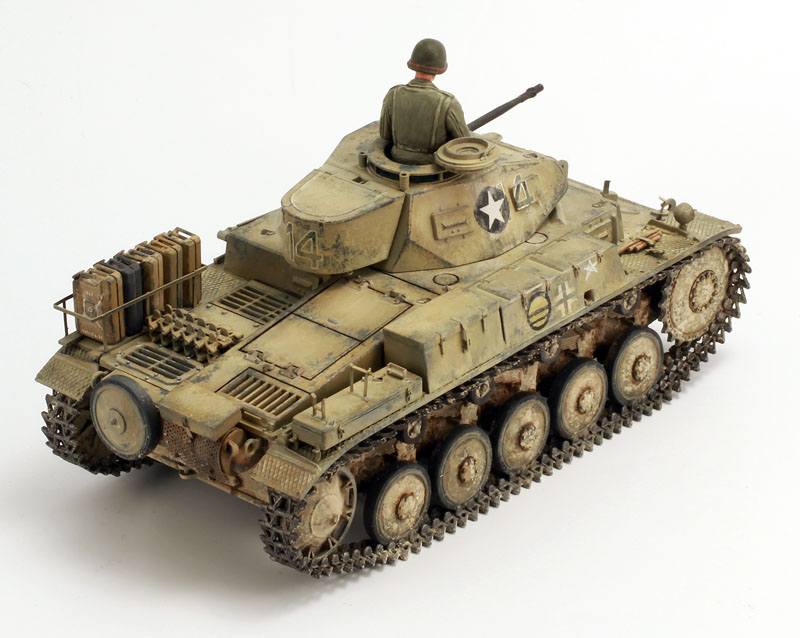
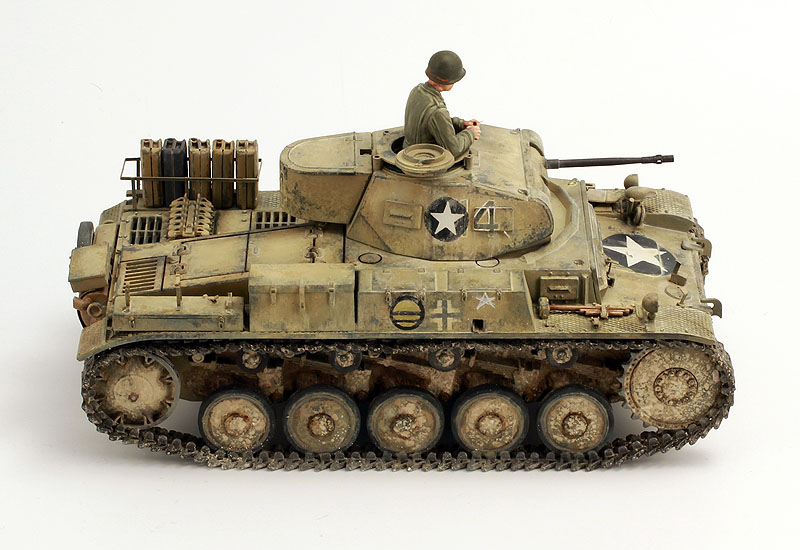
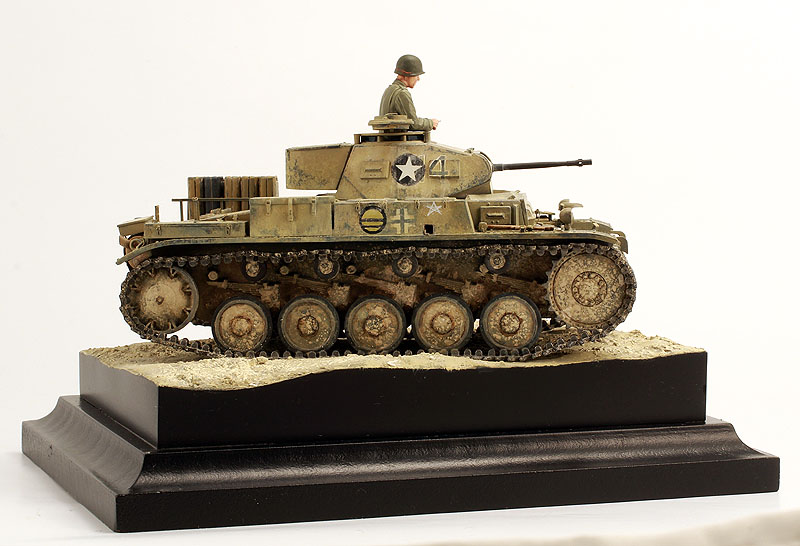
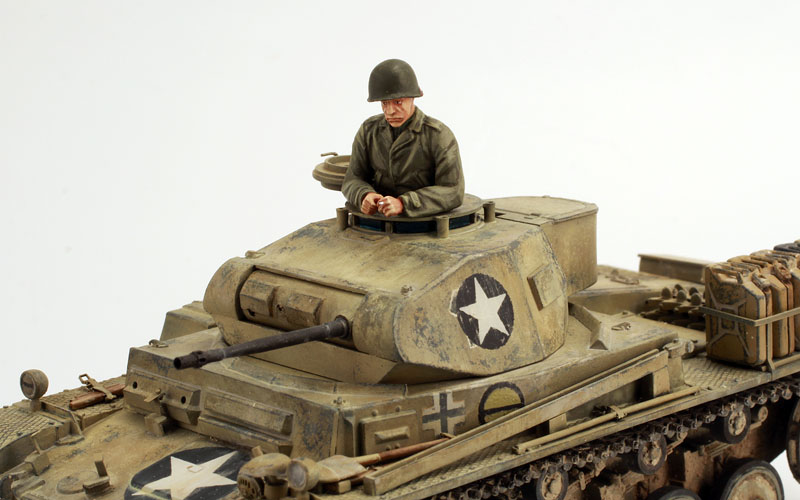
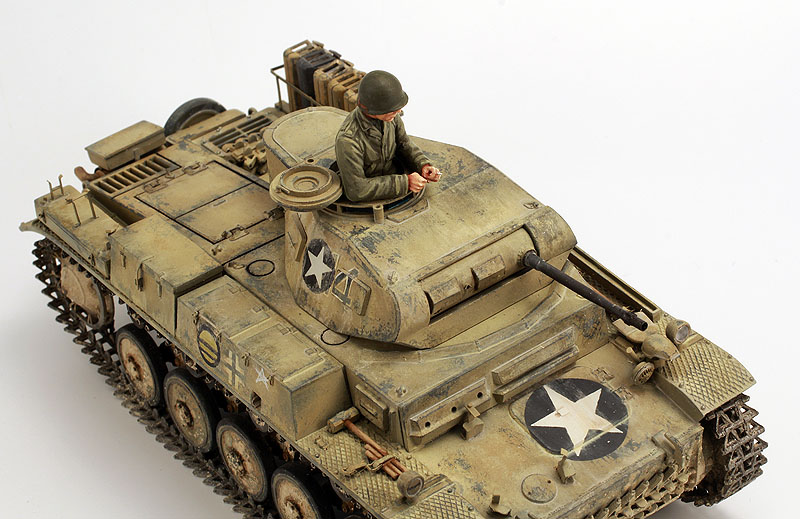
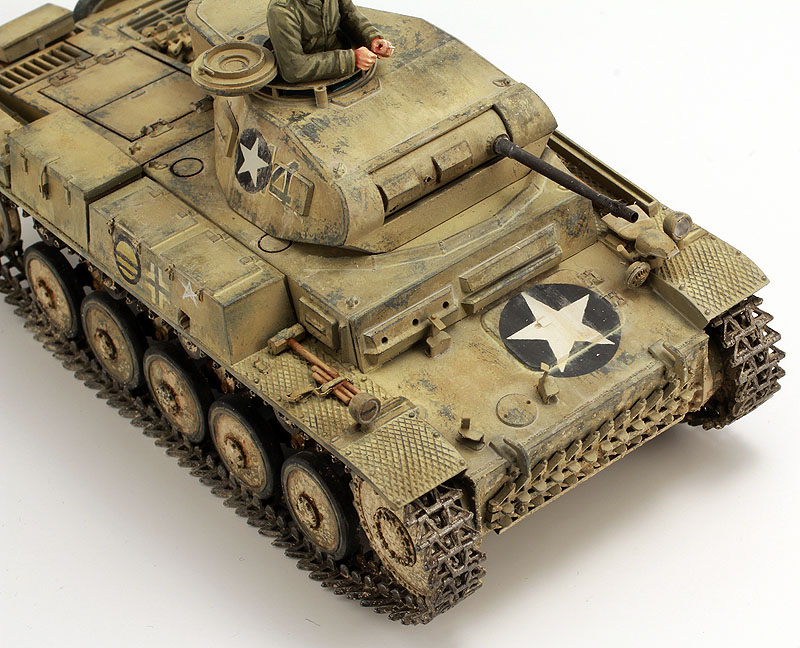
This is a goleden oldie (seen quite a few built up and painted over the last couple of months) Tamiya Pzkpfw 2 ausf. F with modifications done to depict a tank captured in Tunisia by U.S. Rangers which was then sent to Aberdeen.
It was done for a group build @ S.M.Kompas (local modeling club). The GB called for OOB build but not strictly, besides I needed the modifications for the paint scheme I chose, so I also superdetailed what I could/wanted.
Modifications included:
- adding Alan PzkpfwII tracks and idlers
- Aber German tool clamps and clasps
- RB model 2cm barrel
- tools and horn from Tamiya pzkpfw IV details set
- Meng nuts and bolts (with and without washers
- Italeri German gerrycans
- resin Notek is from Niko model's set for Einheitsdiesel truck (even though at the time of Rangers joyriding in it, it didn't have one)
- Numerous scratchbuilt details, mostly done with 0.1mm styrene (I bought a sheet many years ago and used only for shimming, but for small, thin details it's even better than PE!), thinned fenders and so on.
 IMG_5561
 by
Grzegorz Ziecina, on Flickr
 IMG_5562
 by
Grzegorz Ziecina, on Flickr
 IMG_5563
 by
Grzegorz Ziecina, on Flickr
 IMG_5564
 by
Grzegorz Ziecina, on Flickr
 IMG_5565
 by
Grzegorz Ziecina, on Flickr
 IMG_5566
 by
Grzegorz Ziecina, on Flickr
 IMG_5569
 by
Grzegorz Ziecina, on Flickr
 IMG_5570
 by
Grzegorz Ziecina, on Flickr
 IMG_5574
 by
Grzegorz Ziecina, on Flickr
 IMG_5576
 by
Grzegorz Ziecina, on Flickr
 IMG_5577
 by
Grzegorz Ziecina, on Flickr
 IMG_5578
 by
Grzegorz Ziecina, on Flickr
 IMG_5560
 by
Grzegorz Ziecina, on Flickr
Cheers,
Greg

For those about to rock, we salute you!
Texas, United States
Joined: April 07, 2009
KitMaker: 1,063 posts
Armorama: 1,049 posts
Posted: Tuesday, February 06, 2018 - 08:01 AM UTC
That's some fine detailing work! Just goes to show that a few of the oldest kits around can still be turned in to real gems. Love these PzII's from Tamiya,, I've got six in the stash. Look forward to seeing how you finish this!!
Even my pick-up is panzer grey.
Philippines
Joined: October 27, 2013
KitMaker: 520 posts
Armorama: 488 posts
Posted: Tuesday, February 06, 2018 - 12:00 PM UTC
Great work on this kit! Love all the modifications you made to the kit. Makes the kit busier and look more alive. Can't wait to see it painted.
Wojewodztwo Pomorskie, Poland
Joined: May 26, 2003
KitMaker: 1,208 posts
Armorama: 1,023 posts
Posted: Tuesday, February 27, 2018 - 04:52 PM UTC
Thanks for kudos Jack and Nigel!
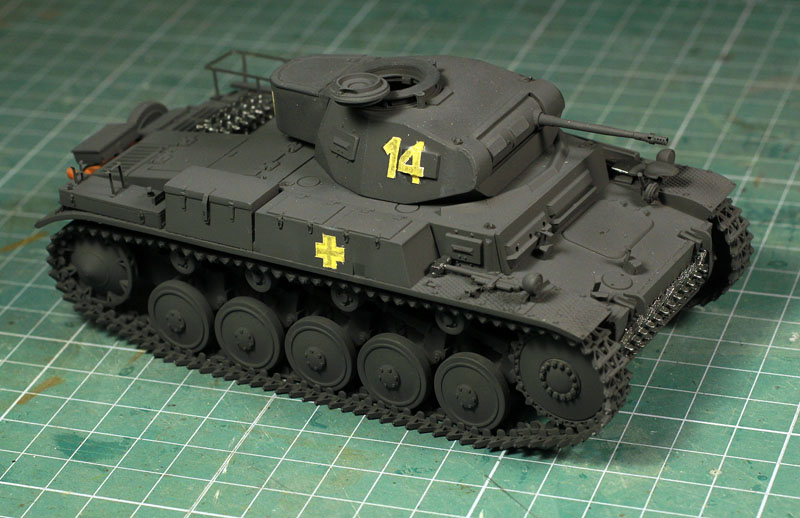
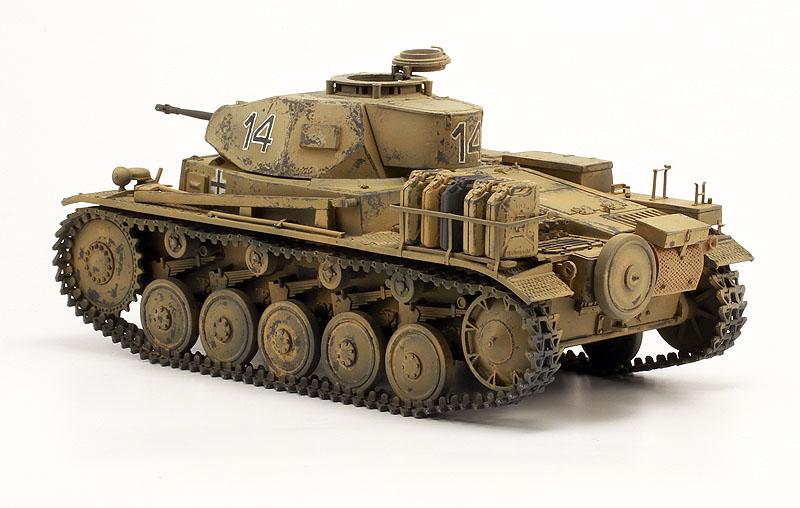
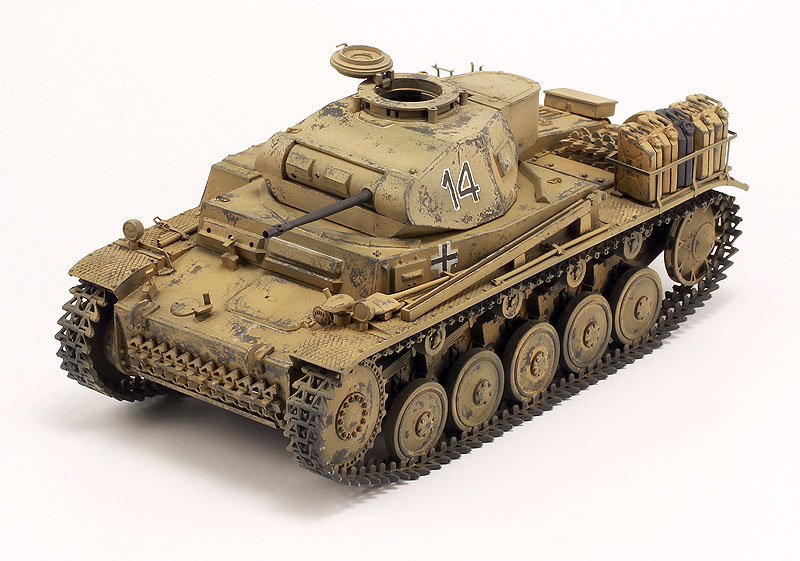
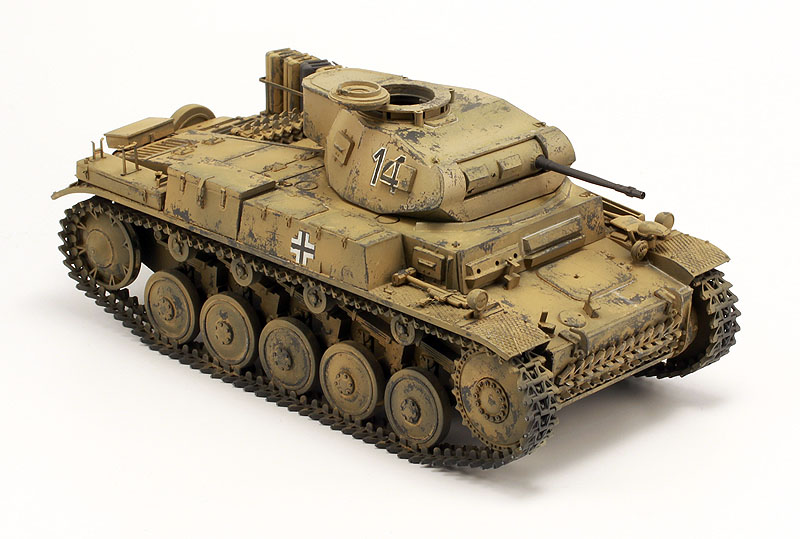
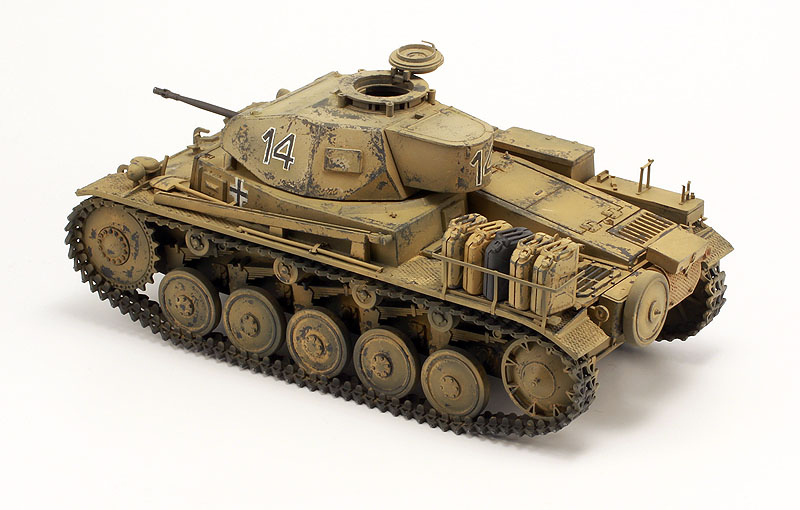
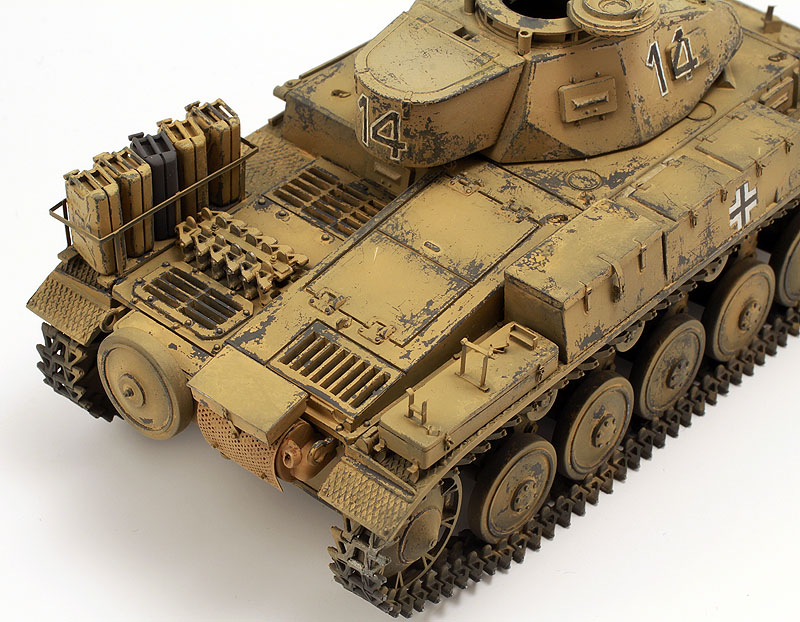
I've started painting the panzer. It was primed in Mr. Surfacer 1000 and base coated in Tamiya panzer gray XF-63. I used tamiya masking tape laser-cut masks to make German markings in white and hand painted the gray infill in the numbers.
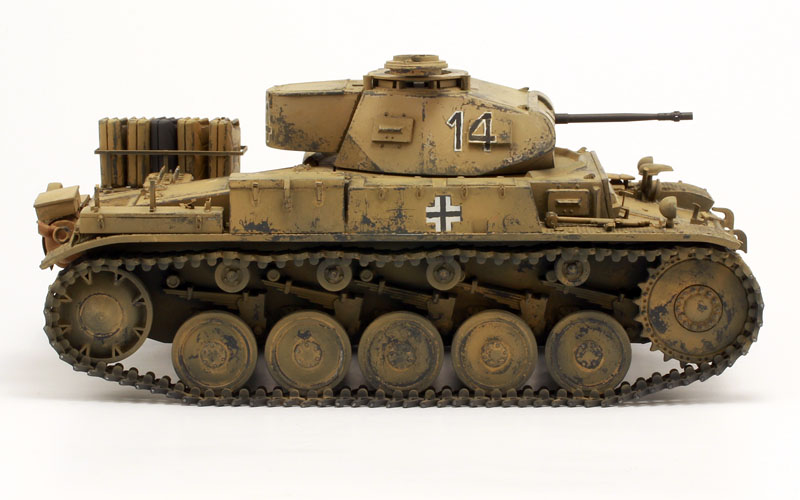
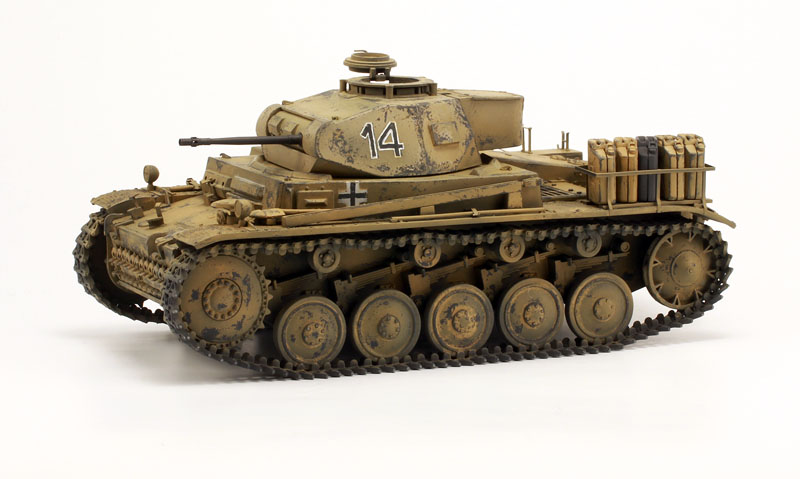
Model was then sprayed with Vallejo chipping medium followed by Tamiya desert yellow XF-59. Then the scratching ensued.
I'm not sure I like the chipping medium. While I like the chips it had created They are pretty random and fine most of the time, also the medium dries very thinly as opposed to hairpray.
I feel it required too much work to get the top paint off and the ability to being chipped deteriorated with time. It may be entierly my fault as on the the medium bottle it says that it is for water based acrylics, which Tamiya paints are not.
I'll try to add another layer of lighter chipped paint to get some variation and highlights in the mix, then detail painting and weathering

 IMG_5581
 by
Grzegorz Ziecina, on Flickr
 IMG_5587
 by
Grzegorz Ziecina, on Flickr
 IMG_5588
 by
Grzegorz Ziecina, on Flickr
 IMG_5589
 by
Grzegorz Ziecina, on Flickr
 IMG_5591
 by
Grzegorz Ziecina, on Flickr
 IMG_5594
 by
Grzegorz Ziecina, on Flickr
 IMG_5592
 by
Grzegorz Ziecina, on Flickr
 IMG_5594
 by
Grzegorz Ziecina, on Flickr
https://www.flickr.com/photos/150425472@N06/39610508575/in/album-72157691423908321/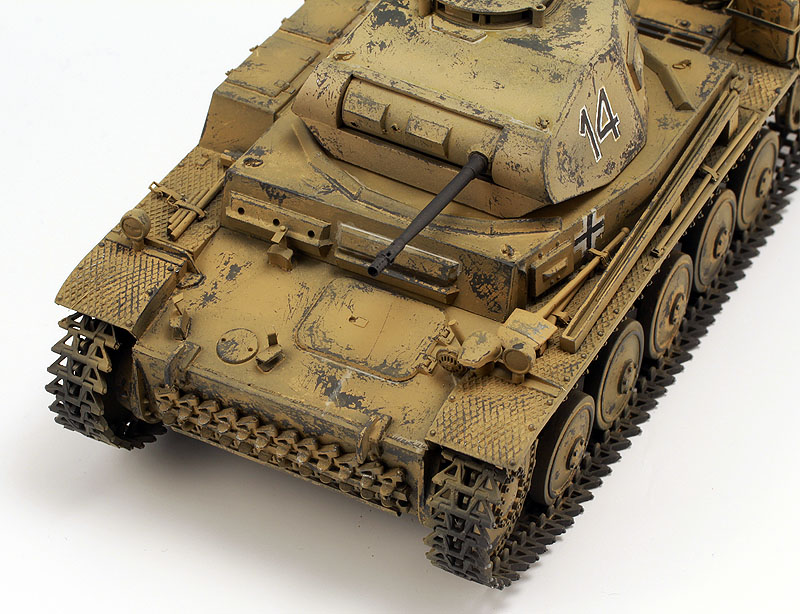 IMG_5596
 by
Grzegorz Ziecina, on Flickr
 IMG_5597
 by
Grzegorz Ziecina, on Flickr
Cheers,
Greg

For those about to rock, we salute you!
Wien, Austria
Joined: March 09, 2016
KitMaker: 2,408 posts
Armorama: 2,300 posts
Posted: Tuesday, February 27, 2018 - 04:58 PM UTC
Excellent work, Grzegorz! Captures the AK atmosphere very well.
Nordrhein-Westfalen, Germany
Joined: July 21, 2007
KitMaker: 521 posts
Armorama: 514 posts
Posted: Tuesday, February 27, 2018 - 06:51 PM UTC
Super nice detailing and paint job I have to say! I like watching it. And also thanks for the very, very nice picture quality! A pleasure to watch.
England - South East, United Kingdom
Joined: November 19, 2008
KitMaker: 2,249 posts
Armorama: 2,007 posts
Posted: Tuesday, February 27, 2018 - 08:03 PM UTC
Grzegorz, it looks great, and yes, thanks for the super photo quality

When the chipping gets too tough, have you tried other methods to loosen the paint, e.g. airbrush cleaner? nail varnish remover? Perhaps the solvent effect, applied in small amounts, can be enough to allow the top layer to be softened enough to make the chips. Then there is just using sandpaper, in a very controlled manner, to abrade the top layer. Just a suggestion of something that could be tried... I'm not staking my life on it!!
Wojewodztwo Pomorskie, Poland
Joined: May 26, 2003
KitMaker: 1,208 posts
Armorama: 1,023 posts
Posted: Tuesday, February 27, 2018 - 08:18 PM UTC
Thanks Israel, it would be even more atmospheric with the DAK palm tree emblems, sadly these are not visible on any of the photos of it (and it is quite well photographed one

Marian, thank you! I do belive that proper photography is nowdays a part of the hobby you can't ignore while presenting your works to the world.
Cheers,
Greg
For those about to rock, we salute you!
Wojewodztwo Pomorskie, Poland
Joined: May 26, 2003
KitMaker: 1,208 posts
Armorama: 1,023 posts
Posted: Tuesday, February 27, 2018 - 08:24 PM UTC
Thanks Matthew!
Thanks for the tip also, all in all I'd not want to try any solvent on this, even where the scrubbing worked nicely I sometimes cut thorugh the base coat to the primer with just the brush and water. For now I'm satisfied with most of the chips and will brush paint or use sponge where it didn't chip the first time

Cheers,
Greg
For those about to rock, we salute you!
Wien, Austria
Joined: March 09, 2016
KitMaker: 2,408 posts
Armorama: 2,300 posts
Posted: Tuesday, February 27, 2018 - 08:33 PM UTC
I agree with the others, the quality of the photos matches that of the model itself. What's your set-up?
Wojewodztwo Pomorskie, Poland
Joined: May 26, 2003
KitMaker: 1,208 posts
Armorama: 1,023 posts
Posted: Tuesday, February 27, 2018 - 09:01 PM UTC
I use 50cm cubic phototent lit with 2x100W incandescent light bulbs for the sides and 1x150W bulb for the top. The backdrop is a sheet of oracal white self adhesive foil, it has a nice satin finish and does not take dirt as much as paper.
I shoot with canon EOS 600D with 50mm macro lens and mounted on a tripod. I use manual settings but like to fix aperture at 16 and ISO at 100 and adjust the shutter time.
I also use photoshop to adjust photo levels, crop the pictures and sometimes sharpen them a bit after cropping to 800 pixels width.
I do belive though that the first part of the setup is more important than hte camera and photoediting software. That said I could use stronger light sources

Cheers,
Greg
For those about to rock, we salute you!
Wien, Austria
Joined: March 09, 2016
KitMaker: 2,408 posts
Armorama: 2,300 posts
Posted: Tuesday, February 27, 2018 - 09:43 PM UTC
Your detailed explanation is much appreciated, I’ll use it as a guideline for setting up my own application.
Wojewodztwo Pomorskie, Poland
Joined: May 26, 2003
KitMaker: 1,208 posts
Armorama: 1,023 posts
Posted: Saturday, March 10, 2018 - 06:41 AM UTC
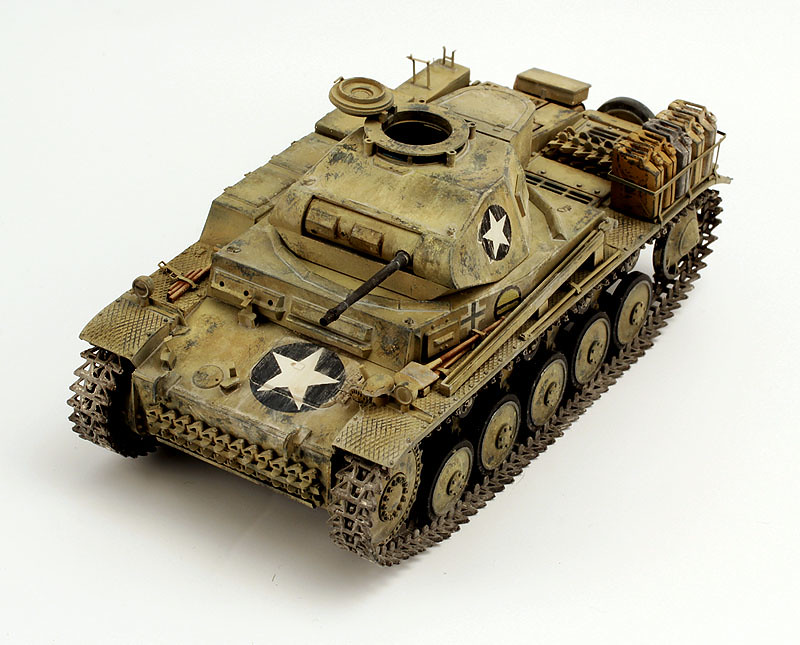
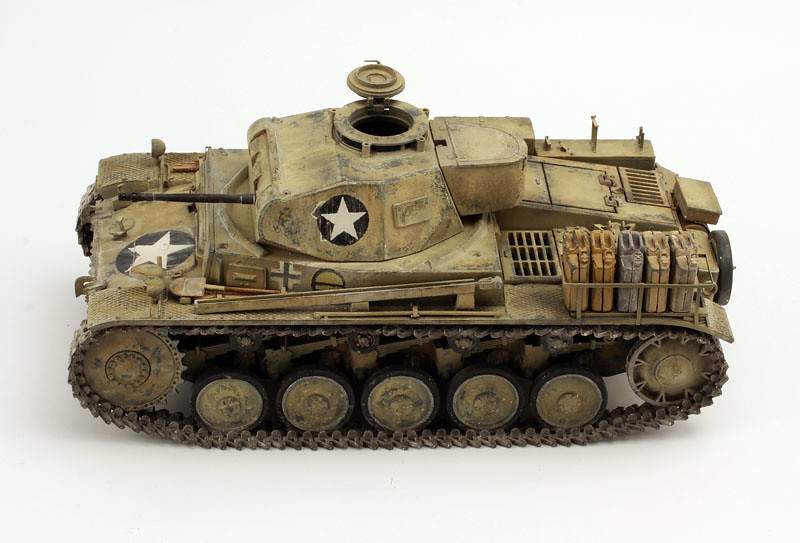
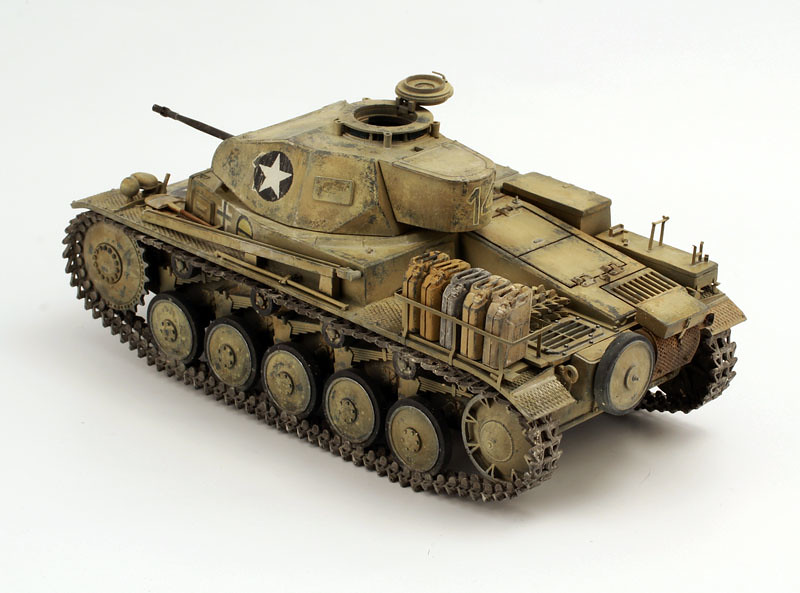
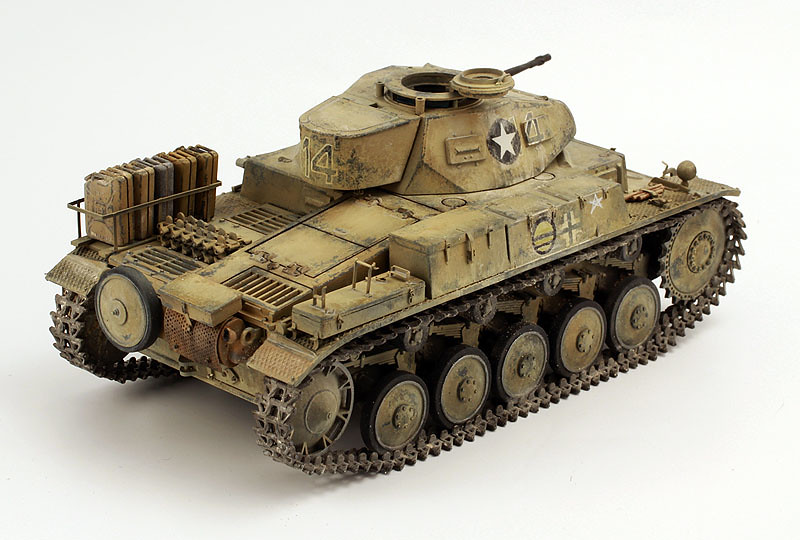
The panzer is now luckily nearing completion.
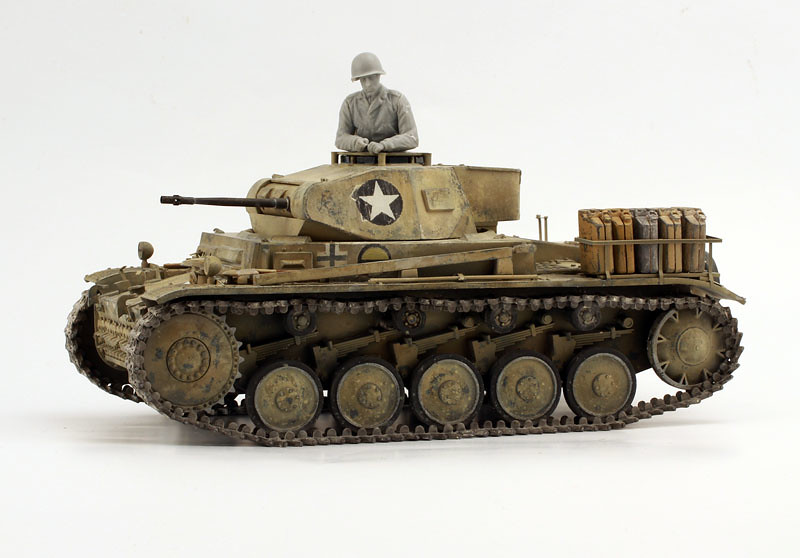
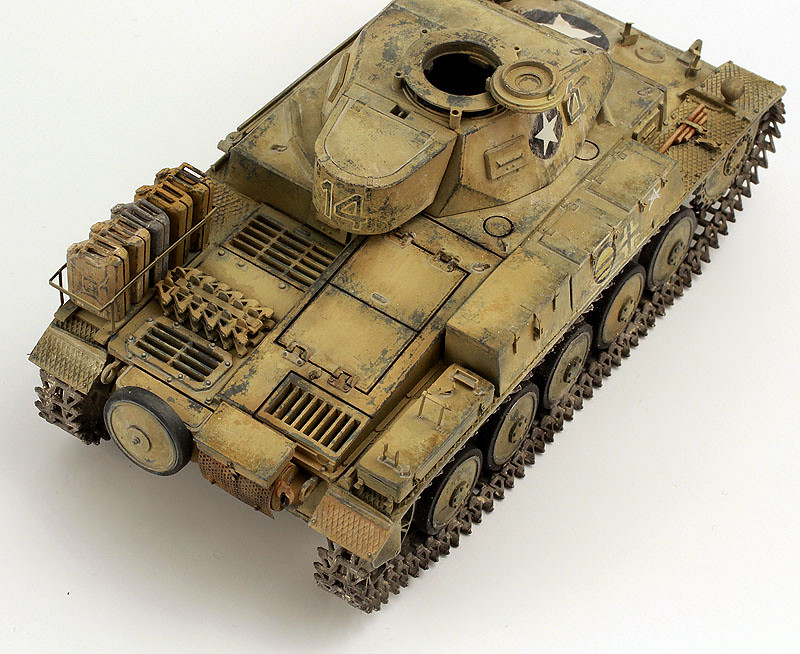
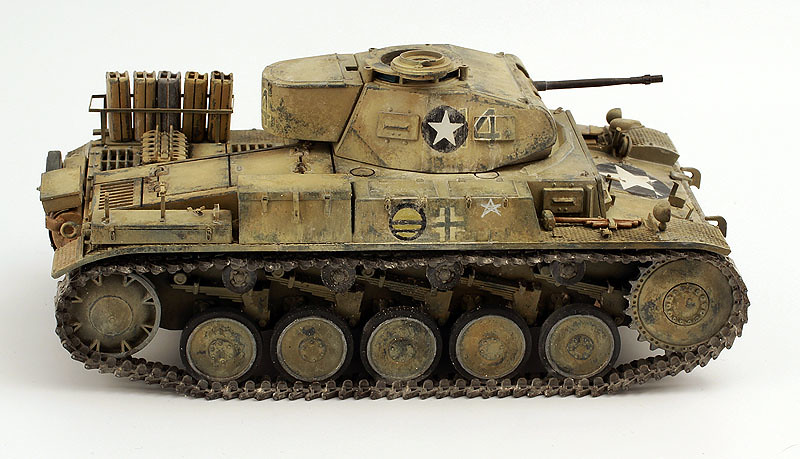
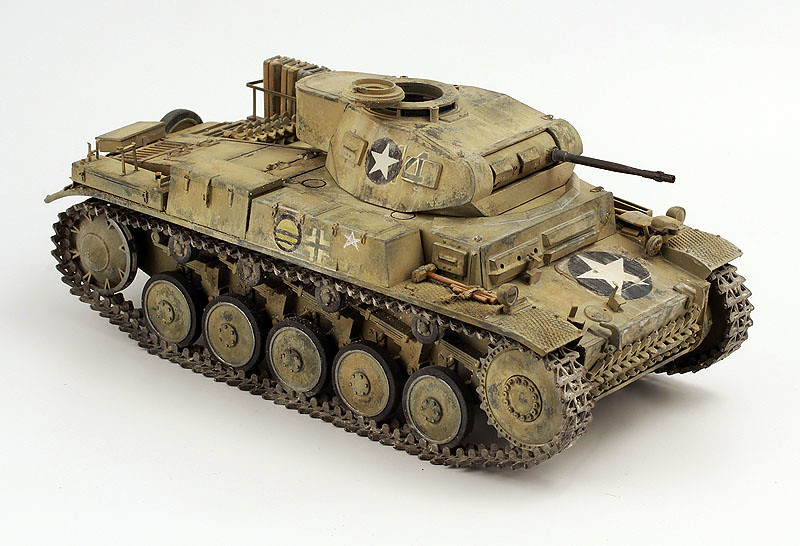
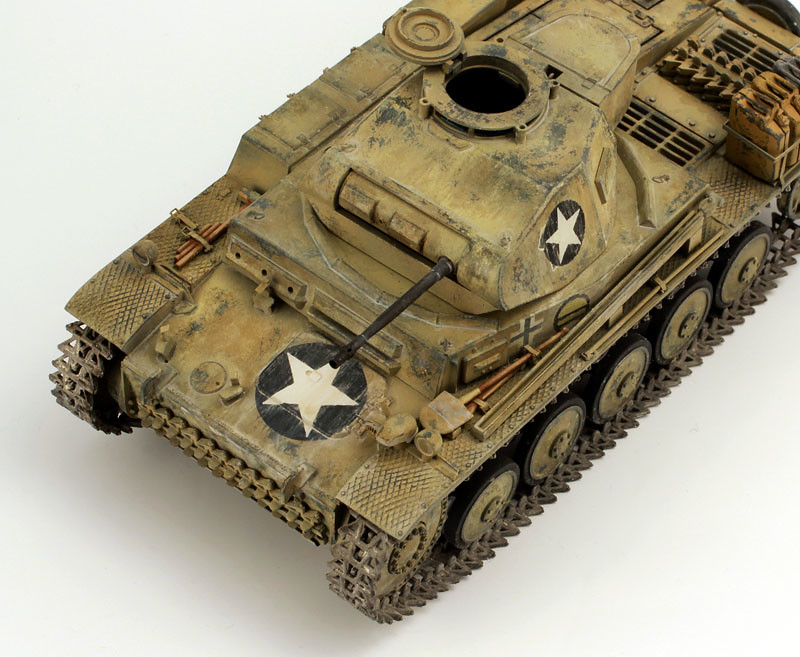
Final layer of paint was Vallejo darka sand over their chipping medium, and this combo works btilliantly. I sprayed the model lightly and chipped with wet brush and I must say I'm pleased with the result.
Then I painted the details and US markings using lasercut masks.
Lastly I've added some dust effects with AMMO light dust enamel and some pigments over the tracks.
I started putting together the commander, he is a Miniart figure from their US drivers set. The chap had his arms slightly reposed to fit over the hatch ring, they still need to be filled and blended.
Not sure When I'll stop but I'll try and add some more dust, perhaps using artist oils, then some dried mud over the suspension, so not calling the painjob done
Cheers,
Greg
 IMG_5598
 by
Grzegorz Ziecina, on Flickr
 IMG_5614
 by
Grzegorz Ziecina, on Flickr
 IMG_5603
 by
Grzegorz Ziecina, on Flickr
 IMG_5604
 by
Grzegorz Ziecina, on Flickr
 IMG_5606
 by
Grzegorz Ziecina, on Flickr
 IMG_5608
 by
Grzegorz Ziecina, on Flickr
 IMG_5609
 by
Grzegorz Ziecina, on Flickr
 IMG_5610
 by
Grzegorz Ziecina, on Flickr
 IMG_5613
 by
Grzegorz Ziecina, on Flickr
For those about to rock, we salute you!
JPTRR
 Managing Editor
#051
Tennessee, United States
Joined: December 21, 2002
KitMaker: 7,772 posts
Armorama: 2,447 posts
Posted: Saturday, March 10, 2018 - 07:05 AM UTC
Grzegorz, Sweet work on this little tank.
Chipping is wonderful.

If they demand your loyalty, give them integrity; if they demand integrity, give them your loyalty.--Col John Boyd, USAF
“Any plan where you lose your hat is a bad plan.”
Texas, United States
Joined: April 07, 2009
KitMaker: 1,063 posts
Armorama: 1,049 posts
Posted: Saturday, March 10, 2018 - 07:36 AM UTC
WOW! Great finish on your little beast. Those US stars really give a different look. Great pics, too!
Even my pick-up is panzer grey.
Florida, United States
Joined: October 21, 2013
KitMaker: 751 posts
Armorama: 751 posts
Posted: Saturday, March 10, 2018 - 04:01 PM UTC
You sure took this very old kit and made it to something that is amazing!!!I am just at a lost of words to describe how amazing it is!!!
Hong Kong S.A.R. / 繁體
Joined: March 04, 2018
KitMaker: 71 posts
Armorama: 59 posts
Posted: Saturday, March 10, 2018 - 08:47 PM UTC
Ahh, Tamiya's ancient Panzer II F. Came with that godawful figure set. But otherwise a solid kit. Good job with yours. I especially love the weathering.
tatbaqui
 News Writer
#040
Metro Manila, Philippines
Joined: May 06, 2007
KitMaker: 2,713 posts
Armorama: 2,451 posts
Posted: Sunday, March 11, 2018 - 03:45 AM UTC
Very nice! How did you do the perforations on the muffler cover?
Wojewodztwo Pomorskie, Poland
Joined: May 26, 2003
KitMaker: 1,208 posts
Armorama: 1,023 posts
Posted: Sunday, March 11, 2018 - 05:21 AM UTC
Frederick, Jack, Jason thank you for your kind coments!
Frederick, I'm glad you like it, the figures may serve as a painting training dummies for our club's beginners

Tat, thanks, the muffler screen was done by laser cutting 0.1mm plasticard.
Cheers,
Greg
For those about to rock, we salute you!
tatbaqui
 News Writer
#040
Metro Manila, Philippines
Joined: May 06, 2007
KitMaker: 2,713 posts
Armorama: 2,451 posts
Posted: Sunday, March 11, 2018 - 08:37 AM UTC
Thanks Greg -- you did well on this oldie!

Wojewodztwo Pomorskie, Poland
Joined: May 26, 2003
KitMaker: 1,208 posts
Armorama: 1,023 posts
Posted: Sunday, March 11, 2018 - 07:38 PM UTC
Thanks Tat!
I used the laser plotter for this part because I have access to one at work, friend that did the same kit for the group build used Aber's PE 'drilled plate'. despite strange english name it's just perforated PE sheet that's perfect for this kind of details.
Cheers,
Greg
For those about to rock, we salute you!
Wien, Austria
Joined: March 09, 2016
KitMaker: 2,408 posts
Armorama: 2,300 posts
Posted: Sunday, March 11, 2018 - 07:45 PM UTC
Quoted Text
I painted the details and US markings
Looks even better! Was that part of the original plan? Does it resemble an actual vehicle used in Tunisia?
Wojewodztwo Pomorskie, Poland
Joined: May 26, 2003
KitMaker: 1,208 posts
Armorama: 1,023 posts
Posted: Monday, March 12, 2018 - 01:27 AM UTC
Quoted Text
Quoted Text
I painted the details and US markings
Looks even better! Was that part of the original plan? Does it resemble an actual vehicle used in Tunisia?
Hi Israel, yes it was my original intent to depict a tank as capturet by 1st Rangers. It was marked with roundels with stars and the black and yellow 'disc' is Presidential Unit Citation given for the unit's actions in the battle. There are quite a lot of the photos of the tank I modeled mine after, including color ones taken by Robert Capa.
Here is a short description of it's history with a handful of smallish period photos and a link to walkaround of the same tank in the recent years:
http://www.armorfortheages.com/MilitaryVehicles/PzKpfwII/PzKpfwII.htmlAnother walkaround page:
http://www.militarymodelling.com/news/article/pz-ii-at-the-national-armor-and-cavalry-heritage-foundation/15645 And my favourite: gallery of good resolution period photos of the rangers riding around some African village in the panzer. From these photos I could confirm some details and found out the little white star that was chalked on the right hand side bin

. It is unfortunately accessible on facebook (I know some folks dont tolerate it):
https://www.facebook.com/pg/Radio.WW2/photos/?tab=album&album_id=1689531647959491Cheers,
Greg
For those about to rock, we salute you!
Wojewodztwo Pomorskie, Poland
Joined: May 26, 2003
KitMaker: 1,208 posts
Armorama: 1,023 posts
Posted: Wednesday, April 04, 2018 - 04:33 AM UTC
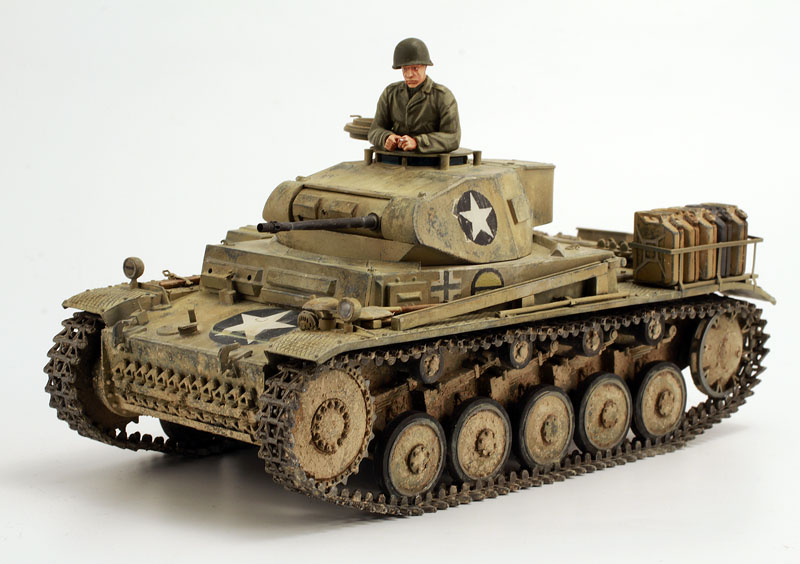
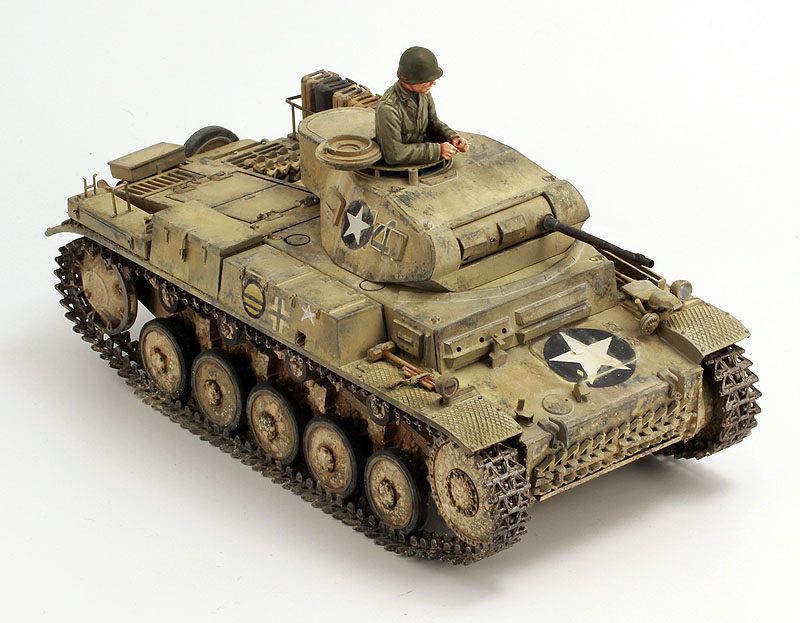
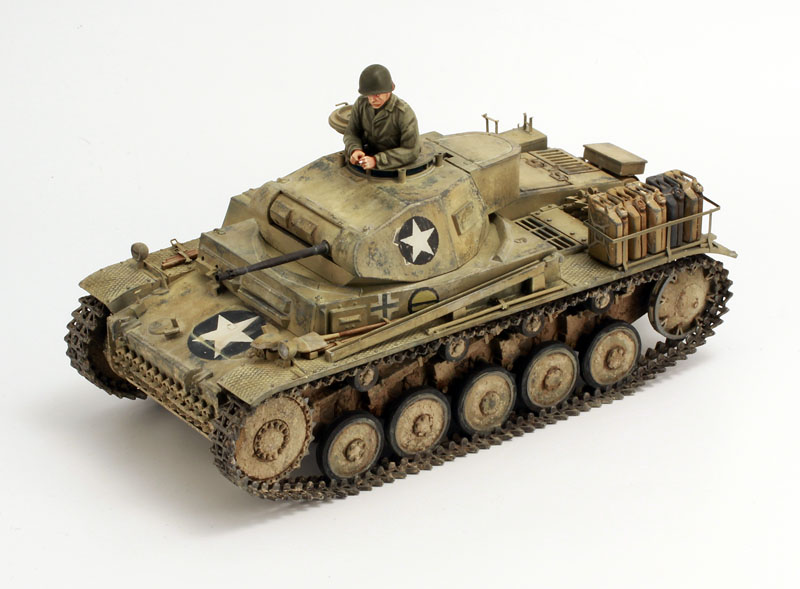
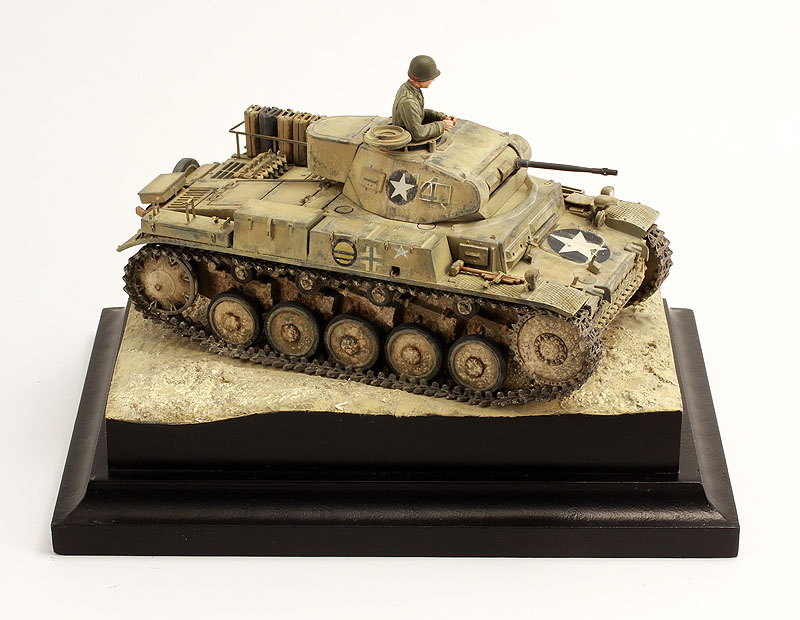
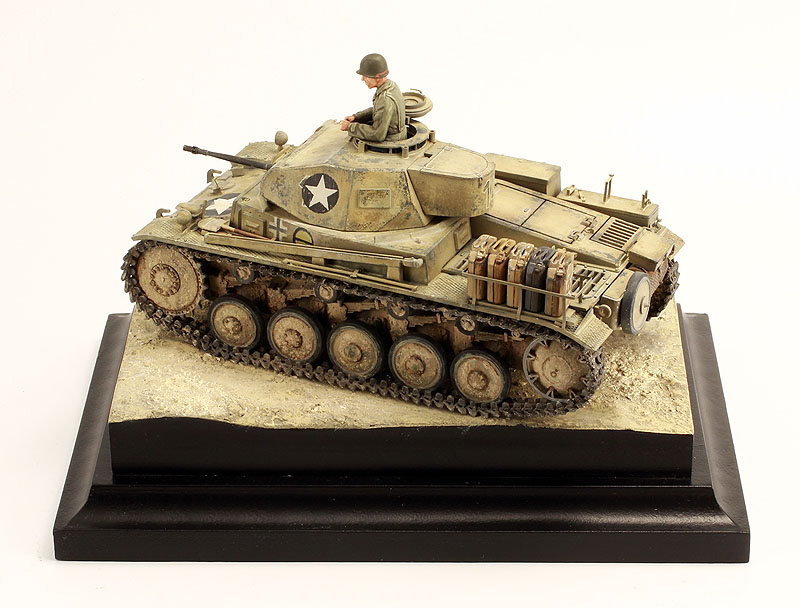
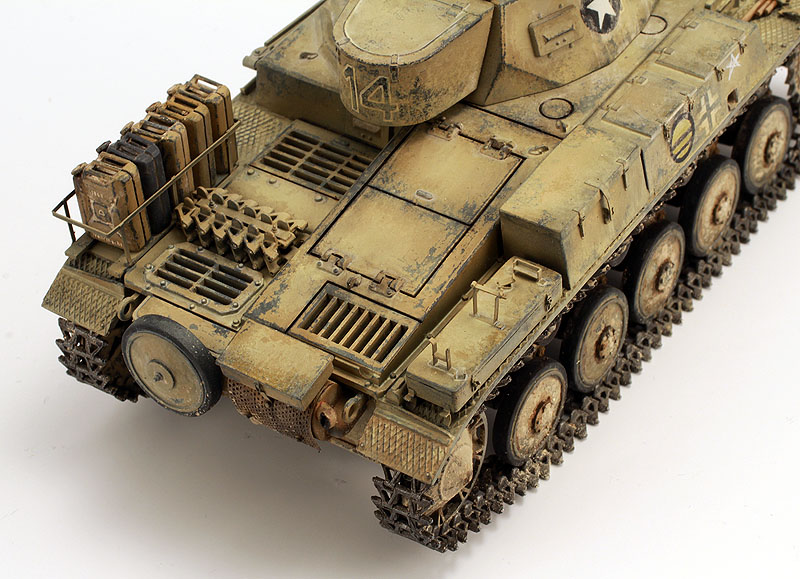
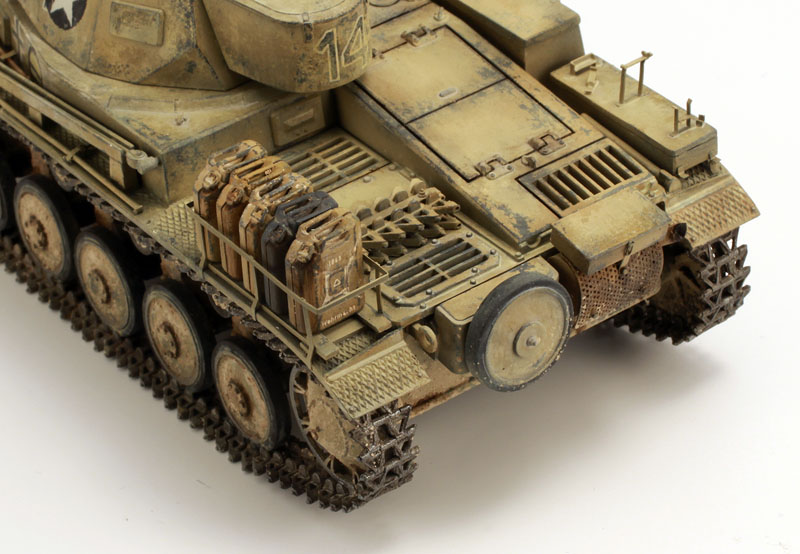
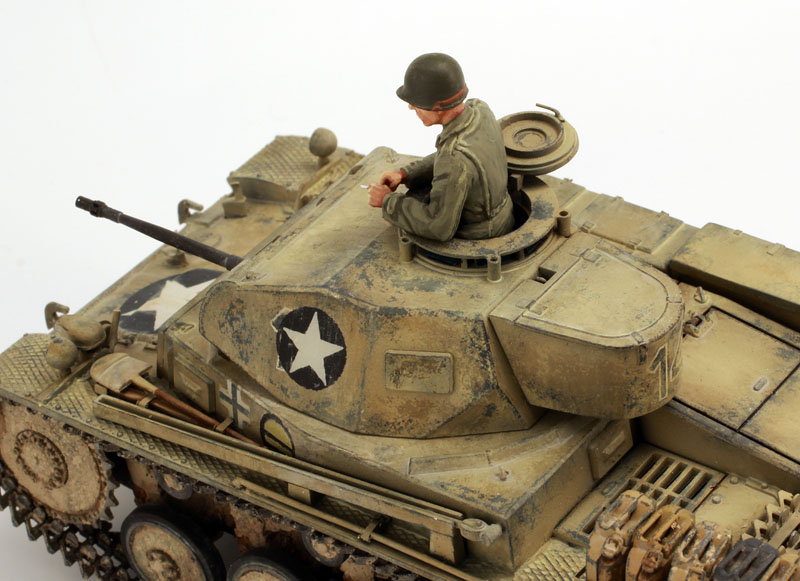
Hi gang, my little panzer is finally finished. Last details added, inspired by one of GB participants, I drilled the left headlight and added a lens from a tasca Sherman (will the Sherman god please forgive me?!) and added stiffening rib inside of the right tool box.
Figure was painted and base created to match others from our little Group Build.
Cheers,
Greg
 IMG_5741
 by
Grzegorz Ziecina, on Flickr
 IMG_5734
 by
Grzegorz Ziecina, on Flickr
 IMG_5733
 by
Grzegorz Ziecina, on Flickr
 IMG_5732
 by
Grzegorz Ziecina, on Flickr
 IMG_5731
 by
Grzegorz Ziecina, on Flickr
 IMG_5730
 by
Grzegorz Ziecina, on Flickr
 IMG_5729
 by
Grzegorz Ziecina, on Flickr
 IMG_5721
 by
Grzegorz Ziecina, on Flickr
 IMG_5724
 by
Grzegorz Ziecina, on Flickr
 IMG_5717
 by
Grzegorz Ziecina, on Flickr
 IMG_5740
 by
Grzegorz Ziecina, on Flickr
 IMG_5739
 by
Grzegorz Ziecina, on Flickr
 IMG_5738
 by
Grzegorz Ziecina, on Flickr
 IMG_5737
 by
Grzegorz Ziecina, on Flickr
 IMG_5736
 by
Grzegorz Ziecina, on Flickr
 IMG_5735
 by
Grzegorz Ziecina, on Flickr
For those about to rock, we salute you!
Wien, Austria
Joined: March 09, 2016
KitMaker: 2,408 posts
Armorama: 2,300 posts
Posted: Wednesday, April 04, 2018 - 04:36 PM UTC
Stunning little beauty, Grzegorz! Interesting that the Americans left the Balkankreuz untouched...
 IMG_5561 by Grzegorz Ziecina, on Flickr
 IMG_5562 by Grzegorz Ziecina, on Flickr
 IMG_5563 by Grzegorz Ziecina, on Flickr
 IMG_5564 by Grzegorz Ziecina, on Flickr
 IMG_5565 by Grzegorz Ziecina, on Flickr
 IMG_5566 by Grzegorz Ziecina, on Flickr
 IMG_5569 by Grzegorz Ziecina, on Flickr
 IMG_5570 by Grzegorz Ziecina, on Flickr
 IMG_5574 by Grzegorz Ziecina, on Flickr
 IMG_5576 by Grzegorz Ziecina, on Flickr
 IMG_5577 by Grzegorz Ziecina, on Flickr
 IMG_5578 by Grzegorz Ziecina, on Flickr
 IMG_5560 by Grzegorz Ziecina, on Flickr


