_GOTOBOTTOM
Armor/AFV
For discussions on tanks, artillery, jeeps, etc.
Tamiya E8 Turret Seam
Brianlee
Visit this Community
United States
Joined: December 17, 2017
KitMaker: 199 posts
Armorama: 198 posts
Posted: Friday, March 23, 2018 - 07:25 PM UTC
Maybe a stupid question

What do you guys do with this seam all the way around:

https://www.flickr.com/photos/162768545@N07/shares/nEym9d

https://www.flickr.com/photos/162768545@N07/shares/N73mq2
Frenchy
Visit this Community
Rhone, France
Joined: December 02, 2002
KitMaker: 12,719 posts
Armorama: 12,507 posts
Posted: Friday, March 23, 2018 - 07:39 PM UTC
Related thread :

http://cs.finescale.com/fsm/modeling_subjects/f/3/t/164660.aspx

H.P.
Brianlee
Visit this Community
United States
Joined: December 17, 2017
KitMaker: 199 posts
Armorama: 198 posts
Posted: Friday, March 23, 2018 - 09:50 PM UTC
So sand the seam down and stipple it some how? Seems like a pita for a relatively newer kit.
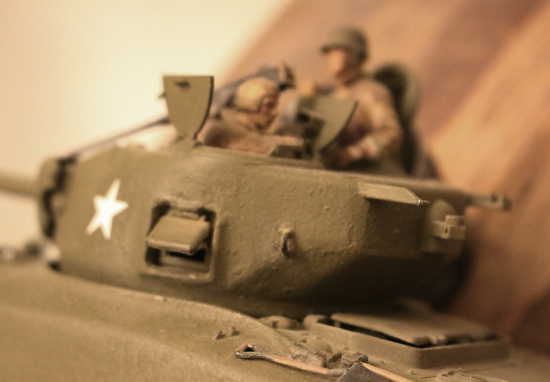
Any other suggestions ? I have wax carving tools, make a stippler our of that ?
KurtLaughlin
Visit this Community
Pennsylvania, United States
Joined: January 18, 2003
KitMaker: 2,402 posts
Armorama: 2,377 posts
Posted: Friday, March 23, 2018 - 10:10 PM UTC

Quoted Text

So sand the seam down and stipple it some how? Seems like a pita for a relatively newer kit.


New kit or not, that's really the only practical way to mold the turret. In fact the real turret had a casting seam in that location, so most people don't consider the work to be an issue.

KL
165thspc
#521
Visit this Community
Kentucky, United States
Joined: April 13, 2011
KitMaker: 9,465 posts
Armorama: 8,695 posts
Posted: Friday, March 23, 2018 - 10:56 PM UTC
The only way to manufacture the scale turret without that seam would be to sand cast (or lost wax cast) them one at a time just like the real thing OR 3D print them. Both methods being costly and slow precesses.

Prepping the turret:
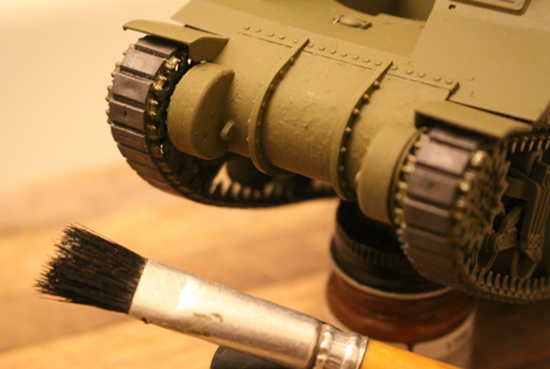
When building the turret run a small but continuous beed of glue all the way around BOTH pieces that form the turret. Wait 5-10 seconds for the glue to soften the plastic then press the two pieces firmly together and hold them there with some force. If you can wipe off any excess glue that ooze's out with a cloth or your fingers then do so. You don't have to be neat just keep the glue from forming a ridge where the seam was. Clamp and let dry overnight. In the morning you should have a turret formed of one solid piece of plastic. Use the tip of a knife blade to scrap down any high points in the seam that remains to get it as even as possible.

Recreating the casting effect:
Working about a two square inch area are at a time, cover the area with a lite coating of the same glue. Cover then entire area to be worked with a thin smooth coating of the glue. Then using a good sized ( 1/2 inch wide) old stiff, short bristle paint brush you might have lying around, scrub and then quickly stipple (poke or jab) the area to give it the desired texture. Go easy as this technique can easily create too much of a texture to look to scale.

This is an old technique but dependable. (Models are both 1/35th scale.)


Good for transmission housings too! (Apply texture before adding the housing bolted division detail.)
Biggles2
Visit this Community
Quebec, Canada
Joined: January 01, 2004
KitMaker: 7,600 posts
Armorama: 6,110 posts
Posted: Saturday, March 24, 2018 - 03:55 AM UTC
Alternatively, you could use plastic rod or stretched sprue of appropriate diameter and glue in place along the seam line, in the same way as making weld seams. Saturate the rod (or sprue) until it's soft and work it down into the joint. Leave it overnight to set and harden, then sand it smooth to the rest of the surface, or add texture if the rest of the turret has it.
junglejim
Visit this Community
Alberta, Canada
Joined: February 18, 2003
KitMaker: 1,728 posts
Armorama: 1,629 posts
Posted: Saturday, March 24, 2018 - 05:32 AM UTC
Some don't even have seams (from a Canadian M4A2 76 HVSS)


Jim
Kenaicop
#384
Visit this Community
Nevada, United States
Joined: August 23, 2005
KitMaker: 1,426 posts
Armorama: 1,316 posts
Posted: Saturday, March 24, 2018 - 08:12 AM UTC
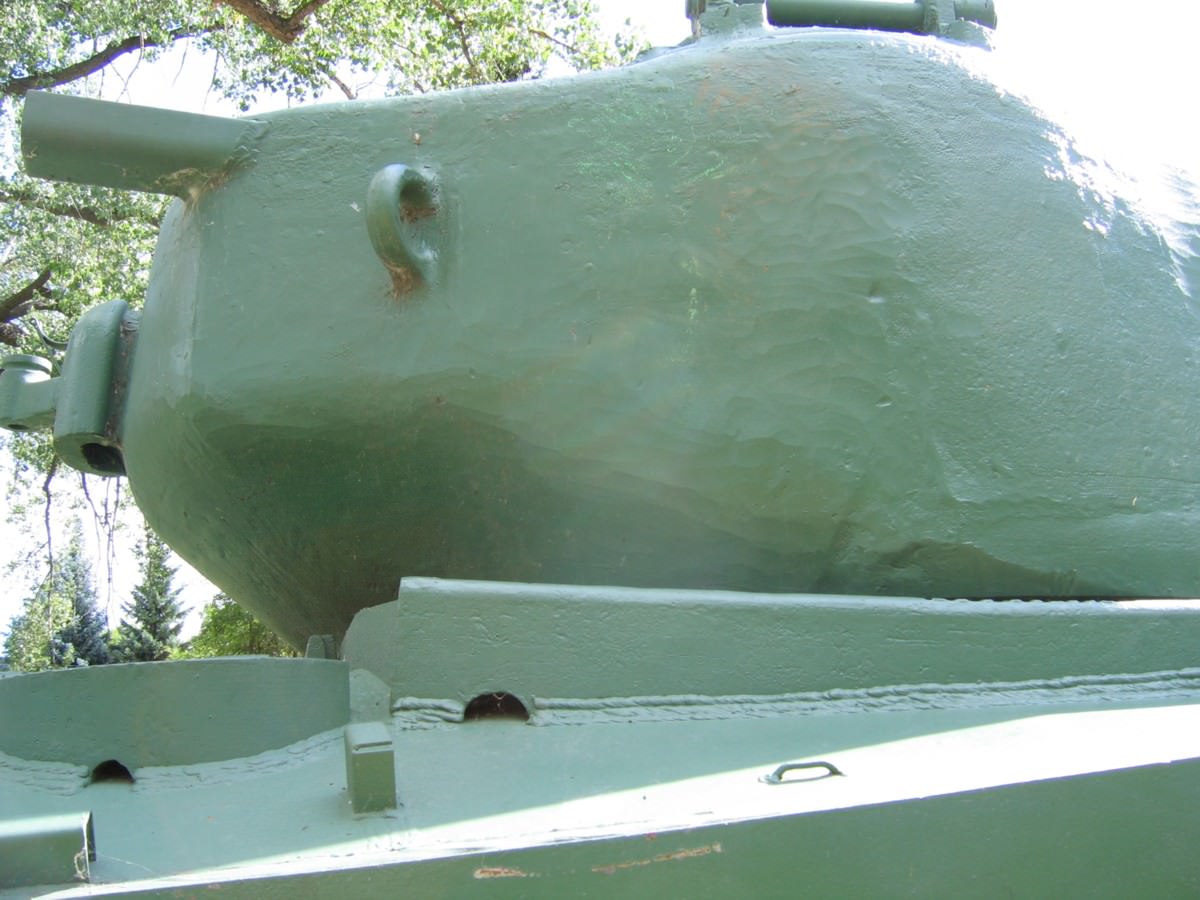
Since it’s right there in our faces, any tips on getting the little drain holes into an oval shape as apposed to round from using a drill bit? I try to do them on all my Sherman’s, but they’re all round
165thspc
#521
Visit this Community
Kentucky, United States
Joined: April 13, 2011
KitMaker: 9,465 posts
Armorama: 8,695 posts
Posted: Saturday, March 24, 2018 - 08:18 AM UTC
Use oval shaped drill bits! (Just kidding)

If those shot skirts are separate pieces on the kit then no problem as an oval shaped file will do the trick. However if they are molded into the upper shell you may just be out of luck. Maybe grind off the entire skirt and then make your own????

Anybody?
165thspc
#521
Visit this Community
Kentucky, United States
Joined: April 13, 2011
KitMaker: 9,465 posts
Armorama: 8,695 posts
Posted: Saturday, March 24, 2018 - 08:36 AM UTC
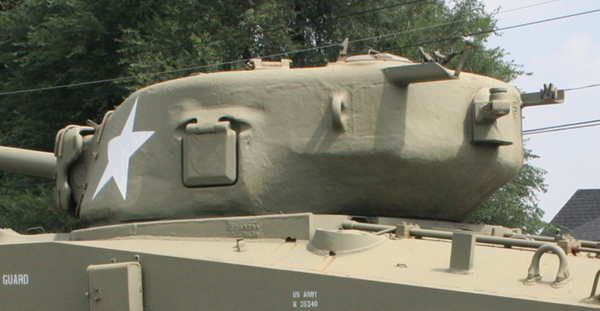
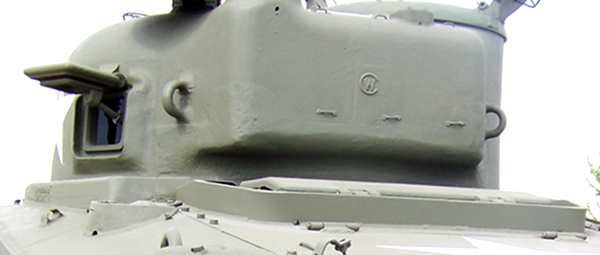
Look at all the seams on this one! And here I thought the turret was formed out of just an upper and lower casting.


Then on these two you see hardly any seams at all!


p.s. I have never seen a weld bead left on the seam between the upper and lower turret halves. Welding thick armor plate is different than simply attaching two pieces of metal. As you can see in the photos items simply attached to the outside surface of the turret, like the machine gun stowage brackets, will show weld beads but when welding thick solid armor the seam in the metal is cast to form a tapered V groove. The weld is then built up from the bottom of the V until it completely fills the gap between the two pieces of armor and is the same thickness as the armor, much like a pool filling with water. In the end this operation will form a nearly flat weld surface in the face of the metal.
Brianlee
Visit this Community
United States
Joined: December 17, 2017
KitMaker: 199 posts
Armorama: 198 posts
Posted: Saturday, March 24, 2018 - 09:07 AM UTC
Ok some good ideas - I already glued the turret with Tamiya extra thin and sanded a bit along the seam to even it up and filled fine seam with perfect plastic putty ( which I've found to be my fav)

I can just use water though to remove.

I don't want to risk making it look worse with the stiff brush on soft plastic technique but would like to try. The welds bead with thin in tube of styrene sounds good too. I've never done either technique though and would like to avoid it looking worse

Can I clean out the putty and then just build up some Tamiya thin cement in the seam ? Then after dry, brush more thin all around the seam and stipple ?

Brianlee
Visit this Community
United States
Joined: December 17, 2017
KitMaker: 199 posts
Armorama: 198 posts
Posted: Saturday, March 24, 2018 - 09:11 AM UTC

Quoted Text

Welding thick armor plate is different than simply attaching two pieces of metal. Items simply attached to the outside surface of the turret show weld beads but in welding thick armor the seam in the metal is tapered to form a V groove and the weld is built up from the bottom of the V until it completely fills the gap between the two pieces of armor, much like a pool filling with water. In the end this operation will form a nearly flat weld surface in the face of the metal.[/I]


So in this case, my sanding down a bit an filling the fine seam with putty could work/be authentic?
165thspc
#521
Visit this Community
Kentucky, United States
Joined: April 13, 2011
KitMaker: 9,465 posts
Armorama: 8,695 posts
Posted: Saturday, March 24, 2018 - 09:24 AM UTC
I suggest you join two pieces of think flat scrap plastic (maybe some thick Evergreen sheet) and try the technique on that. Remember the Evergreen is probably a softer plastic than the kit plastic so it will react faster to the glue.

Once you master this trick you will never want to build another smooth turreted Sherman again.
sdk10159
Visit this Community
Oregon, United States
Joined: December 08, 2005
KitMaker: 556 posts
Armorama: 433 posts
Posted: Saturday, March 24, 2018 - 09:52 AM UTC

Quoted Text

Since it’s right there in our faces, any tips on getting the little drain holes into an oval shape as apposed to round from using a drill bit? I try to do them on all my Sherman’s, but they’re all round


Drill two holes
gloucesternige
Visit this Community
England - South West, United Kingdom
Joined: January 13, 2012
KitMaker: 307 posts
Armorama: 283 posts
Posted: Saturday, March 24, 2018 - 05:57 PM UTC

Quoted Text


Quoted Text

Since it’s right there in our faces, any tips on getting the little drain holes into an oval shape as apposed to round from using a drill bit? I try to do them on all my Sherman’s, but they’re all round


Drill two holes


Or.. drill one tiny hole at the lowest point, then using the tip of a new no 11 blade, rock up and over from side to side until you get the shape you need.
KurtLaughlin
Visit this Community
Pennsylvania, United States
Joined: January 18, 2003
KitMaker: 2,402 posts
Armorama: 2,377 posts
Posted: Saturday, March 24, 2018 - 07:32 PM UTC

Quoted Text

p.s. I have never seen a weld bead left on the seam between the upper and lower turret halves.


That is because the turrets were NOT made in halves and welded together. Turrets were cast in one piece.

Different foundries had different practices for where they placed the pour gates and how they finished the castings. A thorough examination of the characteristics will let you build a more accurate model.

KL
Scarred
Visit this Community
Washington, United States
Joined: March 11, 2016
KitMaker: 1,792 posts
Armorama: 1,186 posts
Posted: Saturday, March 24, 2018 - 07:53 PM UTC
Unless the kit has an interior the best place to test paint colors or techniques is the inside of the hull. Same color plastic, same type of plastic so you can judge how much cement you need to achieve the desired effect. My stippling brush is an old 1/2" wide paint brush that I've cut the bristles to half their original length. It gets rid of any taper to the bristles and by shortening them it makes them stiffer.
Biggles2
Visit this Community
Quebec, Canada
Joined: January 01, 2004
KitMaker: 7,600 posts
Armorama: 6,110 posts
Posted: Saturday, March 24, 2018 - 08:14 PM UTC

Quoted Text


That is because the turrets were NOT made in halves and welded together. Turrets were cast in one piece.
KL


How did they cast a complicated shape (T23 turret), with convex and concave curves with a hollow interior, in a single casting? And why can't the plastic companies do the same?
Scarred
Visit this Community
Washington, United States
Joined: March 11, 2016
KitMaker: 1,792 posts
Armorama: 1,186 posts
Posted: Saturday, March 24, 2018 - 08:43 PM UTC
By using multiple molds. Simple example: They mold the top half exterior of the turret in sand that has a bonding agent in it, make another mold of the top half interior, do the same with the bottom, join all the molds together, which is four separate molds into one big mold then pour in hot metal.

Mold lines are where each separate mold joins another. Think of how many molds are used to make a 8 cylinder engine block with all the water jackets in it. And they have to consider that metal shrinks as it solidifies so the molds are larger than the final part.
barkingdigger
Staff MemberAssociate Editor
ARMORAMA
#013
Visit this Community
England - East Anglia, United Kingdom
Joined: June 20, 2008
KitMaker: 3,981 posts
Armorama: 3,403 posts
Posted: Sunday, March 25, 2018 - 12:10 AM UTC

Quoted Text


Quoted Text


That is because the turrets were NOT made in halves and welded together. Turrets were cast in one piece.
KL


How did they cast a complicated shape (T23 turret), with convex and concave curves with a hollow interior, in a single casting? And why can't the plastic companies do the same?


Because the real turret was cast in a sand mould, and the mould was then broken up to pour out afterwards. Plastic kits are made in hard steel moulds, so cannot have any undercuts that would prevent the tool from being withdrawn - hence the need to make kit turrets in two parts.
KurtLaughlin
Visit this Community
Pennsylvania, United States
Joined: January 18, 2003
KitMaker: 2,402 posts
Armorama: 2,377 posts
Posted: Sunday, March 25, 2018 - 01:40 AM UTC

Quoted Text


Because the real turret was cast in a sand mould, and the mould was then broken up to pour out afterwards. Plastic kits are made in hard steel moulds, so cannot have any undercuts that would prevent the tool from being withdrawn - hence the need to make kit turrets in two parts.


More to the point, each tank turret mold was hand made and destroyed to remove the part. I don't think modelers are willing pay what it would cost to have a dedicated mold for each kit.

KL
Biggles2
Visit this Community
Quebec, Canada
Joined: January 01, 2004
KitMaker: 7,600 posts
Armorama: 6,110 posts
Posted: Sunday, March 25, 2018 - 07:21 PM UTC
Couldn't it be possible with slide-molding? There's also 3-D printing, but that's something else, and fairly expensive.
tankmodeler
#417
Visit this Community
Ontario, Canada
Joined: March 01, 2004
KitMaker: 3,123 posts
Armorama: 2,539 posts
Posted: Sunday, March 25, 2018 - 09:41 PM UTC

Quoted Text

Couldn't it be possible with slide-molding?


"Possible" is such a cost dependent word.

Is it possible? Yes. It is possible.

Is it cost effective? No, not by a loooong shot.

You would need an interior plug, made of a bunch of articulated pieces, each keyed and attached to a mechanism to permit the required motion so that the plug could be removed out through the turret ring hole. Remember, the entire interior shape has to come out through that much smaller hole. It may not be possible to disassemble the interior plug tooling automatically, in which case each turret tool would need to be disassembled manually, then put back together and inserted into the main injection tool before the next turret can be injected.

Then you would need a bunch of exterior tooling pieces, also attached to mechanisms that would allow them to be withdrawn and the moulded turret ejected from the machine.

Manufacturing rates would plummet from dozens per hour to maybe one. Manual touch labour would go from essentially none per part to possible an hour to disassemble and reassemble the plug tool.

Cost for an injected sprue would climb from about a quarter to something like 40 to 60 bucks depending on the fully burdened labour charge rate. And that's before mark-ups and the incredibly more expensive tooling design and manufacturing costs are amortised.

Your 75 buck Asuka Sherman would probably be 400-500 bucks. Maybe more.

So, possible? Yeah, maybe. Just.

Economically possible? Hell no.

Paul
RLlockie
Visit this Community
United Kingdom
Joined: September 06, 2013
KitMaker: 1,112 posts
Armorama: 938 posts
Posted: Sunday, March 25, 2018 - 11:46 PM UTC
Is it really so difficult to fill a join line on a kit turret and then either blend the texture to match the rest of the turret or add a residual mould line where it wasn’t all ground off at the foundry/factory? I’ve never even thought about it much - it’s just part of the project, like removing parts from sprues, filling sink marks and ejection pin scars and removing mould lines. Isn’t it just ‘modelling’? Certainly a price I’m willing to pay for being able to buy kits at (relatively) low cost.
Scarred
Visit this Community
Washington, United States
Joined: March 11, 2016
KitMaker: 1,792 posts
Armorama: 1,186 posts
Posted: Monday, March 26, 2018 - 03:09 AM UTC
Filling and sanding a seam like that adds to the realism because the mold lines on the real turrets aren't smooth, some show the grind marks so I never sand mold lines completely smooth on a Sherman turret. It's nice that they now try to mold in the cast texture because for decades it was always smooth plastic so you had to stipple your own texture. And I don't think many modelers know how big castings are made or they wouldn't think the seams were weld lines.
 _GOTOTOP