

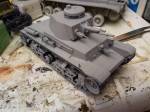
Here are my progress on Academy's 1/35 Panzer 35(t) befehlswagen.
https://imgur.com/gallery/kkPyK
https://imgur.com/gallery/y2n7x
https://imgur.com/gallery/MvdJD
Hosted by Darren Baker
ACADEMY Pz.35(t) build log

TheLilPeashooter

Joined: March 04, 2018
KitMaker: 71 posts
Armorama: 59 posts
Posted: Saturday, March 31, 2018 - 06:45 PM UTC
TheLilPeashooter
Joined: March 04, 2018
KitMaker: 71 posts
Armorama: 59 posts
Posted: Saturday, March 31, 2018 - 07:08 PM UTC
You might notice in one of the image there's a green circle - most pictures of the tank I saw didn't have the MG. Instead a circular hatch took its place. There are some problems: 1) the ball mount is moulded on the upper hull and 2) I lack the skills and confidence to remove it. So I might just build a standard Pz 35(t)?
Apart from that little issue the fit and rivet details are excellent. Rivet counters, do your job.
Btw I plan to use the Krupp Protze in the background in a diorama set.
Apart from that little issue the fit and rivet details are excellent. Rivet counters, do your job.
Btw I plan to use the Krupp Protze in the background in a diorama set.
TheLilPeashooter
Joined: March 04, 2018
KitMaker: 71 posts
Armorama: 59 posts
Posted: Sunday, April 01, 2018 - 08:24 PM UTC
More progress - completed the tracks
I have to say, the details are fabulous. The wheels, however, will be tedious to paint.
https://imgur.com/gallery/9P2PX
I have to say, the details are fabulous. The wheels, however, will be tedious to paint.
https://imgur.com/gallery/9P2PX

RobinNilsson

Joined: November 29, 2006
KitMaker: 6,693 posts
Armorama: 5,562 posts
Posted: Sunday, April 01, 2018 - 09:06 PM UTC
Hi Frederick,
It looks as if there are also some sinkmarks around that hull MG.
If I had this problem I would drill small holes in a circle, inside the circle of rivets and, if possible, outside of the sinkmarks. The holes small holes should be very close to each other. Cut away the rest and file the edges smooth. Shape a disc of plastic to fit in the hole. Get the fit as tight as possible to avoid as much putty as possible. Glue the disc in place with some reinforcement on the back (lengths of sprue).
Use something with a straight edge to check that you get a flush fit with the frontal armour plate, saves a lot on sanding later.
Fill any remaining holes with small pieces of styrene.
Let it dry for a day or two.
Glue fine sandpaper to the end of a stick, 2-4 mm in diameter. You can used a piece of cut off sprue.
Carefully sand around the edges of the inserted disc and be careful with those rivets.
Forget what I wrote above. It could be useful when trying to create a smooth surface to replace a piece of removed equipment but it does not apply in this case .....
Try to find images showing the front of the command version.
Did it have that circle of rivets around the hole for the MG?
Was there a blanking plate with visible edges?
It seems as if the command version had a circular plate to cover the hole left by the MG mounting ....


Make a circular plate.
Drill holes in the correct pattern
Glue pieces of stretched sprue in the holes
Carefully sand down to resemble rivets. Hard to see if it was rivets or hexagonal bolt heads
A similar blanking plate on a Pz 38(t):
https://upload.wikimedia.org/wikipedia/commons/thumb/e/ec/Panzer_38%28t%29_Ausf._S.jpg/1200px-Panzer_38%28t%29_Ausf._S.jpg
/ Robin
It looks as if there are also some sinkmarks around that hull MG.
If I had this problem I would drill small holes in a circle, inside the circle of rivets and, if possible, outside of the sinkmarks. The holes small holes should be very close to each other. Cut away the rest and file the edges smooth. Shape a disc of plastic to fit in the hole. Get the fit as tight as possible to avoid as much putty as possible. Glue the disc in place with some reinforcement on the back (lengths of sprue).
Use something with a straight edge to check that you get a flush fit with the frontal armour plate, saves a lot on sanding later.
Fill any remaining holes with small pieces of styrene.
Let it dry for a day or two.
Glue fine sandpaper to the end of a stick, 2-4 mm in diameter. You can used a piece of cut off sprue.
Carefully sand around the edges of the inserted disc and be careful with those rivets.
Forget what I wrote above. It could be useful when trying to create a smooth surface to replace a piece of removed equipment but it does not apply in this case .....
Try to find images showing the front of the command version.
Did it have that circle of rivets around the hole for the MG?
Was there a blanking plate with visible edges?
It seems as if the command version had a circular plate to cover the hole left by the MG mounting ....
Make a circular plate.
Drill holes in the correct pattern
Glue pieces of stretched sprue in the holes
Carefully sand down to resemble rivets. Hard to see if it was rivets or hexagonal bolt heads
A similar blanking plate on a Pz 38(t):
https://upload.wikimedia.org/wikipedia/commons/thumb/e/ec/Panzer_38%28t%29_Ausf._S.jpg/1200px-Panzer_38%28t%29_Ausf._S.jpg
/ Robin
TheLilPeashooter
Joined: March 04, 2018
KitMaker: 71 posts
Armorama: 59 posts
Posted: Sunday, April 01, 2018 - 10:37 PM UTC
Thank you for the feedback Robin. I made up my mind and will be building the normal version, because I am in a rush to complete it.
It seems that even Bronco got the same issue (although their's are easier to correct).
It seems that even Bronco got the same issue (although their's are easier to correct).
TheLilPeashooter
Joined: March 04, 2018
KitMaker: 71 posts
Armorama: 59 posts
Posted: Tuesday, April 03, 2018 - 04:50 PM UTC
Alrght, trying a new function today (pray it works)
 |

WEB HOSTING BY


Copyright ©2021 Armorama and Kitmaker Network, a subsidiary of Silver Star Enterprises
All Rights Reserved. Please read our Conditions of Use and Privacy Policy.
All Rights Reserved. Please read our Conditions of Use and Privacy Policy.