

Hosted by Darren Baker
Leopard 1NL
Removed by original poster on 01/28/21 - 16:14:05 (GMT).

BlackWidow

Joined: August 09, 2009
KitMaker: 1,732 posts
Armorama: 326 posts
Posted: Tuesday, May 22, 2018 - 11:31 PM UTC
Hello Jasper,
a Leo is always a lovely sight, no matter if 1 or 2. You've done a nice job on that kit! I like it, too. Did you use the antenna wire from the kit? Earlier this year I've also build this Revell kit but I have done it in the colours of your neighbours in the south, a Leopard 1BE. Have a look if you like.
During my army time (1985-89) I had many contacts with the Dutch Army and their Leopard 2A4NL.
Torsten

Jasperb12

Joined: July 23, 2016
KitMaker: 105 posts
Armorama: 71 posts
Posted: Wednesday, May 23, 2018 - 12:17 PM UTC
Thank you Torsten!
The Leopard series are indeed great looking tanks, my personal favorite! The antennas are made of stretched sprue, so not the wire provided with the kit. Interesting to hear your experiences with the Leopard 2A4, the 2A4NL is still on my wishlist!
With kind regards,
Jasper Breur
The Leopard series are indeed great looking tanks, my personal favorite! The antennas are made of stretched sprue, so not the wire provided with the kit. Interesting to hear your experiences with the Leopard 2A4, the 2A4NL is still on my wishlist!
With kind regards,
Jasper Breur
BlackWidow
Joined: August 09, 2009
KitMaker: 1,732 posts
Armorama: 326 posts
Posted: Thursday, May 24, 2018 - 01:15 AM UTC
Jasper, in my first year of service I was a tanker on a Leopard 2A4 but changed 1986 to the transportation group of the unit, because I was able to get a truck driving licence there. 3 years I drove a MAN 5 to gl. We had good contacts with the 43. Tankbataljon from Langemannshof Barracks near Bergen (I was based in Lüneburg). Somewhere I still have a dutch barret. In 1988 I was even on manoeuvres with that dutch unit in Bergen-Hohne and supplied their tanks with fuel and 120 mm ammo. Still have good memories of that time and remember, that they had some pretty girls in their unit .... 
Torsten
Torsten

b2nhvi

Joined: June 17, 2016
KitMaker: 1,124 posts
Armorama: 1,014 posts
Posted: Thursday, May 24, 2018 - 09:36 AM UTC
Just finished my Dutch Leo. Added the main gun simulator (suppose to be at Bergen-Hohne range so seemed logical.) and wiring and brick-a- brack in the storage basket. Weathering might be a little over kill. 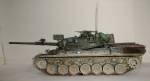


baldwin8

Joined: January 23, 2009
KitMaker: 89 posts
Armorama: 74 posts
Posted: Thursday, May 24, 2018 - 05:42 PM UTC
Nice Leo Jasper. Tidy base and I like the cam netting.
ManicMailman

Joined: March 18, 2018
KitMaker: 6 posts
Armorama: 6 posts
Posted: Thursday, May 24, 2018 - 06:07 PM UTC
What method did you use for the camo netting?
It looks great, along with the rest of the model.
It looks great, along with the rest of the model.
Jasperb12
Joined: July 23, 2016
KitMaker: 105 posts
Armorama: 71 posts
Posted: Thursday, May 24, 2018 - 06:30 PM UTC
Thank you Timothy!
Good looking Leopard, but the weathering indeed might be a little over the top. I also have to dissapoint you on the Hoffman Device: The Dutch Army never used that. They used this gunfire simulator as seen in the picture below.
https://nimh-beeldbank.defensie.nl/beeldbank/indeling/detail/start/3?q_searchfield=Leopard+1
Jasperb12
Joined: July 23, 2016
KitMaker: 105 posts
Armorama: 71 posts
Posted: Thursday, May 24, 2018 - 06:38 PM UTC
Craig, Paul thank you very much!
I used gauze net that I dipped in a solution of water and PVA glue.
Regards,
Jasper Breur
Quoted Text
What method did you use for the camo netting?
It looks great, along with the rest of the model.
I used gauze net that I dipped in a solution of water and PVA glue.
Regards,
Jasper Breur
BroadSky

Joined: September 22, 2016
KitMaker: 37 posts
Armorama: 34 posts
Posted: Thursday, May 24, 2018 - 11:33 PM UTC
Hello Jasper,
I can't really see it but did you use the (rubber) kit tracks? If so, these are the best rubber tracks I've ever seen! Great job! The same applies to the rest of the model!
Greetings,
Mark
I can't really see it but did you use the (rubber) kit tracks? If so, these are the best rubber tracks I've ever seen! Great job! The same applies to the rest of the model!
Greetings,
Mark
Jasperb12
Joined: July 23, 2016
KitMaker: 105 posts
Armorama: 71 posts
Posted: Thursday, May 24, 2018 - 11:43 PM UTC
Quoted Text
I can't really see it but did you use the (rubber) kit tracks? If so, these are the best rubber tracks I've ever seen! Great job! The same applies to the rest of the model!
Thank you Mark!
These are indeed the rubber tracks provided with the kit. These tracks arent that good though. They are too long and have ejection marks all over them. Detail isnt that great either. But as always, some weathering works wonders!
With kind regards,
Jasper Breur

Sunbeamrapier

Joined: April 17, 2015
KitMaker: 59 posts
Armorama: 19 posts
Posted: Friday, May 25, 2018 - 12:24 AM UTC
A nice-looking model. I like the idea of the tank hiding behind a tree!☺️
b2nhvi
Joined: June 17, 2016
KitMaker: 1,124 posts
Armorama: 1,014 posts
Posted: Friday, May 25, 2018 - 12:43 AM UTC
RE: Dutch main gun simulator .... Is that the gizmo to the right of the gun? I thought that opening was for part of the sighting system.
b2nhvi
Joined: June 17, 2016
KitMaker: 1,124 posts
Armorama: 1,014 posts
Posted: Friday, May 25, 2018 - 12:48 AM UTC
The hiding behind the tree thing is real effective. 
Removed by original poster on 01/28/21 - 16:15:12 (GMT).
b2nhvi
Joined: June 17, 2016
KitMaker: 1,124 posts
Armorama: 1,014 posts
Posted: Sunday, May 27, 2018 - 03:31 AM UTC
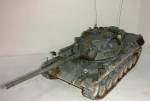
Nice work Jasper.I like the texturing on the hull plates. From the extra armor I presume yours is a 1V. Looks like the mount is welded to the add on mantle armor. Would that have worked on the original rounded mantel? Oh .. what is the red cylinder behind the headlight? Part or an automated fire suppression system?
Jasperb12
Joined: July 23, 2016
KitMaker: 105 posts
Armorama: 71 posts
Posted: Sunday, May 27, 2018 - 10:54 AM UTC
Quoted Text
Nice work Jasper.I like the texturing on the hull plates. From the extra armor I presume yours is a 1V. Looks like the mount is welded to the add on mantle armor. Would that have worked on the original rounded mantel? Oh .. what is the red cylinder behind the headlight? Part or an automated fire suppression system?
Thank you Timothy!
That is indeed a Leopard 1V. The system is bolted onto the mantlet, so both the Leopard 1 and the Leopard 1V use the same way of mounting the system. This can be seen in this picture from leopardclub.ca.

And here you can see the system mounted:

The red cylinder is indeed one of the two fire extinguishers found behind the head lights on Dutch Leopards. These shouldnt be red however! That was a mistake on my part.
With kind regards,
Jasper Breur
b2nhvi
Joined: June 17, 2016
KitMaker: 1,124 posts
Armorama: 1,014 posts
Posted: Sunday, May 27, 2018 - 11:33 AM UTC
Ah! I see now. Answered another question I had about it blocking the gun sight. Other photo I saw was from above and looked like it was over the port. Guess I'm going to have to refurb mine. What color did you use for the base color? I used Model Master RAL 6014 (2175)
)
)
Jasperb12
Joined: July 23, 2016
KitMaker: 105 posts
Armorama: 71 posts
Posted: Sunday, May 27, 2018 - 12:18 PM UTC
Glad I can be of help Timothy! I used Revell 42 gelboliv. Almost spot on to the original. Its your call if you want to cut up your Leopard. I made my gunfire simulator out of the German one. I cut out 4 tubes and glued them to a base I made out of plastic card. The round thing under the tubes is bended photo-etch

mshackleton

Joined: December 16, 2007
KitMaker: 559 posts
Armorama: 517 posts

Posted: Sunday, May 27, 2018 - 12:28 PM UTC
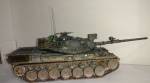
The red thing is one of two hand-held fire extinguishers carried behind the headlights. On 1NL they were exposed like this, but painted green. On 1V, they were usually in green bags. I don't know why Jasper has painted the mantlet plug chain red. It is nothing to do with the extinguisher.
Look here and scroll down to Netherlands: http://leopardclub.ca/Spotlight/
Jasper - the searchlight should be parallel (same direction) as the gun, not pointing upwards. The glacis plate should be completely smooth - no texture.
Look here and scroll down to Netherlands: http://leopardclub.ca/Spotlight/
Jasper - the searchlight should be parallel (same direction) as the gun, not pointing upwards. The glacis plate should be completely smooth - no texture.

Jasperb12
Joined: July 23, 2016
KitMaker: 105 posts
Armorama: 71 posts
Posted: Friday, June 01, 2018 - 02:24 AM UTC
Michael,
The searchlight is indeed a mistake on my part, but that's just the way the part comes out of the box. The mantlet plugs are not painted red however. What you see in the picture is part of the fire extinguisher and not the chain, which is underneath it. The texture on the frontplate is indeed wrong, but I think this is a result of the filling I did on the holes for the snow grouser rack.
With kind regards,
Jasper
b2nhvi
Joined: June 17, 2016
KitMaker: 1,124 posts
Armorama: 1,014 posts
Posted: Friday, June 01, 2018 - 02:18 PM UTC
Spotlight was a unique Dutch anti helicopter tactic. Blind the pilot! 
 |

WEB HOSTING BY


Copyright ©2021 Armorama and Kitmaker Network, a subsidiary of Silver Star Enterprises
All Rights Reserved. Please read our Conditions of Use and Privacy Policy.
All Rights Reserved. Please read our Conditions of Use and Privacy Policy.