_GOTOBOTTOM
Armor/AFV: Large Scale
1/16 and Larger Armor Modeling
Hosted by Darren Baker
1/6th scale M40 Recoilless Rifle Project
armourguy
Visit this Community
Pennsylvania, United States
Joined: March 12, 2008
KitMaker: 464 posts
Armorama: 371 posts
Posted: Monday, August 06, 2018 - 04:21 PM UTC
Over the Winter I had an idea for a 1/6th scale post WWII / Nam era vehicle project. The Vehicle was to be an M151A2C Mutt w.the 106mm M40 recoilless rifle.


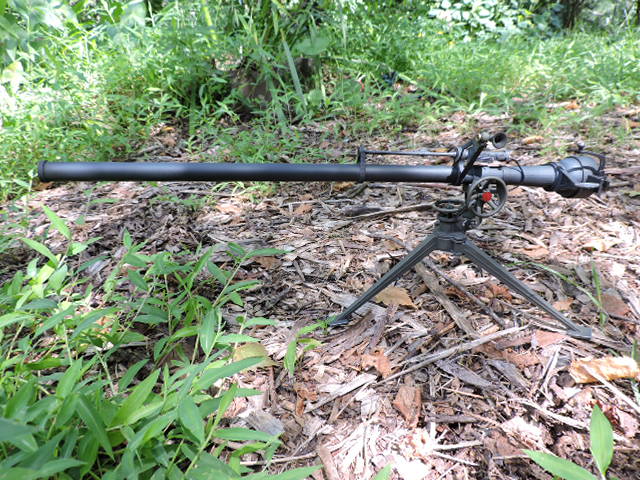
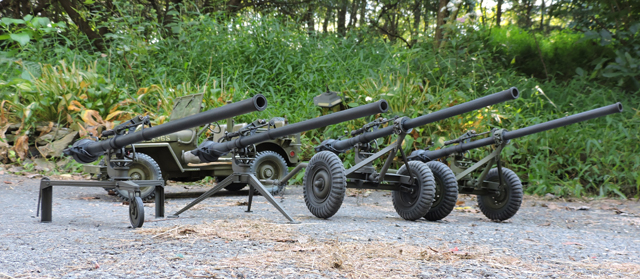
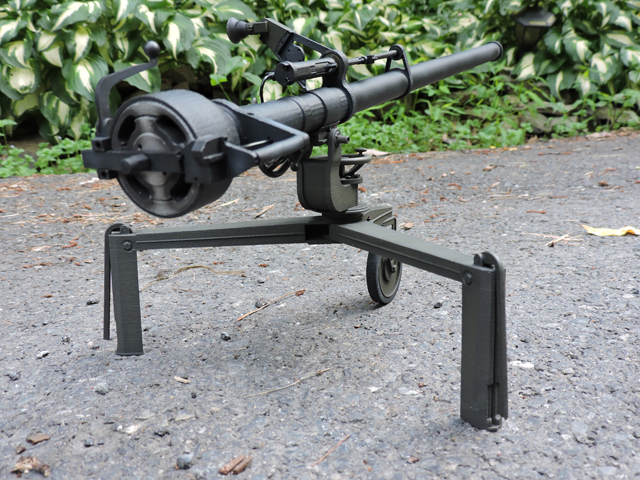
Before I would be able to dig into / commit to this project I decided to develop the most important aspect of the project first... which would be the M40, as if I were to hit something unfeasible / impractical to execute with my tooling the project could be axed before the project proceeded to far and funds would be lost.


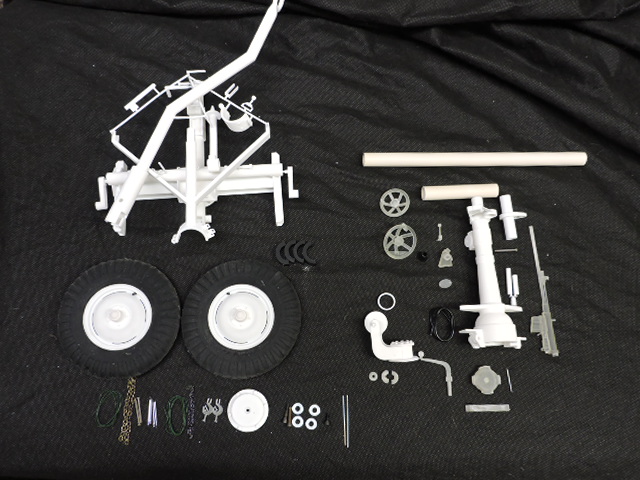
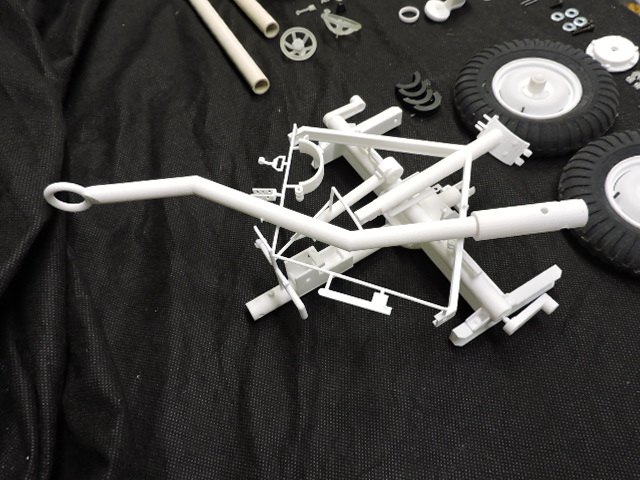
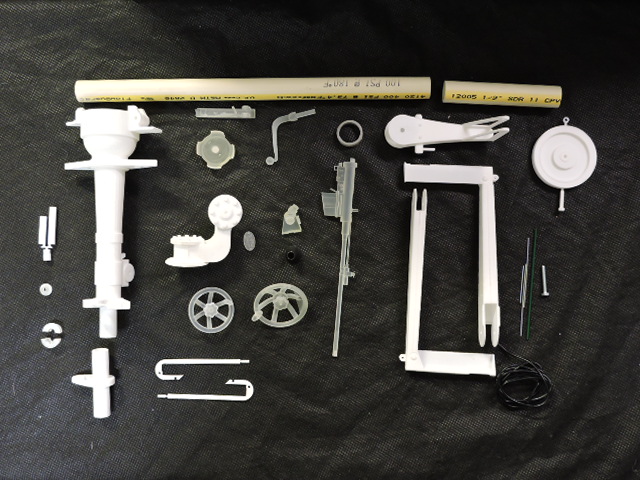
For this project I wanted to venture out of my normal medias (resin, metal... etc) and develop the M40 (and eventually the Mutt parts) utilizing as many 3D printed parts as possible as they have several advantages to them compared to other legacy medias.


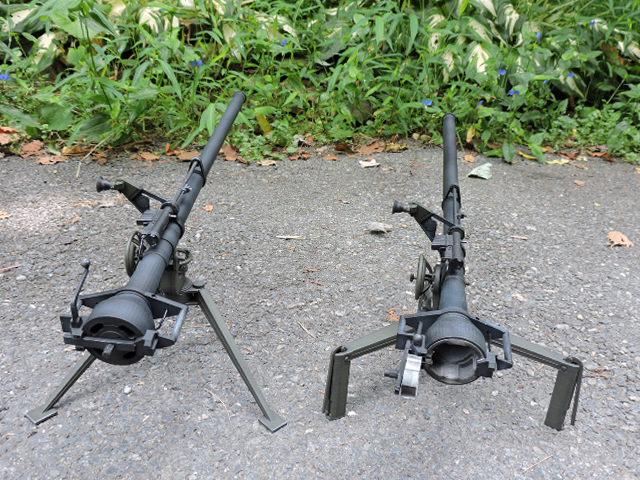
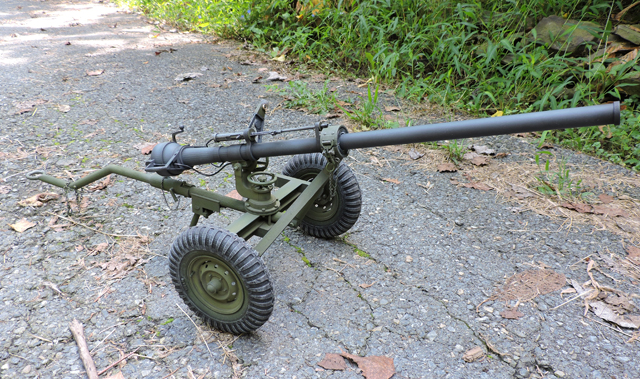
After a few months of late night tinkering with several types of software I was able to complete the gun, and in a way where I can release it as a full kit.


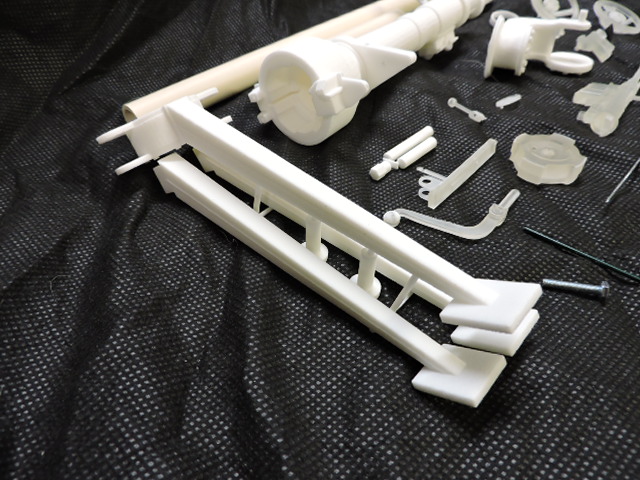
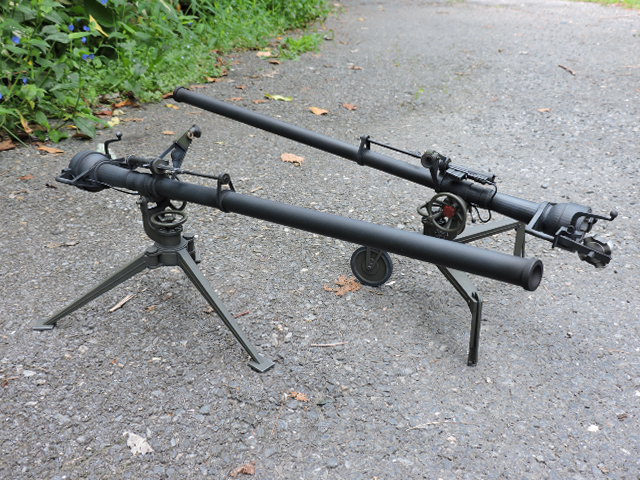
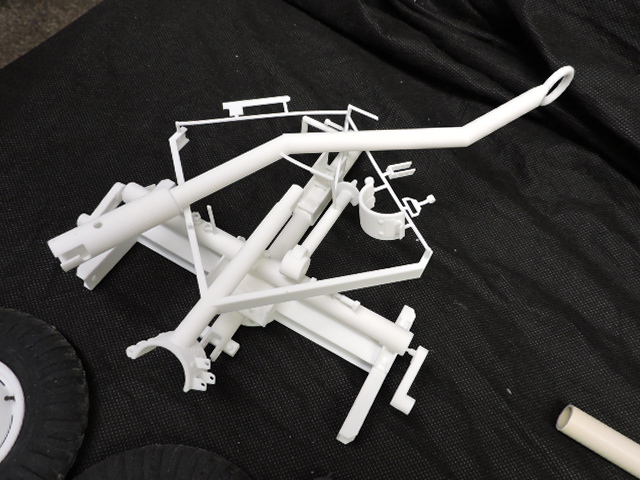
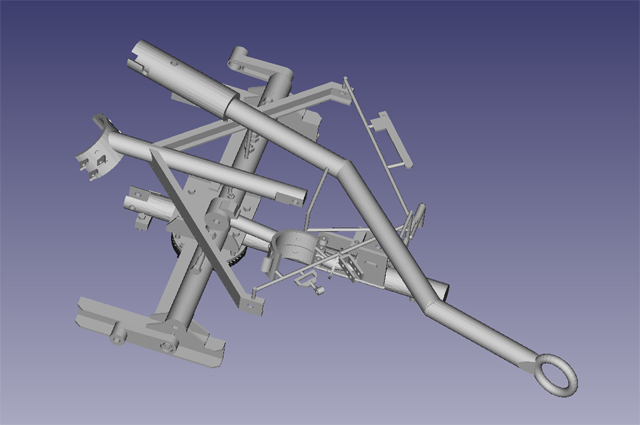
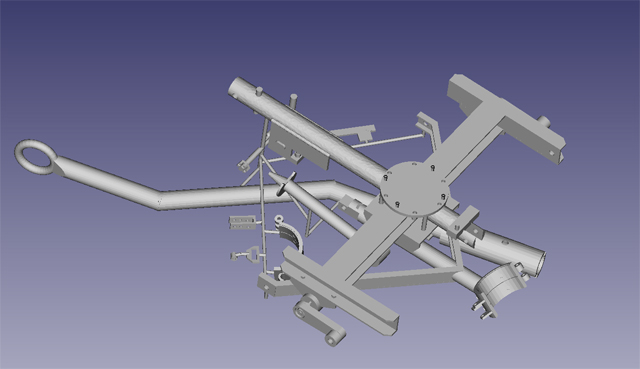
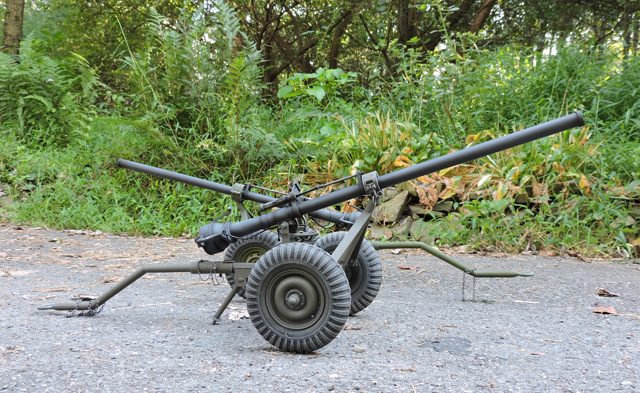
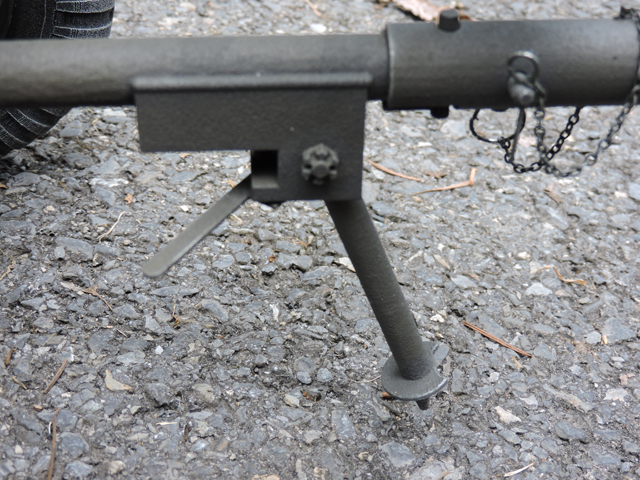
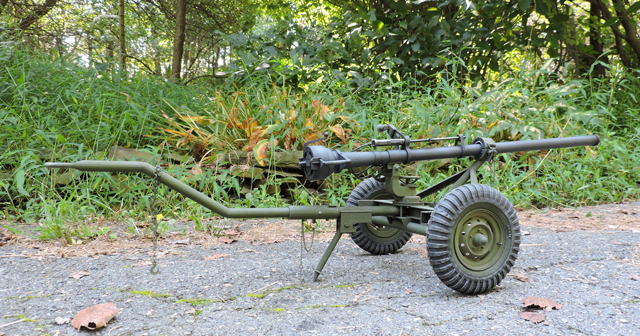
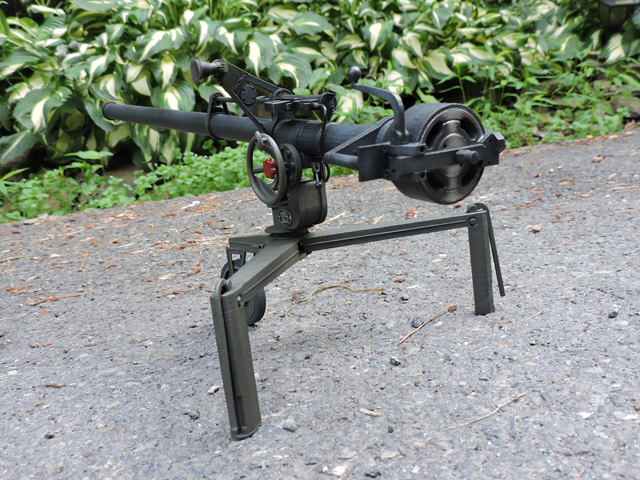
Like I wrote above the main contents of the model are all 3D printed parts. The only part that is not printed (outside of some assorted metal bits) are the barrel sections and a cast rubber eye cup for the optic.


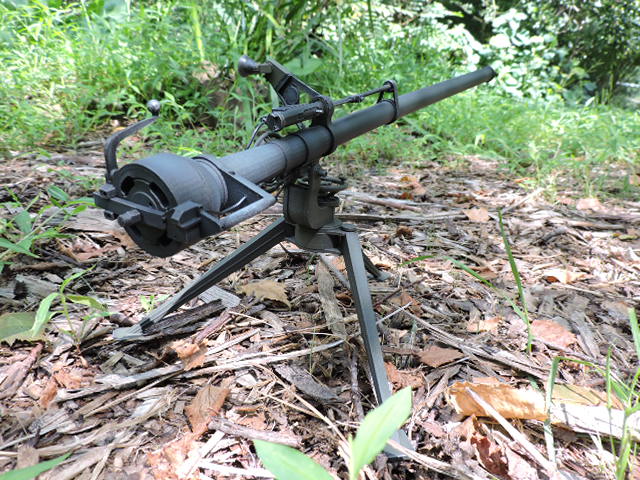
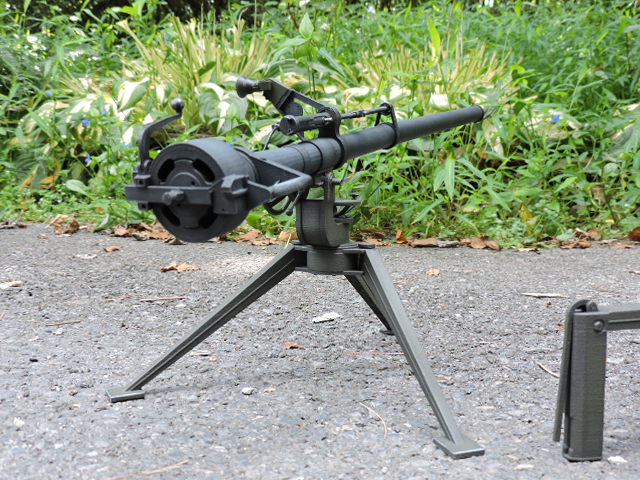
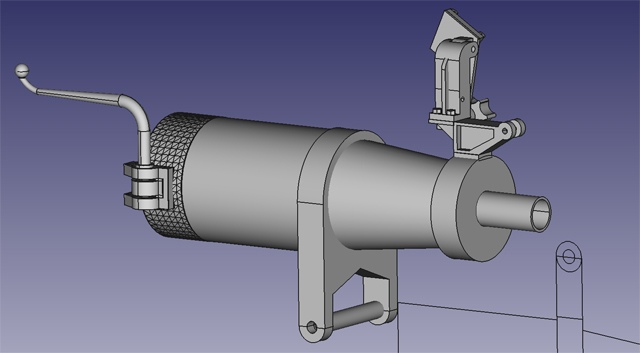
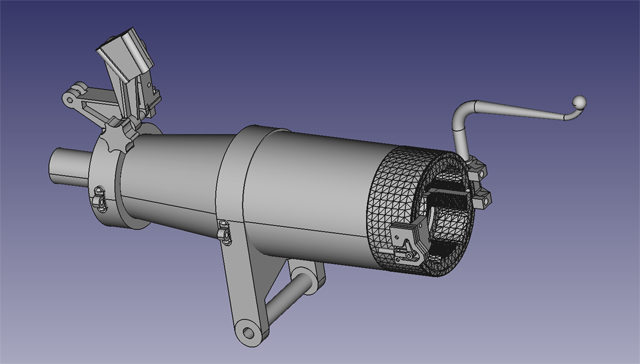
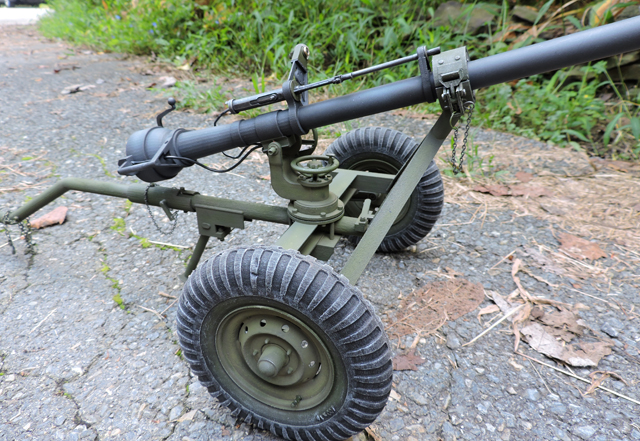
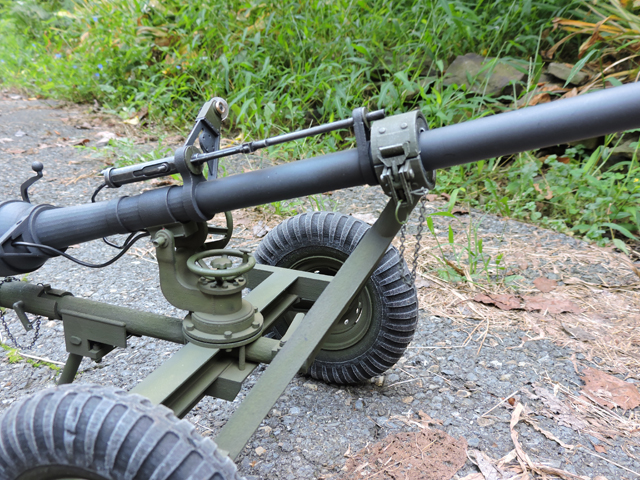
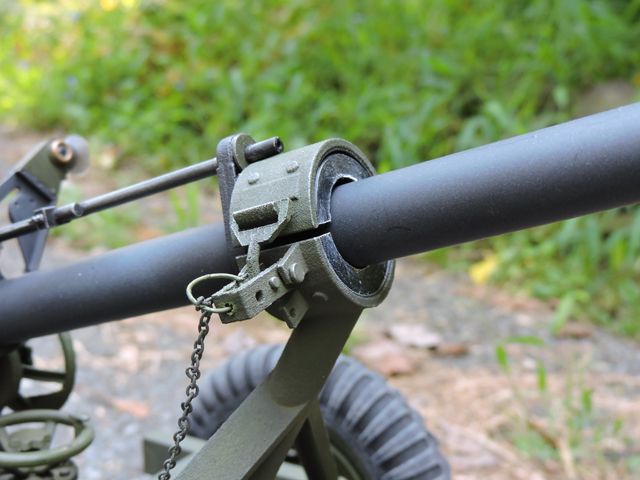
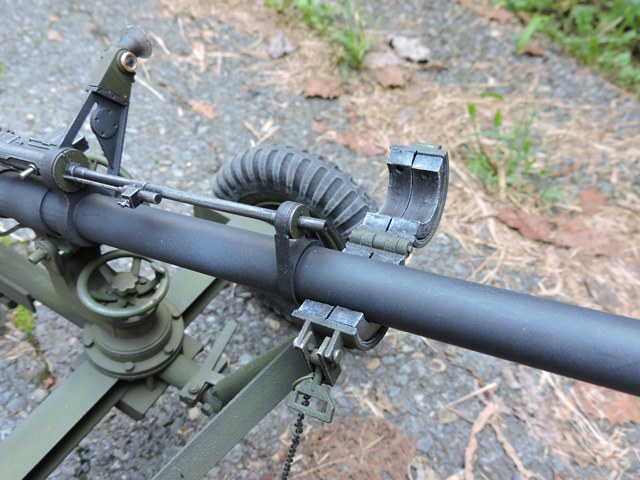
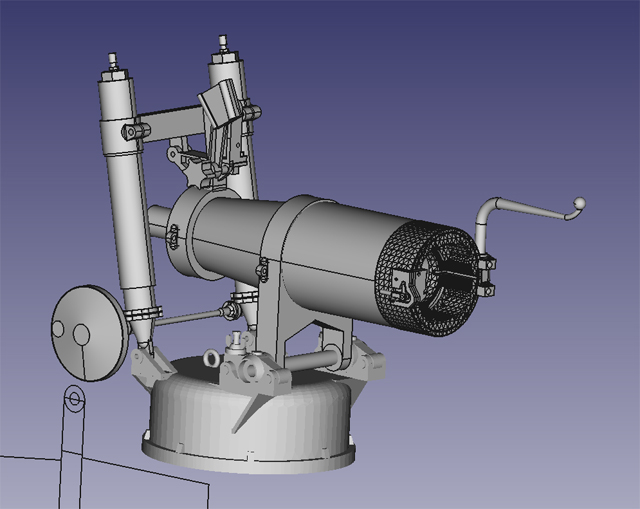
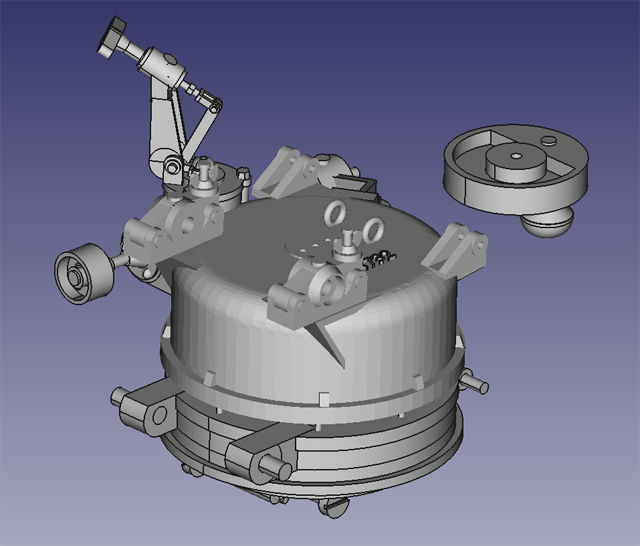
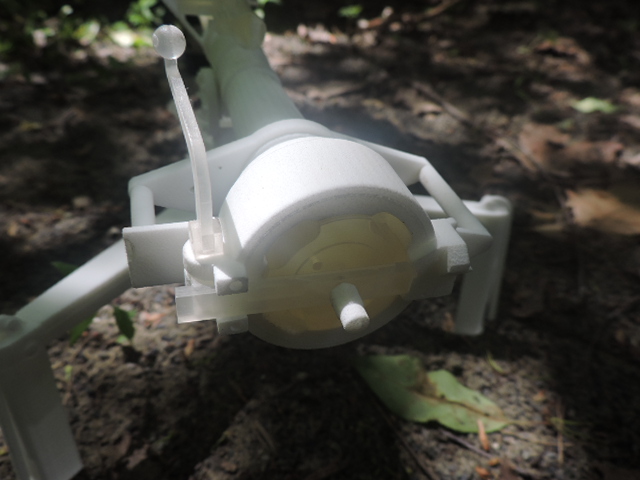
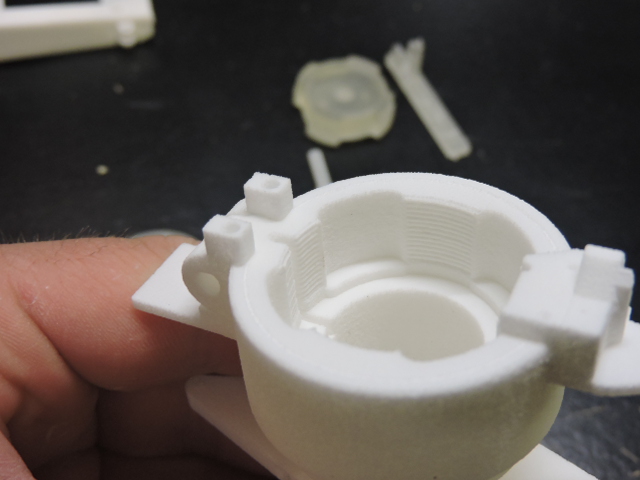
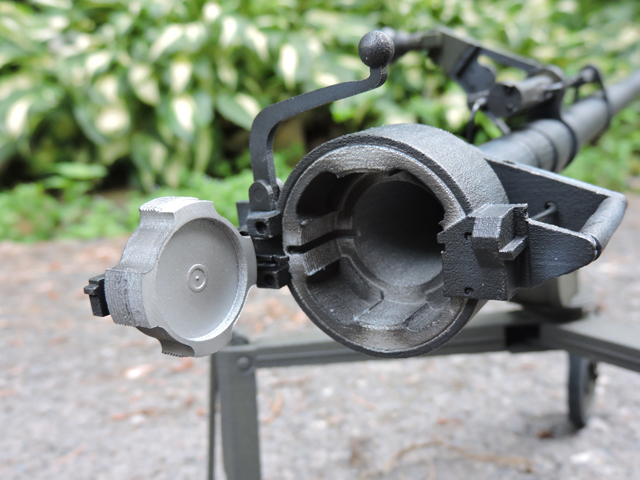
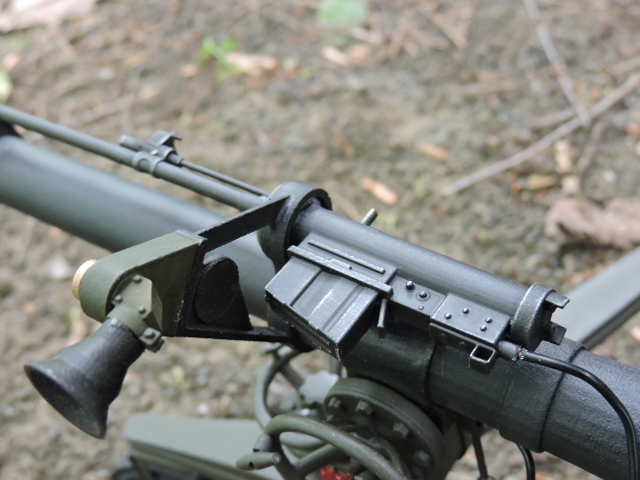
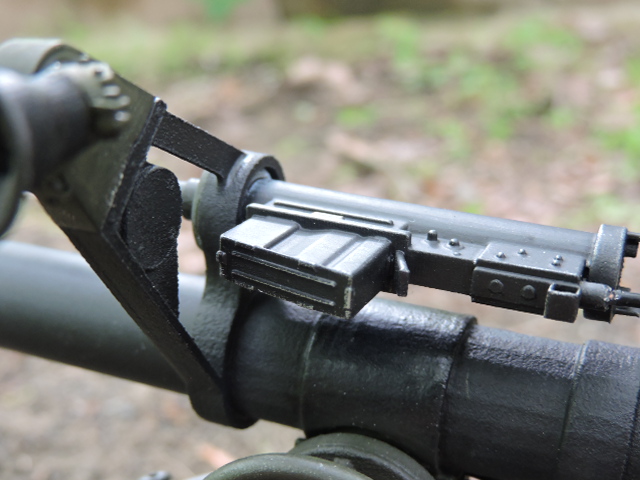
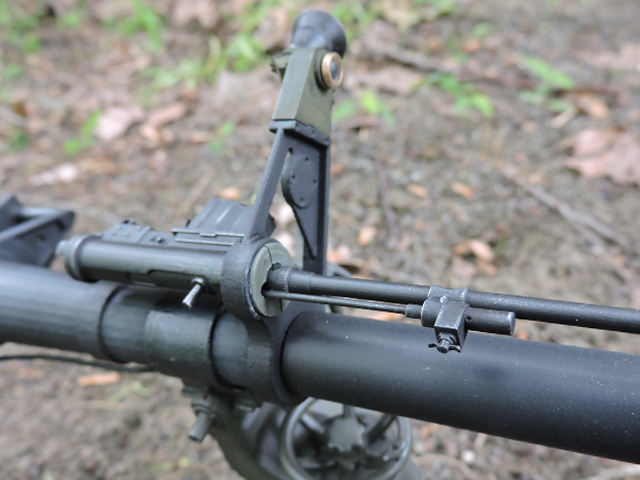
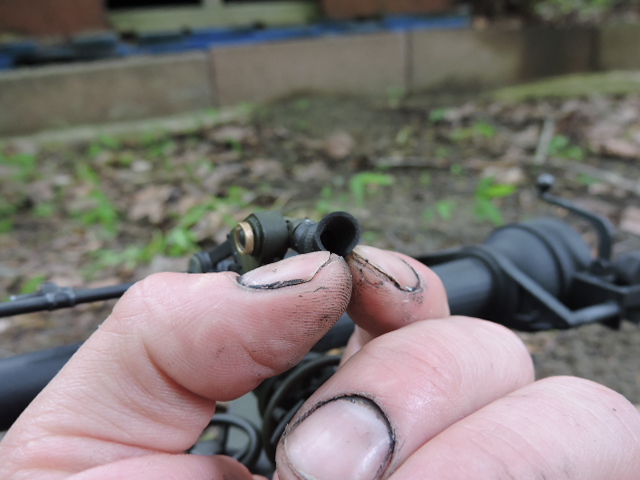
one of the detail features that I wanted to build into the model was the ability to have a breech block that could pivot / lock so that the model can be displayed in either a loaded or unloaded state.


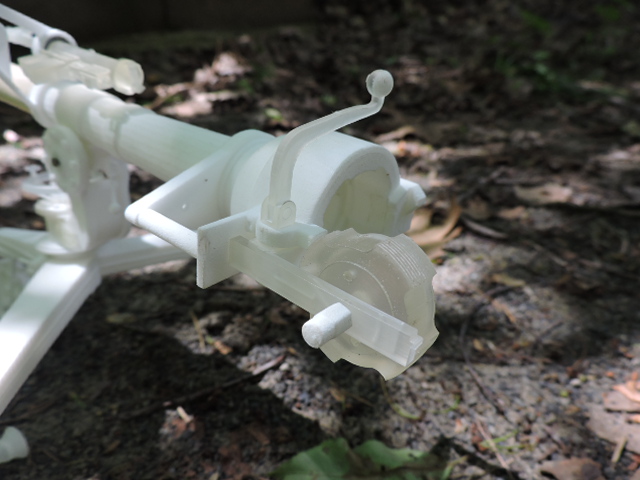
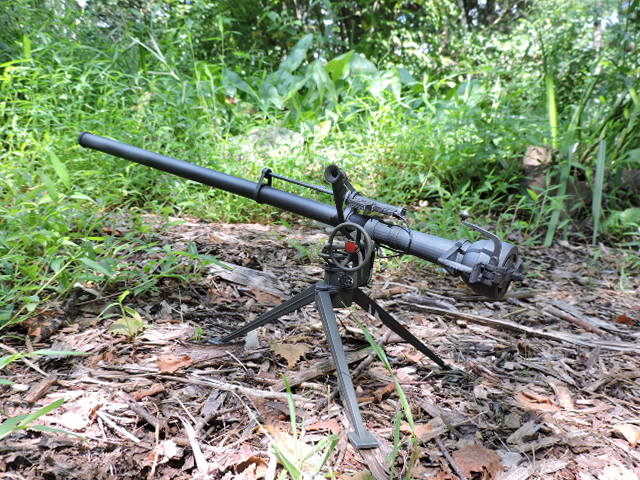
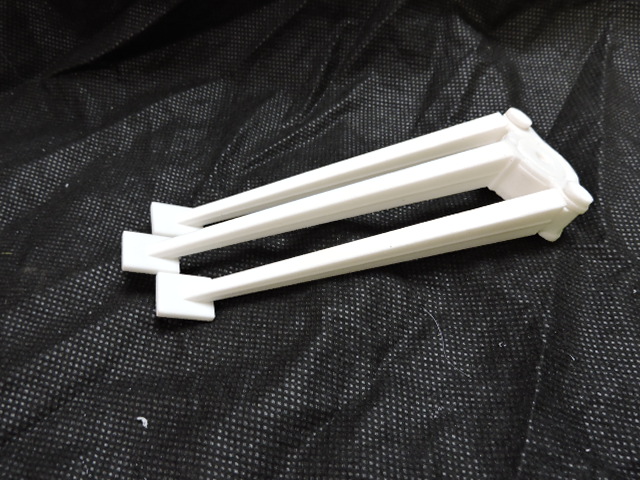
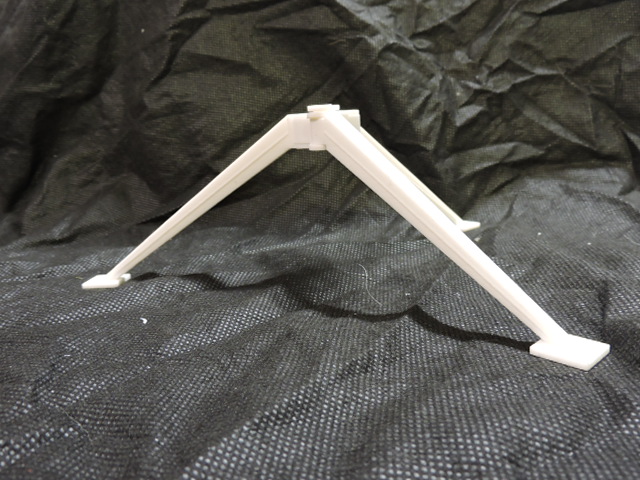
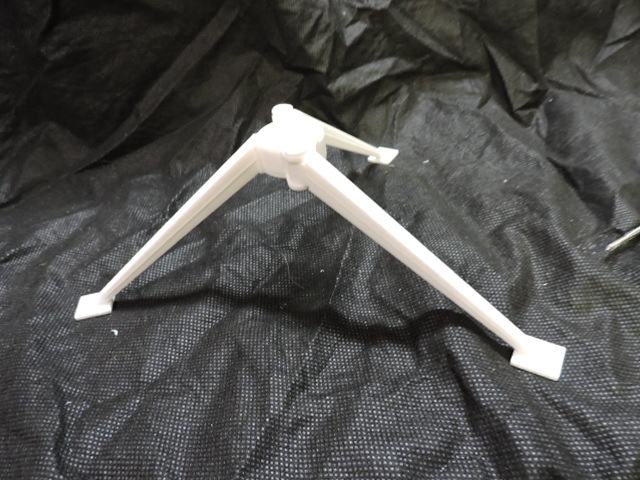
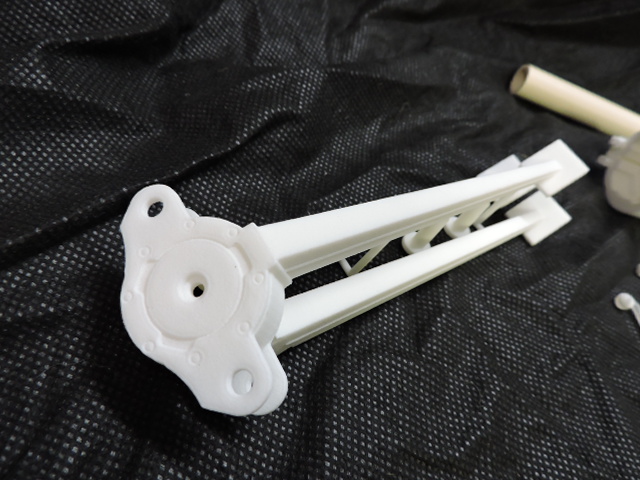
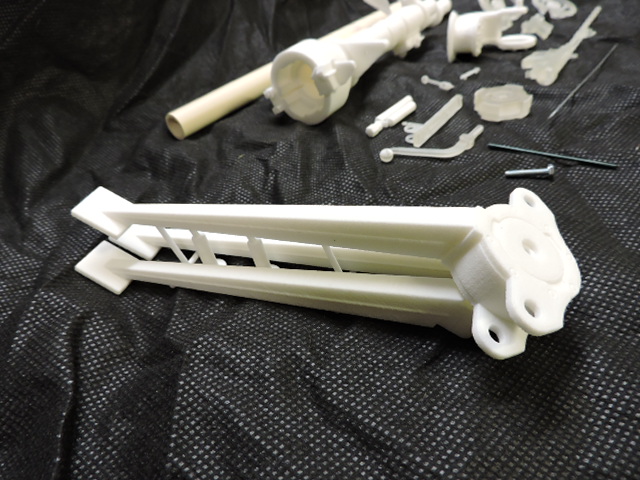
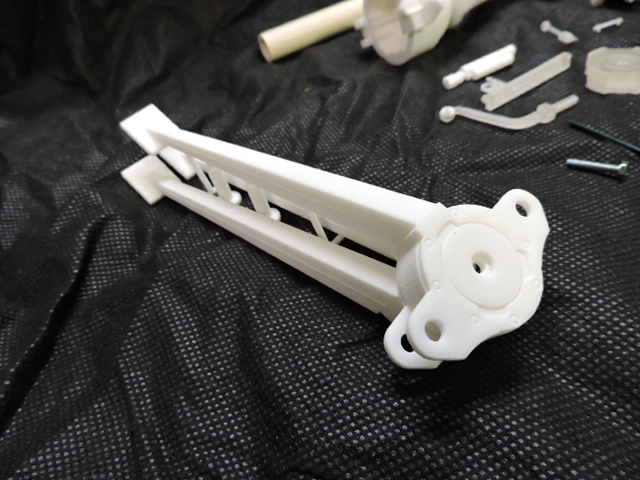
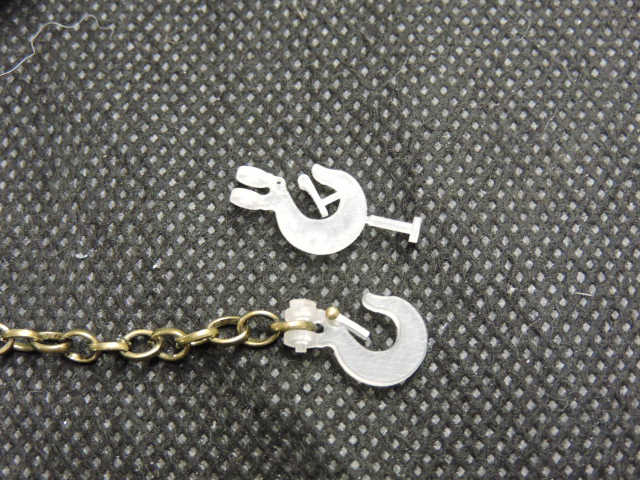
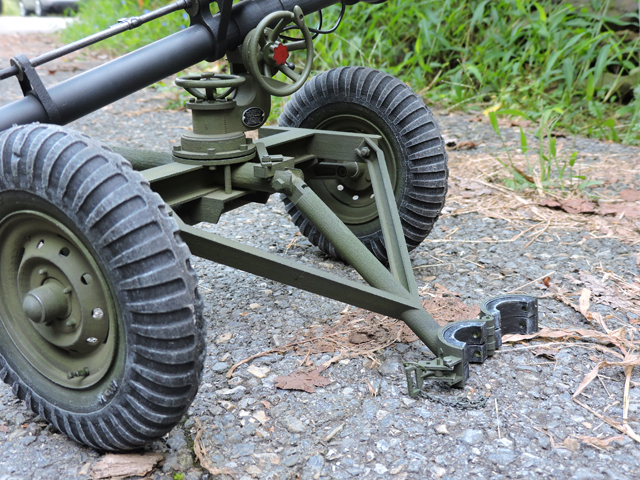
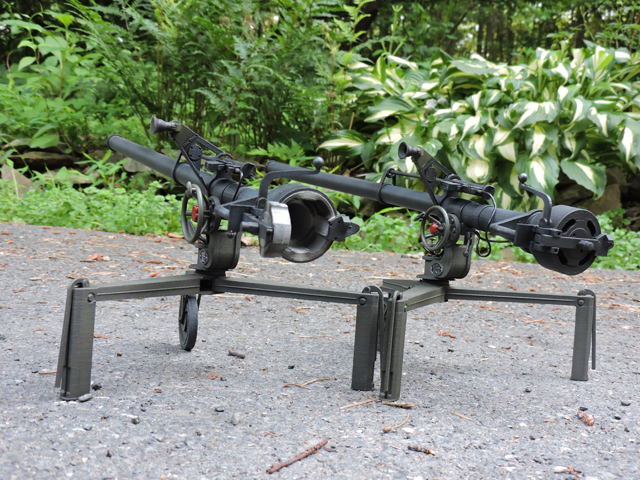
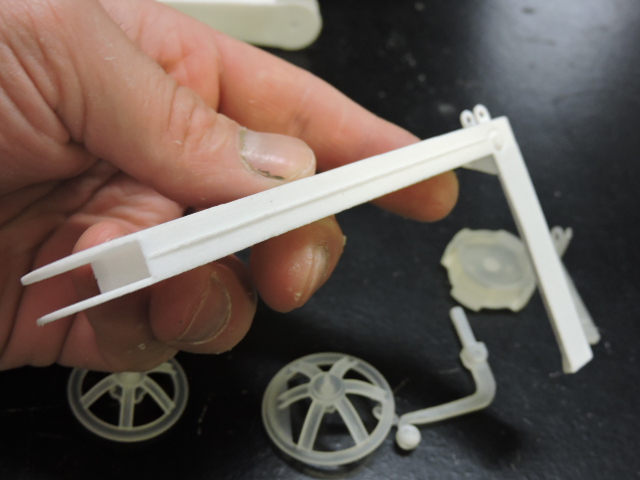
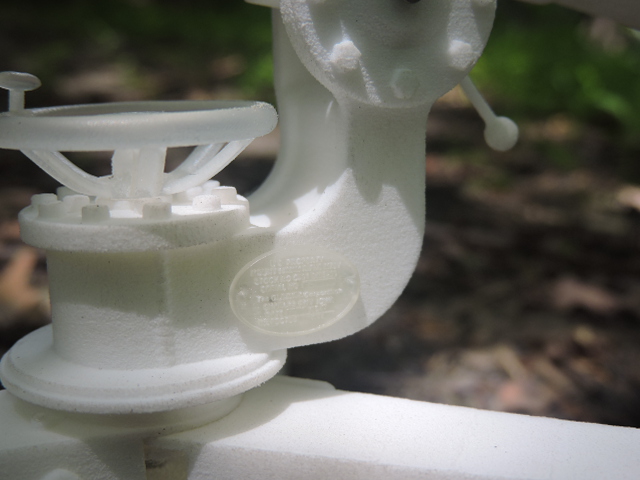
Another plus that I learned about this type of media is that unlike Resin I can have many detail parts that would normally need to be separate parts that get glued / mounted on in sub assemblies... with this media they can all be integrally mounted which cuts down on parts required / build time. This can be seen most notably on the tripod legs and the main rear receiver section


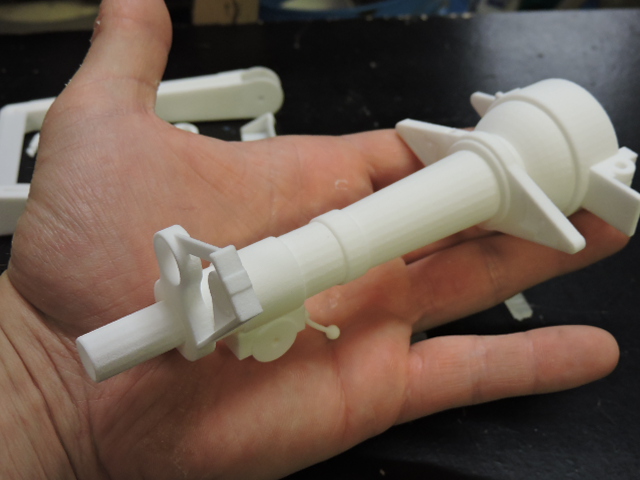
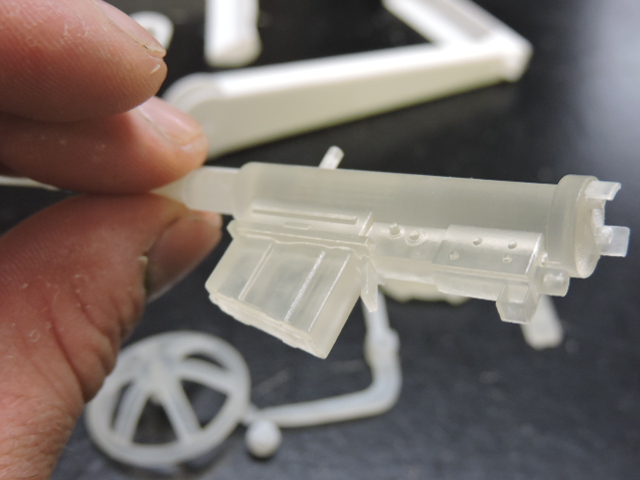
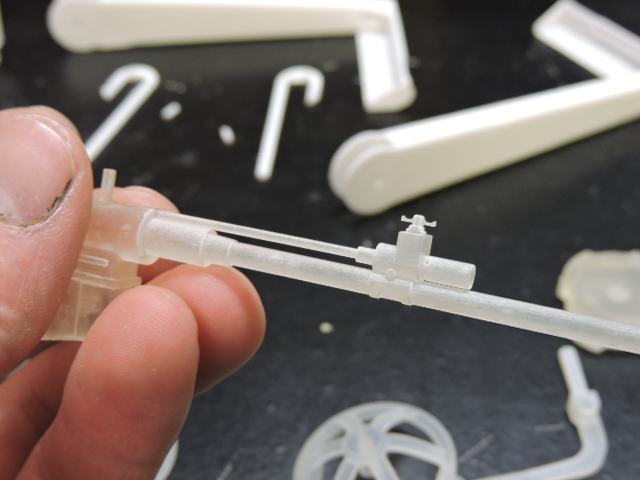
For smaller parts where fine details are more present I opted to use a different printing media, which if I were to fabricate these the old way would be much more difficult to not only fabricate but to mold / cast.


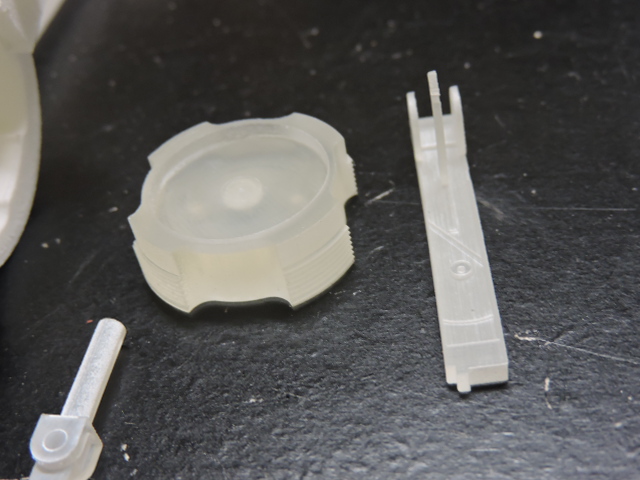
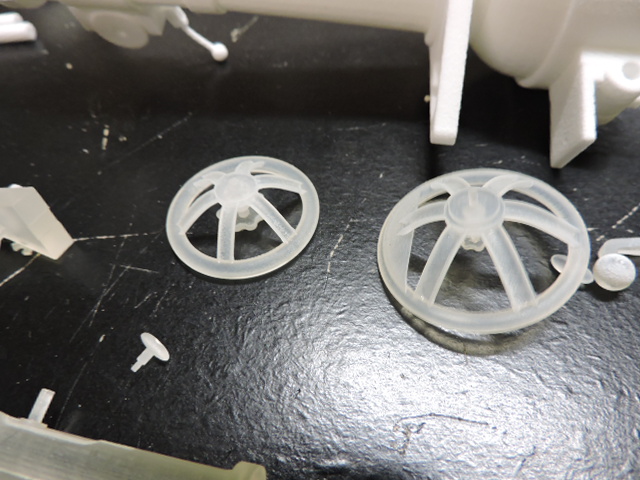
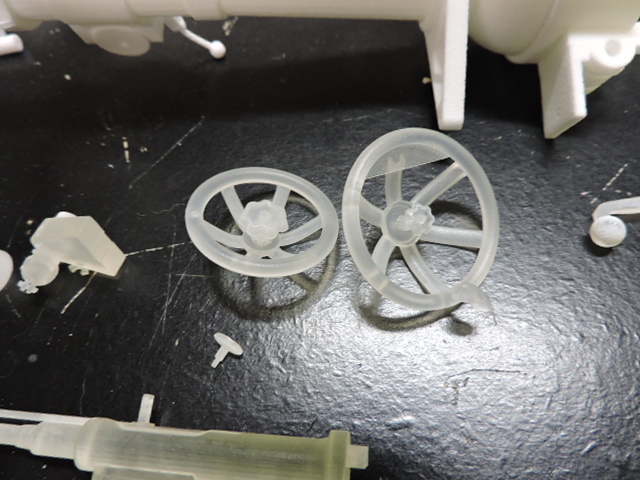
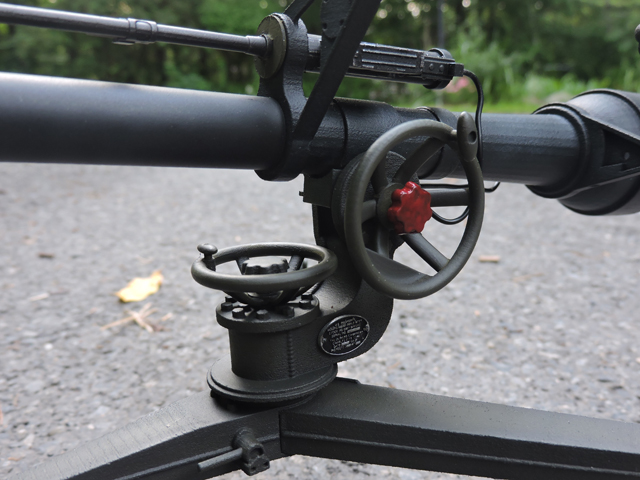
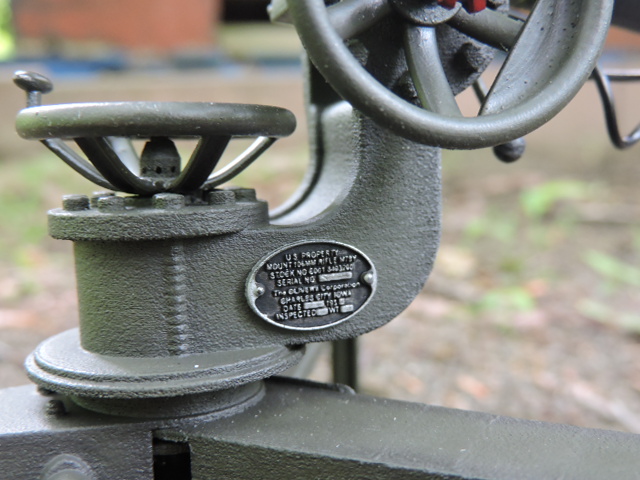
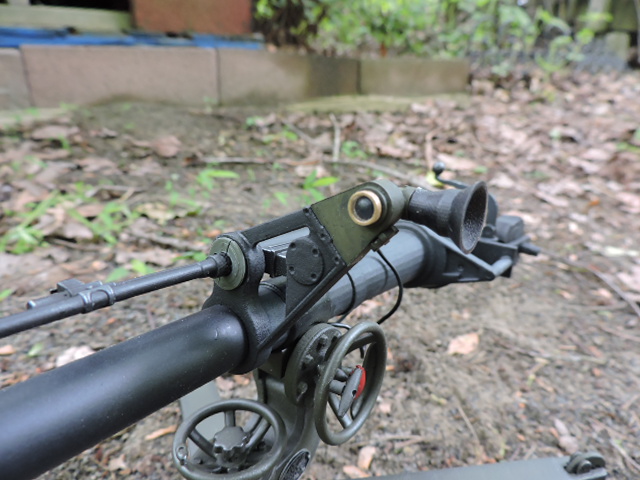
This is most notably seen on parts like the Crank wheels, optic, and breech block parts. However where this material really shines is on the Data plate where with this technology I was able to get all the mfg info to be present.


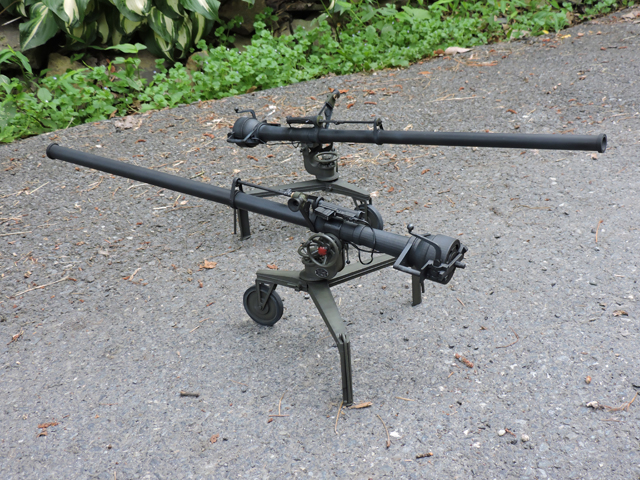
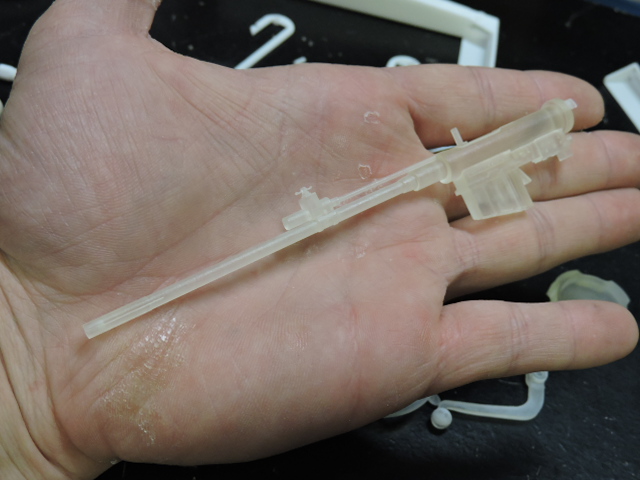
As well as the M8C spotting rifle. Which was a particular enjoyable piece to design


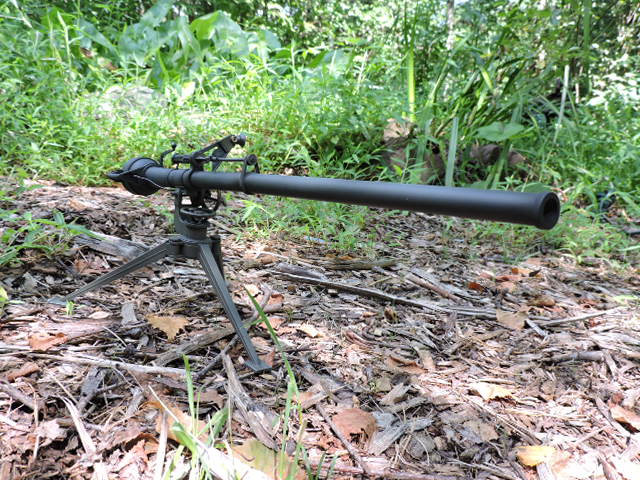
For the optic, I went with the HD material for both detail retention, but also because of it's translucent nature makes a great platform for the lenses as they don't need to be painted. As for the eye cup, like I mentioned above this is a cast rubber part. No paintwork is needed and gets mounted in it's raw material.


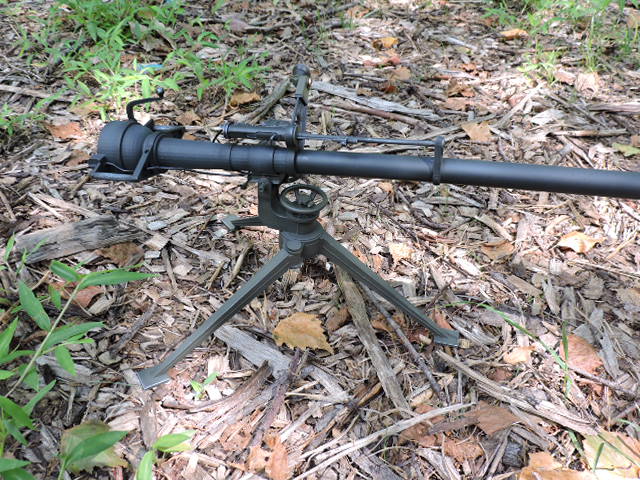
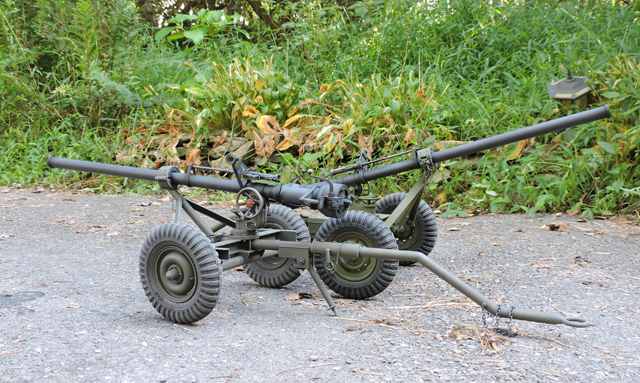
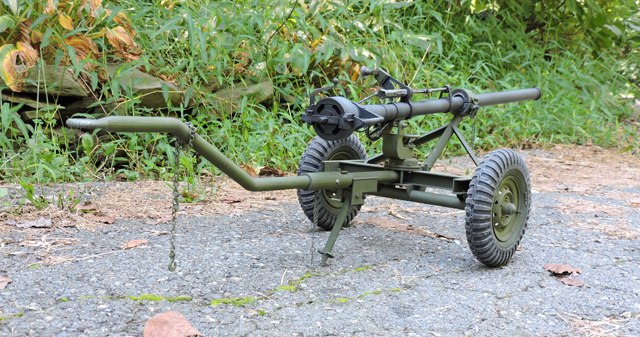
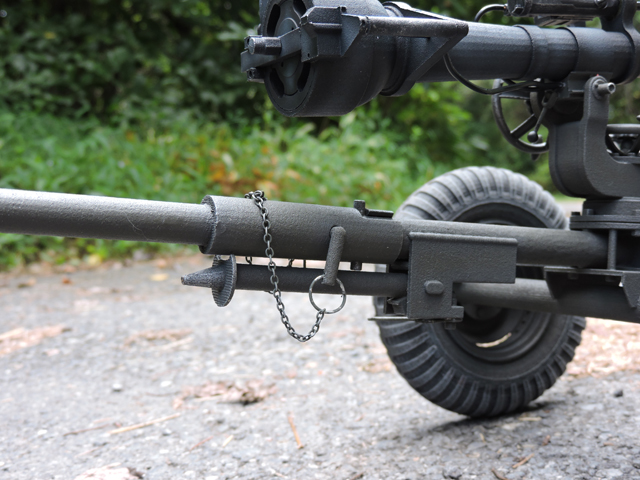
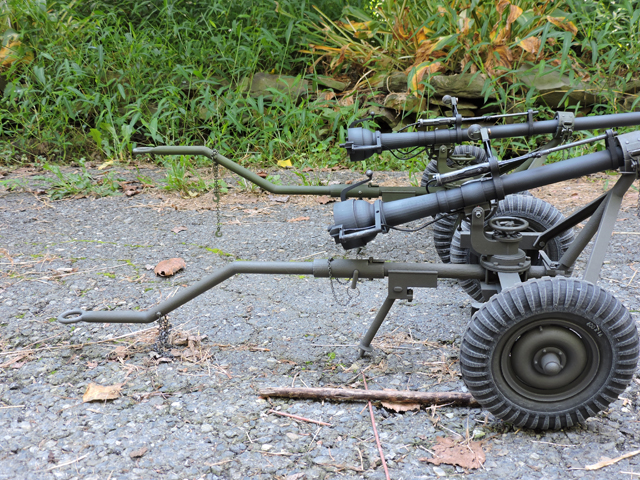
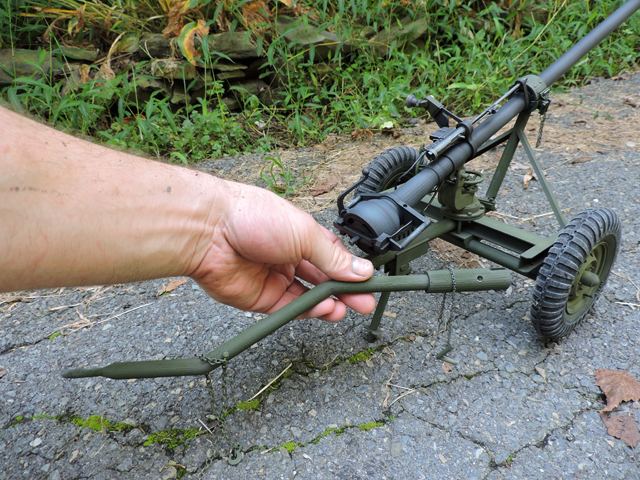
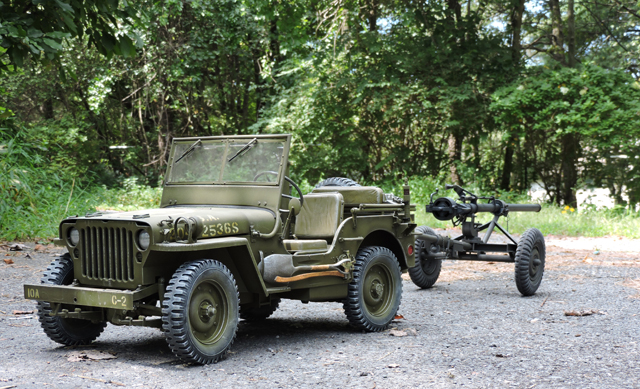
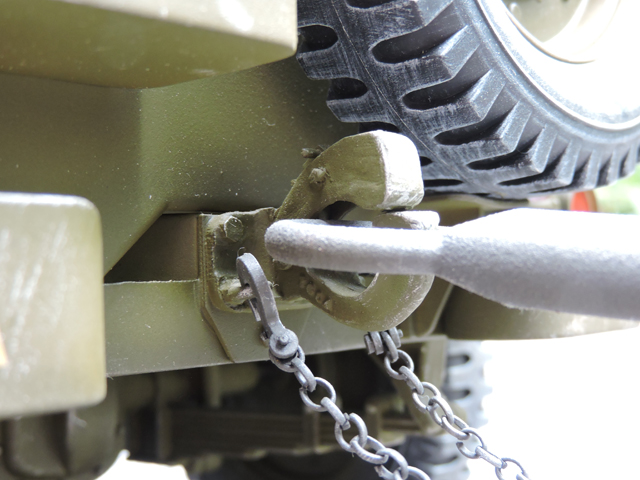
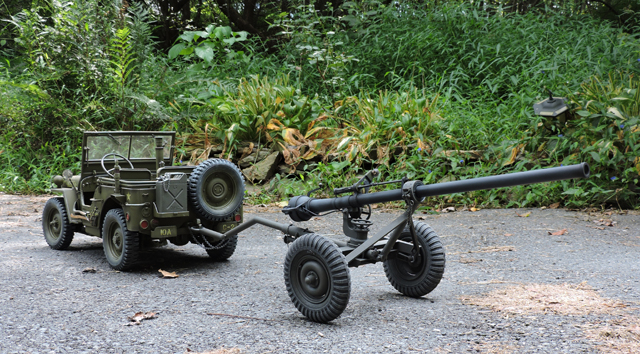
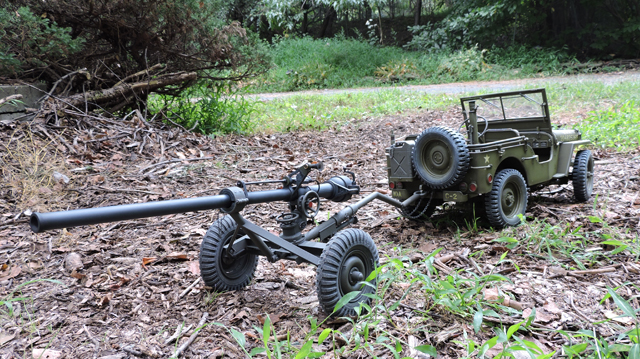
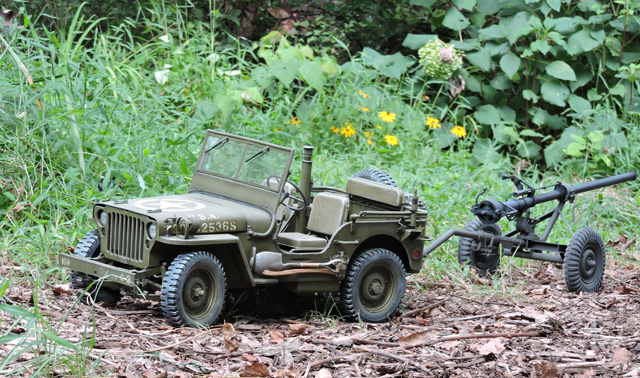
For the model's M79 tripod, I designed the rear legs to be adjustable, and the vehicle clips to be functional as well.


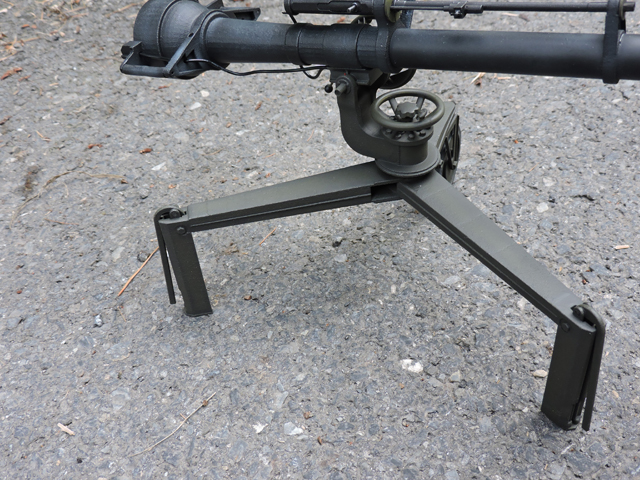
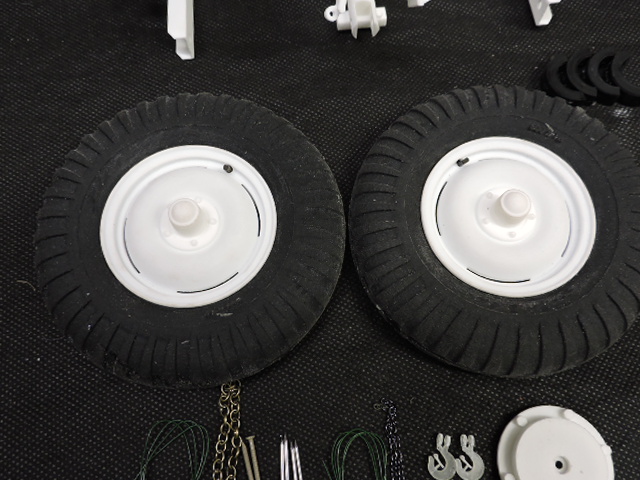
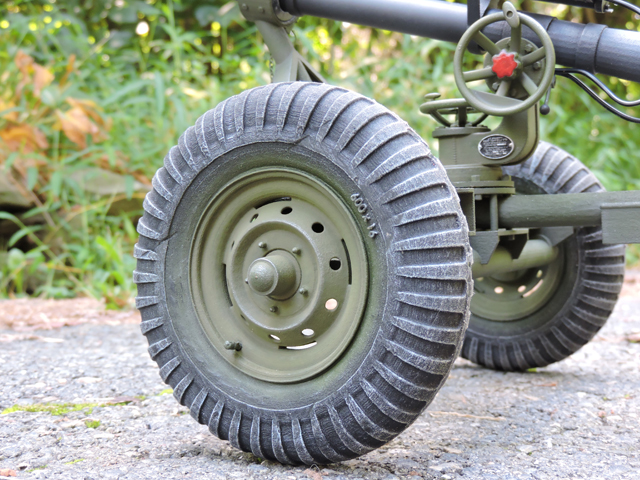
The vehicle clips are also functional. As for the front the front tire spins.


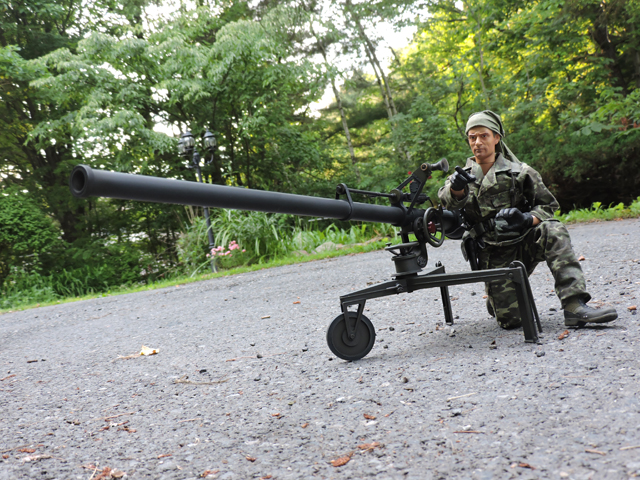
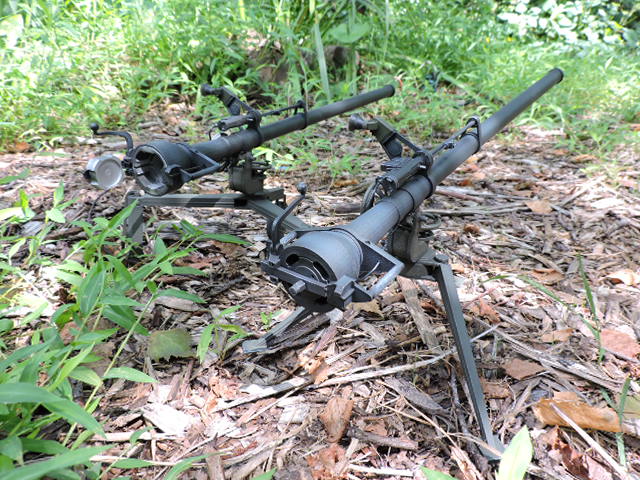
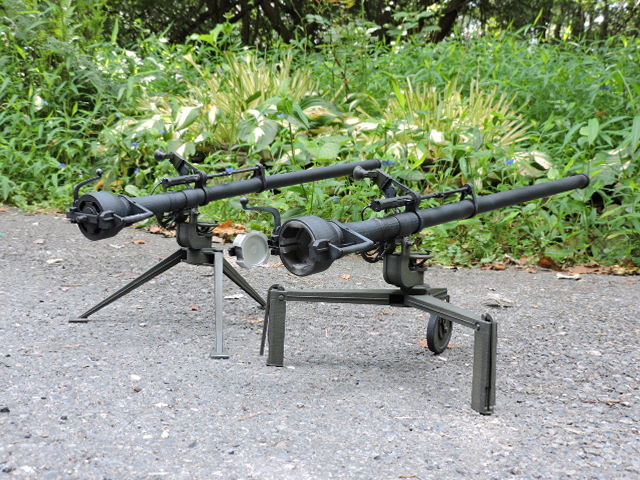
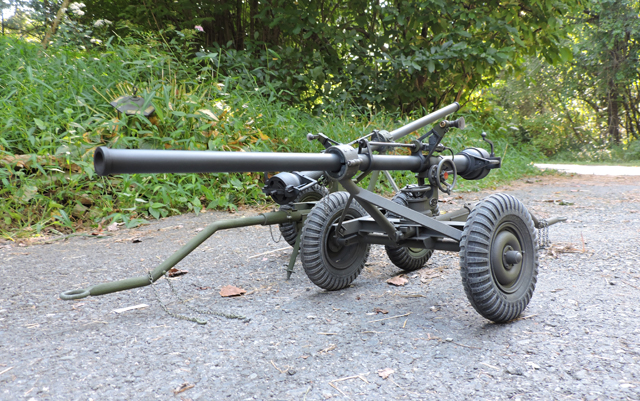
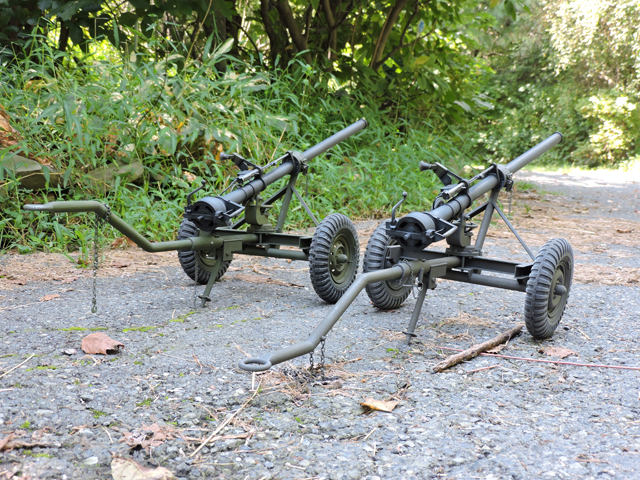
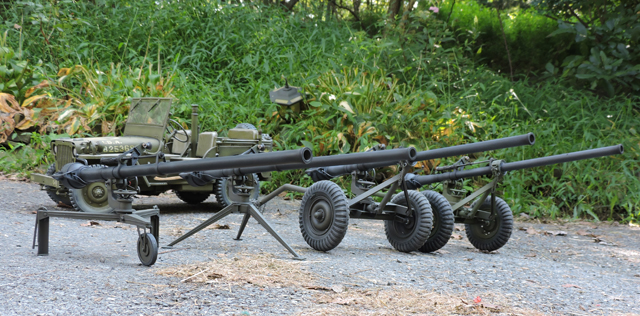
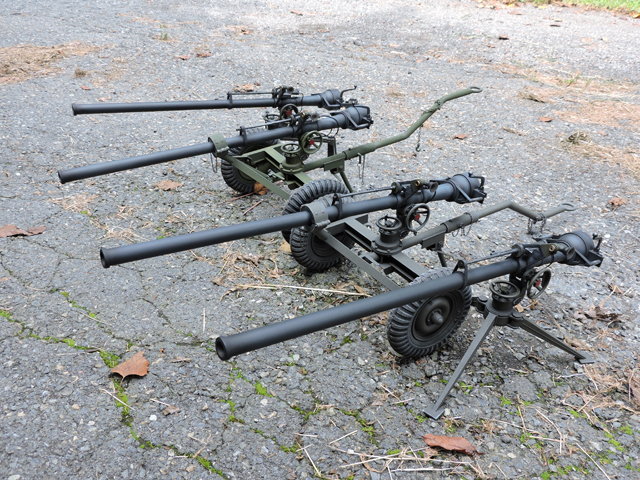
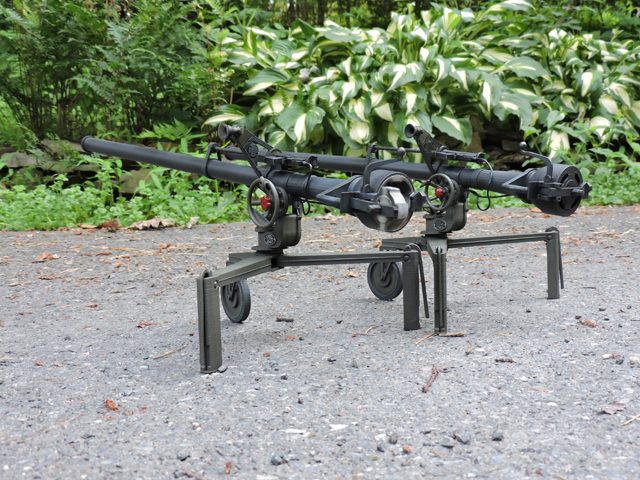
Once all the parts were in hand the first gun model went up very quickly, After my experience with building the first one I saw room for improvement. These tweeks were made and the second gun was built.


The gun is on;y really half of the equation. Once the gun was done I tooled up some ammo. Currently I have the HEAT round and a spent casing. Because of the perforated cases on these weapons the 3D print media is probably the best and only real way to replicate this feature.


For the loaded rounds because the projectile and the case are separate parts this allows me to insert a paper liner in the interior of the shell which is very close to the combustible propellant material that would line these shells in real life.


Even though this project started out as a side "why not" exercise in looking into new fabrication techniques... it kind of grew into a whole range of variable and options... as once I had the basic configuration I then ran with the project creating a few different variations in the process... which I'll be posting shortly, but until then here is a sneak peek .


The kit has been posted on a new section of my website that will focus on heavy weapon sets, http://eastcoastarmory.com/heavy_weapons.htm


Which after my experience with the M40... I defiantly see some 1/6th scale Artillery being developed in my future !


In addition to the above I also made two youtube videos that go into more detail on the kits features.


https://youtu.be/NRJgUz74m0M


https://youtu.be/jDsQhykY7T0
zapper
Visit this Community
Skåne, Sweden
Joined: October 18, 2005
KitMaker: 745 posts
Armorama: 734 posts
Posted: Monday, August 06, 2018 - 10:55 PM UTC
Very cool use of modern technology there! The M40 looks really nice! I noticed that you made an M27 mount as well. Would it be possible for you to scale it down and offer it in 1/35 too? There are good options for the recoilless rifle in 1/35 but none of them offered with the M27 mount that seem to be what the USMC used in Vietnam.

Cheers,
/E
armourguy
Visit this Community
Pennsylvania, United States
Joined: March 12, 2008
KitMaker: 464 posts
Armorama: 371 posts
Posted: Wednesday, August 08, 2018 - 02:09 AM UTC

Quoted Text

Very cool use of modern technology there! The M40 looks really nice! I noticed that you made an M27 mount as well. Would it be possible for you to scale it down and offer it in 1/35 too? There are good options for the recoilless rifle in 1/35 but none of them offered with the M27 mount that seem to be what the USMC used in Vietnam.

Cheers,
/E


Thanks, I wasn't planning on releasing the M27 tripod in 1/35th scale, but I don't see why not. The model / runner are all done and can be scaled down to 1/35. I have one of the AFV club M40's on hand and I can scale it down to fit that model.
bat-213
Visit this Community
Canada
Joined: December 30, 2011
KitMaker: 902 posts
Armorama: 788 posts
Posted: Thursday, August 09, 2018 - 07:37 AM UTC
wow great builds ,and they look so real .well done .
armourguy
Visit this Community
Pennsylvania, United States
Joined: March 12, 2008
KitMaker: 464 posts
Armorama: 371 posts
Posted: Wednesday, August 29, 2018 - 04:34 PM UTC
After wrapping the standard M79 mounted M40, I then turned my attention to the M27 tripod.


The tripod itself was a smaller lighter less complex tripod compared to the M79. One advantage that this tripod has is the ability to fold making it more compact for vehicle storage.

For the model I went ahead and designed this folding feature into the set


For production I went and designed the tripod and all it's parts as a single printing with all parts attached via runners


The simpler tripod also made for a quicker build.


With the two compared side by side you can see how they differ,


After I built the model I posted a video on youtube where I go over the kit in more focus,
https://youtu.be/ihHfqfpz5ik

and more higher res pics were posted on the facebook page,
https://www.facebook.com/125690767591642/photos/?tab=album&album_id=1031594040334639

I have probably one or two more variants of the M40 left in the pipeline, which I'll go over in more detail in a week or two.

Also I'm working on tooling up the earlier M27 105mm recoilless.


Because this weapon system was not in service for long and replaced by the M40, There is not a whole lot of info on this gun. I got some really good resources on the gun and the Jeep mounted carriage, but I was curious if anyone had any info on if this weapon system was ever fitted to a GPW Jeep, or also if anyone has some info or reference material on the M22 trailer. Any help would be helpful.

zapper
Visit this Community
Skåne, Sweden
Joined: October 18, 2005
KitMaker: 745 posts
Armorama: 734 posts
Posted: Thursday, August 30, 2018 - 01:10 AM UTC
I assume you have the LIFE series of photographs of the M27 armed MB?

http://images.google.com/hosted/life/543e3c32cdc13b54.html

Cheers,
/E
sgtreef
Visit this Community
Oklahoma, United States
Joined: March 01, 2002
KitMaker: 6,043 posts
Armorama: 4,347 posts
Posted: Thursday, August 30, 2018 - 11:59 AM UTC
Wonder what have been up to John , nice work as usual.

Cheers


Jeff
armourguy
Visit this Community
Pennsylvania, United States
Joined: March 12, 2008
KitMaker: 464 posts
Armorama: 371 posts
Posted: Thursday, August 30, 2018 - 03:08 PM UTC

Quoted Text

I assume you have the LIFE series of photographs of the M27 armed MB?

http://images.google.com/hosted/life/543e3c32cdc13b54.html

Cheers,
/E


No I missed these, Thanks for the link though... They are exactly what I've been looking for!!! Guess I got some Dragon jeep kits to be ordering


Quoted Text

Wonder what have been up to John , nice work as usual.

Cheers
Jeff


Hi Jeff, I never left. I've been so busy with builds and part orders for the last few years that I just don't have time to post on the forums like I use to. These days all the project update info gets posted on the facebook page http://www.facebook.com/EastCoastArmory

and the youtube channel, https://www.youtube.com/user/oddball759mm
HansBouwmeester
Visit this Community
Namibia
Joined: March 30, 2015
KitMaker: 346 posts
Armorama: 343 posts
Posted: Friday, August 31, 2018 - 01:25 AM UTC
Looking great and brings back memories. In 1982 I "served my time" and actually fired this thing while it was mounted on a jeep.
armourguy
Visit this Community
Pennsylvania, United States
Joined: March 12, 2008
KitMaker: 464 posts
Armorama: 371 posts
Posted: Sunday, September 09, 2018 - 10:22 AM UTC
Thanks Hans, Hopefully your target was something cool like an old tank or something more interesting then a paper target.

As for the model, I completed the next release in my M40 Family... the Towed Norwegian 106mm Rekylfri Kanon M40.


Like the other two models I built above the actual M40 parts are the same, the difference with this set is the replacement of the tripod with that of the wheeled trailer.


One advantage about this material over my older fabrication techniques is that with this medium I can have most of the parts for the kit on runners and integrally printed.


One of the features I wanted to incorporate was with the Tires was to have the center hubs being printed, while the tires were molded and casted in rubber along with the valve stems.


While I was designing the trailer I was using for reference an image of a real unit that had M151 Mutt rims fitted.


For the M151 rims / tires I used the same design with the printed hubs / cast rubber tires


Shortly after the parts were completed and in print I found out that the owner of the reference unit swapped out the original wheels which were M38 pattern for the M151 rims. After discovering this I went and developed the M38 rims, and had a second unit printed


Outside of the wheels the two units are identical detail and function features. As for functions the front travel lock is fully functional along with the chain retained locking pin


In the travel lock itself there are rubber dampeners to protect the barrel. these are also casted in rubber.


After the hinge is opened, the entire travel lock pivots out of the way.


Another functional feature is the ability for the rear standing leg can fold in the retracted state. When deployed it holds up the weight of the trailer, and tucks away when hooked up to a jeep or truck


The next feature that the system has is the ability for the tail section to be reversible. This feature was designed so that the system can be switched so that it can be towed by a Jeep, or a truck.


For a jeep, the arm is in the lower position, and because of the higher level of the hitch on a truck, the arm would be in the higher section


To adjust the arm there is a chain retained pin, that when removed the arm can be unlocked, removed, rotated, and remount


The unit can be mounted to a 1/6th scale jeep. For a place holder I have my dragon jeep that I built several years ago.


When the jeep model was built I swapped out the stock tow hitch with one of my resin ones. With this mod I'm able to hook up this system.


One final feature that I built into the trailer kit was the chain and safety hooks.


With this version out of the way I think that I've done the major variants of the M40 series. The last two that I know of are the the units for the Jeep mounting bracket (which I will eventually need for my M151 project) and the version with the loaded chamber indicator for the Ontos... which may be something I could do down the road, esp after some more full kits under the belt .


More pics were posted on the facebook page, https://www.facebook.com/pg/EastCoastArmory/photos/?tab=album&album_id=1045042105656499&__xts__%5B0%5D=68.ARBj87P1s-ZVLqWgm4ARUtu-P4cwLYljuzzJKNF336CTwFqyVotRQrjx9MgnGP8ix5W9vkjadiUz6DgA4EG60vv1YDtF4latBRTnBSRz_D5IDX8RhngyQnuV1mlB-KjNPXSddCRMgJuWPQbHsBKBSCbLQS-Fcau90TC3RJWQd6Jkr1xzyD8hIQ&__tn__=-UC-R

and a video was posted on youtube which goes int to the features in more detail,
https://youtu.be/fePyJAmv0Rc

With the M40's now done, I've been working on finishing off the M27 105mm... most of the gun's model files are done and I've been working on the M22 trailer and Jeep mount... more to come


tangodown
#494
Visit this Community
New Brunswick, Canada
Joined: August 08, 2018
KitMaker: 213 posts
Armorama: 198 posts
Posted: Sunday, September 09, 2018 - 11:12 AM UTC
Wow this is quite the project. Well done!!
LonCray
Visit this Community
Virginia, United States
Joined: August 24, 2005
KitMaker: 348 posts
Armorama: 256 posts
Posted: Monday, September 10, 2018 - 03:35 AM UTC
They look ready to load and fire. Wow.
 _GOTOTOP