_GOTOBOTTOM
Яusso-Soviэt Forum
Russian or Soviet vehicles/armor modeling forum.
Czech T55 A2MB
retiredyank
Visit this Community
Arkansas, United States
Joined: June 29, 2009
KitMaker: 11,610 posts
Armorama: 7,843 posts
Posted: Tuesday, September 11, 2018 - 02:05 AM UTC
I've decided to build all of my models, up to the last step(tracks). I don't get much time, but have done this one, in two weeks. The fenders are yet to be done and more weathering. I am very please, with oils. No more hours of applying pin washes. A couple of brush strokes and done. I used the paints pictured, plus Vallejo German White and Natural Steel and a sample Reaper sent me. The only issues I encountered were the painting guide and decals. The guide reverses the color, from one view to another. The decals are black, but shown in white. I painted them on. All comments welcome.


sampiero
Visit this Community
Cote-d`Or, France
Joined: January 14, 2008
KitMaker: 257 posts
Armorama: 250 posts
Posted: Tuesday, September 11, 2018 - 07:03 AM UTC
excellent work
sgtreef
Visit this Community
Oklahoma, United States
Joined: March 01, 2002
KitMaker: 6,043 posts
Armorama: 4,347 posts
Posted: Tuesday, September 11, 2018 - 10:09 AM UTC
Looks good Matt,only 2 weeks, even better.
Yep hope to see it with some tracks on it.

Cheers

Jeff
mogdude
Visit this Community
United States
Joined: June 18, 2012
KitMaker: 459 posts
Armorama: 195 posts
Posted: Tuesday, September 11, 2018 - 01:05 PM UTC

Quoted Text

I've decided to build all of my models, up to the last step(tracks). I don't get much time, but have done this one, in two weeks. The fenders are yet to be done and more weathering. I am very please, with oils. No more hours of applying pin washes. A couple of brush strokes and done. I used the paints pictured, plus Vallejo German White and Natural Steel and a sample Reaper sent me. The only issues I encountered were the painting guide and decals. The guide reverses the color, from one view to another. The decals are black, but shown in white. I painted them on. All comments welcome.


Looking great question tho
What exactly is ment by no more hours of pin wash just a few brush strokes and done I am interested in your techneique
ivanhoe6
Visit this Community
Wisconsin, United States
Joined: April 05, 2007
KitMaker: 2,023 posts
Armorama: 1,234 posts
Posted: Tuesday, September 11, 2018 - 01:36 PM UTC
Nice job hand lettering the numbers Matt ! I too am curious about how to avoid pin washes.
retiredyank
Visit this Community
Arkansas, United States
Joined: June 29, 2009
KitMaker: 11,610 posts
Armorama: 7,843 posts
Posted: Tuesday, September 11, 2018 - 09:12 PM UTC
Thank you for all of the kind comments.

On this build, I simply brush them over a satin coat. I'm not sure how it will work, on gloss coats or flat coats. However, this is just my method. I will attempt this on a gloss coat, after I'm finished with this build. I heavily reduce oils, with sansodor(though I imagine turpentine or mineral spirits will work). Capillary action will draw the paint, into the creases and crevices. What little residual paint is left helps tint the surround paint, without drowning the pin wash. Or you can simply remove it with a cotton swab. I will see if I can post a step-by-step, with photos. It took me a few attempts to achieve acceptable results.

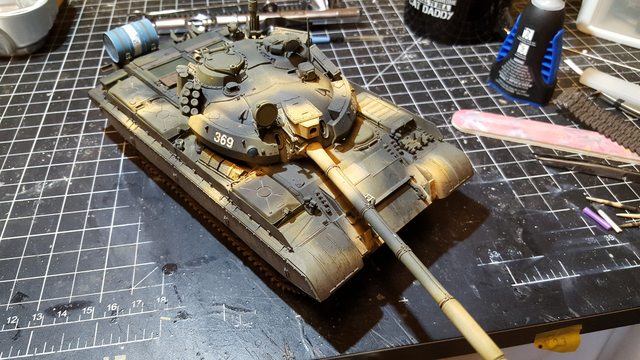
All of the visible pin wash, on this build was done with this method. I did outline a few details, with a ready wash, but not in the photos posted.

Today, heavy weathering and road gear. Pictures to follow.
retiredyank
Visit this Community
Arkansas, United States
Joined: June 29, 2009
KitMaker: 11,610 posts
Armorama: 7,843 posts
Posted: Wednesday, September 12, 2018 - 09:08 AM UTC
I need a real camera. I attempted to fix the color; so the images difference in tone, slightly.


retiredyank
Visit this Community
Arkansas, United States
Joined: June 29, 2009
KitMaker: 11,610 posts
Armorama: 7,843 posts
Posted: Friday, September 14, 2018 - 08:14 AM UTC


I find these acceptable, for two hour's worth of work. The running gear is painted and ready to go on. First, weathering the lower hull. One and one-half track runs to finish. I did not use oils, here. Vallejo effects, Track Primer, and MM Steel. Pigments used are from VMS. Micro-applicators were perfect for this. I still haven't mastered the "flick" technique. I may have a bad bottle. It flicks in large spots, nothing near scale restrictions. Almost forgot the machine gun. This is the first day I haven't had 8 hours of homework complete. So, I have dedicated it to progressing, on this build. Since I am to tracks, expect updates on my Syrian T-55 AMV and jagdpanzer. Now, time for a drink.
retiredyank
Visit this Community
Arkansas, United States
Joined: June 29, 2009
KitMaker: 11,610 posts
Armorama: 7,843 posts
Posted: Thursday, September 20, 2018 - 01:52 AM UTC
Just about to wrap this one up. A few details to paint, tow cables to add and the mg. I actually prefer the look of it, without. May take a liberty, on that. Should I add a little stowage?

RobinNilsson
Staff MemberTOS Moderator
KITMAKER NETWORK
Visit this Community
Stockholm, Sweden
Joined: November 29, 2006
KitMaker: 6,693 posts
Armorama: 5,562 posts
Posted: Thursday, September 20, 2018 - 03:27 AM UTC
Looks really good!
Nice touch with that blue fuel drum.
/ Robin
retiredyank
Visit this Community
Arkansas, United States
Joined: June 29, 2009
KitMaker: 11,610 posts
Armorama: 7,843 posts
Posted: Thursday, September 20, 2018 - 12:43 PM UTC

Quoted Text

Looks really good!
Nice touch with that blue fuel drum.
/ Robin


Thanks. To be honest, the blue fuel drum is one reason I wanted to build this kit.

One problem I encountered. Right in the center of the turret, the paint turned to powder and dusted off, revealing primer. This is my first time using Mig and Mission Models paints. This is the only place it happened. Thankfully, Vallejo Yellow Green was a perfect match to cover the blemish.
 _GOTOTOP