

Hosted by Darren Baker
Merkava 2b

Armorsmith

Joined: April 09, 2015
KitMaker: 1,063 posts
Armorama: 1,000 posts
Posted: Monday, January 21, 2019 - 05:05 AM UTC
Did all Mk2b have anti skid on the horizontal surfaces? Some photos clearly show the anti skid while others appear not to have it so I need definitive clarification from someone more knowledgeable than I. Thanks.
ReluctantRenegade

Joined: March 09, 2016
KitMaker: 2,408 posts
Armorama: 2,300 posts
Posted: Monday, January 21, 2019 - 05:12 AM UTC
The answer is yes. If you see some areas without thats because it wore off.
Armorsmith
Joined: April 09, 2015
KitMaker: 1,063 posts
Armorama: 1,000 posts
Posted: Monday, January 21, 2019 - 05:31 AM UTC
Thanks Israel.
ReluctantRenegade
Joined: March 09, 2016
KitMaker: 2,408 posts
Armorama: 2,300 posts
Posted: Monday, January 21, 2019 - 05:41 AM UTC
Youre welcome, mate.

panzerbob01
Joined: March 06, 2010
KitMaker: 3,128 posts
Armorama: 2,959 posts
Posted: Monday, January 21, 2019 - 06:12 AM UTC
@DanaS:
So it looks like you may be going into the Merkava / non-slip "rabbit-hole"! Taking up the Takom 2b kit, I presume?
The perhaps "sad" reality is that almost ALL merks, other than some old Mk.1 tanks, have been non-slip coated. Even many Mk.1 were retrofit as the Mk.2 came out. So, about the only Merk you can "legit build" sans non-slip is the original Mk.1 in fairly early service. So, for all of us who seek a Merk or 3 in our collection... to be accurate, we need to have non-slip.
But no despair! There are actually pretty effective (if not altogether easy) ways to add the stuff (onto any Merk kit without molded-on non-slip), and when you do so, it looks VERY COOL. A bit of work, but hey! We're in the armor hobby and you want a good-looking Merk build, right?
You have many choices as to how you can add the non-slip - some folks detail-mask the parts and spray on textured paint (not, in my opine, the most realistic finish, but... and the masking is a lot of work and if you make a "boo-boo" and the paint gets into wrong places... well, not easy to fix!). Others apply some sort of fluid adhesive and add grit to create the surface - also some work but maybe a better-looking outcome (IMO), and more flexibility to create the real wear and unevenness of the actual stuff on Merks. There are now some non-slip "kits" available to create these surfaces. They are a set of adhesive and grit, so... much like the DIY kind.
I'm right now "DIY coating" my Takom 2b turret and hull w/ non-slip - I found that the "Stynylres" primer made and sold by Badger Airbrush Co. is pretty nice as a base adhesive for, in my case, sifted tile grout mix. The primer goes on where you want it in a small brushed-on patch, followed by a little sift of grout followed by tilting the piece and gently blowing off the surplus grout. Let it dry completely, and then use a soft sable brush to reduce the n-s layer (knock off grit) as you desire. It's a bit tedious (because you have to do a lot of small patches one at a time...), but then so are link tracks, and some of us love those, too! :-).
The nice aspects to Stynylres are 1) goes on quick, 2) no damage to the kit bits, 3) easy to wash off when wet and easy to scrape off when dry when you want to clean up details and fix "boo-boos", 4) the primer is about as safe as any material you can use, and less messy than, say, using Future (which also works, but tends to "self-level" and run around to unwanted places on the kit).
Of course, you can use any grit material you like to get the effect and "grain size" you want - I've done powdered cinnamon and ground white pepper (and a few other spices from the cabinet!) and plaster and baking soda and tile grout and fine tile-set mortar... ALL grits do better when sifted through a fine mesh onto the work-site.
Enjoy!
Cheers! Bob
Armorsmith
Joined: April 09, 2015
KitMaker: 1,063 posts
Armorama: 1,000 posts
Posted: Monday, January 21, 2019 - 06:48 AM UTC
Bob-Thanks for the tutorial on the DYI method you use. Always looking for new stuff to try. In the past I have used Tamiya clear as an adhesive and baking soda as the grit. Like you I work in small sections. Very easy fix mistakes as it can be washed off with Windex. Once dry some light brushing removes and excess that hasn't already been blown off. Then I clear coat the whole thing to seal it.
Thanks again.
Thanks again.
panzerbob01
Joined: March 06, 2010
KitMaker: 3,128 posts
Armorama: 2,959 posts
Posted: Monday, January 21, 2019 - 07:43 AM UTC
Quoted Text
Bob-Thanks for the tutorial on the DYI method you use. Always looking for new stuff to try. In the past I have used Tamiya clear as an adhesive and baking soda as the grit. Like you I work in small sections. Very easy fix mistakes as it can be washed off with Windex. Once dry some light brushing removes and excess that hasn't already been blown off. Then I clear coat the whole thing to seal it.
Thanks again.
I would guess that almost any paint suitable for styrene could work - it just has to remain tacky long enough for one to add the grit - and of course to be able to hold onto that grit. I'm in favor of using acrylics and other water-washable stuff where possible, as it allows easier fix-ups and easier clean-up as well. And less likely to damage the kit finish. Trying different grits can be fun and educational...
 Different countries have used different sizes of actual grit in their non-slip applications. I've found that the Israeli applications tend to look "coarser" and less uniform than do some US stuff. Hence I've tried many things... Fine tile grout turned out to give what looks pretty real in scale compared to many photos, but that's really pretty subjective.
Sounds like you are on your way to a properly gritty Merk!

Cheers! Bob
ReluctantRenegade
Joined: March 09, 2016
KitMaker: 2,408 posts
Armorama: 2,300 posts
Posted: Monday, January 21, 2019 - 08:57 AM UTC
I think I'm gonna try this stuff on my Mk.2B: https://www.youtube.com/watch?v=S-hFFChTn2M
panzerbob01
Joined: March 06, 2010
KitMaker: 3,128 posts
Armorama: 2,959 posts
Posted: Tuesday, January 22, 2019 - 04:28 AM UTC
Quoted Text
I think I'm gonna try this stuff on my Mk.2B: https://www.youtube.com/watch?v=S-hFFChTn2M
HullTex is one of those kits involving application of an adhesive / bonding layer, followed by application of grit. In every practical / procedural (thus meaning modeler tasks and effort) way, it works just like the DIY approaches.
The real issues involved in applying any such adhesive-and-grit non-slip to your styrene tank are 1) finding an adhesive which will actually adhere to and remain stable on styrene surfaces when applied as a thin layer (thin, because you want a thin paint-like layer, not some mess of mud that fills and hides the actually-visible details on the kit), and 2) finding and applying a suitable grit to that adhesive.
The adhesive question reduces to deciding whether one wants to apply something which actually bonds into the plastic - thus some sort of styrene solvent - which will be a permanent effect on the kit surface, or whether one wants some non-solvent stuff... Model cements and solvent-based plastic putty and enamel paints and lacquers and all adhesives which contain stuff like toluene, xylene, MEC, and other organic solvents are in this plastic-bonding class. They DO work to hold grit, but once applied, cannot be readily fixed or altered if mistakes are made.
The non-chemical-bonding, non-solvent adhesives include things like white glues, acrylic paints, Future, etc. These water-soluble products do NOT chemically bond to the styrene, so are less well-adhered to your kit. They can generally be washed or easily chipped off, and are actually rather sensitive to whether your styrene surface is rough or smooth or really free of oils, etc. These products adhere best to sanded, roughened surfaces and to very clean surfaces free of mold-release oils. They generally work well to hold grit, and are easier to remove and to fix mistakes on.
EVERY adhesive has its own collection of pros and cons. Future dries slowly so you get time to apply grit, but F self-levels and you can easily find it going elsewhere after you apply it. White glue-based stuff (including wood glues, Elmer's, and Gorilla glues - versions of PVA glue) can be water-diluted and dry slowly, allowing good grit placement, but tend to be extremely sensitive to surfaces... They don't adhere at all well to smooth or dirty styrene. Sanding and cleaning are a must when using these things. Primers, such as Stynylres (which I have successfully used), are less sensitive to surface condition and adhere pretty well. But they tend to dry pretty fast when applied in thin layer, and so grit placement is constrained...
And then there are some who have tried 2-part epoxy as the adhesive... Can't recommend doing that. But that's just my opinion!
Moral of adhesive story: None are perfect in every way! Try some and find which works best for YOU.
The Hull Tex product is, I believe, a water-soluble glue-based adhesive. It does work well, but, IMHO, not any better than does any of several DIY water-sol adhesives. The grit provided could be "correct" in size for some scale applications - but again there are many DIY grits available locally and cheaply (even free). The challenge or task, regardless of what adhesive you use and what grit you apply, is to grit the wet adhesive in a way which yields the density and evenness (or lack thereof) you desire. I find that all grits want to be sifted on to avoid clumping...
I am interested in the Hull Tex kit - folks I know have been pretty enthused about it.. But it won't be much different then a DIY job, in terms of doing it. Just more expensive!
Of course, this is all my experience and opinion, and other's mileage will differ!

Cheers! Bob

GTDeath13

Joined: June 12, 2015
KitMaker: 921 posts
Armorama: 919 posts

Posted: Tuesday, January 22, 2019 - 05:09 AM UTC
One can always brush some MrSurfacer 1200, sprinkle fine aquarium sand (0.2-0.4mm is just perfect) and get the job done.
Regarding the original question, all Merkava tanks have antiskid on them except the very first batch at Lebanon in 1982.
Regarding the original question, all Merkava tanks have antiskid on them except the very first batch at Lebanon in 1982.
panzerbob01
Joined: March 06, 2010
KitMaker: 3,128 posts
Armorama: 2,959 posts
Posted: Tuesday, January 22, 2019 - 07:18 AM UTC
Quoted Text
One can always brush some MrSurfacer 1200, sprinkle fine aquarium sand (0.2-0.4mm is just perfect) and get the job done.
Regarding the original question, all Merkava tanks have antiskid on them except the very first batch at Lebanon in 1982.
That Mr. S does, of course, work as an adhesive. I find it to be a reasonably viable option, and many of us have some in our modeling kit and supplies drawer... Mr. S 600 also works. Mr. S falls into the "permanently-bonded solvent-based" set of possible adhesives, and comes with the stated caveat of chemically-bonding to styrene and being hard to remove if you make a mistake. But, to be sure, it does work as a grit adhesive!
A 0.4mm grit is way too large for the typical non-slip grit - even the coarser sort used by the Israelies, in 1/35th scale. (0.4mm = 0.55 inch in 1/35th) Even 0.2mm is too coarse - being the equivalent of 1/4 gravel in 1/35th.
Most non-slip grit or sand is less than 1/8th inch in real life - so you are looking for a grit of perhaps 0.1mm or finer to keep things looking reasonably scalar. Tile grout gets close, as does baking soda. As a sort of "rule", I look at ref photos which show close-ups of hull details -such as welds or little tie-downs or bolt-heads- surrounded by non-slip, and use these to sort of visually "scale" my grit applications. I seek to get pretty much the grit grain that looks "scaled" to those details in real life and on the kit.
Of course, use whatever looks right and works well for you!
Cheers! Bob
GTDeath13
Joined: June 12, 2015
KitMaker: 921 posts
Armorama: 919 posts
Posted: Tuesday, January 22, 2019 - 08:07 AM UTC
Just a clarification: You apply the sand before primer and paint. So the 0.2 - 0.4 mm is just fine. And I do believe the material used by IDF is about 3-5mm in reality.
Another reason for the 0.2 - 0.4 mm suggestion is that you can find it ready in this size. And one can alays use a simple mesh to finetune his grain size.
Here is a build ith 0.4 - 0.6 mm sand. As you may notice, it looks a tad overscale, so that is why I think the 0.2 - 0.4 is ok.
https://armorama.kitmaker.net/forums/267054&ord=&page=3
panzerbob01
Joined: March 06, 2010
KitMaker: 3,128 posts
Armorama: 2,959 posts
Posted: Tuesday, January 22, 2019 - 10:00 AM UTC
Quoted Text
Just a clarification: You apply the sand before primer and paint. So the 0.2 - 0.4 mm is just fine. And I do believe the material used by IDF is about 3-5mm in reality.
Another reason for the 0.2 - 0.4 mm suggestion is that you can find it ready in this size. And one can alays use a simple mesh to finetune his grain size.
Here is a build ith 0.4 - 0.6 mm sand. As you may notice, it looks a tad overscale, so that is why I think the 0.2 - 0.4 is ok.
https://armorama.kitmaker.net/forums/267054&ord=&page=3
GREAT-looking stuff on your link! I really enjoy seeing that fine work you did! And actually I like your gritty surface, too! But to be accurate and "sure", yes, your grit is WAY too large (IMO, of course!
). Yes, the IDF use a coarser grit then most other forces - ca 2-3mm in real size... 3mm in 1/35th is 0.086mm... round up to a nice 1/10th or 0.1mm grit size. Even 5mm grit - about 1/4 US inch, and larger then most or all Israeli non-slip grit - would still be only 0.143mm - round up to a nice 0.15mm. So perhaps 1/3 the size of your 0.4+ grit... The tile grout I use comes "free" - I just go over to the local big-box home center and collect some off the floor or rack where those always - leaky fine tile grout bags are stacked! If I was going to do 1000 Merks and other coated kits (LoL!), I would buy a pound bag, but...! The fine tile grout comes in at around 0.06 - 0.15mm. There are always, of course, some larger and aggregated bits, but fine grout is pretty consistently fine to get the right surface in your shower or other tiled place. And of course, one can always sift it thru any mesh you want for sizing... And for those seeking finer grit... try plaster or dry dry-wall compound.
That said; folks should use what works best for them!
Bob
PS: Us modelers are, even at 1/35th scale, faced with a lot of challenge when it comes to getting "true-looking" scalar non-slip - in large part because even the finer-grain pigments in many model paints can easily "swamp" and "smooth-out" scalar grit, and the non-slip gritty surface can easily get obscured with painting followed by weathering. Using coarser grit helps keep the look, but can easily look a lot like gravel on the surface - NOT what the real things look like. It's a bit of a dance and anyone who gets something pretty self-satisfying on their build should be proud and rightly so!


Tankrider
Joined: October 07, 2002
KitMaker: 1,280 posts
Armorama: 1,208 posts
Posted: Thursday, January 24, 2019 - 08:54 AM UTC
Check with your local craft stores and see if they have embossing powder. Use Future or the Pledge replacement as the adhesive. Paint the areas that you want the anti-slip at with the Future/Pledge and sprinkle the embossing powder on. if mistakes occur, wait until dry and either scrape it off or spray with Windex to dissolve the Future/Pledge and reapply.
I found the embossing powder at a local Jo-Ann Craft Center. It worked great on my Meng Merkava III Baz.
John
I found the embossing powder at a local Jo-Ann Craft Center. It worked great on my Meng Merkava III Baz.
John
Armorsmith
Joined: April 09, 2015
KitMaker: 1,063 posts
Armorama: 1,000 posts
Posted: Thursday, January 24, 2019 - 02:12 PM UTC
I'll check the local HobbyLobby and will give it a try.
panzerbob01
Joined: March 06, 2010
KitMaker: 3,128 posts
Armorama: 2,959 posts
Posted: Thursday, January 24, 2019 - 06:13 PM UTC
Quoted Text
Check with your local craft stores and see if they have embossing powder. Use Future or the Pledge replacement as the adhesive. Paint the areas that you want the anti-slip at with the Future/Pledge and sprinkle the embossing powder on. if mistakes occur, wait until dry and either scrape it off or spray with Windex to dissolve the Future/Pledge and reapply.
I found the embossing powder at a local Jo-Ann Craft Center. It worked great on my Meng Merkava III Baz.
John
Future works OK as the adhesive - it is a bit more sensitive to "dirty" styrene surfaces then is the stynylrez (meaning: the Future will run and develop "holidays" where it de-adheres to the plastic easier then does Stynylrez), but it does not dry as fast (meaning: you get more time to apply your grit).
I tried out the Future versus the Stynylrez on my Takom Merk 2b today... (Using the inside of the hull pieces as the test-areas).
There turned out to be a VERY happy medium! I mixed the Future and Stynylrez 1:1 - this slowed the drying from the rather rapid Stynylrez times (good!), improved the adherence over straight Future (good!), and the Stynylrez color makes it much easier to see where your stuff is going and where it is staying well (good!)!
The F / S mix turns out to be a pretty nice "best of all worlds" - easy to apply and track on the kit, brushes on well (allowing good detail control), and proves to be a pretty good adhesive for the tile grout. So I went ahead and non-slipped my mostly-assembled turret and the hull top surfaces. Took about an hour all-up, and looks REALLY GOOD! I'll try to get a picture posted...
@John C: I've never actually seen nor handled the embossing powder you used... I am curious as to how well it turned out as a 1/35 scale non-slip surface. Could you post a pic of that build you mentioned?
Cheers! Bob
Tankrider
Joined: October 07, 2002
KitMaker: 1,280 posts
Armorama: 1,208 posts
Posted: Friday, January 25, 2019 - 02:05 AM UTC
Bob,
I fully intended to take a pic last night and promptly forgot about it when I got home. I will try to take one tonight.
I did forget to mention that Future can be tinted with a couple drops of food coloring to allow you to see where it has been applied to the model's surface. Again, I am not advocating that this is the best method, just another option to add to the Israeli armor builder's "tool kit".
John
Edit:
Here are the pictures that I mentioned several days ago... Let's see if this works...

The anti slip on the turret of the Meng Merkava Siman III Baz

The anti slip on the hull of the Meng Merkava Siman III Baz
IMHO, the embossing powder captures the look of the graininess of the basalt used in the Israeli anti slip coating.
John
I fully intended to take a pic last night and promptly forgot about it when I got home. I will try to take one tonight.
I did forget to mention that Future can be tinted with a couple drops of food coloring to allow you to see where it has been applied to the model's surface. Again, I am not advocating that this is the best method, just another option to add to the Israeli armor builder's "tool kit".
John
Edit:
Here are the pictures that I mentioned several days ago... Let's see if this works...
The anti slip on the turret of the Meng Merkava Siman III Baz
The anti slip on the hull of the Meng Merkava Siman III Baz
IMHO, the embossing powder captures the look of the graininess of the basalt used in the Israeli anti slip coating.
John
panzerbob01
Joined: March 06, 2010
KitMaker: 3,128 posts
Armorama: 2,959 posts
Posted: Friday, January 25, 2019 - 03:29 AM UTC
Quoted Text
Bob,
I fully intended to take a pic last night and promptly forgot about it when I got home. I will try to take one tonight.
I did forget to mention that Future can be tinted with a couple drops of food coloring to allow you to see where it has been applied to the model's surface. Again, I am not advocating that this is the best method, just another option to add to the Israeli armor builder's "tool kit".
John
John
There are lots of very workable and useful tools for this - and having tried but a few of the many, I can only offer that ALL actually WORK! Having just tried the Future (funny, as I've long been a Future fan and user - including tinting it to color "glass" and make headlamps and such, sealing acrylic coats for weathering and decal setting, etc. - but moved a year ago and "lost" my Future in the shuffle... using it for this task didn't much cross my feeble mind!
YOU brought the F back onto my radar... and my darling other half informed me "why, yes, the old Future bottle is right back there under the sink!" So I gave it a whirl!)... I am an instant FAN! PS: Yeah, I was also going to upload a couple pics last night... For reasons not yet known to me, the upload process failed.

 I'm going to retry today...
Bob

cabasner
Joined: February 12, 2012
KitMaker: 1,083 posts
Armorama: 1,014 posts
Posted: Sunday, January 27, 2019 - 02:06 PM UTC
Quoted Text
I think I'm gonna try this stuff on my Mk.2B: https://www.youtube.com/watch?v=S-hFFChTn2M
Israel,
I have this stuff, but have yet to try it. I plan to use it on many tanks, but plan on using it for sure on my Takom Merkava 1 Hybrid. I built my Takom Merkava 1 without anti skid.
panzerbob01
Joined: March 06, 2010
KitMaker: 3,128 posts
Armorama: 2,959 posts
Posted: Sunday, January 27, 2019 - 05:03 PM UTC
Curt:
The initial version - Mk.I - is wholly legit without any non-skid when built as their initial use period (although many were later retrofit with non-skid, so if you wanted to build a Mk.I after conversions and retrofit started up to produce the -hybrid and later production versions, you could apply non-slip to that initial version). So, Takom's Mk.I doesn't need any such addition to be historically accurate. The Mk.I hybrid, on the other hand, should get so treated, as these were apparently pretty much all coated up. All II, III, and IV versions are non-skid coated.
Cheers! Bob
panzerbob01
Joined: March 06, 2010
KitMaker: 3,128 posts
Armorama: 2,959 posts
Posted: Sunday, January 27, 2019 - 05:11 PM UTC
John C.:
Hey! That embossing powder looks pretty good! I'm going to get some and try it out - it could be the non-skid on an up-coming Magach 7C...!
I see that the mortar apparently has a separate turret-roof cage on your Meng III BAZ... Is that cage the kit part, or is it AM or... The Takom kits (such as my current Mk. 2b project) alas have a single molded cage-with-capped muzzle piece, and while it looks OK and not bad, a separate cage really looks RIGHT!
I found that almost any sort of non-skid route I've tried ends up "clogging" and sometimes fouling those little molded-on triangular tie-down rings - it's pretty hard to apply the non-skid without burying some of those little details. Looks like you are seeing some of that effect, too. I ended up shaving most of those rings (and other molded-on handles) off and replacing them with stretched-sprue rings and handles after applying the non-skid - this mostly ensures that they are fully visible and clear of the grit, as on the real thing.
Bob
Hey! That embossing powder looks pretty good!
I'm going to get some and try it out - it could be the non-skid on an up-coming Magach 7C...!I see that the mortar apparently has a separate turret-roof cage on your Meng III BAZ... Is that cage the kit part, or is it AM or... The Takom kits (such as my current Mk. 2b project) alas have a single molded cage-with-capped muzzle piece, and while it looks OK and not bad, a separate cage really looks RIGHT!
I found that almost any sort of non-skid route I've tried ends up "clogging" and sometimes fouling those little molded-on triangular tie-down rings - it's pretty hard to apply the non-skid without burying some of those little details. Looks like you are seeing some of that effect, too. I ended up shaving most of those rings (and other molded-on handles) off and replacing them with stretched-sprue rings and handles after applying the non-skid - this mostly ensures that they are fully visible and clear of the grit, as on the real thing.
Bob
Removed by original poster on 01/28/19 - 05:45:15 (GMT).
Removed by original poster on 01/28/19 - 05:39:46 (GMT).
panzerbob01
Joined: March 06, 2010
KitMaker: 3,128 posts
Armorama: 2,959 posts
Posted: Sunday, January 27, 2019 - 05:44 PM UTC
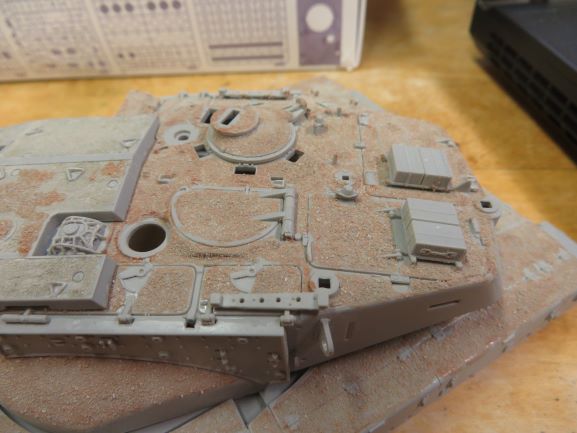
Here is the top of the partially-assembled turret of my Takom Mk. 2b wip... Note that the pinkish color is due to the color of the Stynylrez that I mixed 1:1 with the future. The grit is grey tile thinset mortar. There are still a number of small places where I will remove some grit and clean up details - this pic shows things after the application but before any clean-up and "tweaking" - the "raw" form.
Bob :-)
 |

WEB HOSTING BY


Copyright ©2021 Armorama and Kitmaker Network, a subsidiary of Silver Star Enterprises
All Rights Reserved. Please read our Conditions of Use and Privacy Policy.
All Rights Reserved. Please read our Conditions of Use and Privacy Policy.