Hi All,
This is the latest dio which I have built.
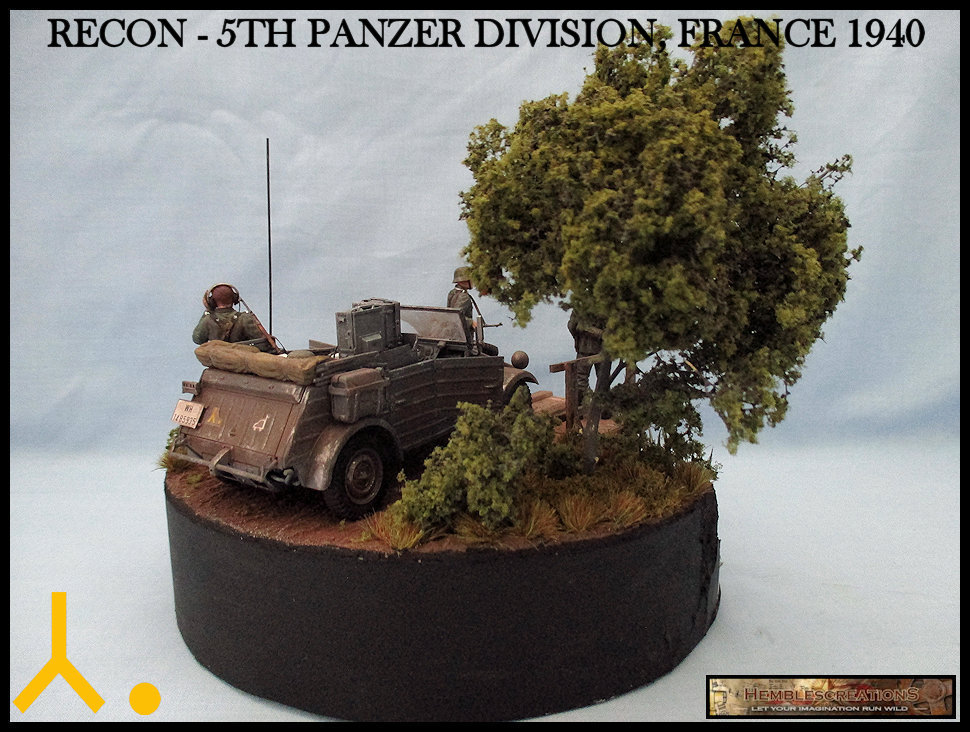
Kubelwagen Radio car dio completed-1:35 scale.
Recipe.
Figures/car - The Kubelwagen is from Tamiya and is kit #35213 and is built straight out of the box. The radio bench is scratch built using plastic card and the radio set is an old Verlinden kit that I did years ago and using it here after the dio it was on got broken when moving.
I added brackets and details on the radio set using plastic card, resin pieces and photo etched parts. The maps and charts are from and old Verlinden 1/35 map set.
The head set and the small mic I have had in the parts box for years and can't remember which company made them, The map bracket behind the back seat was done using plastic card and half the rifle bracket that came with the kit and the jerry can storage bracket was done using plastic card.
The figures are from ICM and is kit # 35639 and were built straight out of the box except for the radio operator's left arm which was scratch built using spare arms.
Base - The base was done using foam board and the ground work is a mix of 70% spakfilla and 30% sand with medium brown paint added to it.
The bridge is made from balsa wood and the nuts/bolts were done using thin plastic rod and the nail holes were done using a tooth pick.
The ground work was done using grass tufts and small bush clumps which I got from my local gaming shop. The tree and small bushes are from Woodland Scenics fine foliage light green set and the bulrush are from Ammo Mig.
The water was done using a two part resin from Tamiya with a drop of beige brown mixed in and the ripple effect was done using Woodland Scenics Water effects.
Dioramas
Do you love dioramas & vignettes? We sure do.
Hosted by Darren Baker, Mario Matijasic
Kubelwagen Radio Car dio 1:35
hemblecreations
Australia
Joined: August 22, 2018
KitMaker: 173 posts
Armorama: 110 posts
Joined: August 22, 2018
KitMaker: 173 posts
Armorama: 110 posts
Posted: Saturday, March 23, 2019 - 02:32 PM UTC
obg153
Texas, United States
Joined: April 07, 2009
KitMaker: 1,063 posts
Armorama: 1,049 posts
Joined: April 07, 2009
KitMaker: 1,063 posts
Armorama: 1,049 posts
Posted: Sunday, March 24, 2019 - 02:17 AM UTC
Outstanding detail all thru the scene! I'm really impressed with how you got the details(buttons/collar piping/buckles, etc.). Wish I could get my figures looking that good. Would you consider doing some tutorials?
hemblecreations
Australia
Joined: August 22, 2018
KitMaker: 173 posts
Armorama: 110 posts
Joined: August 22, 2018
KitMaker: 173 posts
Armorama: 110 posts
Posted: Sunday, March 24, 2019 - 10:50 AM UTC
Quoted Text
Outstanding detail all thru the scene! I'm really impressed with how you got the details(buttons/collar piping/buckles, etc.). Wish I could get my figures looking that good. Would you consider doing some tutorials?
Thanks heaps Jack and yeah mate I can do some tutorials no worries at all.
Posted: Sunday, March 24, 2019 - 10:55 AM UTC
Great job mate!! I really like your attention to detail..
ml-fin
Finland
Joined: November 24, 2013
KitMaker: 37 posts
Armorama: 37 posts
Joined: November 24, 2013
KitMaker: 37 posts
Armorama: 37 posts
Posted: Sunday, March 24, 2019 - 11:20 AM UTC
Very nice painting indeed but those ammo pouches are way too low. You should check how theu were attached to the belts. Other than that i like it much, colors are so right everywhere.
joepanzer
North Carolina, United States
Joined: January 21, 2004
KitMaker: 803 posts
Armorama: 740 posts
Joined: January 21, 2004
KitMaker: 803 posts
Armorama: 740 posts
Posted: Sunday, March 24, 2019 - 12:05 PM UTC
OUTSTANDING!!
I agree with the need for a tutorial
hemblecreations
Australia
Joined: August 22, 2018
KitMaker: 173 posts
Armorama: 110 posts
Joined: August 22, 2018
KitMaker: 173 posts
Armorama: 110 posts
Posted: Sunday, March 24, 2019 - 03:18 PM UTC
Quoted Text
Great job mate!! I really like your attention to detail..
Thanks heaps Cam.
hemblecreations
Australia
Joined: August 22, 2018
KitMaker: 173 posts
Armorama: 110 posts
Joined: August 22, 2018
KitMaker: 173 posts
Armorama: 110 posts
Posted: Sunday, March 24, 2019 - 03:19 PM UTC
Quoted Text
Very nice painting indeed but those ammo pouches are way too low. You should check how theu were attached to the belts. Other than that i like it much, colors are so right everywhere.
Thanks heaps Marko and I didn't even realize they were lower then they should be, thanks for pointing it out to me mate.
hemblecreations
Australia
Joined: August 22, 2018
KitMaker: 173 posts
Armorama: 110 posts
Joined: August 22, 2018
KitMaker: 173 posts
Armorama: 110 posts
Posted: Sunday, March 24, 2019 - 03:20 PM UTC
Quoted Text
OUTSTANDING!!
I agree with the need for a tutorial
Cheers Joe I'll get one made up over the week and post next week.
dhines
Nova Scotia, Canada
Joined: November 17, 2015
KitMaker: 407 posts
Armorama: 373 posts
Joined: November 17, 2015
KitMaker: 407 posts
Armorama: 373 posts
Posted: Monday, March 25, 2019 - 02:43 PM UTC
Great job Ron, I would also love to see a tutorial.
hemblecreations
Australia
Joined: August 22, 2018
KitMaker: 173 posts
Armorama: 110 posts
Joined: August 22, 2018
KitMaker: 173 posts
Armorama: 110 posts
Posted: Monday, March 25, 2019 - 11:01 PM UTC
Quoted Text
Great job Ron, I would also love to see a tutorial.
Cheers Dale and I'm working out on a few tutorials idea's so that I can start doing them.
timcc2008
United States
Joined: May 12, 2010
KitMaker: 139 posts
Armorama: 135 posts
Joined: May 12, 2010
KitMaker: 139 posts
Armorama: 135 posts
Posted: Tuesday, March 26, 2019 - 12:48 AM UTC
Very nicely detailed in a small dio. Looking forward to future work and any tutorials you may do.
vr
Tim
vr
Tim
hemblecreations
Australia
Joined: August 22, 2018
KitMaker: 173 posts
Armorama: 110 posts
Joined: August 22, 2018
KitMaker: 173 posts
Armorama: 110 posts
Posted: Tuesday, March 26, 2019 - 06:15 PM UTC
Quoted Text
Very nicely detailed in a small dio. Looking forward to future work and any tutorials you may do.
vr
Tim
Thanks heaps Tim.
strongarden
Florida, United States
Joined: May 14, 2012
KitMaker: 730 posts
Armorama: 624 posts
Joined: May 14, 2012
KitMaker: 730 posts
Armorama: 624 posts
Posted: Saturday, March 30, 2019 - 04:38 AM UTC
Very nicely done Ron, I like the details you've added in your Kubel!
The radio operator's expression is perfect: like he's monitoring airwave chatter on the 5th Divsion's early advances.
Personaly I always appreciate the time one takes to share who/what/when and where you've used to obtain your reults.
Cheers
Dave
The radio operator's expression is perfect: like he's monitoring airwave chatter on the 5th Divsion's early advances.
Personaly I always appreciate the time one takes to share who/what/when and where you've used to obtain your reults.
Cheers
Dave
hemblecreations
Australia
Joined: August 22, 2018
KitMaker: 173 posts
Armorama: 110 posts
Joined: August 22, 2018
KitMaker: 173 posts
Armorama: 110 posts
Posted: Saturday, March 30, 2019 - 10:41 AM UTC
Quoted Text
Very nicely done Ron, I like the details you've added in your Kubel!
The radio operator's expression is perfect: like he's monitoring airwave chatter on the 5th Divsion's early advances.
Personaly I always appreciate the time one takes to share who/what/when and where you've used to obtain your reults.
Cheers
Dave
Thanks heaps Dave and I've always enjoyed sharing how I've made something as it gives other people the chance to try it themselves.