_GOTOBOTTOM
Armor/AFV: Axis - WWII
Armor and ground forces of the Axis forces during World War II.
Hosted by Darren Baker
Sd.Kfz 223 Leichter Panzerspähwagen Funk
jldurand
Visit this Community
Quebec, Canada
Joined: July 06, 2013
KitMaker: 225 posts
Armorama: 215 posts
Posted: Saturday, April 06, 2019 - 12:19 PM UTC
Sd.Kfz 223 Leichter Panzerspähwagen Funk - Hobby Boss - 1/35

Slowly getting there: painting shovel, jerrycans, one layer satin varnish, decals, another layer of varnish, grey-blue filter...


obg153
Visit this Community
Texas, United States
Joined: April 07, 2009
KitMaker: 1,063 posts
Armorama: 1,049 posts
Posted: Saturday, April 06, 2019 - 01:09 PM UTC
The grubby road-grime & faded paint look really good! Do you have further plans for it? I have this kit in the stash and now I'm tempted to dig it out.
jldurand
Visit this Community
Quebec, Canada
Joined: July 06, 2013
KitMaker: 225 posts
Armorama: 215 posts
Posted: Saturday, April 06, 2019 - 02:33 PM UTC

Quoted Text

The grubby road-grime & faded paint look really good! Do you have further plans for it? I have this kit in the stash and now I'm tempted to dig it out.


Thank you.

It's not finished yet... But yes, I have a "France 1940" diorama in mind with 5 figs.
panzerbob01
Visit this Community
Louisiana, United States
Joined: March 06, 2010
KitMaker: 3,128 posts
Armorama: 2,959 posts
Posted: Saturday, April 06, 2019 - 02:47 PM UTC
Cool, Jean-Louis! Nice job going, there, friend!

These little armored cars are among my fav general AFV modeling subject for, oh, only the past 50 or so years! And this one, in particular, grabbed my attention when it came out.

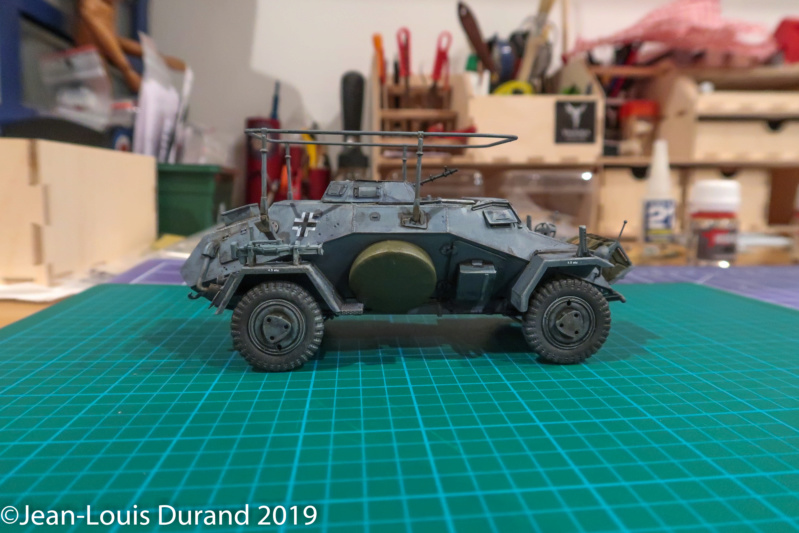
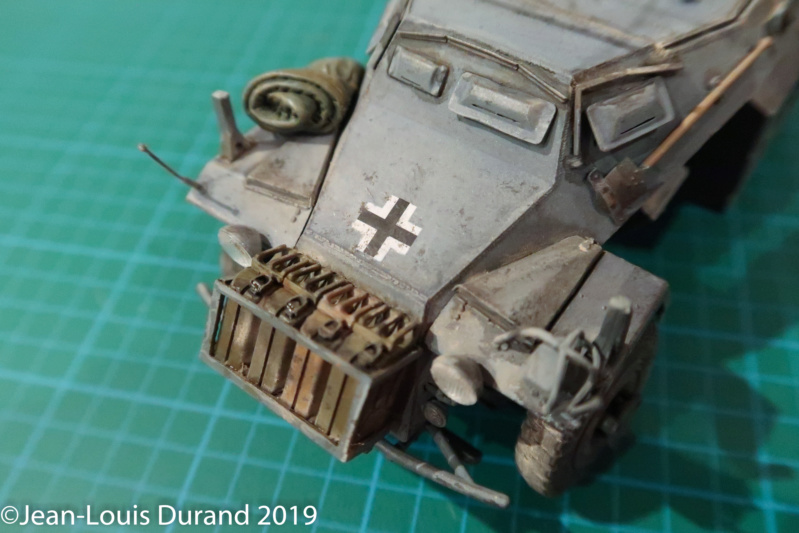
HB's 223 is, IMHO, a pretty nice kit in many ways - full of details in and out, lots of modeling pleasure for your modeling money, goes together pretty well in most aspects, and an interesting subject, to boot!

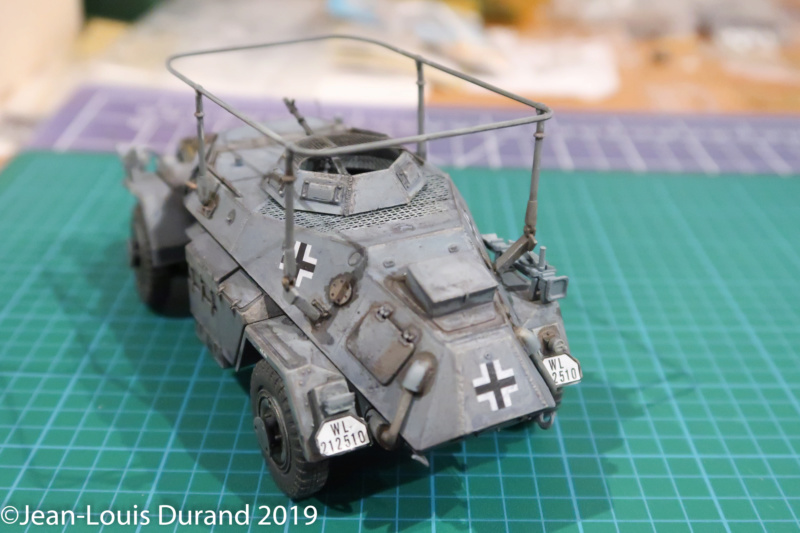
It is, however, a bit of a "curate's egg", as some might say... HB got a lot of things screwed up in this kit. For those interested in model "historical accuracy"... The kit builds a later-war hull (actually, the last 222 hull version built - from later 1943 - by Wegmann, so, hull-wise, an "Ausf B") - but provides the early-war-style frame antenna on the early-war mounts (which, alas, were not used on the Ausf B hull). And inside, HB just simply blew it badly. Who would think that a dedicated radio car should have some radio equipment inside, right? Not, I guess, HB! The interior is very neat and full of bits and pieces, but pretty much almost completely wrong.

The real deal had a lot of radio stuff - mounted in racks behind the driver and on the hull floor and left wall. The kit provides nada. The real 223 had a crank-and-gear system to raise and lower the antenna from inside. But this gear shifted positions from earlier versions to the later Ausf B: located behind the rear cabin bulkhead in the Ausf B, and located across the cabin roof behind the driver's seat in the earlier versions / Ausf A specific hull. The kit provides neither. The later car (this kit) had a gas-filler pipe located inside the cabin on the rear bulkhead - beneath a small hatch in the screen roof. I think, IIRC, that the mesh PE does have that hatch, but no filler pipe is provided inside. The rear floor is lacking the central hump and the 2 gas tanks, and there is no jump seat provided for the radio op (but hey, no radios, so...!). The list, sadly, goes on.

I've built this one, and I tried, with more success in some aspects then in others, to correct some of the errors. Lots of fun!

But it IS a cool little build, and looks quite interesting when done, regardless. It's always neat to see folks do one of these up, IMHO! I'm pleased to see it going along, and look forward to what you end up with!

Cheers! Bob
jldurand
Visit this Community
Quebec, Canada
Joined: July 06, 2013
KitMaker: 225 posts
Armorama: 215 posts
Posted: Sunday, April 07, 2019 - 06:20 AM UTC
Hi Bob !

Thank you for those useful informations.

I was totally aware of that when I started the kit. Unfortunately, I miss time for my favourite hobby and I do mostly "out of the box" builds. I am also aware that I might be inaccurate regarding History but it's OK for me. As long I have fun building models, I am happy
Maybe when I retire, I will try to be a little less lazy and scratchbuild a little more...

Anyway, it is always a pleasure for me to read and learn new things every day, so do not hesitate when you have information to share !

Cheers

Jean-Louis
jldurand
Visit this Community
Quebec, Canada
Joined: July 06, 2013
KitMaker: 225 posts
Armorama: 215 posts
Posted: Sunday, April 07, 2019 - 03:57 PM UTC
Nearly finished. I only have the headlights left, and the dust. I painted rear lights and exhaust, as well as the jack. For this one, I choosed a more greenish colour to break the monotone Feldgrau.


jldurand
Visit this Community
Quebec, Canada
Joined: July 06, 2013
KitMaker: 225 posts
Armorama: 215 posts
Posted: Monday, April 08, 2019 - 01:28 PM UTC
One of the last steps. I painted the headlights. And no, this is not an unfinished Tiger that you can see in the background ! It is my assistant, Corporal Kuti...


jldurand
Visit this Community
Quebec, Canada
Joined: July 06, 2013
KitMaker: 225 posts
Armorama: 215 posts
Posted: Sunday, May 12, 2019 - 01:21 PM UTC
Built and paint finished !


obg153
Visit this Community
Texas, United States
Joined: April 07, 2009
KitMaker: 1,063 posts
Armorama: 1,049 posts
Posted: Sunday, May 12, 2019 - 03:25 PM UTC
Great looking finish! Eager to see how it goes in the dio you're planning. What color/colors did you use to get that faded gray appearance?
jldurand
Visit this Community
Quebec, Canada
Joined: July 06, 2013
KitMaker: 225 posts
Armorama: 215 posts
Posted: Sunday, May 12, 2019 - 04:07 PM UTC

Quoted Text

Great looking finish! Eager to see how it goes in the dio you're planning. What color/colors did you use to get that faded gray appearance?


Thank you Jack.

For the colors:
Hataka Early WW2 German AFV panel lightning set
Tamiya panel line black for the darker areas (I use the panel liner without washing it when it dries.
After that, Prince August satin varnish and highlights with Caran d'Ache "crayons aquarelle" (watercolors pencils).
Then black wash and rust wash and pigments at the end.
 _GOTOTOP