Anyone who knows me, knows that I’ve built more than a few KV-1s in my time. This time, I’m going to build something a little different, and I thought I’d bring you all along for the ride.
KV-1S production began at ChKZ in August 1942. Until that time, both UTZM and Factory No.200 had been building KV hulls for ChKZ. In September, the decision was made to switch UZTM to T-34 production due to disruption in the supply of T-34s from Stalingrad, and to increase the output of KV-1S hulls from Factory No.200. The September quota was double that delivered in August.
By October, Factory No.200 was falling behind and requested permission to deliver up to 100 KV-1 (as opposed to KV-1S) hulls to ChKZ to meet its quota. This request was sent to Ivan Zaltsman, People’s Commissar of Tank Manufacturing, and was routed up to the State Committee for Defense. Such high-level authorization was presumably needed because the substitution would drive the weight of the vehicles up, and the State Defense Committee had been very emphatic during the KV-1S’s design period, about driving the weight of the vehicle down to ~42 tons.
Authorization was given by Molotov on 15 October 1942, and ChKZ completed 70 vehicles with KV-1 Model 1942 (square rear overhang) hulls and KV-1S turrets. These tanks had a number of KV-1S components on the hulls however, such as twin driver’s periscopes.
Sources differ as to the units that received these ‘hybrid’ KVs. One source gives the following allocations:
• 8 to the 9th Independent Guards Breakthrough Tank Regiment at Kubinka
• 16 to the 10th Independent Guards Breakthrough Tank Regiment at the Moscow Training Schools (Kosterovo/Noginsk)
• 3 to the Ulyanov Academy
• 34 to the 12th Independent Guards Breakthrough Tank Regiment at the Moscow Training Schools (Kosterovo/Noginsk)
• 9 to ZKU
• 7 to the Armored Car and Tank Center (Lubertsy)
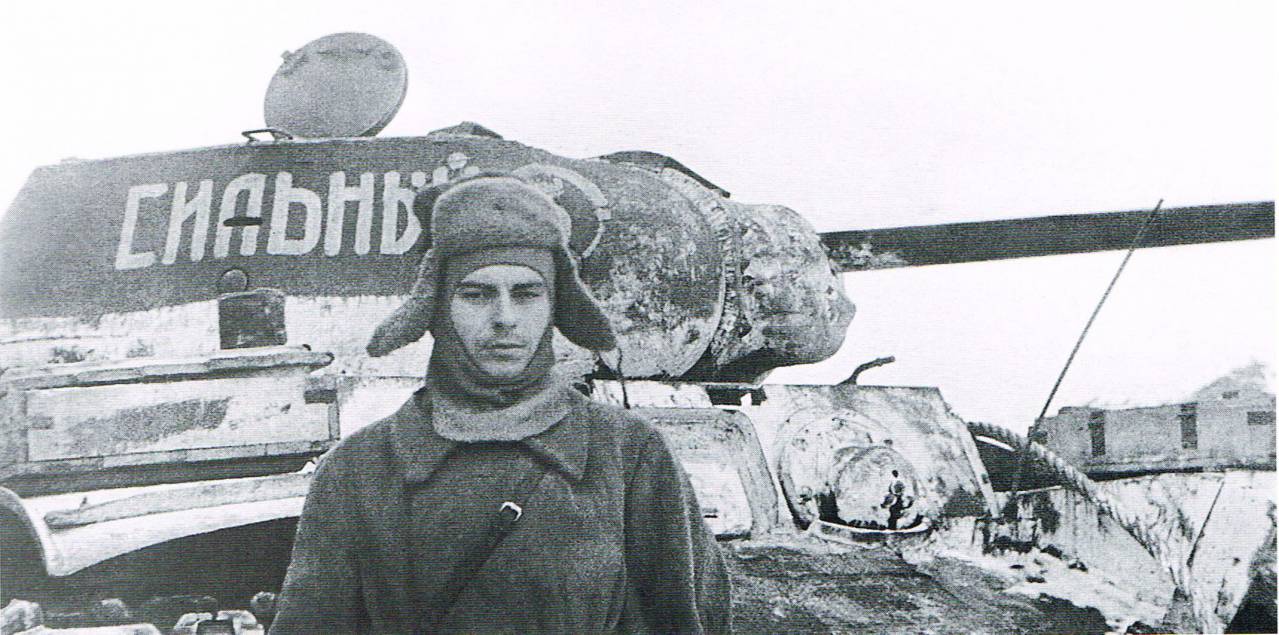
This gives us a total of 77 however, so the allocations may not be entirely accurate. To further complicate matters, there is a photo in the Russian State Documentary Film & Photo Archive showing one of these vehicles, carrying the turret slogan ‘СИЛЬНЫЙ’ (‘Powerful’), captioned as belonging to the 14th Independent Guards Breakthrough Tank Regiment. This unit was established at the same time and location as the 10th and 12th regiments, and was assigned 21 new KV tanks on 10 December 1942.
14th Independent Guards Breakthrough Tank Regiment departed for the Don Front on 26 December 1942, and was assigned to support 24th Rifle Division in 65th Army as part of Operation Little Saturn, reducing the Stalingrad pocket. It fought until 19 January 1943 when it was ordered into reserve to repair and re-equip. 7 of its remaining serviceable tanks were transferred to the 9th Regiment and 2 to the 5th Regiment between 20 January and 1 March. Other vehicles were repaired and dispersed to other units, while 7 were written off.
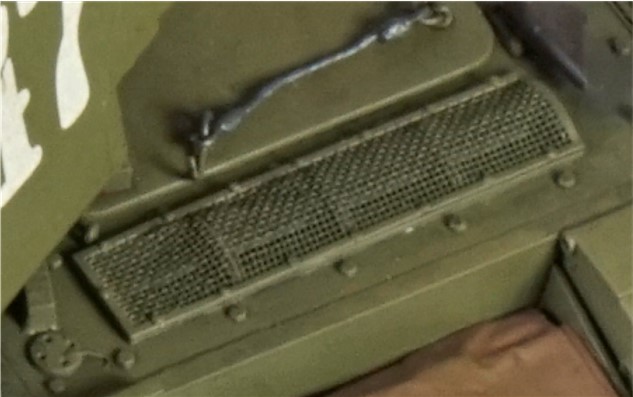
I want to model ‘Powerful’ as it is shown in the photo, but a lot of details are not visible. Fortunately, there is a preserved vehicle at Parfino, Novgorod Oblast, purportedly from 12th Independent Guards Breakthrough Tank Regiment. It’s not 100% certain that the Parfino vehicle has all the same features as ‘Powerful’ so a little modeler’s license is in order, particularly since the Parfino vehicle was incomplete when recovered and has had a sheet-metal engine deck and fenders added.
I have all of Trumpeter’s KV releases, and for this project I will use the following kits:
• #00358 KV-1 Model 1942 Simplified Turret
• #01566 KV-1S Heavy Tank
In addition, I plan to use some aftermarket sets and parts from the spares box.
Armor/AFV
For discussions on tanks, artillery, jeeps, etc.
Hosted by Darren Baker, Mario Matijasic
KV-1/KV-1S Hybrid
MrNeil
New Jersey, United States
Joined: November 01, 2005
KitMaker: 266 posts
Armorama: 262 posts
Joined: November 01, 2005
KitMaker: 266 posts
Armorama: 262 posts
Posted: Wednesday, June 19, 2019 - 12:25 PM UTC
Jacques
Minnesota, United States
Joined: March 04, 2003
KitMaker: 4,630 posts
Armorama: 4,498 posts
Joined: March 04, 2003
KitMaker: 4,630 posts
Armorama: 4,498 posts
Posted: Wednesday, June 19, 2019 - 01:47 PM UTC
Looking forward to this build Neil. You find all the cool stuff to do.
gharker
British Columbia, Canada
Joined: May 21, 2014
KitMaker: 109 posts
Armorama: 109 posts
Joined: May 21, 2014
KitMaker: 109 posts
Armorama: 109 posts
Posted: Wednesday, June 19, 2019 - 04:25 PM UTC
I have been thinking about doing this tank myself soon, I will be following this one.
MrNeil
New Jersey, United States
Joined: November 01, 2005
KitMaker: 266 posts
Armorama: 262 posts
Joined: November 01, 2005
KitMaker: 266 posts
Armorama: 262 posts
Posted: Thursday, June 20, 2019 - 07:19 AM UTC
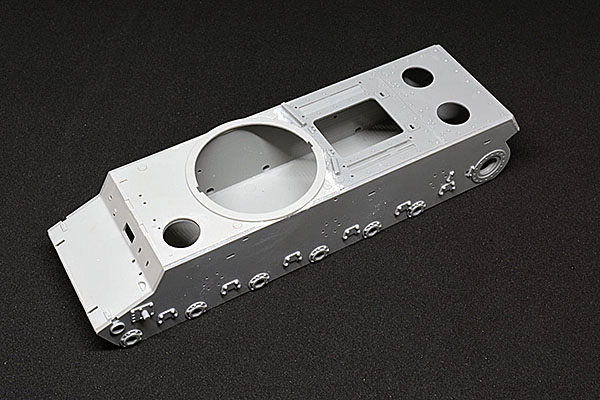
I began construction with the hull. I used the KV-1S lower hull tub, combined with the hull sides from the Model 1942 kit (parts B1 and B2). I needed to remove the locating pins from the inside of each hull side, and cut away the overhang from each upper rear corner of the hull tub. You could use the Model 1942 hull tub here if you wish, which would avoid the need to modify the part, but the KV-1S hull had locating marks for the circular towing eye mounts on the lower front hull, so I chose to use that.
Next I added the glacis plate, superstructure front plate and forward hull roof from the KV-1S kit (part WG11), since it included the locating tabs for the twin periscopes and avoids the annoying insert around the hull hatch, present on the Model 1942 kit part, and which requires sanding to eliminate the joint.
The Model 1942 hull and the KV-1S hull are engineered differently so the KV-1S hull roof does not sit down properly onto the Model 1942 hull sides. I cut away the protruding sections forward and aft of the turret ring, and thinned down the underside of the turret ring itself to achieve the proper fit. Since my cutting wasn’t quite precise enough, I used a little putty to fill the resulting gaps.
I then added the lower rear hull and engine/transmission decks from the Model 1942 kit (parts A12 and F28), and the nose cap (part F4) to complete the main ‘box’ of the hull.
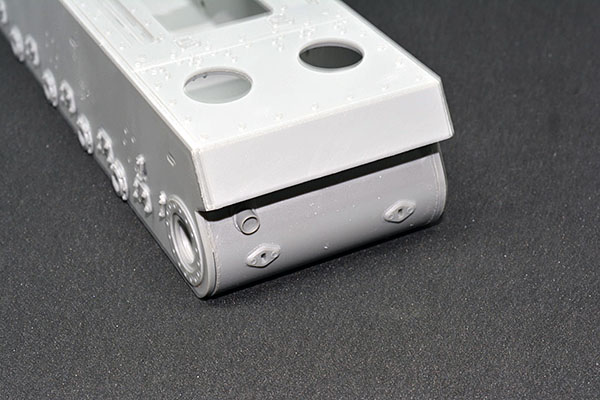
In the summer of 1942, the mounting plates for the towing eyes on the lower front and rear hull went from the diamond shape common on the KV-1 to a circular shape present on most KV-1s hulls. The Parfino vehicle has circular mounts on the forward hull and diamond shaped ones on the rear hull. Using the KV-1S hull tub and the Model 1942 lower rear hull gave the right combination.
Owengate
United States
Joined: June 03, 2019
KitMaker: 73 posts
Armorama: 39 posts
Joined: June 03, 2019
KitMaker: 73 posts
Armorama: 39 posts
Posted: Thursday, June 20, 2019 - 07:34 AM UTC
Seeing that first photo makes me excited for this build.
bill_c
Campaigns Administrator
New Jersey, United States
Joined: January 09, 2008
KitMaker: 10,553 posts
Armorama: 8,109 posts
Joined: January 09, 2008
KitMaker: 10,553 posts
Armorama: 8,109 posts
Posted: Thursday, June 20, 2019 - 08:27 AM UTC
So THAT'S why you had a KV-1 box at last night's build night at the club! Now it all makes sense. Watching this one with great interest. The Trumpy KVs build up very well, but need some AM PE for things like the vents and intakes.
MrNeil
New Jersey, United States
Joined: November 01, 2005
KitMaker: 266 posts
Armorama: 262 posts
Joined: November 01, 2005
KitMaker: 266 posts
Armorama: 262 posts
Posted: Thursday, June 20, 2019 - 09:24 AM UTC
Bill, I have the aftermarket all lined up
bill_c
Campaigns Administrator
New Jersey, United States
Joined: January 09, 2008
KitMaker: 10,553 posts
Armorama: 8,109 posts
Joined: January 09, 2008
KitMaker: 10,553 posts
Armorama: 8,109 posts
Posted: Thursday, June 20, 2019 - 10:18 AM UTC
Quoted Text
Bill, I have the aftermarket all lined up
If you don't know what's needed for the build, I can't imagine who would know better, haha!
I did a little hunt today around an Ekranami, and the AM stuff is thin on places like Sprue Bros. Guess the kits are too old to keep that stuff in stock?
MrNeil
New Jersey, United States
Joined: November 01, 2005
KitMaker: 266 posts
Armorama: 262 posts
Joined: November 01, 2005
KitMaker: 266 posts
Armorama: 262 posts
Posted: Thursday, June 20, 2019 - 10:27 AM UTC
Very likely, but there are various sellers on eBay who carry them. I picked up an Eduard screens set (TP088), an Aber barrel (35 L49) and a set of Masterclub 608mm tracks (MTL35030) from sellers in Poland.
For the Ehkranami, the same screens set is good but you'd need an F-32 barrel rather than a ZIS-5 barrel. The Aber barrel 35 L43 is the right one, and there are a bunch of alternatives listed at 4bogreen.com
pgb3476
Texas, United States
Joined: March 11, 2007
KitMaker: 977 posts
Armorama: 976 posts
Joined: March 11, 2007
KitMaker: 977 posts
Armorama: 976 posts
Posted: Thursday, June 20, 2019 - 11:32 AM UTC
I'll be watching for sure. I did not know it was a hybrid as I have seen a number of color profiles showing this specific tank as a straight KV-1S, I even built two in the past as the reflected in those profiles.
bill_c
Campaigns Administrator
New Jersey, United States
Joined: January 09, 2008
KitMaker: 10,553 posts
Armorama: 8,109 posts
Joined: January 09, 2008
KitMaker: 10,553 posts
Armorama: 8,109 posts
Posted: Friday, June 21, 2019 - 03:25 AM UTC
Quoted Text
For the Ehkranami, the same screens set is good but you'd need an F-32 barrel rather than a ZIS-5 barrel. The Aber barrel 35 L43 is the right one, and there are a bunch of alternatives listed at 4bogreen.com
Thanks, Neil, you are the man for KVs....
MrNeil
New Jersey, United States
Joined: November 01, 2005
KitMaker: 266 posts
Armorama: 262 posts
Joined: November 01, 2005
KitMaker: 266 posts
Armorama: 262 posts
Posted: Friday, June 21, 2019 - 11:40 AM UTC
Now that the main structure of the hull was together, I began adding details.
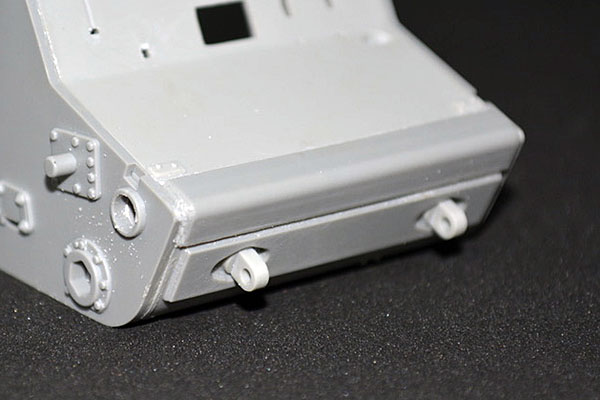
By 1942, all KV-1 hulls were fitted with applique armor on the lower front hull plate. This was temporarily omitted when the KV-1S was introduced but returned by early 1943. The KV-1 Model 1942 hull on the Parfino vehicle has the armor fitted, so it’s reasonable to assume that ‘Powerful’ would have had it too. I took the part (F3) from the Model 1942 kit and added it along with the circular front towing eyes (parts WA17) from the KV-1S kit, to match the Parfino vehicle.
The armor plate has a weld bead molded onto each end, but not to the top and bottom. The same goes for the nose cap. I added the missing weld beads from 10-thou styrene rod, softened with liquid cement and textured with a knife blade.
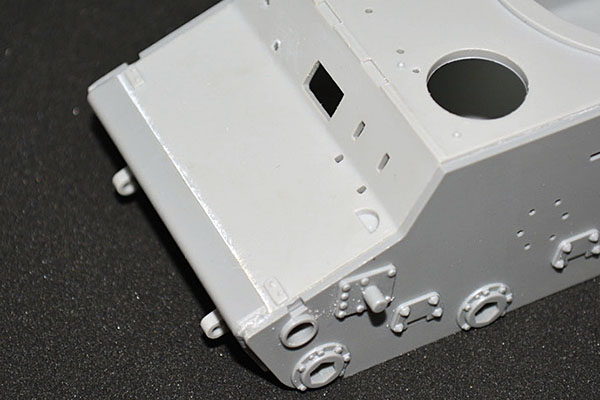
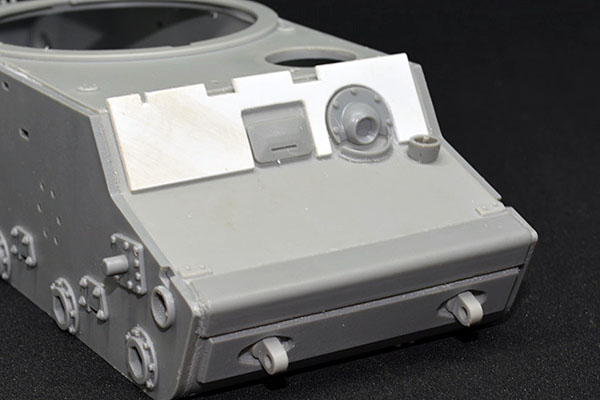
In October 1942, Factory No.200 was building KV hulls with applique armor on the superstructure front plate. This applique armor was taller than the hull itself, unlike the armor on UZTM hulls which ended at the roof.
The Model 1942 kit provides an applique armor plate but it’s the UZTM pattern and it’s designed for the KV-1 hull with a single driver’s periscope, whereas the KV-1S hull has two periscopes. I made a replacement from styrene sheet to match photos of the Parfino vehicle, using part D18 from the Model 1942 kit as a template to position the cutouts for the MG mount and driver’s visor.
Removed by original poster on 06/22/19 - 00:52:08 (GMT).
KurtLaughlin
Pennsylvania, United States
Joined: January 18, 2003
KitMaker: 2,402 posts
Armorama: 2,377 posts
Joined: January 18, 2003
KitMaker: 2,402 posts
Armorama: 2,377 posts
Posted: Friday, June 21, 2019 - 12:53 PM UTC
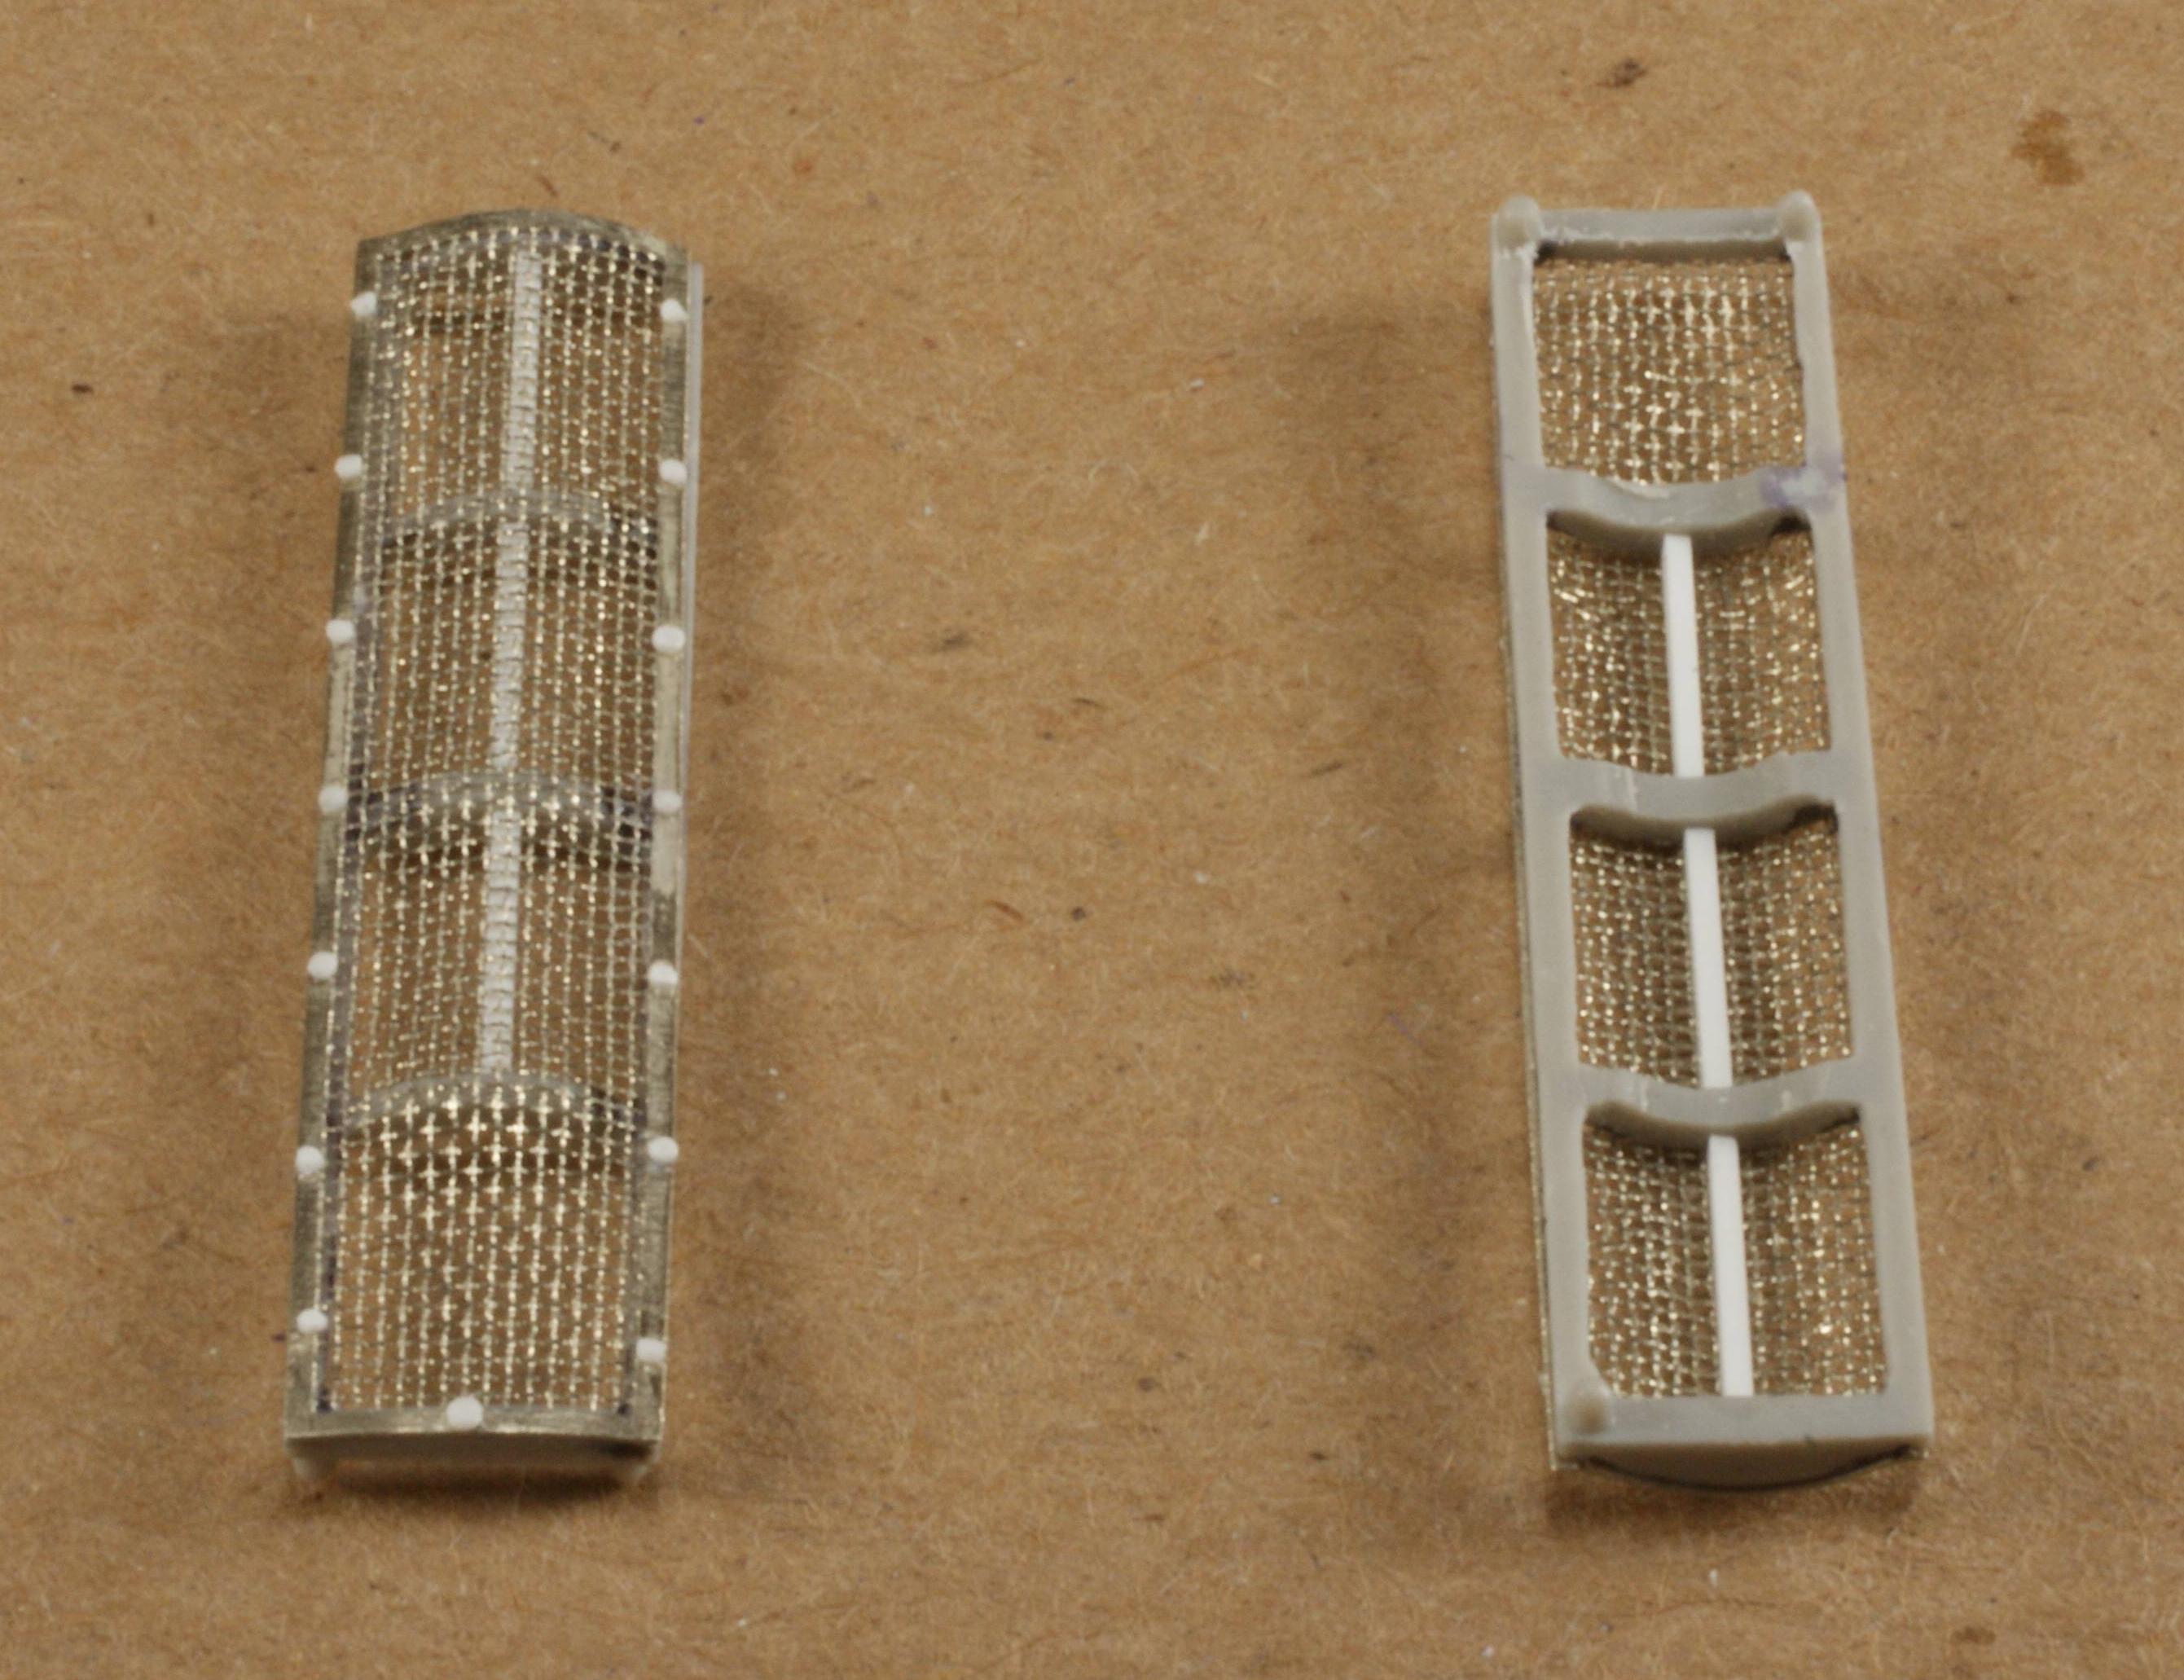
I like the Aber screens but I haven't tried anything else. The frames are too much trouble for me so I hollowed out the kit screens and used the PE parts on the plastic frames.
KL
KL
MrNeil
New Jersey, United States
Joined: November 01, 2005
KitMaker: 266 posts
Armorama: 262 posts
Joined: November 01, 2005
KitMaker: 266 posts
Armorama: 262 posts
Posted: Friday, June 21, 2019 - 01:00 PM UTC
Kurt, there are numerous aftermarket sets out there for the screens, but I found Aber’s are way over-engineered, Lion Roar’s are incorrectly shaped, and other manufacturers’ screens usually come as part of larger general update sets. Eduard’s TP088 offers a good balance of accuracy and detail with ease of assembly, and is relatively cheap since it only includes the screens and a couple minor detail parts.
KurtLaughlin
Pennsylvania, United States
Joined: January 18, 2003
KitMaker: 2,402 posts
Armorama: 2,377 posts
Joined: January 18, 2003
KitMaker: 2,402 posts
Armorama: 2,377 posts
Posted: Friday, June 21, 2019 - 01:16 PM UTC
Quoted Text
Kurt, there are numerous aftermarket sets out there for the screens, but I found Aber’s are way over-engineered, Lion Roar’s are incorrectly shaped, and other manufacturers’ screens usually come as part of larger general update sets. Eduard’s TP088 offers a good balance of accuracy and detail with ease of assembly, and is relatively cheap since it only includes the screens and a couple minor detail parts.
Yeah, that's why I went with reworking the plastic. It probably took less time than mucking with the PE frames. I liked their air exhaust screens too. Their air deflector was made backwards, however. I was looking for the Eduard set at AMPS but I think I only saw one KV fender set at the whole show.
KL
MrNeil
New Jersey, United States
Joined: November 01, 2005
KitMaker: 266 posts
Armorama: 262 posts
Joined: November 01, 2005
KitMaker: 266 posts
Armorama: 262 posts
Posted: Friday, June 21, 2019 - 01:32 PM UTC
Your hollowed out plastic frames with the Aber mesh came out pretty nice!
Posted: Friday, June 21, 2019 - 04:58 PM UTC
Following your build,Mr.Neil!
I just finished building a 1942 KV-1(#00358) and the instructions given in your wonderfull website came very handy!
MrNeil
New Jersey, United States
Joined: November 01, 2005
KitMaker: 266 posts
Armorama: 262 posts
Joined: November 01, 2005
KitMaker: 266 posts
Armorama: 262 posts
Posted: Saturday, June 22, 2019 - 01:14 AM UTC
Glad you found it useful, Angel
rfbaer
Texas, United States
Joined: June 12, 2007
KitMaker: 1,866 posts
Armorama: 1,696 posts
Joined: June 12, 2007
KitMaker: 1,866 posts
Armorama: 1,696 posts
Posted: Sunday, June 23, 2019 - 02:22 AM UTC
What an ideal way to use up some KV spares I have myself, plus an excellent how-to.
panamadan
Minnesota, United States
Joined: July 20, 2004
KitMaker: 1,513 posts
Armorama: 1,449 posts
Joined: July 20, 2004
KitMaker: 1,513 posts
Armorama: 1,449 posts
Posted: Sunday, June 23, 2019 - 02:45 AM UTC
Fun to watch Neil!
Dan
Dan
Posted: Sunday, June 23, 2019 - 04:12 AM UTC
It is good to see the KV master building on the site.
lancew
Auckland, New Zealand
Joined: April 15, 2006
KitMaker: 10 posts
Armorama: 9 posts
Joined: April 15, 2006
KitMaker: 10 posts
Armorama: 9 posts
Posted: Sunday, June 23, 2019 - 08:45 AM UTC
Following this with interest it's always nice to find one these oddball KV subjects.
One question re the coaming around the driver's visor. I know this was a feature of KV-8's and was wondering how common this was on normal KV's like mthis one
MrNeil
New Jersey, United States
Joined: November 01, 2005
KitMaker: 266 posts
Armorama: 262 posts
Joined: November 01, 2005
KitMaker: 266 posts
Armorama: 262 posts
Posted: Monday, June 24, 2019 - 01:28 AM UTC
Quoted Text
Following this with interest it's always nice to find one these oddball KV subjects.
One question re the coaming around the driver's visor. I know this was a feature of KV-8's and was wondering how common this was on normal KV's like mthis one
Lance, I've never seen the extended coaming on any vehicles except KV-8s and this batch of hybrids. That leads me to wonder if those 'spare' hulls were originally intended for KV-8 production.
Of course, I might simply have not seen the right photos
lancew
Auckland, New Zealand
Joined: April 15, 2006
KitMaker: 10 posts
Armorama: 9 posts
Joined: April 15, 2006
KitMaker: 10 posts
Armorama: 9 posts
Posted: Monday, June 24, 2019 - 11:07 AM UTC
I was wondering the same the same thing. But just like with researching Shermans it seems you can never say never when it comes to KV's