HI guys,
i'm looking to get some pictures of the engine from a ISU 152K and for some reason i can't find any when i do a google search so i guess i'm doing something wrong. I have been told that it's similar to T54 engine and i have bough the miniart engine kit but there are two versions so i need to know which one to assemble.
thanks
Armor/AFV
For discussions on tanks, artillery, jeeps, etc.
For discussions on tanks, artillery, jeeps, etc.
Hosted by Darren Baker, Mario Matijasic
ISU152K engine pictures needed
Klaus-Adler

Joined: June 08, 2015
KitMaker: 1,505 posts
Armorama: 840 posts

Posted: Saturday, June 29, 2019 - 09:56 AM UTC

Frenchy

Joined: December 02, 2002
KitMaker: 12,719 posts
Armorama: 12,507 posts

Posted: Saturday, June 29, 2019 - 10:26 AM UTC
Here are some TM views of the V-54K engine as fitted to the ISU-152K :
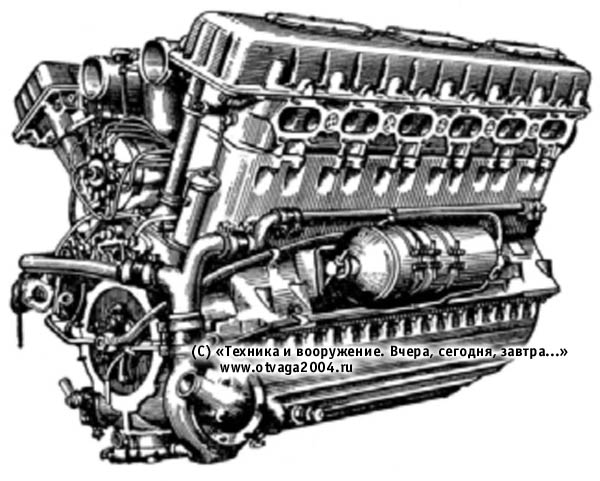
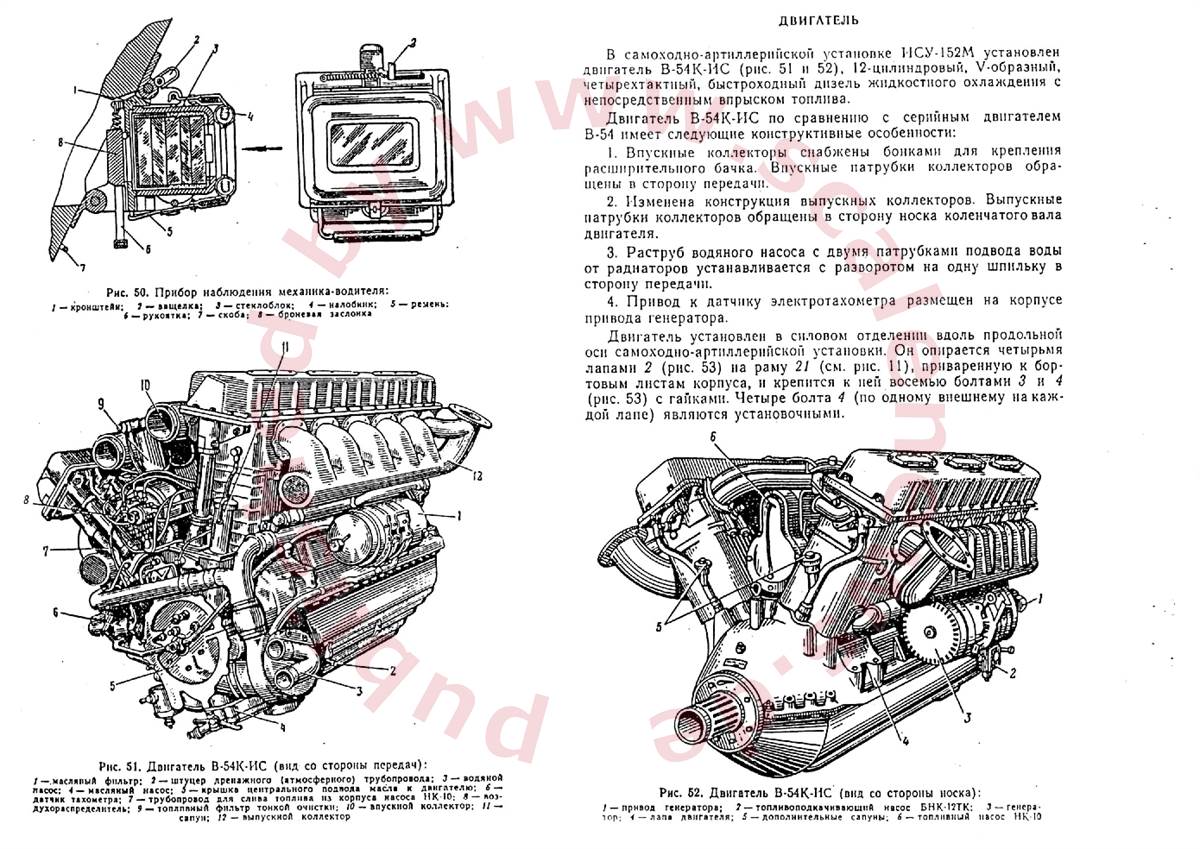
and here's the T-54 engine (V-54) :
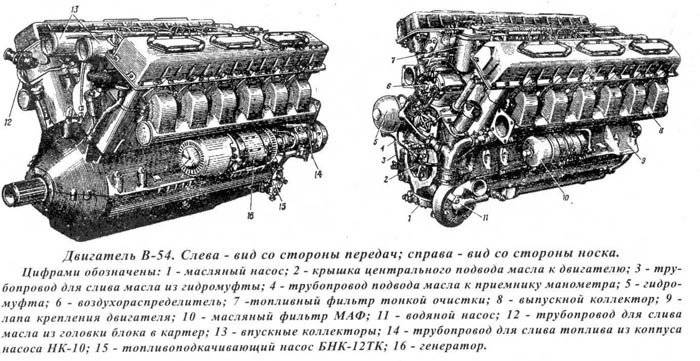
H.P.


and here's the T-54 engine (V-54) :

H.P.
Klaus-Adler

Joined: June 08, 2015
KitMaker: 1,505 posts
Armorama: 840 posts

Posted: Saturday, June 29, 2019 - 11:34 AM UTC
Damn Frenchy, i don't, know how you do it but you always turn up trumps, many thanks, at least i know which version of the mini-art kit i need to build

Frenchy

Joined: December 02, 2002
KitMaker: 12,719 posts
Armorama: 12,507 posts

Posted: Saturday, June 29, 2019 - 11:49 AM UTC
You're welcome David  I'm not sure it's really important, but I've just noticed that these drawings :

in fact show the V-54K-IS engine, fitted to the ISU-152M. (just try to spot the differences... )
)
Here's the engine bay :
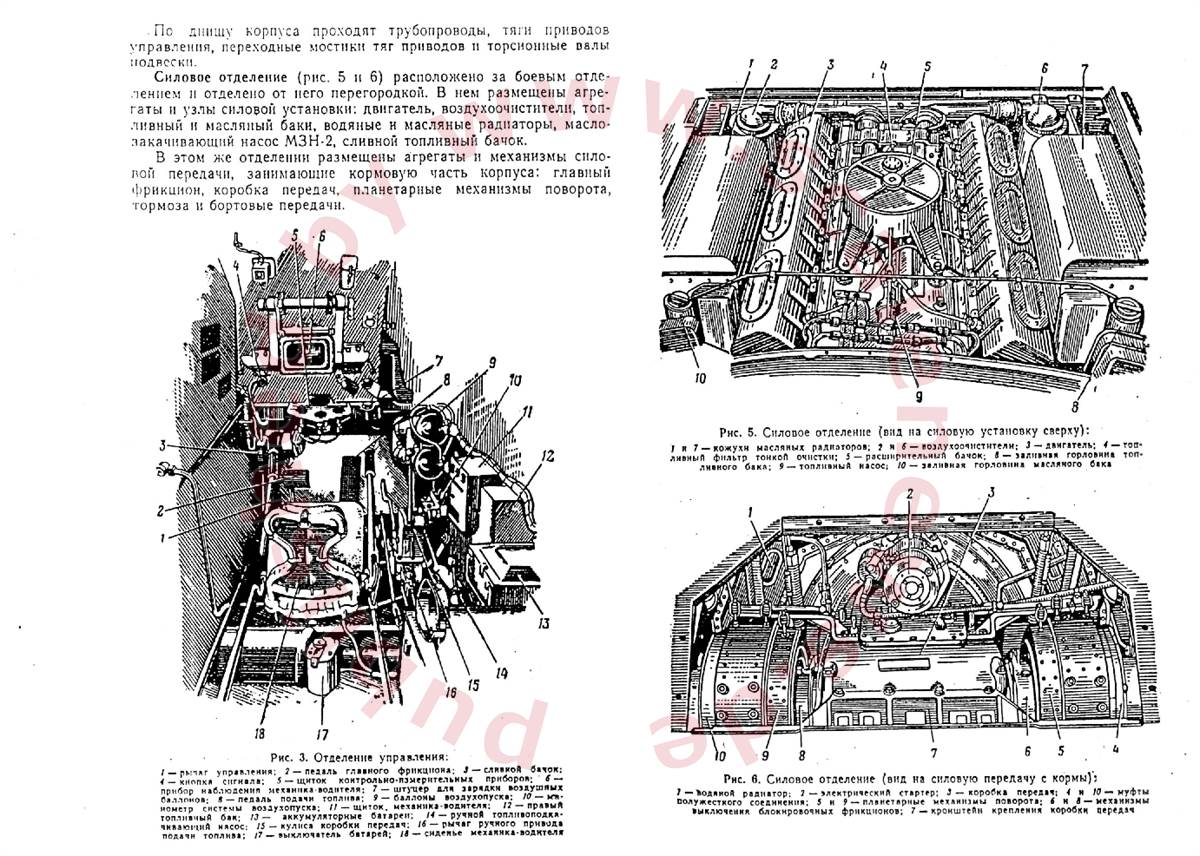
H.P.
 I'm not sure it's really important, but I've just noticed that these drawings :
in fact show the V-54K-IS engine, fitted to the ISU-152M. (just try to spot the differences...
 )
)Here's the engine bay :

H.P.
Klaus-Adler

Joined: June 08, 2015
KitMaker: 1,505 posts
Armorama: 840 posts

Posted: Sunday, June 30, 2019 - 01:12 AM UTC
Thanks again Frenchy, is there any chance you can whistle up some photographs of the engine in the actual engine compartmet?
i tried the obvious search on google but come up dry again... i guess i am useless at this sort of thing.
i tried the obvious search on google but come up dry again... i guess i am useless at this sort of thing.

Frenchy

Joined: December 02, 2002
KitMaker: 12,719 posts
Armorama: 12,507 posts

Posted: Tuesday, July 02, 2019 - 12:08 AM UTC
I agree pics are not thick on the ground.... 
Here are some restoration pics :
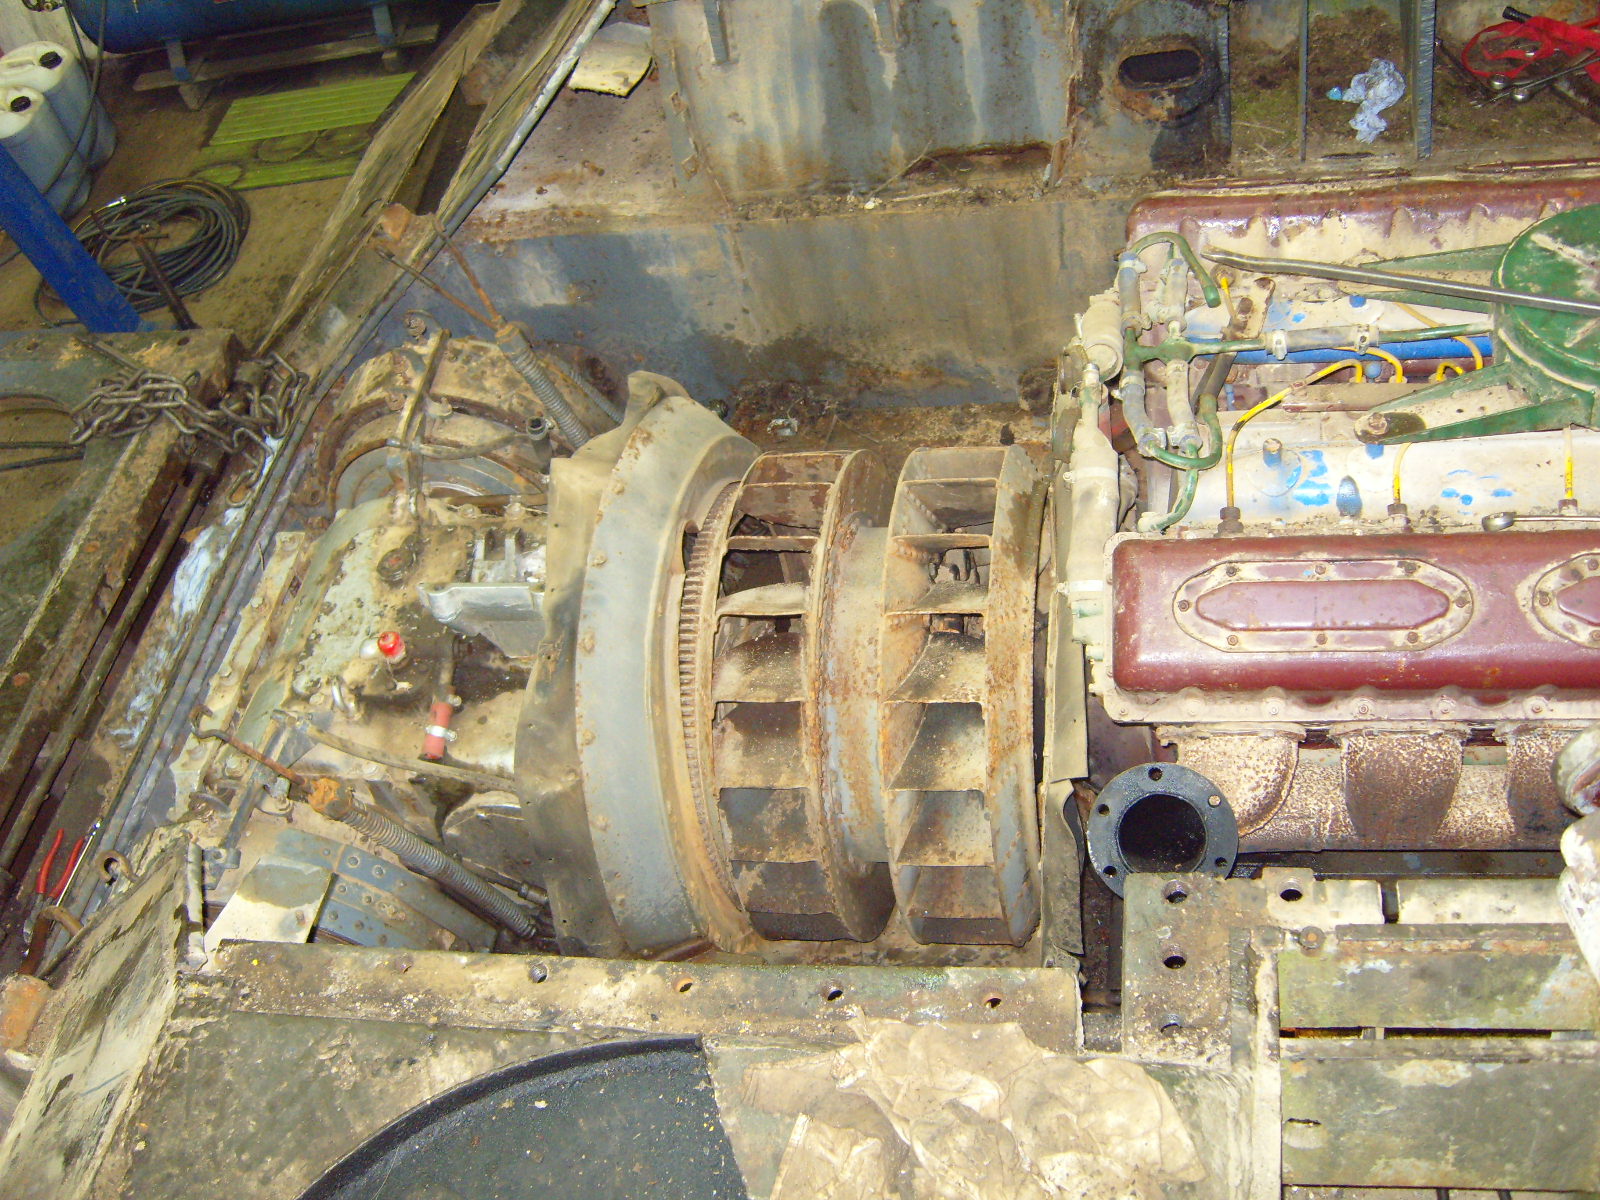
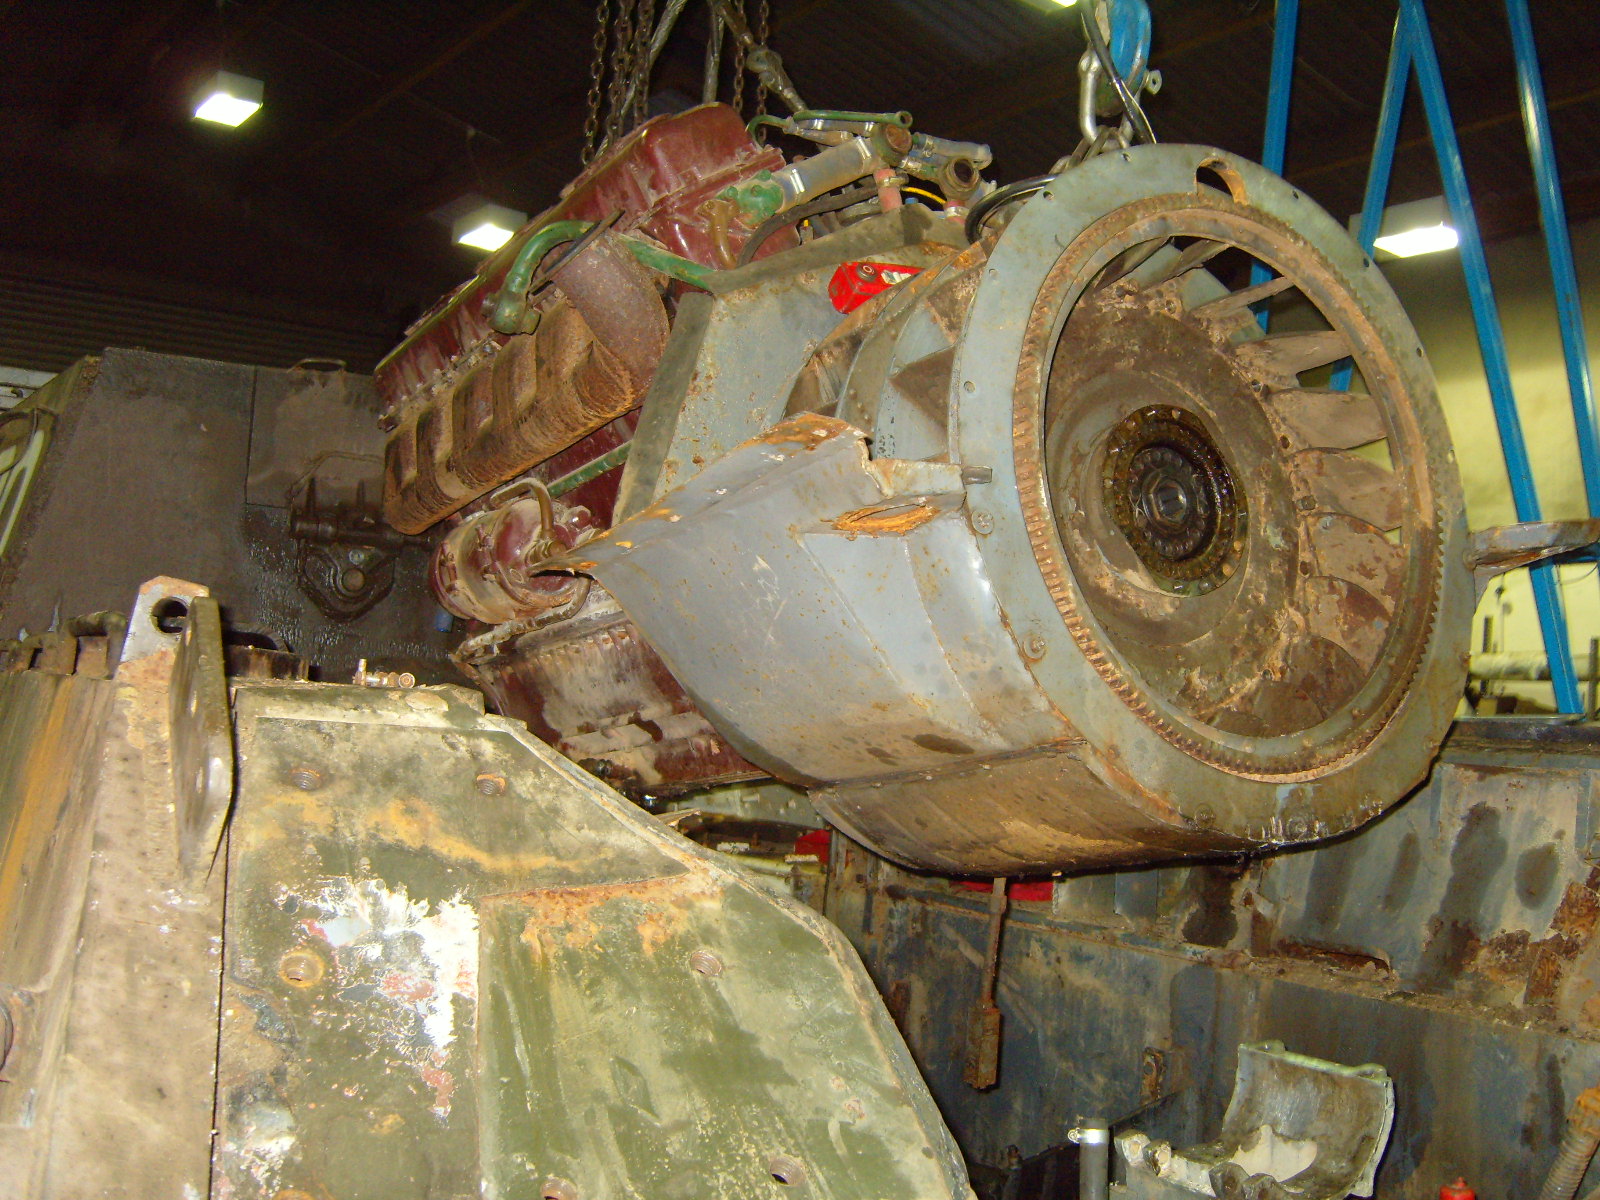
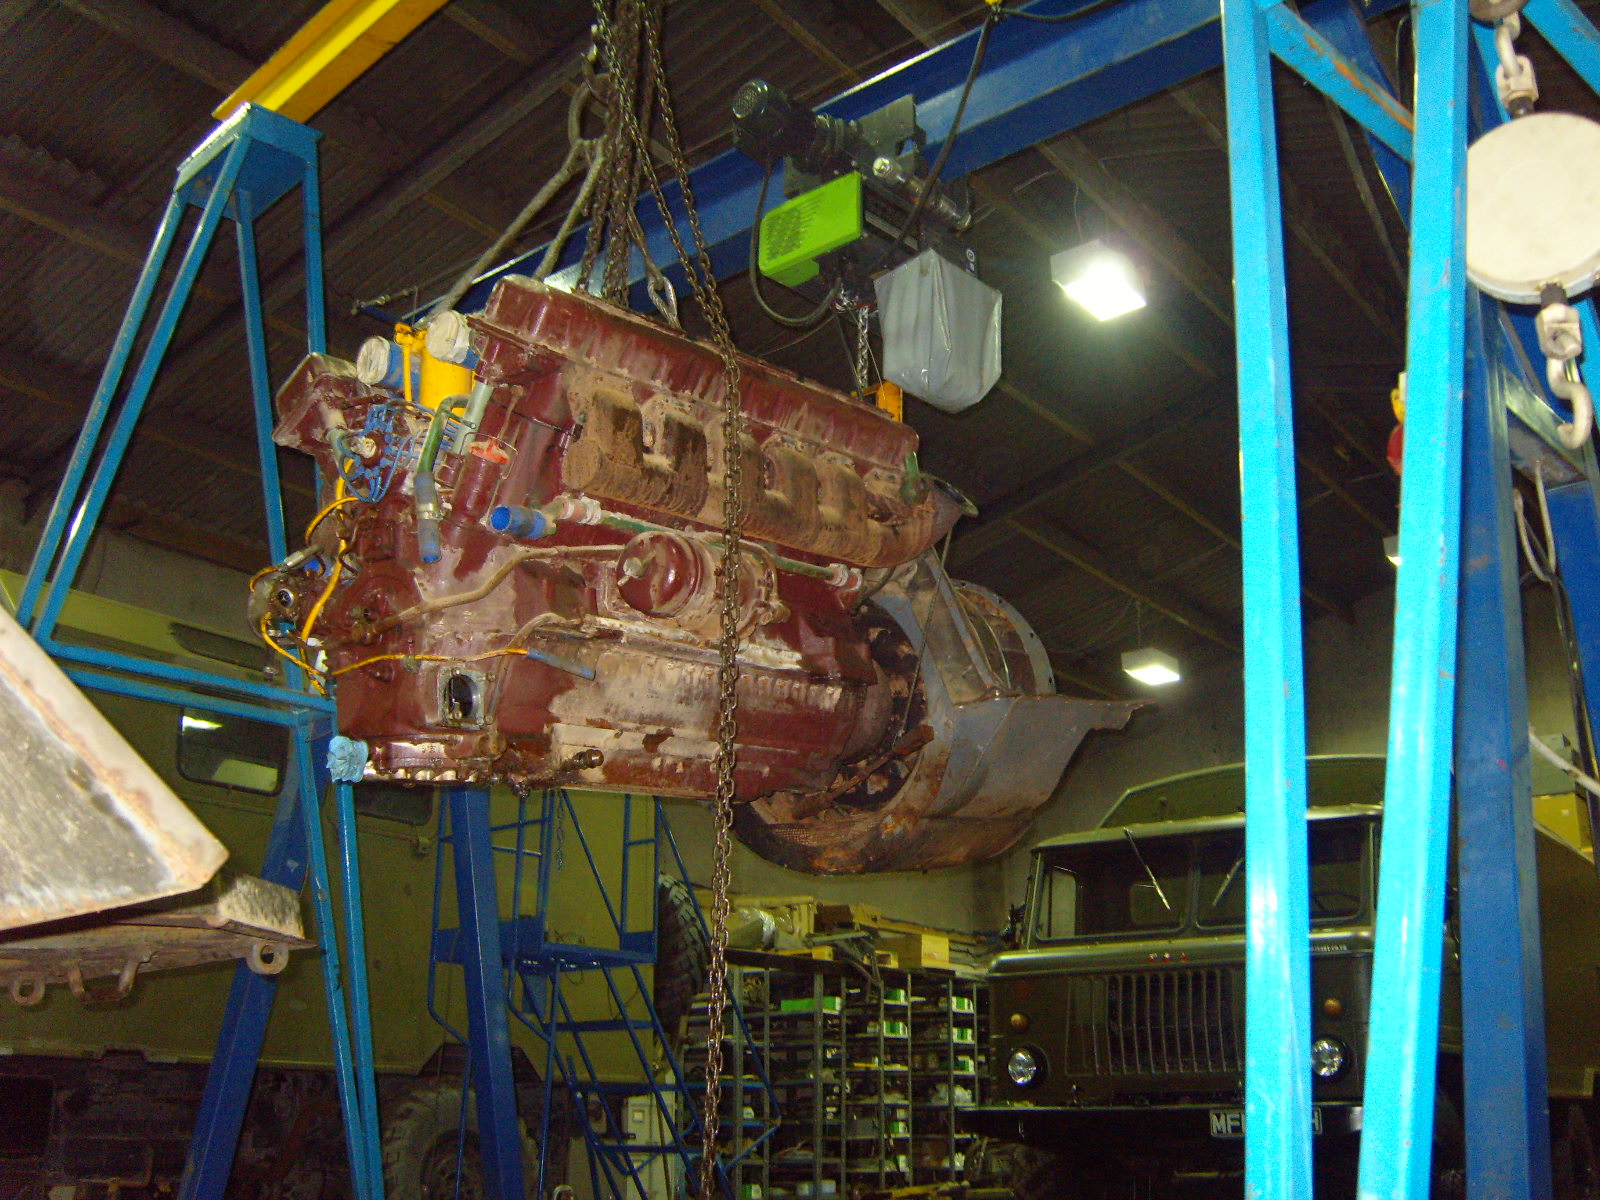
from this blog (videos included ) :
) :
http://www.russianmilitary.co.uk/blog.php
PS : I don't know what ISU-152 version it is....
H.P.

Here are some restoration pics :
from this blog (videos included
 ) :
) :http://www.russianmilitary.co.uk/blog.php
PS : I don't know what ISU-152 version it is....
H.P.
Posted: Tuesday, July 02, 2019 - 12:28 AM UTC
David,
You can download the Manual for ISU-152 and ISU-152K here:
https://yadi.sk/d/Ct5mp_TD1zPS8
The Manual is in djvu format.
Engine starts from p.100 onwards.
HTH

You can download the Manual for ISU-152 and ISU-152K here:
https://yadi.sk/d/Ct5mp_TD1zPS8
The Manual is in djvu format.
Engine starts from p.100 onwards.
HTH


Frenchy

Joined: December 02, 2002
KitMaker: 12,719 posts
Armorama: 12,507 posts

Posted: Tuesday, July 02, 2019 - 01:51 AM UTC
Some engine bay glimpses here (looks like these guys have a genuine copy of the TM  ) :
) :
https://www.youtube.com/watch?v=n_aDMqFrUV8&feature=player_embedded
H.P.
 ) :
) :https://www.youtube.com/watch?v=n_aDMqFrUV8&feature=player_embedded
H.P.
Klaus-Adler

Joined: June 08, 2015
KitMaker: 1,505 posts
Armorama: 840 posts

Posted: Saturday, July 06, 2019 - 10:32 PM UTC
hi guys,
i bought the mini art engine kits and i was wondering which one of the two would be ideal for the ISU 152K?
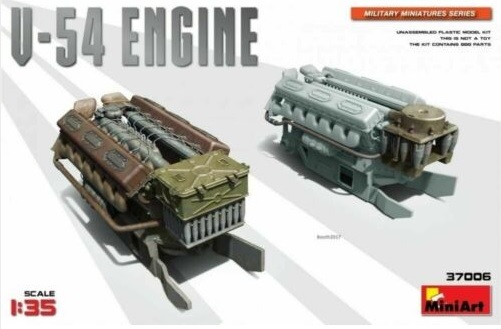
i bought the mini art engine kits and i was wondering which one of the two would be ideal for the ISU 152K?

Posted: Sunday, July 07, 2019 - 01:54 AM UTC
David,
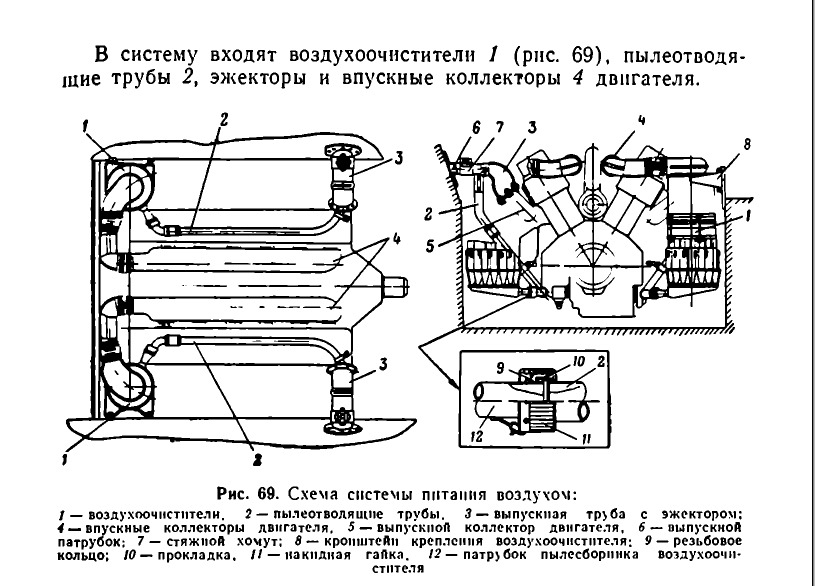
The V-54K-IS engine running on the ISU-152K was longitudinal and had 2 airfilters(VTI-2), while the kit you bought represent transverse mounted V-54.
You'll need to replicate those 2 airfilters-none of the options provided in the kit is appropriate.
Airfilters are under #1:
This is how an airfilter looks:
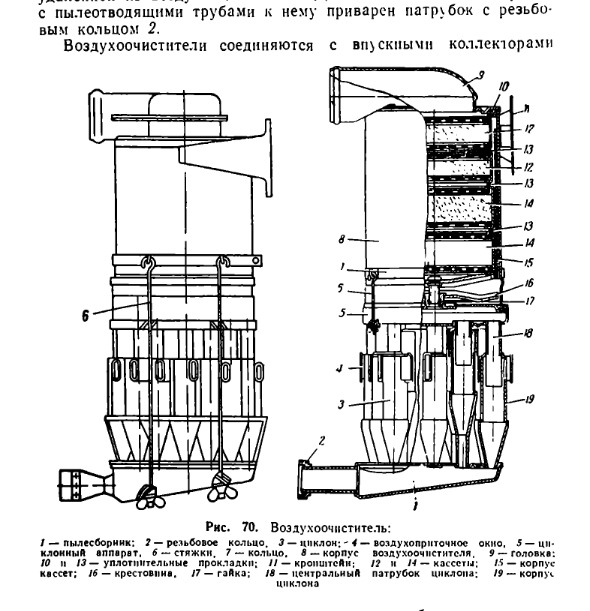
HTH

The V-54K-IS engine running on the ISU-152K was longitudinal and had 2 airfilters(VTI-2), while the kit you bought represent transverse mounted V-54.
You'll need to replicate those 2 airfilters-none of the options provided in the kit is appropriate.
Airfilters are under #1:

This is how an airfilter looks:

HTH

Klaus-Adler

Joined: June 08, 2015
KitMaker: 1,505 posts
Armorama: 840 posts

Posted: Sunday, July 07, 2019 - 02:15 AM UTC
what about the big square box on the front of the engine that is on the left side of the picture or the one with the large cylinder on the top on the engine on the right?

Frenchy

Joined: December 02, 2002
KitMaker: 12,719 posts
Armorama: 12,507 posts

Posted: Sunday, July 07, 2019 - 02:41 AM UTC
In both cases, these are the air filters, but as Angel has explained , none are useable with the ISU-152K. You'll have to scratchbuild new filters, as per the drawings Angel has posted.
H.P.
H.P.
Posted: Sunday, July 07, 2019 - 05:37 AM UTC
David,
Those filters are mounted pretty low and won't be too visible.
What I would do if I was walking in your shoes is-I would use the parts provided for the VTI-4 airfilter(the big square box on the left engine) in the kit you purchased:
1.I would cut parts Ha12 and Ha 13 in halves, so that each half contains 4 pipes(the inverted bottle shaped features).
2.I would use each of these halves and Ha10/Ha11 to build 2 sides of the lower airfilter-those sides that might be visible.
3.I would measure and cut styrene sheets for the bottom of the airfilter and the other 2 sides.
Thus I will have 2 airfilter bases.
Then I would add cylinder from styrene(either rod, or rolled sheet) to represent the Cyclone(the upper) part of the airfilter.
And finaly-I would add some bent styrene rods(or stretched sprue) to represent the air feeding pipes.
HTH,

Klaus-Adler

Joined: June 08, 2015
KitMaker: 1,505 posts
Armorama: 840 posts

Posted: Monday, July 08, 2019 - 02:45 AM UTC
hi guys, many thanks for all the help so far, does anyone have any pictures of the actual air filter used on the ISU 152K, i'm not very good with technical drawings and an actual picture would be better thanks.

Frenchy

Joined: December 02, 2002
KitMaker: 12,719 posts
Armorama: 12,507 posts

Posted: Monday, July 08, 2019 - 02:52 AM UTC
(I didn't know what these were until Angel posted the drawings
 )
)H.P.
Klaus-Adler

Joined: June 08, 2015
KitMaker: 1,505 posts
Armorama: 840 posts

Posted: Wednesday, July 10, 2019 - 01:12 PM UTC
Frenchy you're a genius, I tried every version of "isu 152k air filters" and found nothing...how the hell do you manage to do it.
many thanks for all of your help, you guys are amazing.
many thanks for all of your help, you guys are amazing.

Frenchy

Joined: December 02, 2002
KitMaker: 12,719 posts
Armorama: 12,507 posts

Posted: Wednesday, July 10, 2019 - 05:12 PM UTC
You're welcome. The picture comes from the blog I've mentionned in a previous post.
H.P.
H.P.
Klaus-Adler

Joined: June 08, 2015
KitMaker: 1,505 posts
Armorama: 840 posts

Posted: Wednesday, August 07, 2019 - 06:08 AM UTC
that's the video I'm using as my main source of information. I would love to know what that bowl shaped item is that is on the top of the engine.
incidentally the engine compartment access hatch on the trumpeter kit is molded closed so will have to drill that out and fabricate a new one
incidentally the engine compartment access hatch on the trumpeter kit is molded closed so will have to drill that out and fabricate a new one
MrNeil

Joined: November 01, 2005
KitMaker: 266 posts
Armorama: 262 posts

Posted: Wednesday, August 07, 2019 - 06:24 AM UTC
Quoted Text
that's the video I'm using as my main source of information. I would love to know what that bowl shaped item is that is on the top of the engine.
The bowl shaped item is the header tank for the cooling system.
 |


