_GOTOBOTTOM
Armor/AFV: Modern - USA
Modern Armor, AFVs, and Support vehicles.
Hosted by Darren Baker
M49A2 Fueler rebuild
HeavyArty
Visit this Community
Florida, United States
Joined: May 16, 2002
KitMaker: 17,694 posts
Armorama: 13,742 posts
Posted: Friday, July 05, 2019 - 03:50 AM UTC
I am currently rebuilding an old model that I had used for parts. I built the AFV Club M49A2C shortly after it came out, around late '94 to early '95 when I was in OBC at Ft Sill, OK. A few years later (2004-ish), I pulled the cab and a few other parts off it to build my M54A1 "King Cobra" guntruck.


The rest of the fueler was relegated to the spares bin.

Recently, I came across it and decided to rebuild it. To do so, I needed a new cab. I was able to source a complete cab parts B sprue from the AFV Club M35 series trucks from a contact in Hong Kong.


I also sourced some missing parts from a member here, Wayne "namengr" Wickell. Thanks to him for the missing gear box, fuel tank, and a couple other small parts.

The rest of the frame and M49 tanker-specific parts were mostly still there, albiet a little worse for wear. I had to rebuild a few things and reattach a lot of the parts. The frame alone was in four pieces with all the axles separate. I built the air tanks in the middle of the frame from scratch.


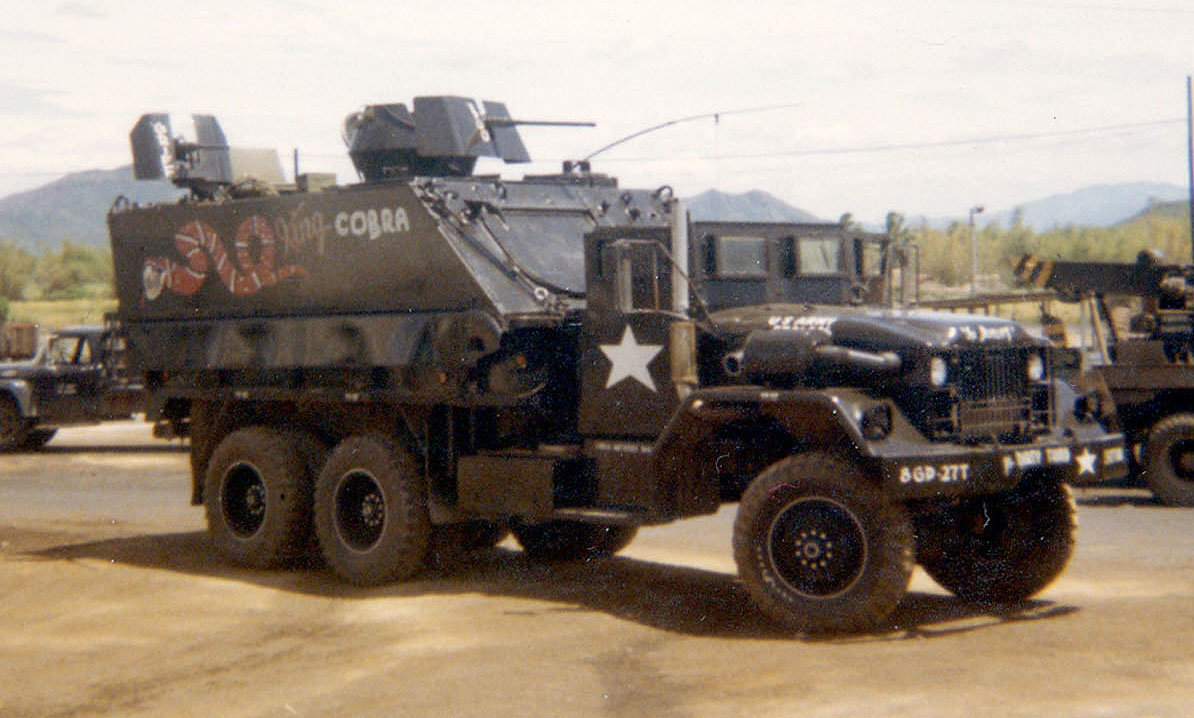
I plan on building it as a late Vietnam to early '70s era M49A2 w/o winch in overall green with white markings, like below.


Here it is so far, ready for paint.


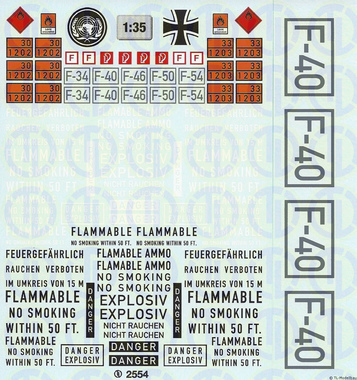
For markings, I found a German decal set from TL Modellbau that includes the "Flammable No Smoking..." markings in white, as well as black.


I will be using decals from the M35A1 "Nancy" Gun Truck kit for common markings in white. I also have a set of the Archer M35 instrument decals for it as well.

I hope to have some paint on it soon and I am waiting for the decals to come in.

namengr
Visit this Community
Illinois, United States
Joined: September 01, 2014
KitMaker: 332 posts
Armorama: 328 posts
Posted: Friday, July 05, 2019 - 04:32 AM UTC

Glad I could help you bring this old girl back to life. Will be watching to see the finished project. Wayne
HeavyArty
Visit this Community
Florida, United States
Joined: May 16, 2002
KitMaker: 17,694 posts
Armorama: 13,742 posts
Posted: Tuesday, July 16, 2019 - 12:49 PM UTC
Work continues on the fuel truck. I was able to get it painted and added all the decals. I used Testors Model Master Olive Drab for the overall color. Next up is a dullcoat, painting the lights, and weathering.

The Archer cab decals are really nice. They really dress up the cab and instrument cluster.


The white common markings (stars, US Army serial numbers, stenciling, etc.) are all from the AFV Club M35A1 Nancy Guntruck. The bumper numbers are from the spares bin. The "Flammable..." decals are from the TL Modellbau set.


The decals in the pump compartment are from the fueler kit.


More to come as I continue.
SpeedyJ
Visit this Community
Bangkok, Thailand / ไทย
Joined: September 17, 2013
KitMaker: 1,617 posts
Armorama: 1,150 posts
Posted: Tuesday, July 16, 2019 - 02:07 PM UTC
Great stuff. Fuelers are cool subjects.

Kind regards,

Robert Jan
HeavyArty
Visit this Community
Florida, United States
Joined: May 16, 2002
KitMaker: 17,694 posts
Armorama: 13,742 posts
Posted: Wednesday, July 17, 2019 - 02:06 AM UTC
Thanks Robert Jan. I think it is a pretty cool subject and am enjoying the rebuild.
barkingdigger
Staff MemberAssociate Editor
ARMORAMA
#013
Visit this Community
England - East Anglia, United Kingdom
Joined: June 20, 2008
KitMaker: 3,981 posts
Armorama: 3,403 posts
Posted: Wednesday, July 17, 2019 - 07:29 AM UTC
Great work as usual, Gino!

On the photo it says "Potable Water" below the "Flammable" - were they kidding? I've never, ever, met a container that could be cleaned thoroughly enough to hold drinking water that wouldn't make you retch after it had held fuel - no matter how well it was steamed out. Or did 11CAV have access to some kind of magic?...
HeavyArty
Visit this Community
Florida, United States
Joined: May 16, 2002
KitMaker: 17,694 posts
Armorama: 13,742 posts
Posted: Wednesday, July 17, 2019 - 08:36 AM UTC
Thanks. I like how it is coming out.

No idea on the "Flammable...Potable Water" bit. Maybe it is Fire Water, good stuff!!
namengr
Visit this Community
Illinois, United States
Joined: September 01, 2014
KitMaker: 332 posts
Armorama: 328 posts
Posted: Wednesday, July 17, 2019 - 10:39 AM UTC
More than likely they used the tankers to haul water for use in washing down vehicles. They needed to make use of whatever was handy. We used stuff that was never intended for what we used them for. We had a water tanker trailer that we used for wetting down our haul roads. When we stood down there was no paperwork for it so we drove out to a perimeter road and unhooked and left it. Allegedly! Scrounge, make do, adapt. Wayne
HeavyArty
Visit this Community
Florida, United States
Joined: May 16, 2002
KitMaker: 17,694 posts
Armorama: 13,742 posts
Posted: Wednesday, July 17, 2019 - 11:33 PM UTC

Quoted Text

More than likely they used the tankers to haul water for use in washing down vehicles.


Maybe. But I think it would say "Non-Potable Water" if that was the case. Still a mystery.
namengr
Visit this Community
Illinois, United States
Joined: September 01, 2014
KitMaker: 332 posts
Armorama: 328 posts
Posted: Thursday, July 18, 2019 - 05:32 AM UTC
Yeah, that is confusing. Maybe it started as a water truck and was switched over to a gasser. Also, thanks for the heads up on the tanker decals, just ordered some for mine. Wayne
HeavyArty
Visit this Community
Florida, United States
Joined: May 16, 2002
KitMaker: 17,694 posts
Armorama: 13,742 posts
Posted: Monday, July 22, 2019 - 09:42 AM UTC
It is complete. I painted the seats and top field drab. I drybrushed with a sandy color and a bit of a rust color. Then a light wash of an acrylic sandy color.

Here are the finished pics.


Interior.


With a figure for a bit of scale, guarding the fueler.


It has been a fun rebuild. It also shows how much my building and skills have changed since I first built it in '94. That seems like ages ago.
namengr
Visit this Community
Illinois, United States
Joined: September 01, 2014
KitMaker: 332 posts
Armorama: 328 posts
Posted: Monday, July 22, 2019 - 10:06 AM UTC
Turned out great. would fit right in to a VN convoy dio or scene. Wayne
HeavyArty
Visit this Community
Florida, United States
Joined: May 16, 2002
KitMaker: 17,694 posts
Armorama: 13,742 posts
Posted: Monday, July 22, 2019 - 11:42 PM UTC
Thanks Wayne, I like how it turned out. Thanks for your help on it as well.
Beast
Visit this Community
Michigan, United States
Joined: October 21, 2005
KitMaker: 55 posts
Armorama: 55 posts
Posted: Tuesday, July 23, 2019 - 05:42 AM UTC
Looks outstanding! The only small thing I see is that the hood star is facing the wrong direction. On post WWII US Army vehicles the star points forward (leading the way). And yes great call on the Modellbau decal set for the FLAMEABLE markings in white. I used them a few years ago to replicate a M49 that my father drove while in Korea in the early 60's

HeavyArty
Visit this Community
Florida, United States
Joined: May 16, 2002
KitMaker: 17,694 posts
Armorama: 13,742 posts
Posted: Tuesday, July 23, 2019 - 05:59 AM UTC
Thanks. It was a fun rebuild.


Quoted Text

The only small thing I see is that the hood star is facing the wrong direction. On post WWII US Army vehicles the star points forward (leading the way).


Well, yes, that is what the regulation says, but the reg is not always followed...

I put it on, sealed it down, then thought the same thing. After looking at pictures of actual M35A1 series trucks w/the white stars, it looks about 50/50 on which way they point. Also, the actual Nancy Guntruck had the star pointing towards the windshield (rear).


This is also depicted on the AFV Club 1/35 Nancy instructions, which is what I followed for decal placement.


Based on the above, I decided to leave it as is.

m75
Visit this Community
California, United States
Joined: July 20, 2002
KitMaker: 666 posts
Armorama: 661 posts
Posted: Wednesday, July 24, 2019 - 02:16 AM UTC
Nice work Gino.

I have had similar experiences with the hood star, and end up using whatever decals and directions are handy.

A recurring observation is that it seems all manufacturers of the standard military cab for cargo trucks (M35, M52, etc) don't realize that there are roll-up windows within the doors, although there might be window cranks included in the kit. The top edge of the doors is always a solid block with no representation of the window glass frame. And the window channel guide (the triangle fillet) at the front edge of the door is a three-sided sheet metal piece that the front edge of the window runs through as it is raised or lowered.
Frenchy
Visit this Community
Rhone, France
Joined: December 02, 2002
KitMaker: 12,719 posts
Armorama: 12,507 posts
Posted: Wednesday, July 24, 2019 - 02:22 AM UTC


H.P.
HeavyArty
Visit this Community
Florida, United States
Joined: May 16, 2002
KitMaker: 17,694 posts
Armorama: 13,742 posts
Posted: Wednesday, July 24, 2019 - 02:45 AM UTC
Yes, one small blip of the kit(s) that I knew about. However, AFV Club intends you (per instructions) to build it with the side door windows up (glass in place), thus negating the need for additional details on the tops of the doors. I didn't see the need to add any more details there as most won't recognize it anyways. Maybe I will add the details to the next M35/M54 build, we'll see.

Beast
Visit this Community
Michigan, United States
Joined: October 21, 2005
KitMaker: 55 posts
Armorama: 55 posts
Posted: Wednesday, July 24, 2019 - 05:10 AM UTC
Here was some pics of the one I did a couple of years ago.


HeavyArty
Visit this Community
Florida, United States
Joined: May 16, 2002
KitMaker: 17,694 posts
Armorama: 13,742 posts
Posted: Wednesday, July 24, 2019 - 08:50 AM UTC
Good job. Yours looks nice as well.
CMOT
Staff MemberEditor-in-Chief
ARMORAMA
Visit this Community
England - South West, United Kingdom
Joined: May 14, 2006
KitMaker: 10,954 posts
Armorama: 8,571 posts
Posted: Monday, August 19, 2019 - 04:06 AM UTC
Gino what is the best kit to buy to replicate this vehicle as I was asking someone about it a couple of weeks ago? I have plenty of M113's for the task.
HeavyArty
Visit this Community
Florida, United States
Joined: May 16, 2002
KitMaker: 17,694 posts
Armorama: 13,742 posts
Posted: Monday, August 19, 2019 - 04:36 AM UTC

Quoted Text

Gino what is the best kit to buy to replicate this vehicle as I was asking someone about it a couple of weeks ago? I have plenty of M113's for the task.


I am assuming you are talking about one of the below 5-ton guntrucks w/an M113 on back.


The truck was an M54 5-ton. AFV Club's new-ish M54A2 kit is perfect for them and is an awesomely detailed kit to boot.


CMOT
Staff MemberEditor-in-Chief
ARMORAMA
Visit this Community
England - South West, United Kingdom
Joined: May 14, 2006
KitMaker: 10,954 posts
Armorama: 8,571 posts
Posted: Monday, August 19, 2019 - 05:50 AM UTC
Thank you Gino
 _GOTOTOP