20' Standard Refrigerated Container

#521
Kentucky, United States
Joined: April 13, 2011
KitMaker: 9,465 posts
Armorama: 8,695 posts
Posted: Saturday, August 17, 2019 - 03:04 AM UTC
In keeping with the whole "Container and Logistics" theme I seem to have going here, I show my current WIP:
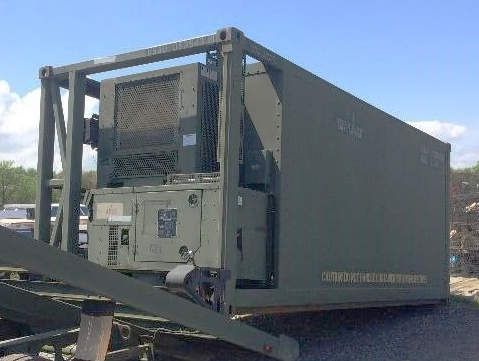
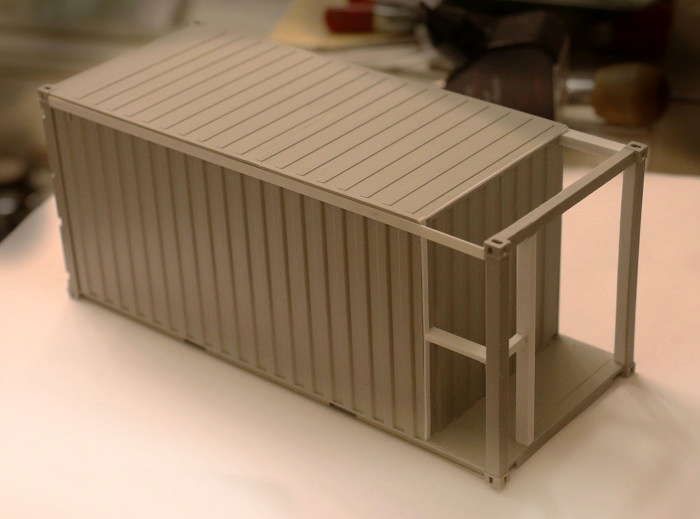
Refrigerated 20' Container. Starting with a standard Italeri 20' container I left the floor panel unchanged while shortening the sidewalls and the roof. From the cut-off wall pieces I separated out the structural beams that form the end framing and connector blocks for the container and framed them up with Evergreen shapes to form the open frame protective structure around the generator and the refrigeration equipment.
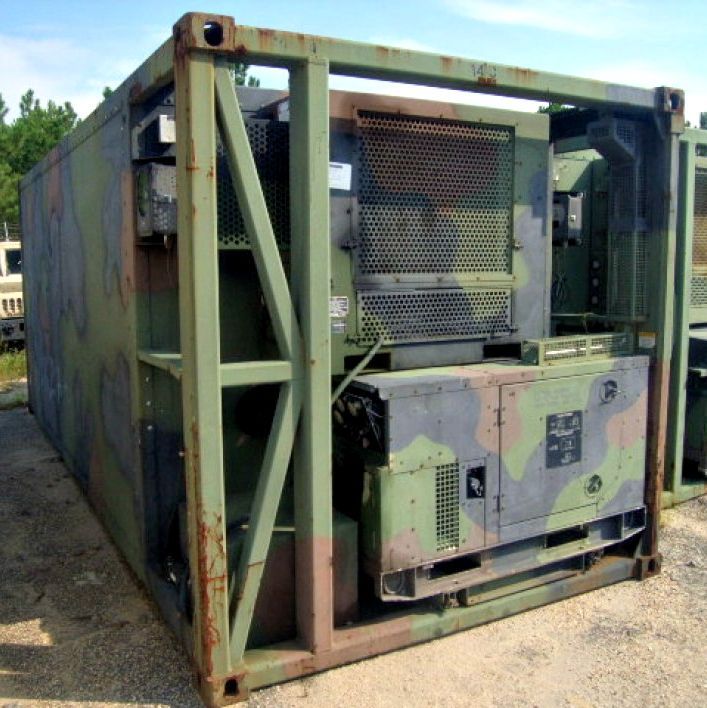
Diesel generator below and refrigeration unit above.


#521
Kentucky, United States
Joined: April 13, 2011
KitMaker: 9,465 posts
Armorama: 8,695 posts
Posted: Saturday, August 17, 2019 - 03:08 AM UTC
The first order of business is the cutting and shortening of the original side and roof panels and the structural framing of the open equipment end of the container:
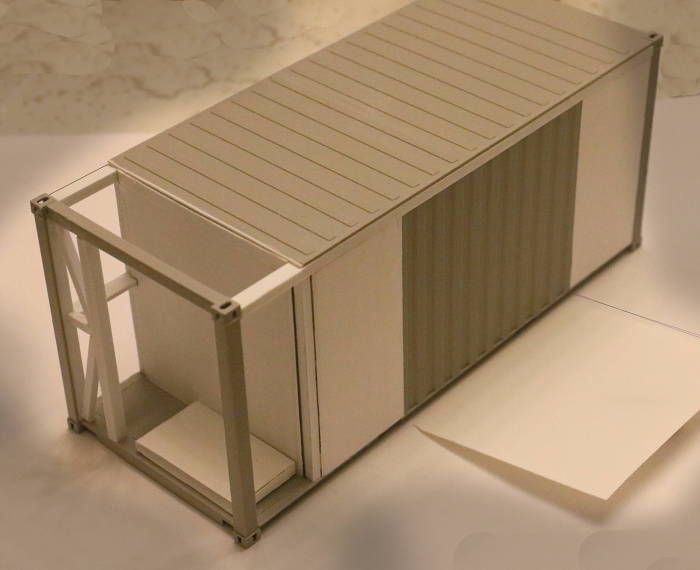
The second step is the adding of the new insulated sheathing over the existing corrugated siding:


#521
Kentucky, United States
Joined: April 13, 2011
KitMaker: 9,465 posts
Armorama: 8,695 posts
Posted: Saturday, August 17, 2019 - 03:21 AM UTC
Next up would be the beginnings of building the Generator (Genset) and the refrigeration unit:
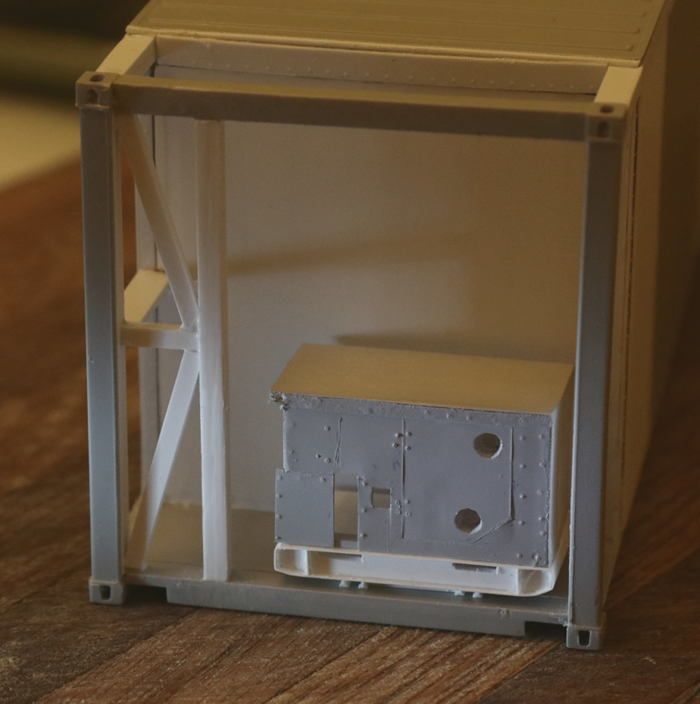
The base skid for the Genset I built by first shaping front and rear formers and then wrapping them with a very thin plastic sheet. (What Tamiya calls "Plastic Paper")

.

Following that I am slowly building up the generator enclosure using the same thin plastic sheet and scribing the panels and doors into this. I use a very small "all" (a old compass point) to add rivet detail.
The large holes are the rotary door locking handles and I will be adding a small bit of brass screen wire to enclose that vertical vent opening. Finally small diameter plastic rod will be added to form the door hinges.
 Next the floor mounted fuel tank!
Florida, United States
Joined: May 16, 2002
KitMaker: 17,694 posts
Armorama: 13,742 posts
Posted: Saturday, August 17, 2019 - 03:27 AM UTC
Looking good so far. Keep up the good work.
Field Artillery --- The KING of BATTLE!!!
"People sleep peaceably in their beds at night only because rough men stand ready to do violence on their behalf." -- George Orwell
Showcase

#521
Kentucky, United States
Joined: April 13, 2011
KitMaker: 9,465 posts
Armorama: 8,695 posts
Posted: Saturday, August 17, 2019 - 03:36 AM UTC
Thanks Gino!
___________________________
Point of information:What I am building here is the early designed refrigerated container. This early design still required either strapping it to a flatrack or using a CHU (Container Handling Unit) to load it onto the standard HEMTT LHS for transport.
Container Mounted to Flatrack for Loading:

Container Loaded Using Container Handling Unit (CHU): Everytime I consider the height of these containers when carried on the backs of the US HEMTT's I think all a foreign country has to do to defeat the US forces is build a lot of low hanging bridges! If they did this we couldn't get food or ammo to the troops - we would be defeated in no time! - (Just kidding - sort of.)
Pennsylvania, United States
Joined: January 18, 2003
KitMaker: 2,402 posts
Armorama: 2,377 posts
Posted: Saturday, August 17, 2019 - 03:43 AM UTC
I think the insulated containers use smooth sides. They have a double wall construction and don't need the reinforcing ribs used in single wall construction.
KL
Bayern, Germany
Joined: October 14, 2008
KitMaker: 4,099 posts
Armorama: 4,067 posts
Posted: Saturday, August 17, 2019 - 03:46 AM UTC
CAD Images mean nothing.
What does a rivet counter count on a cast or welded tank hull?

#521
Kentucky, United States
Joined: April 13, 2011
KitMaker: 9,465 posts
Armorama: 8,695 posts
Posted: Saturday, August 17, 2019 - 03:47 AM UTC
F.Y.I. - The newer designed refrigerated containers incorporate the flatrack structure right into the design of the container. So they are easier to handle, require no separate flatrack and ride lower on the standard HEMTT.
Since I already have a CHU I felt the earlier design reefer container would be more visually interesting for me!
 You might note many of these containers have the ability to run off of "ground power" rather then always running the generator. This is exhibited by there being a heavy extension cord to plug in to.


I have NO idea what that device in front of the container might be. My first thought would be a testing device to check either audio, thermal or magnetic signature of the container??? Probably audio since the container is sitting in a "quiet room" test chamber.Myanmar
Joined: March 05, 2004
KitMaker: 4,011 posts
Armorama: 1,498 posts
Posted: Saturday, August 17, 2019 - 03:49 AM UTC
I like the your build planning and resourcefulness. Good technique making those 'rivets'. Thanks for sharing.

i watched a scale plastic figure crawl along the edge . . . of an exacto blade . . . that's my dream , it's my nightmare . . . . . . . crawling , slithering . . . . . along the edge . . . . . . of an exacto . . . . . blade . . . . and surviving

#521
Kentucky, United States
Joined: April 13, 2011
KitMaker: 9,465 posts
Armorama: 8,695 posts
Posted: Saturday, August 17, 2019 - 03:54 AM UTC
Thanks Ko
___________________________________
Quoted Text
I think the insulated containers use smooth sides. They have a double wall construction and don't need the reinforcing ribs used in single wall construction.
KL
Correct - that is why I am covering the existing corrugated siding with more of the thin plastic paper as seen in step two above.
____________________________________
Sorry KL - I didn't know how else to handle that one.

#521
Kentucky, United States
Joined: April 13, 2011
KitMaker: 9,465 posts
Armorama: 8,695 posts
Posted: Saturday, August 17, 2019 - 04:01 AM UTC
That is super reference material Hans !*!*!*!*!*!*!*!*! Thank You
Great additional reference guys - thanks to all.
I may have to change some of my design based on this new information as, up till now, I just had the photos to go by.
p.s. Also - Glad to see I have sparked some interest here - keep it up folks!
Removed by original poster on 08/17/19 - 17:09:33 (GMT).
Pennsylvania, United States
Joined: January 18, 2003
KitMaker: 2,402 posts
Armorama: 2,377 posts
Posted: Saturday, August 17, 2019 - 05:10 AM UTC
Quoted Text
Quoted Text
I think the insulated containers use smooth sides. They have a double wall construction and don't need the reinforcing ribs used in single wall construction.
KL
Correct - that is why I am covering the corrugated siding with more of the thin plastic paper in step two above.
D'oh!
Bayern, Germany
Joined: October 14, 2008
KitMaker: 4,099 posts
Armorama: 4,067 posts
Posted: Saturday, August 17, 2019 - 05:39 AM UTC
CAD Images mean nothing.
What does a rivet counter count on a cast or welded tank hull?
Rhone, France
Joined: December 02, 2002
KitMaker: 12,719 posts
Armorama: 12,507 posts
Posted: Saturday, August 17, 2019 - 05:46 AM UTC
Quoted Text
Probably audio since the container is sitting in a "quiet room" test chamber.
Maybe I should use such a device to put my own refrigerator to the test. Its humming sounds makes my wife crazy

...
H.P.
"Find the Bastards, then Pile On"
Col. George W.Patton III 's standing order for the troopers of the 11th Armoured Cavalry Regiment

#521
Kentucky, United States
Joined: April 13, 2011
KitMaker: 9,465 posts
Armorama: 8,695 posts
Posted: Saturday, August 17, 2019 - 10:48 AM UTC
Georgia, United States
Joined: January 30, 2017
KitMaker: 110 posts
Armorama: 102 posts
Posted: Saturday, August 17, 2019 - 12:29 PM UTC
Holy cow!
That looks fantastic!


#521
Kentucky, United States
Joined: April 13, 2011
KitMaker: 9,465 posts
Armorama: 8,695 posts
Posted: Sunday, August 18, 2019 - 01:05 AM UTC
 Klinge Corp Photo
#521
Kentucky, United States
Joined: April 13, 2011
KitMaker: 9,465 posts
Armorama: 8,695 posts
Posted: Sunday, August 18, 2019 - 03:50 AM UTC
Late design refrigerated container bringing up the rear:
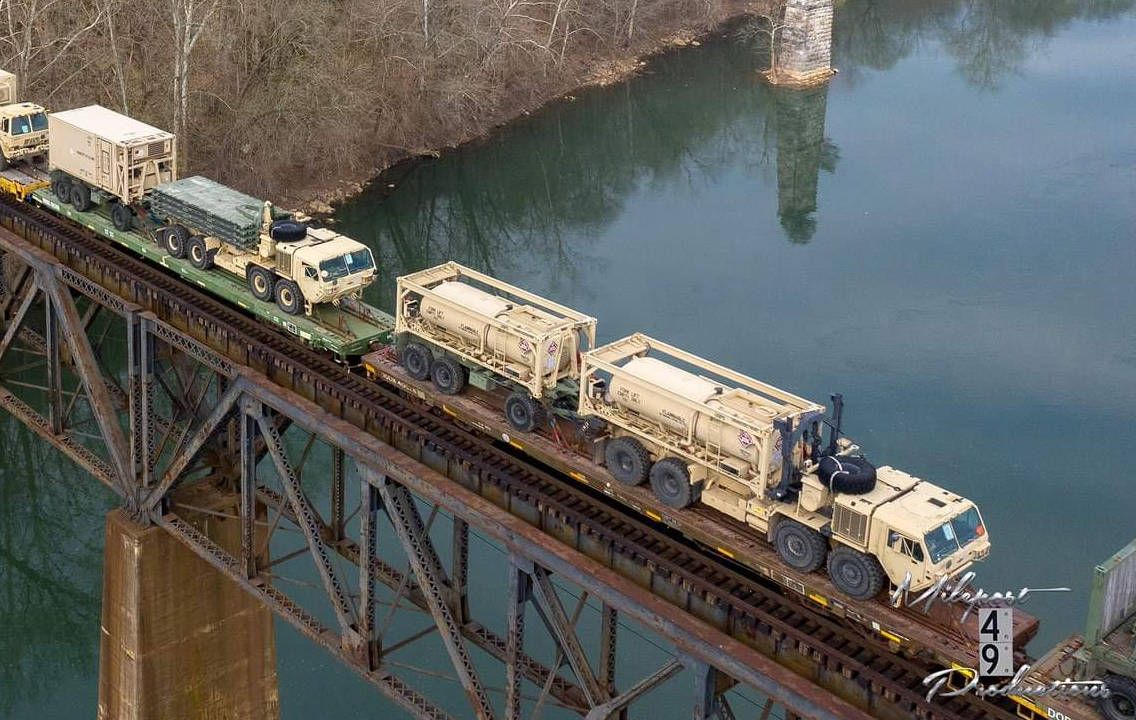 Photo: Milepost 49 Productions - used here for discussion purposes ONLY.
#521
Kentucky, United States
Joined: April 13, 2011
KitMaker: 9,465 posts
Armorama: 8,695 posts
Posted: Sunday, August 18, 2019 - 09:41 AM UTC
Who would of thought these containers would have an emergency escape hatch?
I don't think the cargo version has one?????


My new reefer with insulated doors and the recently added escape hatch.

#521
Kentucky, United States
Joined: April 13, 2011
KitMaker: 9,465 posts
Armorama: 8,695 posts
Posted: Monday, August 19, 2019 - 12:45 AM UTC
I have absolutely no idea what that round dot is just above the escape hatch. It was not in the door casting so it must be in the Tamiya Plastic Paper, perhaps some sort of ejector pin mark left over from the manufacturing process of the paper? I will look for a similar condition in the other sheets I have in the pack.
I did not notice it until after this area was primed and painted. It is so perfectly located above the hatch that I will leave it for now.

#521
Kentucky, United States
Joined: April 13, 2011
KitMaker: 9,465 posts
Armorama: 8,695 posts
Posted: Monday, August 19, 2019 - 04:28 AM UTC
Starting on the refrigeration unit now: - thank you Hans for all the great reference info!The gray toned areas indicate open screen wire vents for air flow in and out of the heat exchanger.


#521
Kentucky, United States
Joined: April 13, 2011
KitMaker: 9,465 posts
Armorama: 8,695 posts
Posted: Monday, August 19, 2019 - 09:38 AM UTC
The base shell for the chiller housing is starting to come together:

.

I have finished the circuit box on the right rear wall and have also gotten a good start on the fuel tank. (Lower left corner on the floor.)

#521
Kentucky, United States
Joined: April 13, 2011
KitMaker: 9,465 posts
Armorama: 8,695 posts
Posted: Monday, August 19, 2019 - 10:33 AM UTC
Condenser side (outside portion) of the chiller unit:

,,,,


#521
Kentucky, United States
Joined: April 13, 2011
KitMaker: 9,465 posts
Armorama: 8,695 posts
Posted: Monday, August 19, 2019 - 01:07 PM UTC
Build status as of a few nights ago:


