Review
AFV Club: 8-Inch Howitzer M1 - WW2
CMOT
 Editor-in-Chief
England - South West, United Kingdom
Joined: May 14, 2006
KitMaker: 10,954 posts
Armorama: 8,571 posts
Posted: Sunday, August 18, 2019 - 04:19 AM UTC
.JPG)
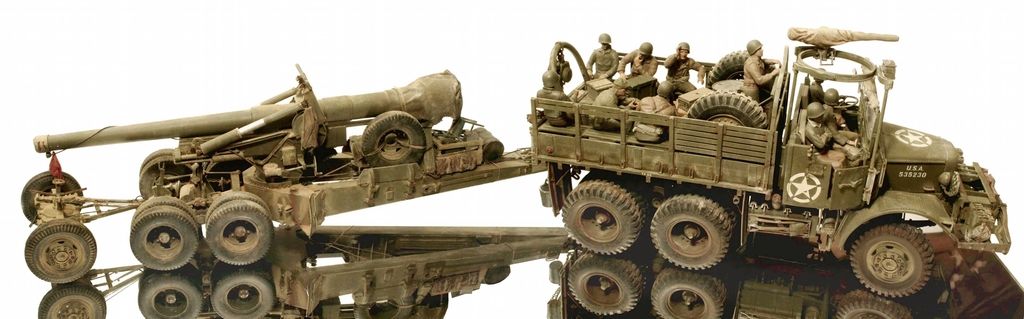
Rick Taylor shares with us a build review of the 8-Inch Howitzer M1 - WW2 by AFV club in 1/35th scale.
Read the ReviewIf you have comments or questions please post them here.
Thanks!

#521
Kentucky, United States
Joined: April 13, 2011
KitMaker: 9,465 posts
Armorama: 8,695 posts
Posted: Sunday, August 18, 2019 - 04:46 AM UTC
Looks to be a real winner of a kit!
But I must add - long overdue from this hobby manufacture!
I presume the 155mm gun, based on the identical carriage and limber will not be far behind. Additionally I suspect some etch manufacture will soon provide us the appropriate etch placards and details for this weapon.
#521
Kentucky, United States
Joined: April 13, 2011
KitMaker: 9,465 posts
Armorama: 8,695 posts
Posted: Sunday, August 18, 2019 - 04:51 AM UTC
Plenty of reference for this weapon sitting in front of the court house in Carlisle, Kentucky:
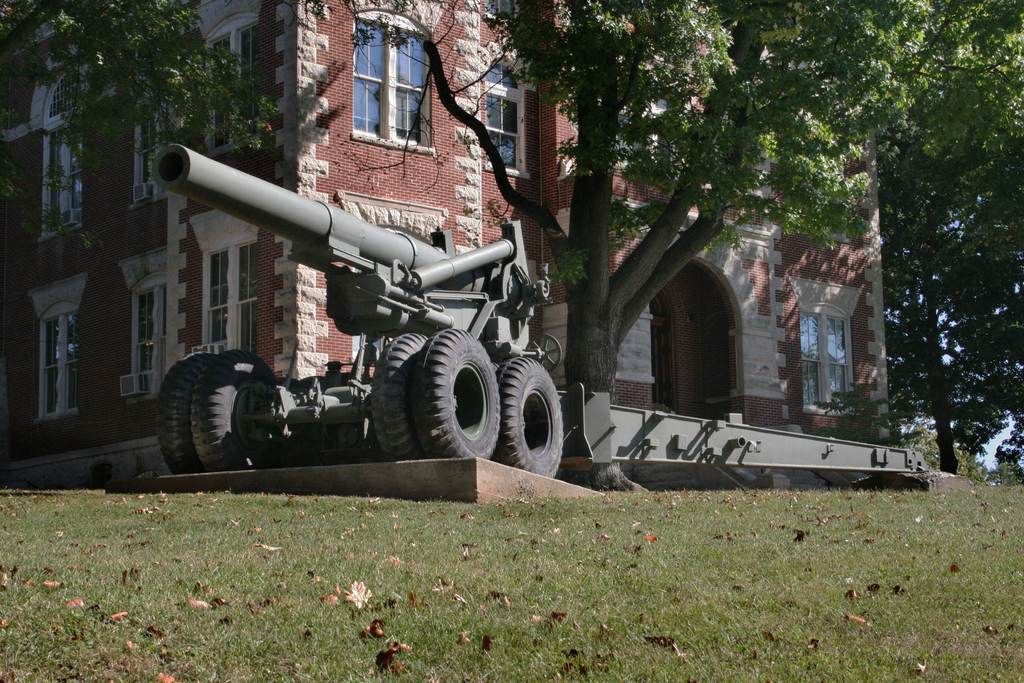 Photo Copyright Michael Koenig 2005 - All Rights Reserved
#521
Kentucky, United States
Joined: April 13, 2011
KitMaker: 9,465 posts
Armorama: 8,695 posts
Posted: Sunday, August 18, 2019 - 05:04 AM UTC
Also, in past days, at the Patton Museum, Ft. Knox, Kentucky:
 Photo Copyright Michael Koenig 2005 - All Rights Reserved
#521
Kentucky, United States
Joined: April 13, 2011
KitMaker: 9,465 posts
Armorama: 8,695 posts
Posted: Sunday, August 18, 2019 - 05:06 AM UTC
#521
Kentucky, United States
Joined: April 13, 2011
KitMaker: 9,465 posts
Armorama: 8,695 posts
Posted: Sunday, August 18, 2019 - 05:10 AM UTC
Washington, United States
Joined: March 15, 2009
KitMaker: 3,670 posts
Armorama: 2,052 posts
Posted: Sunday, August 18, 2019 - 05:39 AM UTC
Rick,
Thanks for the excellent build review. Now, I need to decide what to do with my resin AM set for the WWII backdate!
VR, Russ
#521
Kentucky, United States
Joined: April 13, 2011
KitMaker: 9,465 posts
Armorama: 8,695 posts
Posted: Sunday, August 18, 2019 - 05:42 AM UTC
#521
Kentucky, United States
Joined: April 13, 2011
KitMaker: 9,465 posts
Armorama: 8,695 posts
Posted: Sunday, August 18, 2019 - 05:46 AM UTC
Manitoba, Canada
Joined: January 03, 2016
KitMaker: 3,791 posts
Armorama: 3,778 posts
Posted: Sunday, August 18, 2019 - 10:46 AM UTC
Thanks for the photos Michael, they're more impressive than the kit though that too is welcome. Don't you just love great reference material like this?
bill_c
Campaigns Administrator New Jersey, United States
Joined: January 09, 2008
KitMaker: 10,553 posts
Armorama: 8,109 posts
Posted: Monday, August 19, 2019 - 03:32 AM UTC
I enjoyed building the previous version (backdating it with a more-accurate 3D printed barrel & resin tires), so I am glad that AFV Club has extended the kit to the WW2 version. My only reservation would be the vinyl tires.
Florida, United States
Joined: May 16, 2002
KitMaker: 17,694 posts
Armorama: 13,742 posts
Posted: Monday, August 19, 2019 - 03:47 AM UTC
Quoted Text
My only reservation would be the vinyl tires.
They should not be a reservation. AFV Club's rubber is very stable. As a precaution, I always paint the plastic wheels fully and have had no interaction between the rubber and the plastic.
I recently rebuilt an AFV Club M49A2 Fueler that was originally built in the early '90s and the rubber tires are still perfect. No issues at all. You can see them
here.
Field Artillery --- The KING of BATTLE!!!
"People sleep peaceably in their beds at night only because rough men stand ready to do violence on their behalf." -- George Orwell
Showcase
#521
Kentucky, United States
Joined: April 13, 2011
KitMaker: 9,465 posts
Armorama: 8,695 posts
Posted: Monday, August 19, 2019 - 09:07 AM UTC
I agree in part with the statements made by both Bill and Gino and like Gino. However I have had no problems, ever, with any rubber tires I have encountered. And I have been modeling trains, cars, planes and armor since the early sixties.
I think any problems found with the rubber tires are perhaps the exception rather than the rule. So with that I would say there is little reason for concern.
_____________________________
I too very much enjoyed building and detailing the AFV 155mm Howitzer and back-dating it with a resin set of tires and the early limber.
#521
Kentucky, United States
Joined: April 13, 2011
KitMaker: 9,465 posts
Armorama: 8,695 posts
Posted: Tuesday, August 20, 2019 - 12:50 AM UTC
#521
Kentucky, United States
Joined: April 13, 2011
KitMaker: 9,465 posts
Armorama: 8,695 posts
Posted: Tuesday, August 20, 2019 - 06:07 AM UTC
Washington, United States
Joined: January 31, 2019
KitMaker: 50 posts
Armorama: 49 posts
Posted: Wednesday, August 21, 2019 - 06:01 AM UTC
Mike,
Thanks for posting the walk around photos!
Rick
Washington, United States
Joined: January 31, 2019
KitMaker: 50 posts
Armorama: 49 posts
Posted: Wednesday, August 21, 2019 - 06:01 AM UTC
Here is the link to the in-box review on Armorama
https://armorama.kitmaker.net/review/14579Enjoy!
Rick
#521
Kentucky, United States
Joined: April 13, 2011
KitMaker: 9,465 posts
Armorama: 8,695 posts
Posted: Wednesday, August 21, 2019 - 07:10 AM UTC
Your welcome Rick - hope you can make good use of them!
________________________________
Travel lock installed on the jacks used to raise and lower the wheel boggy:
Note canvas covers over screw jacking threads.

#521
Kentucky, United States
Joined: April 13, 2011
KitMaker: 9,465 posts
Armorama: 8,695 posts
Posted: Wednesday, August 21, 2019 - 07:36 AM UTC
#521
Kentucky, United States
Joined: April 13, 2011
KitMaker: 9,465 posts
Armorama: 8,695 posts
Posted: Wednesday, August 21, 2019 - 07:41 AM UTC
Something for both those who prefer the gun in firing position and those who favor travel position:


Please note: On the M2 Limber when the gun trails have been raised into travel position the threads of the center jacking screw are exposed and they are therefore covered with a canvas cover to protect the screw from highway dust and grime.
#521
Kentucky, United States
Joined: April 13, 2011
KitMaker: 9,465 posts
Armorama: 8,695 posts
Posted: Wednesday, August 21, 2019 - 07:56 AM UTC
#521
Kentucky, United States
Joined: April 13, 2011
KitMaker: 9,465 posts
Armorama: 8,695 posts
Posted: Wednesday, August 21, 2019 - 08:06 AM UTC
In the outside chance a new Mack NO model should become available sometime in the future here is the hitch that will be required to attach the 7 1/2 ton Mack tractor directly to either the 155mm or 8 inch guns:
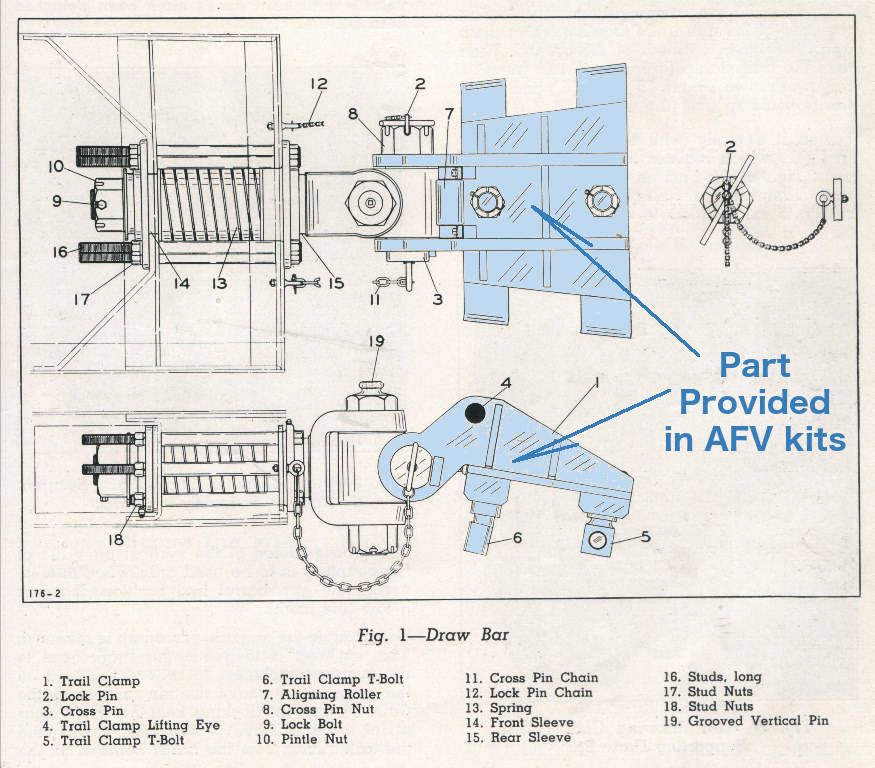

This trail clamp (Girdle) is/was provided in the earlier AFV offering of this gun which employed the M5 rather than the M2 Limber.
___________________________________

Item #4 on the drawing - the trail clamp lifting eye is the point where the chain hoist on the rear of the Mack NO is attached to lift the trails up onto the hitch.
The M23 ammo trailer employed exactly the same arrangement allowing the Mack NO to tow the ammo trailer or either gun directly without the use of a limber.
Queensland, Australia
Joined: August 06, 2005
KitMaker: 3,353 posts
Armorama: 3,121 posts
Posted: Wednesday, August 21, 2019 - 10:40 AM UTC
Quoted Text
Hope no one minds my including roughly a book's worth of photo reference here.
You are kidding aren't you Mike....
(Background noise: click pic save, click pic save, click pic save....)
Thanks for sharing

And thanks for the review. Very Interesting.
On the Bench:
Dust, styrene scraps, paint splotches and tears.
#521
Kentucky, United States
Joined: April 13, 2011
KitMaker: 9,465 posts
Armorama: 8,695 posts
Posted: Thursday, August 22, 2019 - 02:34 AM UTC
I need to make a correction to the above schematic: Part #1 "Trail Clamp" (Girdle) DOES NOT COME in the current AFV kit that utilizes the M2 Limber. This trail clamp only comes in the M115 post-war AFV kit that utilizes the later design M5 Limber. The M5 Limber is however, equally correct for use with either the wartime 155mm or 8 inch guns as is the M2 Limber.
#521
Kentucky, United States
Joined: April 13, 2011
KitMaker: 9,465 posts
Armorama: 8,695 posts
Posted: Thursday, August 22, 2019 - 06:41 AM UTC
A small detail, that if I understand correctly, may have been included in the new AFV kit: the taillight and the muzzel cover for the gun when traveling - note additional reflectors as well. (Shown here on the 240mm gun barrel mounted on its' travel porte.)


F.Y.I. - I made my gun barrel travel cover by starting with a Tamiya canvas bucket molding as the end cap and then adding the side sleeve, making that from scrap sheet plastic.


