_GOTOBOTTOM
Armor/AFV
For discussions on tanks, artillery, jeeps, etc.
Review
Takom: Bergepanther Ausf. G
CMOT
Staff MemberEditor-in-Chief
ARMORAMA
Visit this Community
England - South West, United Kingdom
Joined: May 14, 2006
KitMaker: 10,954 posts
Armorama: 8,571 posts
Posted: Tuesday, September 03, 2019 - 04:32 AM UTC


Mark Nicodemus shares with us a look at the Takom Production Bergepanther Ausf. G in 1/35th scale.

Read the Review

If you have comments or questions please post them here.

Thanks!
Taeuss
Visit this Community
Manitoba, Canada
Joined: January 03, 2016
KitMaker: 3,791 posts
Armorama: 3,778 posts
Posted: Tuesday, September 03, 2019 - 10:44 AM UTC
The only variant I have resisted getting so far; thought that it was pretty interesting having a post-war French military version. The post-war crane that some company made was also an interesting variant that someone should cobble-together.
165thspc
#521
Visit this Community
Kentucky, United States
Joined: April 13, 2011
KitMaker: 9,465 posts
Armorama: 8,695 posts
Posted: Saturday, May 30, 2020 - 02:25 AM UTC
Just bought this kit as a "World Opening Up Again" celebration purchase at Scale Reproduction Hobbies in Louisville, KY.

Looking forward to what appears to be a fabulously detailed kit! Some years ago I made an attempt to accuratize the Italeri Berge using two complete kits and assorted etch sets to complete the model. It was a very satisfying build but now I am looking forward to having EVERYTHING in this kit!

At the shop I told Brian; "I did my best to find the largest box in the armor aisle!"

I have to add that if you are anywhere in the Kentucky area you must check out this shop. (An easy 10 minute cab ride from the International airport in case you have a bit of a longish layover!) With the recent closures of the past many months his shelves are filled to the brim with tons of newly available kits as well as many old favorites. I highly recommend a visit, especially now!

Cheers

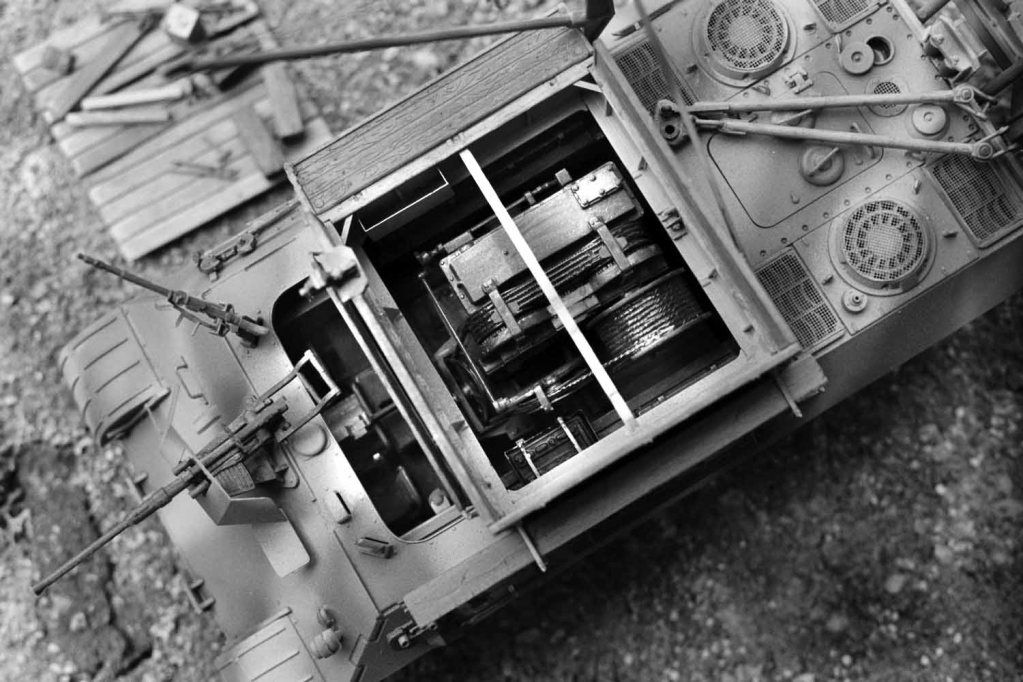
Now on to the build! (I jumped ahead and started right in on the winch!)


Below a couple of photos of the original Italeri build:
These Berges have always been one of my favorite subjects!


Bigred69
Visit this Community
Armed Forces Europe, United States
Joined: December 27, 2015
KitMaker: 290 posts
Armorama: 249 posts
Posted: Saturday, May 30, 2020 - 08:13 AM UTC
Good luck Michael, I will be following your build.
GeraldOwens
Visit this Community
Florida, United States
Joined: March 30, 2006
KitMaker: 3,736 posts
Armorama: 3,697 posts
Posted: Saturday, May 30, 2020 - 11:40 AM UTC
Very happy to know that a few quality brick and mortar hobby shops are keeping the dream alive. If I ever get up there, I'll check them out. Enjoy your build!
wedgetail53
Visit this Community
Queensland, Australia
Joined: October 02, 2008
KitMaker: 658 posts
Armorama: 629 posts
Posted: Saturday, May 30, 2020 - 12:46 PM UTC
G'day Mark

Good review - I have one in my stash waiting to be built. A few thoughts:

1. DON'T install the torsion bars before the transmission, or the transmission will not fit.

2. Stage 15, second para - should be Takom, not Trumpeter (just to show I did actually read the entire review).

3. The length of a Bergepanther tow cable was 50 metres, which equates to 1.43 metres, and there isn't enough cable provided by Takom. My suggestion would be to wrap the main cable drum in several layers of tape to bring the cable provided up to nearer the lip of the drum.

Have fun!

Regards

Rob

brekinapez
Visit this Community
Georgia, United States
Joined: July 26, 2013
KitMaker: 2,272 posts
Armorama: 1,860 posts
Posted: Saturday, May 30, 2020 - 02:11 PM UTC

Quoted Text


3. The length of a Bergepanther tow cable was 50 metres, which equates to 1.43 metres, and there isn't enough cable provided by Takom. My suggestion would be to wrap the main cable drum in several layers of tape to bring the cable provided up to nearer the lip of the drum.


Thanks for that note. I have the Ausf A, and I'll bet that cable is likely too short as well.
165thspc
#521
Visit this Community
Kentucky, United States
Joined: April 13, 2011
KitMaker: 9,465 posts
Armorama: 8,695 posts
Posted: Saturday, May 30, 2020 - 03:19 PM UTC
Yes #3 is an excellent suggestion! Will do!
wedgetail53
Visit this Community
Queensland, Australia
Joined: October 02, 2008
KitMaker: 658 posts
Armorama: 629 posts
Posted: Saturday, May 30, 2020 - 08:37 PM UTC
You're right, it is.
wedgetail53
Visit this Community
Queensland, Australia
Joined: October 02, 2008
KitMaker: 658 posts
Armorama: 629 posts
Posted: Saturday, May 30, 2020 - 08:39 PM UTC

Quoted Text

You're right, it is.


That was actually a reply to Shell.
165thspc
#521
Visit this Community
Kentucky, United States
Joined: April 13, 2011
KitMaker: 9,465 posts
Armorama: 8,695 posts
Posted: Sunday, May 31, 2020 - 03:09 AM UTC
I do wish Takom had indicated "parts not to be used" in their instructions. I always appreciate a kit that feeds the spares box but in this case there seems to be tons of parts intended for other similar vehicles not to be used, possibly causing some confusion.
165thspc
#521
Visit this Community
Kentucky, United States
Joined: April 13, 2011
KitMaker: 9,465 posts
Armorama: 8,695 posts
Posted: Monday, June 01, 2020 - 12:13 AM UTC
First night's productivity: (Hit a minor snag with the winch so moved on to the transmission and floor pan.)


165thspc
#521
Visit this Community
Kentucky, United States
Joined: April 13, 2011
KitMaker: 9,465 posts
Armorama: 8,695 posts
Posted: Monday, June 01, 2020 - 02:07 PM UTC
Anybody else notice that the rear winch crossbar support beam (Part W2-3 in step 19) is not properly keyed to attach to the winch assembly?

The winch has a large rectangular key and the beam itself has a small triangular tapered keyway slot. I don't think I am missing anything here am I?

Just ask'n.
165thspc
#521
Visit this Community
Kentucky, United States
Joined: April 13, 2011
KitMaker: 9,465 posts
Armorama: 8,695 posts
Posted: Wednesday, June 17, 2020 - 09:15 AM UTC
Some additional progress on the Berge lower portion:

So far this seems like a very well made kit and the fit is right on the money!


I suggest that until you have both tub sidewalls in place that you just let the torsion bar assemblies "float" without gluing them. This makes it easier to get them to line up with the end mounting holes when installing the sides. Later if they rattle or have any noticeable play in them a small drop of glue will lock them down.

p.s. I know those two central cross members look crooked to a slight degree but that is correct for the Panther G. Those cross members do actually zig-zag just slightly to clear the torsion bar mounts and torsion bar gear end boxes.
wedgetail53
Visit this Community
Queensland, Australia
Joined: October 02, 2008
KitMaker: 658 posts
Armorama: 629 posts
Posted: Wednesday, June 17, 2020 - 11:13 AM UTC
G'day Michael

I can only agree about your method of installing the torsion bars - the method suggested by Takom is next to impossible. If you haven't glued the engine in place yet, I would recommend not doing so or installation of the drive shaft will be very difficult.

I agree with your installation of the engine before the side walls - otherwise it's a VERY tight fit.

Have fun.

Regards

Rob
165thspc
#521
Visit this Community
Kentucky, United States
Joined: April 13, 2011
KitMaker: 9,465 posts
Armorama: 8,695 posts
Posted: Thursday, June 18, 2020 - 01:47 AM UTC
You are right on target! The engine will be extremely tight. For now my engine is only snapped into its' mounts and even that is a very tight fit!

Thanks for your feedback and your interest.
165thspc
#521
Visit this Community
Kentucky, United States
Joined: April 13, 2011
KitMaker: 9,465 posts
Armorama: 8,695 posts
Posted: Friday, June 26, 2020 - 03:14 PM UTC
I have to admit it kills me with every step, that I must cover up so much detail that I had just previously installed.

Sleepwalker71
Visit this Community
Singapore / 新加坡
Joined: August 30, 2012
KitMaker: 265 posts
Armorama: 186 posts
Posted: Friday, June 26, 2020 - 03:42 PM UTC

Quoted Text

I have to admit it kills me with every step, that I must cover up so much detail that I had just previously installed.


That's really frustrating. At least you have all the photos.
165thspc
#521
Visit this Community
Kentucky, United States
Joined: April 13, 2011
KitMaker: 9,465 posts
Armorama: 8,695 posts
Posted: Saturday, June 27, 2020 - 02:17 AM UTC
Yes and no - because I am the kind of nut that will build details into a model that, in the end only I will know are there. (No explanation for this malady!)

Also one of the many reasons I joined the Patton Restoration Group was to learn "what's on the inside" so a kit like this answers those questions for me in detail.

Going to try and keep the winch removable so I might expose some of that lost detail from time to time. Also the upper body of the Berge, for right now, seems to want to just snap on/snap off so that MAY remain removable as well!

Thanks for your response and your interest.
 _GOTOTOP