

Hosted by Darren Baker
Büssing-NAG 4500A engine photos?
bill_c

Joined: January 09, 2008
KitMaker: 10,553 posts
Armorama: 8,109 posts
Posted: Thursday, October 24, 2019 - 05:44 AM UTC
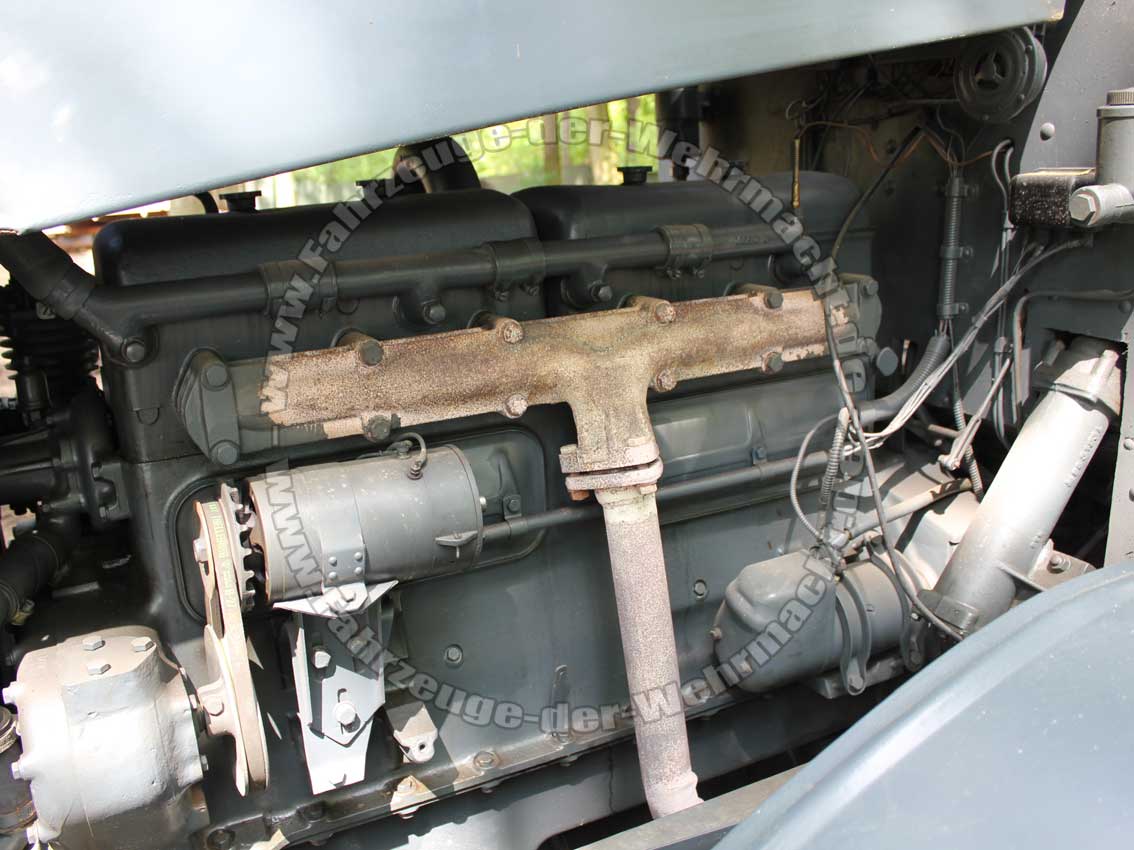
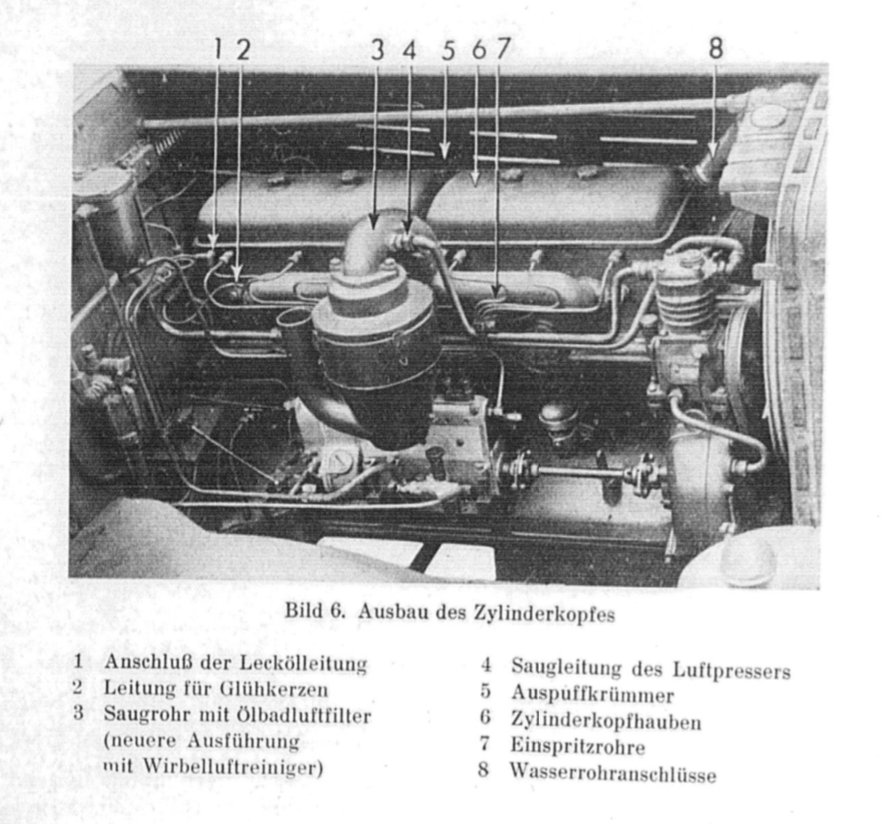
Anyone (Frenchy?) have photos of the Büssing-NAG Type 4500 A engine with its wiring shown or a wiring schematic? TIA.

Frenchy

Joined: December 02, 2002
KitMaker: 12,719 posts
Armorama: 12,507 posts
Posted: Thursday, October 24, 2019 - 06:22 AM UTC


165thspc

#521
Joined: April 13, 2011
KitMaker: 9,465 posts
Armorama: 8,695 posts
Posted: Thursday, October 24, 2019 - 06:33 AM UTC

Waiter, check please!


ayovtshev

#490

Joined: September 22, 2016
KitMaker: 1,432 posts
Armorama: 1,390 posts

Posted: Thursday, October 24, 2019 - 06:48 AM UTC
Ditto!!!

SpeedyJ

Joined: September 17, 2013
KitMaker: 1,617 posts
Armorama: 1,150 posts
Posted: Thursday, October 24, 2019 - 05:55 PM UTC
If you want more, just call my name.
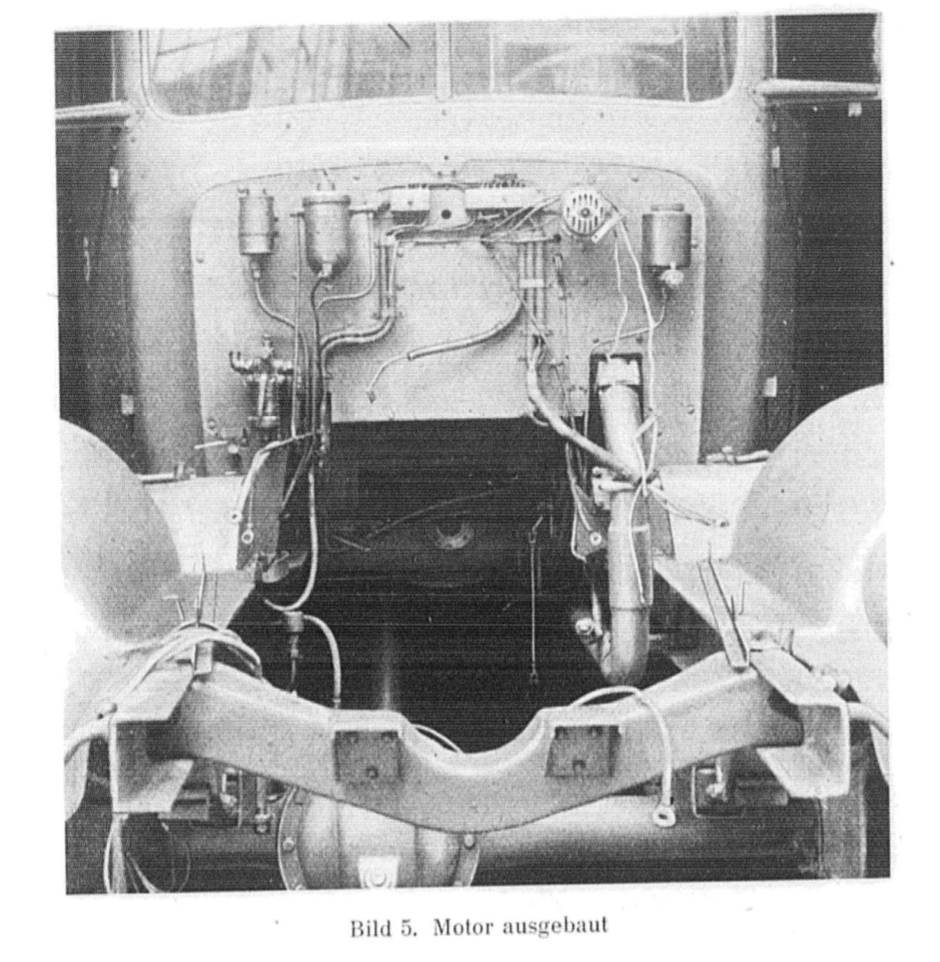
Angel provided me a very detailed manual for both A & S type some time ago.
I simply love the Büssing NAG models.
Screen shots from the manual.
Nice link:
http://fahrzeuge-der-wehrmacht.de/Artikel/Buessing_4500.html
Kind regards,
Robert Jan
Angel provided me a very detailed manual for both A & S type some time ago.
I simply love the Büssing NAG models.
Screen shots from the manual.
Nice link:
http://fahrzeuge-der-wehrmacht.de/Artikel/Buessing_4500.html
Kind regards,
Robert Jan
ayovtshev
#490
Joined: September 22, 2016
KitMaker: 1,432 posts
Armorama: 1,390 posts
Posted: Thursday, October 24, 2019 - 07:19 PM UTC
Robert,
For sure it wasn't me giving you the Manual, as I don't have it.
IIRC it was the owner of Panzer Concepts, who send it to you with your Kfz.415 conversion.

I hope you'll post enough pictures from it while building your Flakmesstruppkraftwagen
For sure it wasn't me giving you the Manual, as I don't have it.
IIRC it was the owner of Panzer Concepts, who send it to you with your Kfz.415 conversion.
I hope you'll post enough pictures from it while building your Flakmesstruppkraftwagen
SpeedyJ
Joined: September 17, 2013
KitMaker: 1,617 posts
Armorama: 1,150 posts
Posted: Thursday, October 24, 2019 - 08:13 PM UTC
Medicine makes it very confusing lately.
You're right (sorry B.J.)
You're right (sorry B.J.)
bill_c
Joined: January 09, 2008
KitMaker: 10,553 posts
Armorama: 8,109 posts
Posted: Saturday, October 26, 2019 - 04:53 AM UTC
Merci, H.P. and Robert Jan! Yes, the AFV Club Buessing-NAG is a gem of a kit.

panamadan
Joined: July 20, 2004
KitMaker: 1,513 posts
Armorama: 1,449 posts
Posted: Saturday, October 26, 2019 - 05:38 AM UTC
Has anyone here built the AFV Club kit?
Dan
Dan
bill_c
Joined: January 09, 2008
KitMaker: 10,553 posts
Armorama: 8,109 posts
Posted: Saturday, October 26, 2019 - 05:44 AM UTC
Quoted Text
Has anyone here built the AFV Club kit?
Dan
I am building it right now. It's excellent with great fit and only a few issues. Very fiddly with lots of detail, though.
panamadan
Joined: July 20, 2004
KitMaker: 1,513 posts
Armorama: 1,449 posts
Posted: Saturday, October 26, 2019 - 07:47 AM UTC
Thanks Bill.
It looks to be a busy kit.
It looks to be a busy kit.
SpeedyJ
Joined: September 17, 2013
KitMaker: 1,617 posts
Armorama: 1,150 posts
Posted: Saturday, October 26, 2019 - 11:15 AM UTC
Building the l4500A with Bilstein crane right now. Blows a modeler away with details. And the kits are not that pricy any more.
Robert Jan
Robert Jan
bill_c
Joined: January 09, 2008
KitMaker: 10,553 posts
Armorama: 8,109 posts
Posted: Monday, October 28, 2019 - 02:15 AM UTC
Yes, it's VERY busy, but the 1-1 was busy with lots of details. This is one of the best kits I have built in a long time. Some of the plastic is a bit brittle, so be cautious lest the carpet monster eat some parts.
panamadan
Joined: July 20, 2004
KitMaker: 1,513 posts
Armorama: 1,449 posts
Posted: Monday, October 28, 2019 - 02:56 AM UTC
I wish the kit had a tarp option as it seems quite common.
Dan
Dan
bill_c
Joined: January 09, 2008
KitMaker: 10,553 posts
Armorama: 8,109 posts
Posted: Monday, October 28, 2019 - 10:36 AM UTC
Quoted Text
I wish the kit had a tarp option as it seems quite common.
I am building the Bilstein crane variant which doesn't call out for a tarp.

Honestly, after years and years trying to find good styrene or resin canvas covers to softskins, you're better off making your own from tissue paper and white glue.
brekinapez
Joined: July 26, 2013
KitMaker: 2,272 posts
Armorama: 1,860 posts
Posted: Monday, October 28, 2019 - 12:14 PM UTC
Quoted Text
I am building the Bilstein crane variant which doesn't call out for a tarp.
I also have this kit. In the field of service-related vehicles it has always stood out to me, as most kits are cargo or personnel transport of some kind and this being a tow truck--and a German one at that--I knew I had to eventually have it on my shelf and was pretty stoked when I found one at a ridiculous price on ebay.
Will you post any notes on your undertaking; maybe point out some of those fiddly bits you mentioned (nudge nudge wink wink)?
SpeedyJ
Joined: September 17, 2013
KitMaker: 1,617 posts
Armorama: 1,150 posts
Posted: Monday, October 28, 2019 - 03:52 PM UTC
I will share some building pictures on this thread. Already build the L4500S and a lot of detail is covered. For the Crane version I do a different version, so might be interesting.
Kind regards,
Robert Jan
Kind regards,
Robert Jan
bill_c
Joined: January 09, 2008
KitMaker: 10,553 posts
Armorama: 8,109 posts
Posted: Tuesday, October 29, 2019 - 02:42 AM UTC
Quoted Text
Will you post any notes on your undertaking; maybe point out some of those fiddly bits you mentioned (nudge nudge wink wink)?
Certainly.
In general, there are a LOT of tiny pieces that can become separated from the sprue trees. Be sure to remove any loosely-hanging parts and put them aside. It's better than having them fall off and disappear into the carpet monster.
There are a lot of knock-out holes, especially on flat parts like the tool shed or the base of the platform. Unfortunately they are supposed to represent wood, so removing them will mean having to restore the "grain." But not all of these surfaces will be visible unless you build the doors open. Plan ahead before driving yourself crazy with work to see if you can just cover the defects up. This isn't possible on the underside of the platform, but again, if you're a stickler for detail, you will want to remove them.
If you are going to show the engine, I suggest adding the wiring before you seat it. There is an extensive amount of detailing on the firewall that would do well with the addition of wires and piping. I didn't get the wiring diagram on this thread in time to do that, so I will close up the bonnet and not show the exquisitely-detailed engine.
I recommend a set of resin tires over the vinyl in the kit. They not only look better, but hold up better over time. DEF Model makes very good resin replacements, but they don't always "marry" to the kit parts well. In this case, they are a perfect match.
The exhaust pipe attaches to a bracket on the rear left side of the vehicle. The instructions ask you to put it on early; DON'T. You will break it off repeatedly handling the chassis as I did, finally losing the bracket entirely and having to scratch a replacement. Cement it on near the end of your build. I recommend the same for the NOTEK lamp that mounts to the front bumper.
The cab goes together with minimal issues, but there are strange to say no decals provided for the instrument dials. AFV Club's painting suggestions are ridiculously simple-minded, so I recommend some Archer dry transfers. You actually rub them onto some wet transfer paper, soak briefly in water, and then slide onto the dials like ordinary decals. I used some leftovers from their Sd.Kfz. 9 (FAMO) set because they were close enough, and the cab will be shown closed up on my build.
When assembling the rear chassis (which is made up of a series of stacked "metal" beams), but sure to pay close attention to the way successive layers are added with bolts, plates and rods. Also be very careful about the alignment as a lack of care will mean the rods won't line up with the holes in the "plates" molded onto the beams.
The various stowage, lines, etc. are held down with brackets. These brackets are EXTREMELY fiddly, and care should be taken when removing them from the sprue tree. They also lack any latches, so I recommend investing in a set of styrene "butterly" latches.
The tube middle section of the crane itself has very thin walls, so be careful when gluing the two halves together lest they buckle from too much cement. Pay attention that some of the crane parts are NOT GLUED. I made the mistake of gluing one of the armatures and had to backtrack. Fortunately it came off without destroying the part and I can make it move freely after a little sanding of the contact points.
I haven't finished the build, so there's the nitty gritty up to now. HTH.
SpeedyJ
Joined: September 17, 2013
KitMaker: 1,617 posts
Armorama: 1,150 posts
Posted: Tuesday, October 29, 2019 - 03:30 AM UTC
That's a very nice list you provided Bill. Kit has some pitfalls which certainly makes such a build frustrating. I in person think that AFV Club parts sometimes are too small / thin where PE would be helpful for strength.
I'm rather busy now, will post as said some pics over the weekend.
Robert Jan
I'm rather busy now, will post as said some pics over the weekend.
Robert Jan
bill_c
Joined: January 09, 2008
KitMaker: 10,553 posts
Armorama: 8,109 posts
Posted: Tuesday, October 29, 2019 - 05:21 AM UTC
Quoted Text
I in person think that AFV Club parts sometimes are too small / thin where PE would be helpful for strength.
As I was building the kit, I thought about whether PE brackets would be better, but believe the HUGE amount of work bending the brass AND centering the brackets would be onerous. Like I said, a few butterfly latches should greatly improve the look of parts that are not that prominent and certainly very tiny in the scheme of things.
 |

WEB HOSTING BY


Copyright ©2021 Armorama and Kitmaker Network, a subsidiary of Silver Star Enterprises
All Rights Reserved. Please read our Conditions of Use and Privacy Policy.
All Rights Reserved. Please read our Conditions of Use and Privacy Policy.