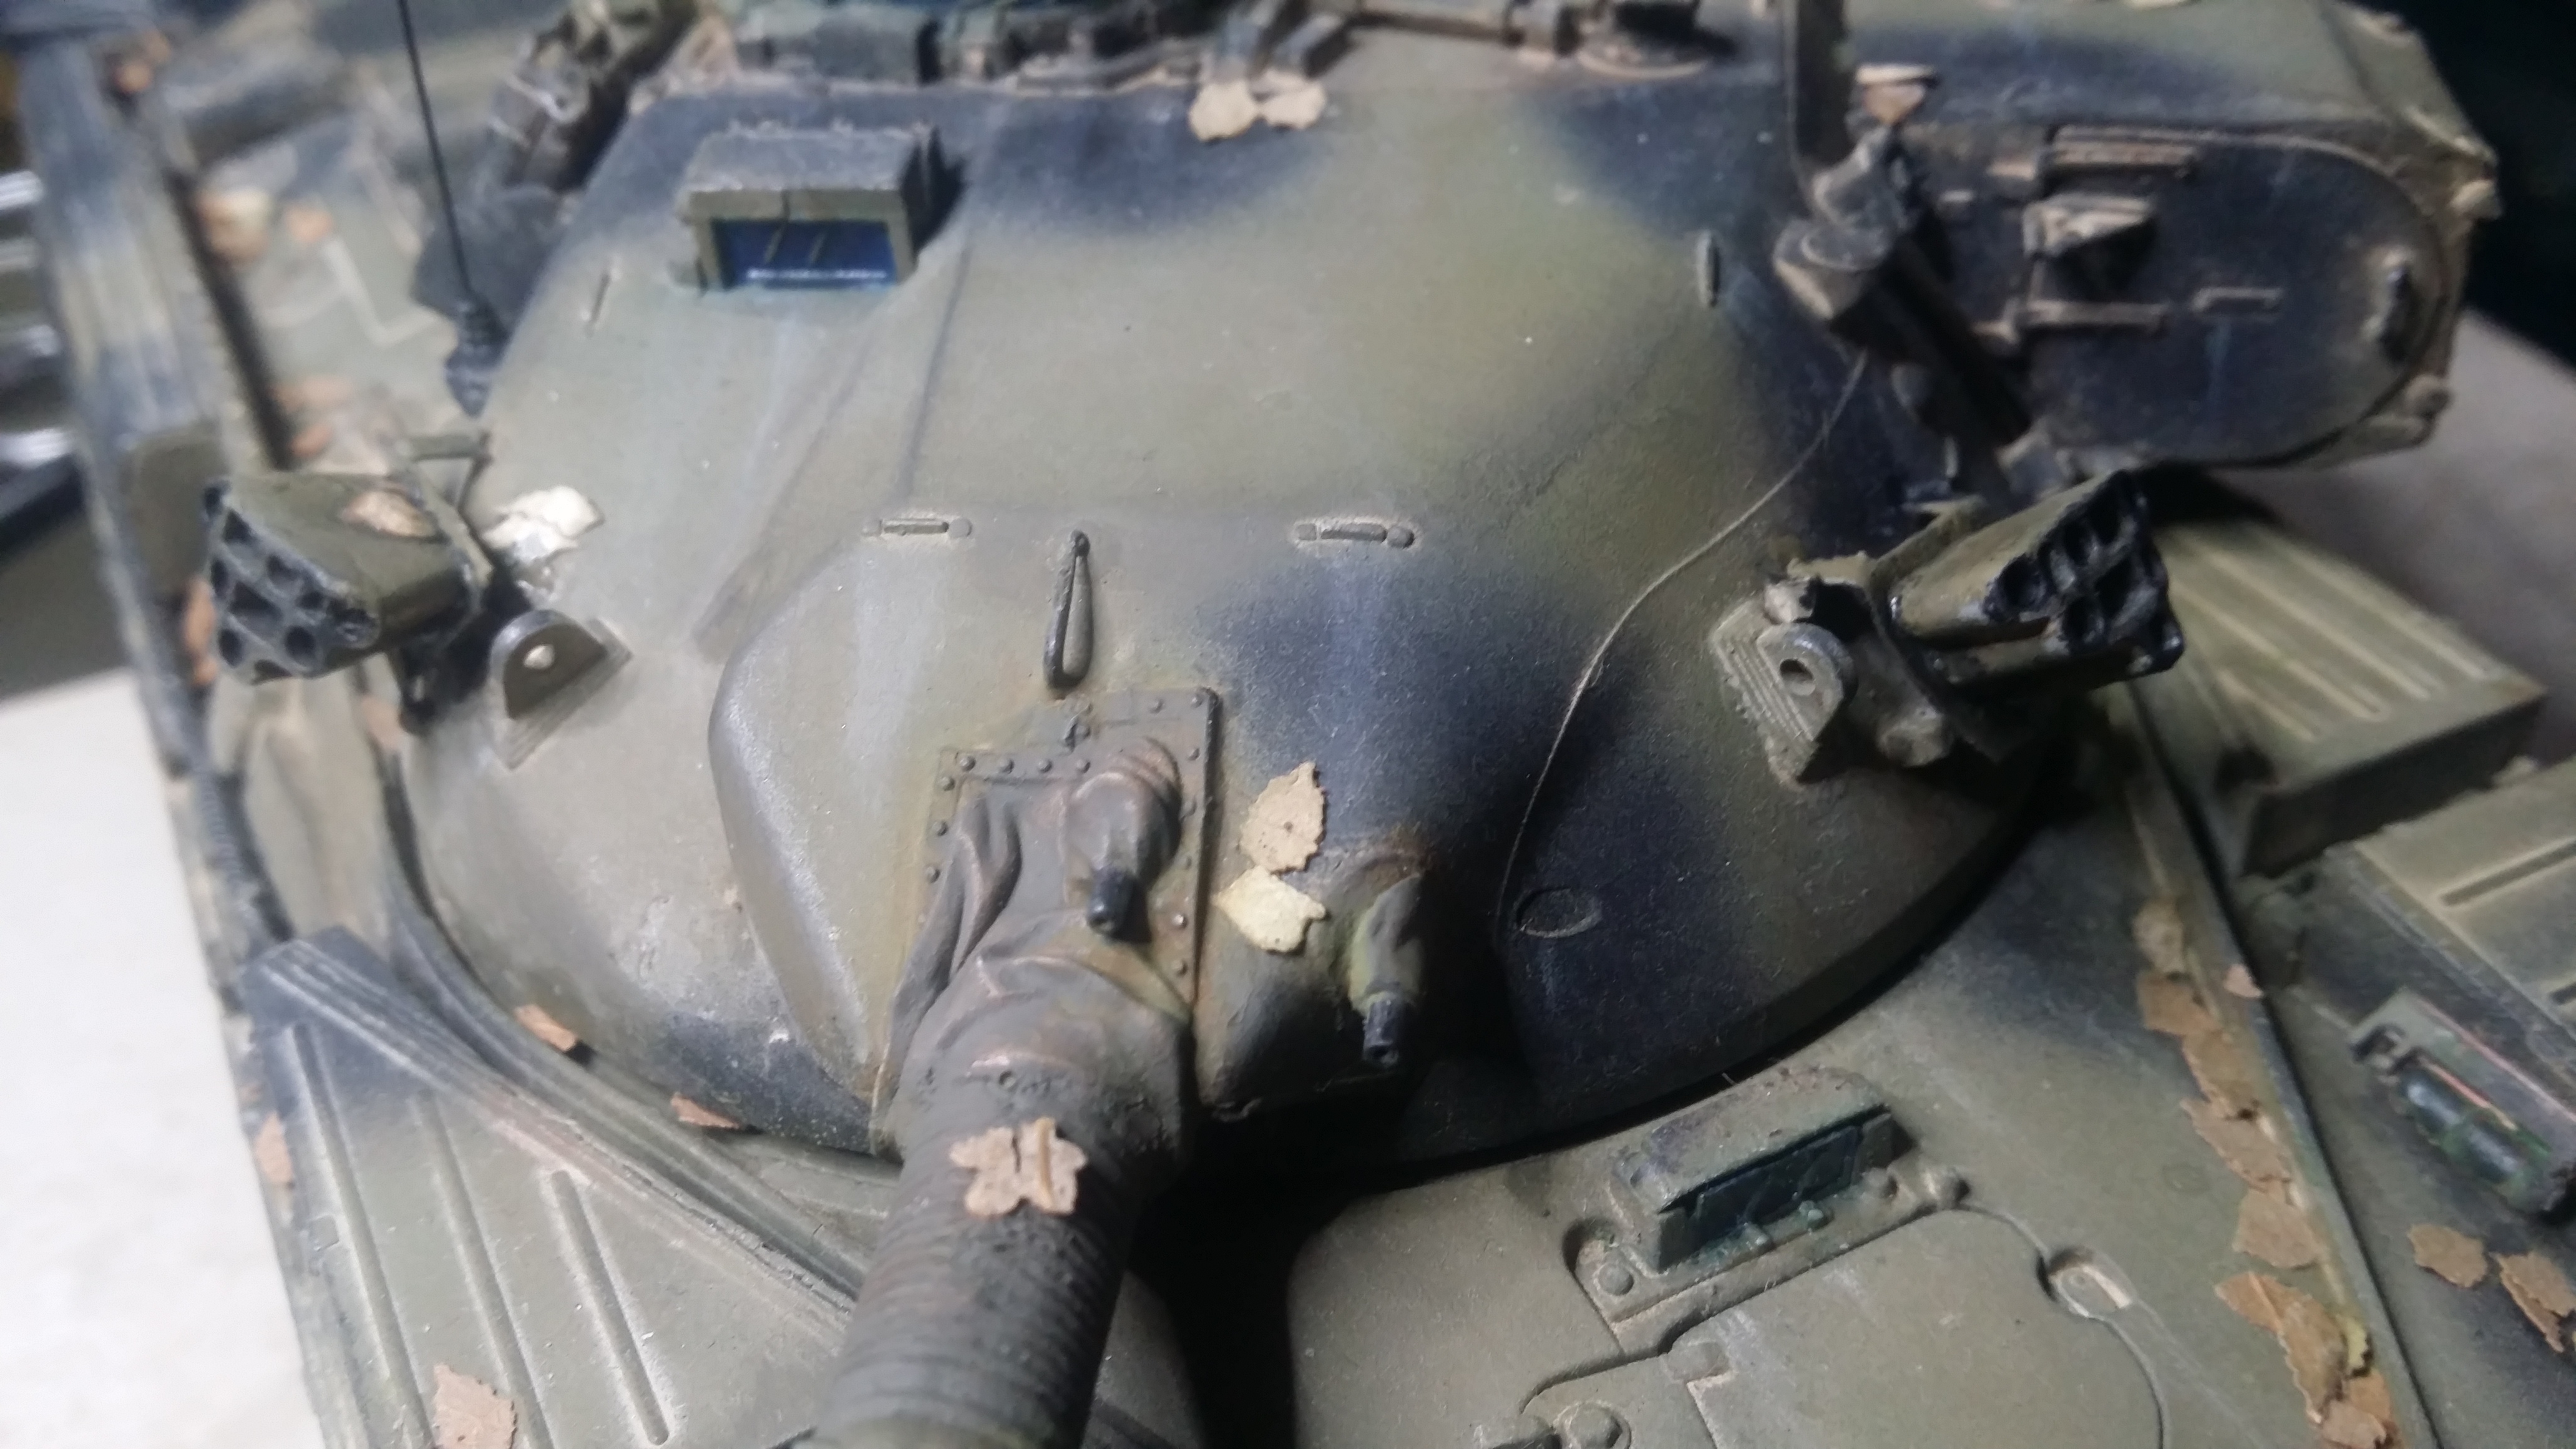
Francisco Gutierrez shares some pictures of Takoms Chieftain Mk.II in 1/35.
Link to Item
If you have comments or questions please post them here.
Thanks!
Armor/AFV
For discussions on tanks, artillery, jeeps, etc.
Hosted by Darren Baker, Mario Matijasic
PHOTOS
Takom Chieftain Mk. IIColinEdm
Associate Editor
Alberta, Canada
Joined: October 15, 2013
KitMaker: 1,355 posts
Armorama: 1,229 posts
Joined: October 15, 2013
KitMaker: 1,355 posts
Armorama: 1,229 posts
Posted: Tuesday, June 02, 2020 - 02:23 PM UTC
Taeuss
Manitoba, Canada
Joined: January 03, 2016
KitMaker: 3,791 posts
Armorama: 3,778 posts
Joined: January 03, 2016
KitMaker: 3,791 posts
Armorama: 3,778 posts
Posted: Thursday, June 04, 2020 - 02:58 AM UTC
Great model of one of my favorite British tanks. Beautifully done & weathered!
FrancisGL
Cordoba, Spain / España
Joined: August 22, 2016
KitMaker: 14 posts
Armorama: 14 posts
Joined: August 22, 2016
KitMaker: 14 posts
Armorama: 14 posts
Posted: Thursday, June 04, 2020 - 07:21 AM UTC
Quoted Text
Great model of one of my favorite British tanks. Beautifully done & weathered!
Hi Taeuss,
Many thanks for your kind words, i'm glad you like it. If you are interested, I have a WIP thread and another RTI in another modeling forum, Britmodeller, with details of the construction and painting, and some more photos of the model,"OLD WARRIOR OF THE COLD WAR, CHIEFTAIN MK2 MANOEUVRES TAKOM 1/35"
https://www.britmodeller.com/forums/index.php?/topic/235063169-old-warrior-of-the-cold-war-chieftain-mk2-takom-135/
Cheers and TC
Francis
BootsDMS
England - South West, United Kingdom
Joined: February 08, 2012
KitMaker: 978 posts
Armorama: 965 posts
Joined: February 08, 2012
KitMaker: 978 posts
Armorama: 965 posts
Posted: Friday, June 05, 2020 - 05:37 AM UTC
Francisco,
'Love this tank - one of my favourites; the weathering is especially good.
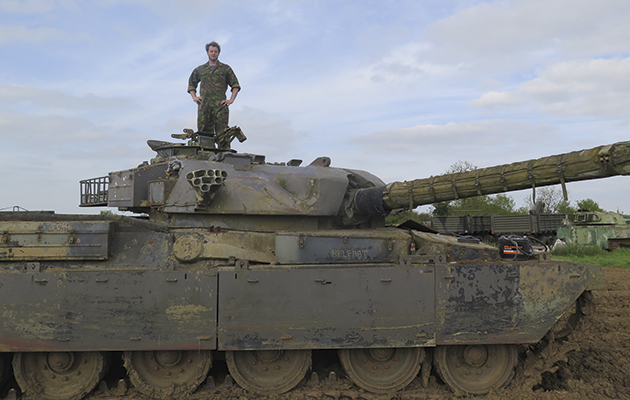
One observation however: I feel that you may have the smoke dischargers wrongly positioned, they should point to the front more (after all, the purpose is to cover and screen the frontal arc). I don't know what the Takom instructions indicate but it might be worth rechecking.
Brian
FrancisGL
Cordoba, Spain / España
Joined: August 22, 2016
KitMaker: 14 posts
Armorama: 14 posts
Joined: August 22, 2016
KitMaker: 14 posts
Armorama: 14 posts
Posted: Friday, June 05, 2020 - 05:56 AM UTC
Quoted Text
Francisco,
'Love this tank - one of my favourites; the weathering is especially good.
One observation however: I feel that you may have the smoke dischargers wrongly positioned, they should point to the front more (after all, the purpose is to cover and screen the frontal arc). I don't know what the Takom instructions indicate but it might be worth rechecking.
Brian
Hi Brian,
many thanks for your kind words, i'm glad you like it. It is a sharp observation, what you indicate is logical, I would not know if I was wrong with the pieces, it would not be the first time it happens to me ... lol, but here I include a photo of the real model, and the truth, to me It is difficult for me to say something for or against. I do not know if in the real model, they can be oriented, which would clarify it, or they are of fixed position.
Cheers and TC
Francis.
:-H
RLlockie
United Kingdom
Joined: September 06, 2013
KitMaker: 1,112 posts
Armorama: 938 posts
Joined: September 06, 2013
KitMaker: 1,112 posts
Armorama: 938 posts
Posted: Friday, June 05, 2020 - 07:26 AM UTC
Brian is correct - I fear that you have them on the wrong sides. The flatter side of the unit is towards the rear of the vehicle on the real thing and they are rigidly mounted. Not sure if the brackets are on the wrong sides too but the way to check is to look at the right side one and see which side of it has a vertical edge and which has one which slopes down to an apex at the bottom. The sloping edge should be inboard, the vertical one outboard.
It’s probably impossible (or at least very difficult) to fit the kit discharger to the wrong bracket so probably just a case of swapping the whole unit from one side to the other.
Otherwise, nice job!
It’s probably impossible (or at least very difficult) to fit the kit discharger to the wrong bracket so probably just a case of swapping the whole unit from one side to the other.
Otherwise, nice job!
FrancisGL
Cordoba, Spain / España
Joined: August 22, 2016
KitMaker: 14 posts
Armorama: 14 posts
Joined: August 22, 2016
KitMaker: 14 posts
Armorama: 14 posts
Posted: Friday, June 05, 2020 - 08:55 PM UTC
Quoted Text
Brian is correct - I fear that you have them on the wrong sides. The flatter side of the unit is towards the rear of the vehicle on the real thing and they are rigidly mounted. Not sure if the brackets are on the wrong sides too but the way to check is to look at the right side one and see which side of it has a vertical edge and which has one which slopes down to an apex at the bottom. The sloping edge should be inboard, the vertical one outboard.
It’s probably impossible (or at least very difficult) to fit the kit discharger to the wrong bracket so probably just a case of swapping the whole unit from one side to the other.
Otherwise, nice job!
Hi Robert, thanks, i'm glad you like it. Thanks for the info, it really is difficult to distinguish them, and the instructions of Takom, (which is my first kit of this brand), are not IMHO, half as good as those of TAMIYA, because they are small drawings on many occasions and that leave much to the interpretation of the modeller ... the funny thing is that nobody in the forum when the WIP told me, although the culprit is me, of course.
I have looked for photos of the real model, and I have discovered a simpler way to distinguish them, that is, from the MK2, because in the MK5, they are different.
These are the holes that the discharges have, once seen, it is easy, and if they were changed.
I have removed, not without breaking the supports, and I am going to try a scratch with them (not my best skill), to see what improvised material.
Cheers and TC
Francis.
RLlockie
United Kingdom
Joined: September 06, 2013
KitMaker: 1,112 posts
Armorama: 938 posts
Joined: September 06, 2013
KitMaker: 1,112 posts
Armorama: 938 posts
Posted: Saturday, June 06, 2020 - 07:08 AM UTC
If I’d seen it while in progress, I’d have commented but unfortunately I missed it. These things are always best fixed before completion!
Somewhere I have an etch fret that I designed back in the 1980s which had the frames on it, flattened. Will see if I can locate one and send you a scan of it. Might be easier than trying to measure from the kit parts.
FrancisGL
Cordoba, Spain / España
Joined: August 22, 2016
KitMaker: 14 posts
Armorama: 14 posts
Joined: August 22, 2016
KitMaker: 14 posts
Armorama: 14 posts
Posted: Saturday, June 06, 2020 - 08:41 AM UTC
Quoted Text
If I’d seen it while in progress, I’d have commented but unfortunately I missed it. These things are always best fixed before completion!
Somewhere I have an etch fret that I designed back in the 1980s which had the frames on it, flattened. Will see if I can locate one and send you a scan of it. Might be easier than trying to measure from the kit parts.
Hi Robert,
No problem, mate, I'm sure you would have been helpful, but when speaking of the forum, I was referring to a different one (Britmodeller.com), in which I publish my models from time to time, from WIP to RTI.
Very grateful if you can find the object and send it to me, it will always be something useful to have.
For my part, since I have heard about the error, I have been thinking about how to fix it without much damage, and what to use as a replacement.
I have looked for the instructions that I already had stored in their corresponding box, and I have been able to improvise, with transparent acetate (it had no plasticard), that it will not matter because it will be painted, the supports of the smoke dischargers, and then, fold the supports to join them to the turret.
It is not 100% accurate, but to my surprise, it has been better than I expected (scratch is not my strength ...), for lack of painting ...
I think tomorrow, I will be able to finish it, and upload a photo of how it looks ...
Cheers and TC
Francis.
FrancisGL
Cordoba, Spain / España
Joined: August 22, 2016
KitMaker: 14 posts
Armorama: 14 posts
Joined: August 22, 2016
KitMaker: 14 posts
Armorama: 14 posts
Posted: Saturday, June 06, 2020 - 10:52 PM UTC
Hi mates,
I have managed to change the error, with some scratch, I include a couple of photos of the result, thank you all for the help and info.
Cheers and TC
Francis.
I have managed to change the error, with some scratch, I include a couple of photos of the result, thank you all for the help and info.
Cheers and TC
Francis.
RLlockie
United Kingdom
Joined: September 06, 2013
KitMaker: 1,112 posts
Armorama: 938 posts
Joined: September 06, 2013
KitMaker: 1,112 posts
Armorama: 938 posts
Posted: Friday, June 12, 2020 - 08:06 PM UTC
Much better, good work.
I actually managed to find and scan the fret - do you still need the image?
FrancisGL
Cordoba, Spain / España
Joined: August 22, 2016
KitMaker: 14 posts
Armorama: 14 posts
Joined: August 22, 2016
KitMaker: 14 posts
Armorama: 14 posts
Posted: Friday, June 12, 2020 - 09:57 PM UTC
Quoted Text
Much better, good work.
I actually managed to find and scan the fret - do you still need the image?
Hi Robert,
many thanks, i'm glad you like it.Fortunately I managed to get the job done without too much damage, and easier than I feared.
I used transparent acetate, if you think about it, it is the same as a PE sheet, although the measurements are not 100% exact, because I had no template to do it, I think the result is quite decent, once painted, it is not noticeable.
If it is not a bother, really, you can send it to an email that I indicate. I already solved it, but it is a resource that may be useful in the future.
Thank you very much for your interest and help.
Cheers and TC
Francis.
[email protected]