

Hi all,
I have a question. I'm fairly new to armour modelling.
My inclination is to paint road wheels and accessories and then attach them to the vehicle once they've been painted, and the base coat is on the vehicle.
But I've seen many videos and photos by vastly more experienced modellers who seem to construct the entire kit, road wheels and accessories included. I guess they paint the details after.
I thought about this, but it seems like painting the rubber on the road wheels, for example, would be difficult when attached.
Is this just a matter of personal preference, or is there some advantage to assembling everything first that I'm not seeing?
Thanks in advance,
Nathan.
AFV Painting & Weathering
Answers to questions about the right paint scheme or tips for the right effect.
Answers to questions about the right paint scheme or tips for the right effect.
Hosted by Darren Baker, Matthew Toms
Painting road wheels & accessories

UpperCanadian

Joined: June 28, 2020
KitMaker: 152 posts
Armorama: 133 posts
Posted: Friday, July 03, 2020 - 11:55 AM UTC

GulfWarrior

Joined: January 05, 2010
KitMaker: 1,051 posts
Armorama: 1,029 posts

Posted: Friday, July 03, 2020 - 12:40 PM UTC
Nathan,
It pretty much is a matter of personal preference. Me personally, I leave the running gear off until until all the painting is done. I mask off the ends of the torsion bars and the holes on the back of the road wheels. Sometimes that little bit of paint can make things tight enough to risk breaking the ends off the torsion bars.
But like I said, it's a personal preference. You'll probably get all sorts of different answers.
Good luck with your work! Be sure to post lots of pictures!


TopSmith
Joined: August 09, 2002
KitMaker: 1,742 posts
Armorama: 1,658 posts

Posted: Tuesday, July 07, 2020 - 05:18 PM UTC
I can't figure out how you can paint a kit after it is completely built. However that is how the actual vehicle is painted.
petbat

Joined: August 06, 2005
KitMaker: 3,353 posts
Armorama: 3,121 posts
Posted: Tuesday, July 07, 2020 - 06:17 PM UTC
Don't be fooled by pics of a fully constructed 'professional' model with no paint. Most often the components are 'dry fit' for the photo and then disassembled into sub components for painting.
If you read through some modelling magazines or look at some online videos, you will see this in practice.
The rule of thumb is, not what do other people do but how comfortable are you in painting the part if attached? Not too comfortable? Then paint it first....
If you read through some modelling magazines or look at some online videos, you will see this in practice.
The rule of thumb is, not what do other people do but how comfortable are you in painting the part if attached? Not too comfortable? Then paint it first....


bison126

Joined: June 10, 2004
KitMaker: 5,329 posts
Armorama: 5,204 posts
Posted: Tuesday, July 07, 2020 - 09:59 PM UTC
It also depends on the model. Sometimes you have to paint the whole lower hull and running gear before the rest of the vehicle because you have to install side skirts.
I usually try to paint the running gear separately. There again it depends on the type of tracks.
Olivier
I usually try to paint the running gear separately. There again it depends on the type of tracks.
Olivier


SSGToms
Joined: April 02, 2005
KitMaker: 3,608 posts
Armorama: 3,092 posts

Posted: Wednesday, July 08, 2020 - 03:48 AM UTC
I always paint the tools and road wheels separately. This is supposed to be an enjoyable hobby. Why give yourself a headache?


Tojo72
Joined: June 06, 2006
KitMaker: 4,691 posts
Armorama: 3,509 posts
Posted: Wednesday, July 08, 2020 - 04:00 AM UTC
I prefer to attach my tools to the vehicle and then paint them.I have a good eye,steady hand,and I slide a post-it note next to or underneath to protect the base.
As far as roadwheels,I always leave them off and paint them separately.
Like it was said,its preference
As far as roadwheels,I always leave them off and paint them separately.
Like it was said,its preference

vettejack
Joined: November 23, 2012
KitMaker: 1,277 posts
Armorama: 1,254 posts

Posted: Wednesday, July 08, 2020 - 06:25 AM UTC
Just be careful when painting those interleaved Wheels (bogies) on those German beasts! Study those wartime photographs!
brekinapez
Joined: July 26, 2013
KitMaker: 2,272 posts
Armorama: 1,860 posts
Posted: Wednesday, July 08, 2020 - 08:15 AM UTC
Go pick yourself up a copy of the game 'Operation' by Milton Bradley. Get real good at it and you should find it easy to paint the parts on the model.
Personally I will do on or off depending on the kit and how things are laid out.
Personally I will do on or off depending on the kit and how things are laid out.

babaoriley
Joined: June 23, 2017
KitMaker: 195 posts
Armorama: 179 posts
Posted: Wednesday, July 08, 2020 - 10:17 AM UTC
I'm often surprised at how many model builders today completely assemble a model (or nearly so) and only then paint it. I've always built and painted sub-assemblies even if that required masking on glue points. IMO trying to weather a tank that is completely assembled is going to present problems, e.g. I see builds where someone visibly had trouble getting into the suspension area with the mud and dust. I suppose it can be faster building first and painting later, but it seems to come with some limitations IMO.

JavierDeLuelmo

Joined: February 29, 2016
KitMaker: 189 posts
Armorama: 186 posts
Posted: Friday, July 10, 2020 - 05:13 AM UTC
I build and complete some 99,5% of the kit before painting. Just keep out transparent parts, fragile items like mirrors or antennas, or things that may hinder painting some areas, like gear sticks or steering wheels.
RLlockie

Joined: September 06, 2013
KitMaker: 1,112 posts
Armorama: 938 posts
Posted: Sunday, July 12, 2020 - 03:45 AM UTC
I wouldn't be too sure that real vehicles are fully assembled before being painted. A number of components (at least in the case of the Third Reich) were supplied by subcontractors in finished form, so roadwheels for example were fitted after being painted. This is visible in images of the MAN factory, for example.
We also know from the restoration of the Bovington Tiger E that there were inner roadwheel faces, hidden from external view, which carried the original external paint finish. There would be no reason to paint these in situ.
We also know from the restoration of the Bovington Tiger E that there were inner roadwheel faces, hidden from external view, which carried the original external paint finish. There would be no reason to paint these in situ.
brekinapez
Joined: July 26, 2013
KitMaker: 2,272 posts
Armorama: 1,860 posts
Posted: Sunday, July 12, 2020 - 07:39 AM UTC
So, as you can see the tank is mostly assembled and the tools are already on:
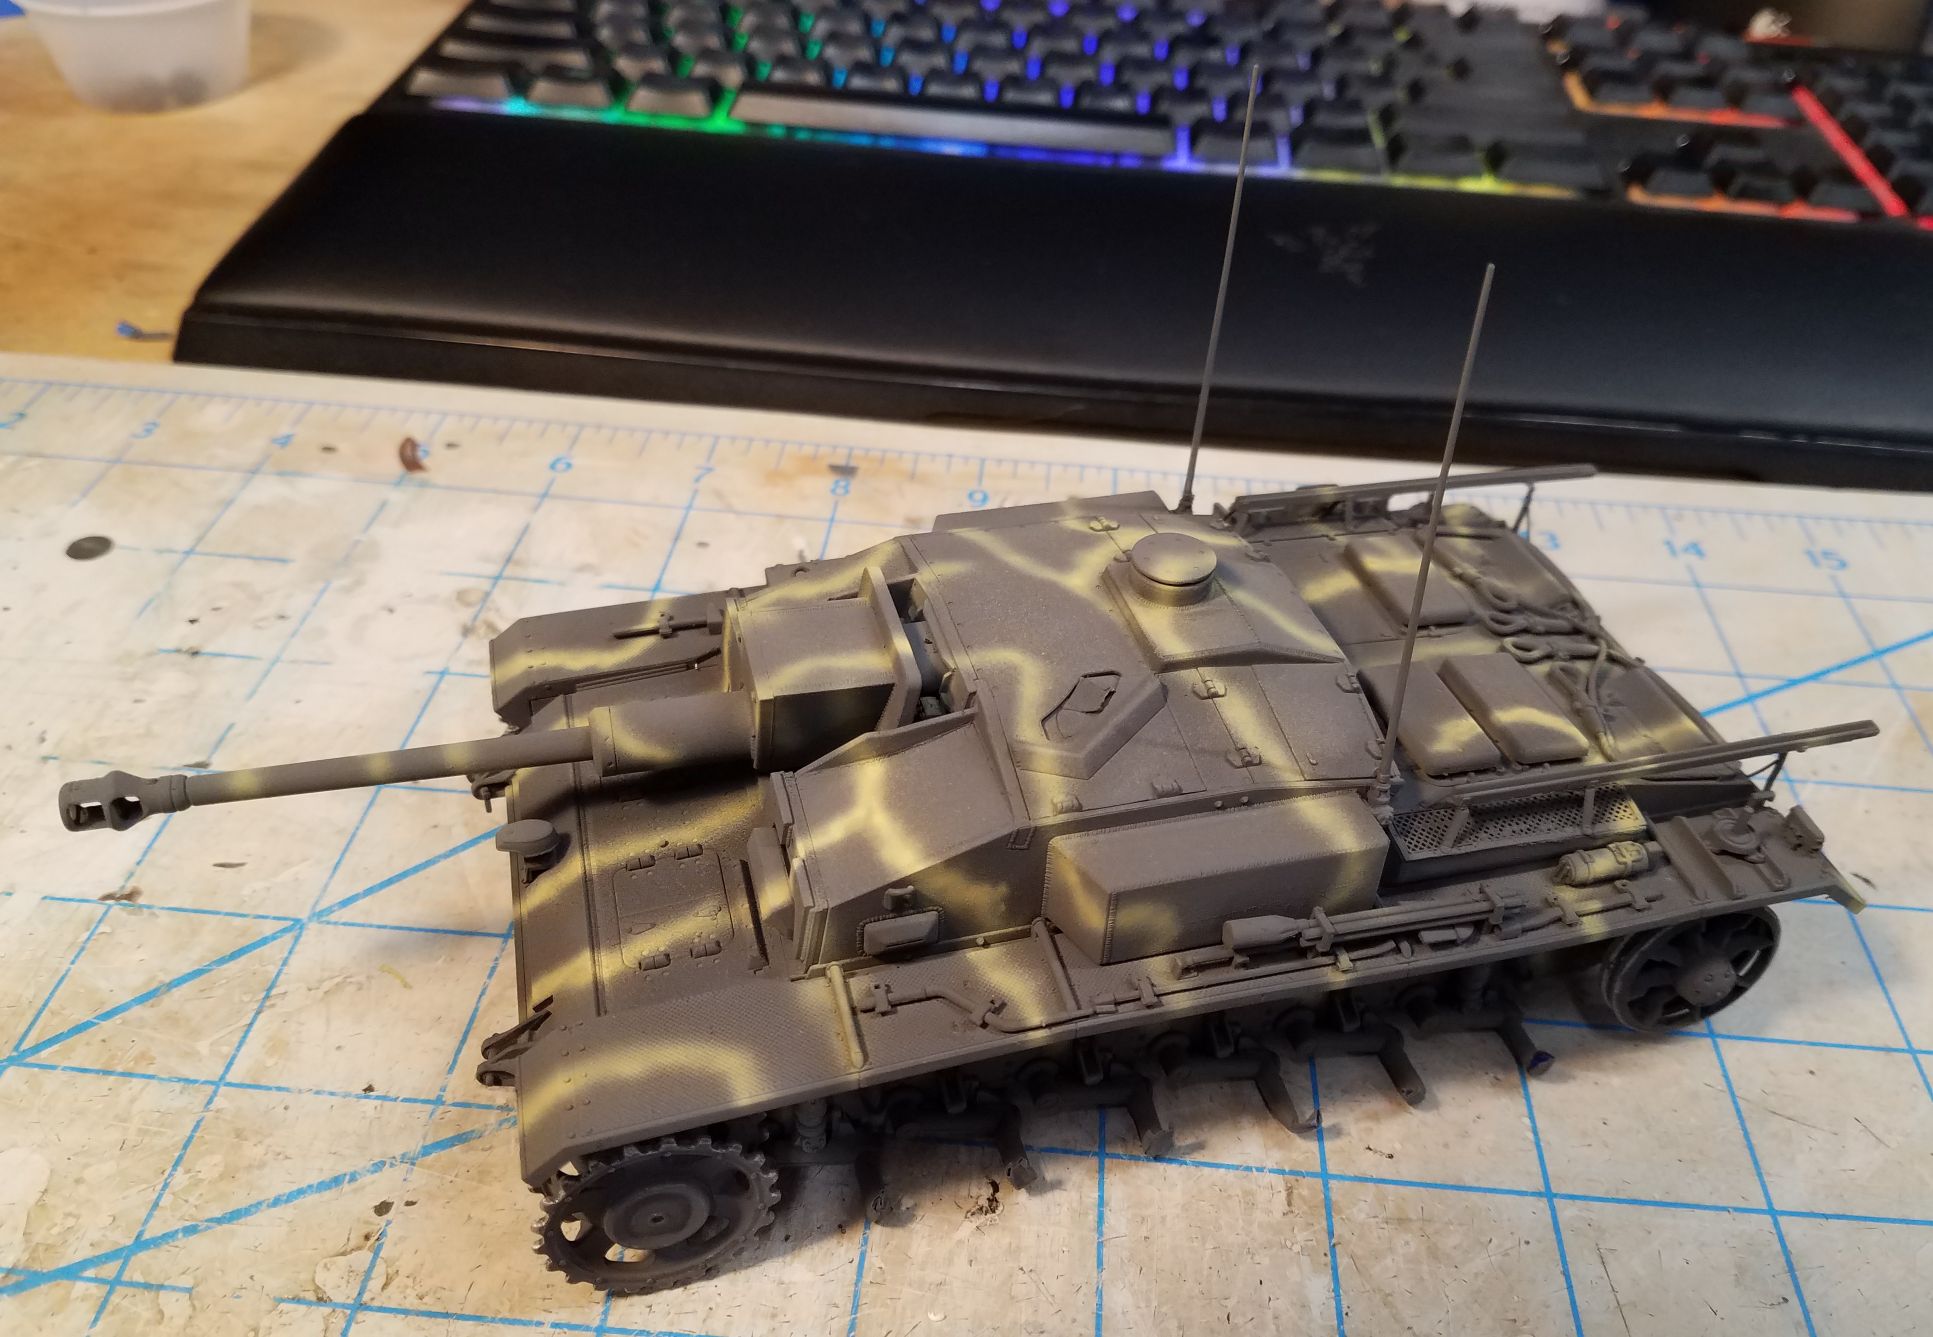
And now they are painted:
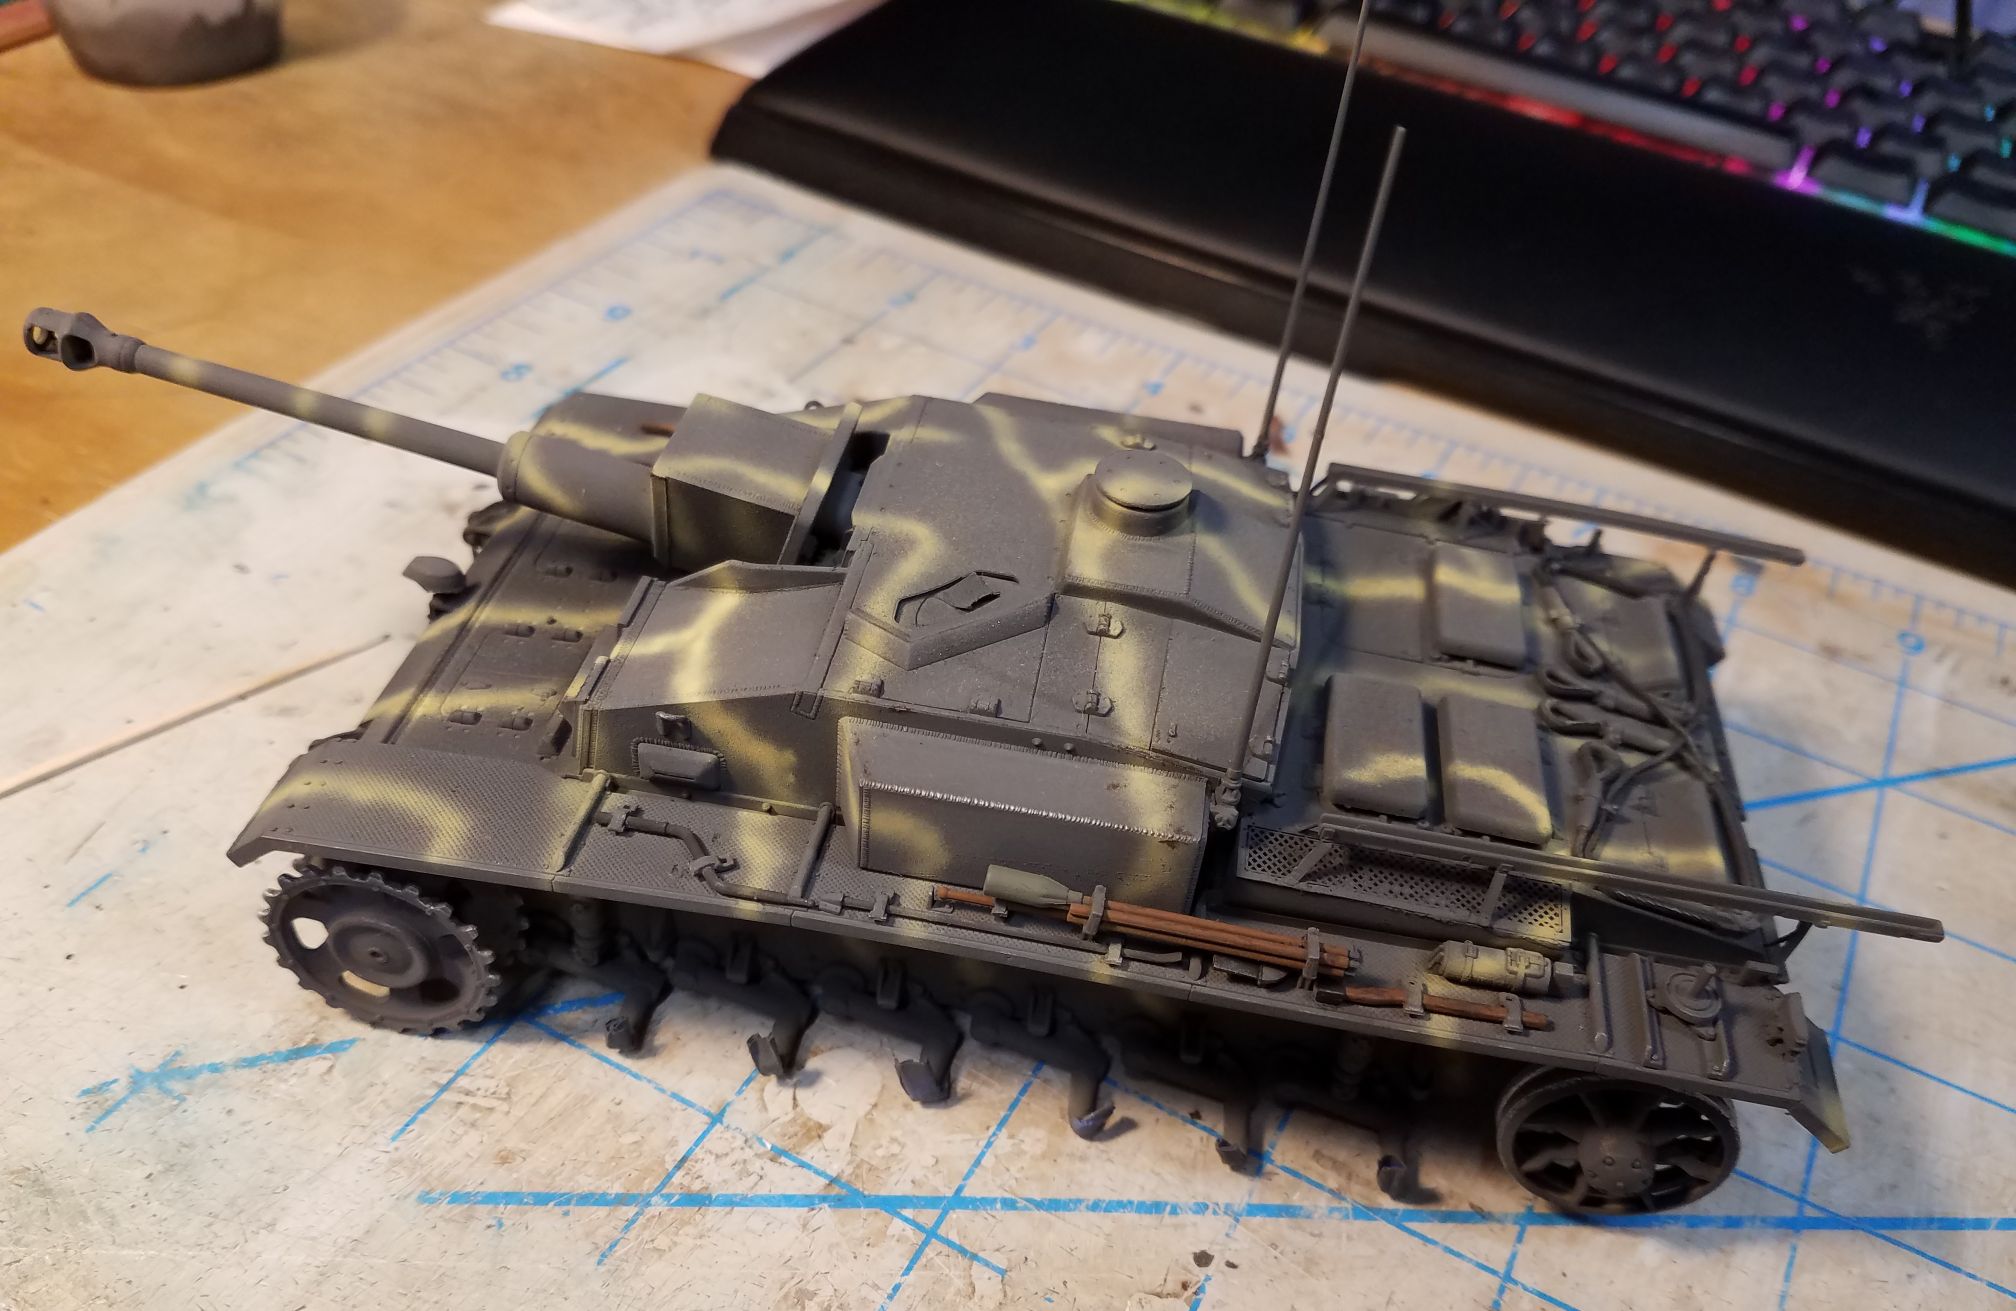
And now they are painted:
UpperCanadian
Joined: June 28, 2020
KitMaker: 152 posts
Armorama: 133 posts
Posted: Sunday, July 12, 2020 - 07:46 AM UTC
Quoted Text
So, as you can see the tank is mostly assembled and the tools are already on:
And now they are painted:
How did you make those antennas?
Stretched sprue?
brekinapez
Joined: July 26, 2013
KitMaker: 2,272 posts
Armorama: 1,860 posts
Posted: Sunday, July 12, 2020 - 08:06 AM UTC
Those are actually the kit antenna. I haven't quite mastered stretched sprue yet; I have only gotten up to my 'varying thickness none of it useful' badge.
Petro
Joined: November 02, 2003
KitMaker: 984 posts
Armorama: 846 posts
Posted: Sunday, July 12, 2020 - 10:20 AM UTC
For the past 10 years I paint the tools after installation.
I used to try to add them later, but normally I could dry fit them fine, but with glue on them I get all ham fisted and scar the paint.
I used to try to add them later, but normally I could dry fit them fine, but with glue on them I get all ham fisted and scar the paint.
UpperCanadian
Joined: June 28, 2020
KitMaker: 152 posts
Armorama: 133 posts
Posted: Sunday, July 12, 2020 - 10:44 AM UTC
Quoted Text
Those are actually the kit antenna. I haven't quite mastered stretched sprue yet; I have only gotten up to my 'varying thickness none of it useful' badge.
I see. I was curious b/c the Pz. III I'm building doesn't come with an antenna. May try stretching sprue.
 |

WEB HOSTING BY


Copyright ©2021 Armorama and Kitmaker Network, a subsidiary of Silver Star Enterprises
All Rights Reserved. Please read our Conditions of Use and Privacy Policy.
All Rights Reserved. Please read our Conditions of Use and Privacy Policy.