

I'm really new at this, so there are lots of things I'm trying to learn.
First: how the heck do you get the pieces off the bloody sprues without damage? I have a pair of sprue clippers, but I still often seem to damage the plastic. I never see any marks on experienced modellers work however. Do they have a technique, or do they just sand and fill any damage?
Second: dust effects? Suppose I'm building a tank in the summer dust at Kursk. I have some 'dust effect' in grey by AK products. But what's the best way to apply it? Like a wash? Should pigments go on first, or after?
Third: chipping effects. Some people suggest hairspray and then actually rubbing off some paint. Or, some people suggest using a sponge to paint on simulated chips. What's easiest for a rookie like me?
Thanks in advance,
Nathan.
AFV Painting & Weathering
Answers to questions about the right paint scheme or tips for the right effect.
Answers to questions about the right paint scheme or tips for the right effect.
Hosted by Darren Baker, Matthew Toms
Further questions (sorry to be a bother)

UpperCanadian

Joined: June 28, 2020
KitMaker: 152 posts
Armorama: 133 posts
Posted: Friday, July 10, 2020 - 03:22 PM UTC

RobinNilsson

Joined: November 29, 2006
KitMaker: 6,693 posts
Armorama: 5,562 posts
Posted: Friday, July 10, 2020 - 10:25 PM UTC
First question:
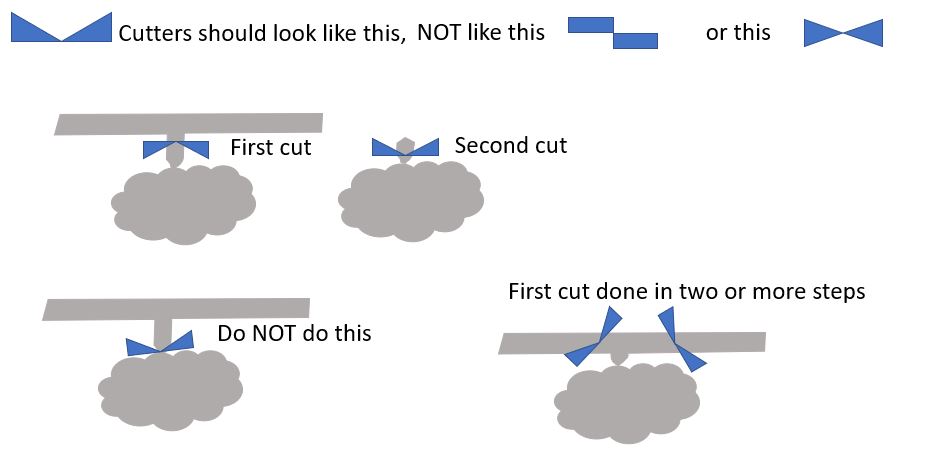
The cutters should have cutting edges as illustraded above. When these cut they exert force upwards, the sloping edges pushes the material upwards. The straight lower edges do not push downwards.
Styrene plastic will stretch and "flow" under pressure.
Pressure comes from cutting and depends on how the volumes of plastic are located in relation to the cutting edges.
The first cut is made at a safe distance and serves to separate the part + injection gate from the rest of the sprue. The second cut eliminates most of the injection gate. Subsequent cuts are done so that the flat side faces the part and the slanting edges pushes away unwanted plastic. In all these cuts you make sure that there is less volume of the injection gate above the slanting edges than below the straight edges. The quality of the cuts depends on the quality of the cutter: sharpness and alignment of the cutting edges, the flat sides of the cutters shall align with each other to get cutting actions instead of crushing and distortion. After a few cuts the cutters are put aside and you use a fine file or fine grit sandpaper to remove the last remnants (check the nail polishing products in the cosmetics department/shop).
Do NOT attempt to go directly for the final cut. The rounded front of the injection gate WILL be forced upwards by the slanted sides of the cutting edges BEFORE the cutting edges themselves bite into the plastic. The result is that you pull out the injection gate by brute force which will leave an ugly scar on the part.
The mechanics of this applies to all cuts.
In the first cut in the illustration the cutter causes damage to the injection gate but there is a safe margin of injection gate before reaching the part. The second cut also attacks the injection gate with the cutting edges to avoid pulling or crushing. The damage zone is now facing away from the part.
In all of the more delicate cuts you make sure that the volume of plastic facing the slanted edges is smaller and thus weaker then the plastic facing the straight edges.
If there is not enough space between the part and the sprue (too short injection gate) to get the cutters safely in position for a safe first cut you will start by cutting the sprue right and left of the injection gate and then nibble your way inwards.
Trying to cut the injection gate directly will result in the cutter pulling the part away from the injection gate.
Some manufacturers have huge injection gates on small parts, the intersection where the injection gate meets the part can sometimes be larger than the small delicate part. The "nibbling" method will usually work but consider the nail polishing sticks instead of going one cut too far ...
If you get scars, happens to all of us occasionally, you can use solvent based glue to turn thin shims of plastic into soft goo and use it as putty to fill the holes. Another option is CA-glue which fills the scar.
Once it is dry you use that nail polishing stick to sand it smooth.
There are some very expensive cutters that almost leave a perfect surface but the mechanics of injection gate hitting sloped edges still apply.

marcb

Joined: March 25, 2006
KitMaker: 1,244 posts
Armorama: 1,226 posts

Posted: Saturday, July 11, 2020 - 01:56 AM UTC
I use Tamiya sprue cutters, x-acto blades with both straight and rounded edge, sandpaper (fine/ grey #240) and emery board (from Boots, etc.)
https://www.plazajapan.com/4950344963553/
Use Tamiya thin cement (green cap).
https://www.scalemates.com/nl/kits/tamiya-87038-tamiya-extra-thin-cement--235143
Use a green scouring pad to get rid of dust after sanding.
https://www.plazajapan.com/4950344963553/
Use Tamiya thin cement (green cap).
https://www.scalemates.com/nl/kits/tamiya-87038-tamiya-extra-thin-cement--235143
Use a green scouring pad to get rid of dust after sanding.

Kevlar06


Joined: March 15, 2009
KitMaker: 3,670 posts
Armorama: 2,052 posts
Posted: Saturday, July 11, 2020 - 03:05 AM UTC
Quoted Text
I'm really new at this, so there are lots of things I'm trying to learn.
First: how the heck do you get the pieces off the bloody sprues without damage? I have a pair of sprue clippers, but I still often seem to damage the plastic. I never see any marks on experienced modellers work however. Do they have a technique, or do they just sand and fill any damage?
Second: dust effects? Suppose I'm building a tank in the summer dust at Kursk. I have some 'dust effect' in grey by AK products. But what's the best way to apply it? Like a wash? Should pigments go on first, or after?
Third: chipping effects. Some people suggest hairspray and then actually rubbing off some paint. Or, some people suggest using a sponge to paint on simulated chips. What's easiest for a rookie like me?
Thanks in advance,
Nathan.
Firstly, you are not a bother! This is the best site to come to to ask any questions, and there are lots of folks here who are willing to help, as you can see. We all started out someplace, and theres a wealth of knowledge to be shared.
1) I just noticed you are in BC, Im a bit farther south, just across the border. But I know there are some good LHS in the Vancouver area, and several modeling groups up there too. You can also join modeling group like IPMS in your local area and get info first hand.
2) Id like to introduce you to Micro-Mark, a company that specializes in all kinds of miniature hobby tools (although you can buy tools from many internet sources). My experience with Canadian postal service is that if youre ordering from the States, there may be a bit of a delay, but generally things get where theyre supposed to go. Heres the Micromark web site:
https://www.micromark.com/?msclkid=ac3971e9a8ec199735922ee0666eb988&utm_source=bing&utm_medium=cpc&utm_campaign=WK_Brand&utm_term=micro%20mark&utm_content=Brand%20%20-%20General
3). There are a myriad of video tutorials on line for things like Chipping, Filters, panel washes, etc. One of my favorites is Panzermiester 36s Top 5 Beginner Weathering Techniques. Heres a link, but there are many more.
https://www.youtube.com/watch?v=pNcUJ0BACO4
(I just noticed youll have to maneuver around the advertisements in this link, but youll get there eventually) heres a playlist of Panzermiester beginner videos:
https://www.youtube.com/playlist?list=PLD8gtuLaOgusNUpSYfzbokp9_i-F0BAnA
4) I use sprue nippers manufactured by Zuron, and Fujiyama, but there are several others out there, as mentioned above, probably the best and most expensive are the Godhand nippers. However, regardless of what you use, youll likely need a good set of files and sanding sticks to fully remove those pesky sprue attachment nubs. And Robin has given you an excellent tutorial above.
5) And, as a coup de gras heres a link to Paul Budziks excellent site, probably one of the finest model building answer sites on the internet. Paul is a master builder, and talks about everything from tools to finishes. Remember though, hes been at it for years:
http://paulbudzik.com/
Take some time and explore his videos, tutorials, and explanations.
Hope this helps.
VR, Russ

justsendit
Joined: February 24, 2014
KitMaker: 3,033 posts
Armorama: 2,492 posts
Posted: Saturday, July 11, 2020 - 05:15 AM UTC
Welcome aboard, Nathan!
One thing you might note, as your stash will undoubtably begin to swell and you wade the waters of kits out there: Often the cutting-tool one uses is not to blame, as styrene compounds can differ between one manufacture to the next. At times, removing parts off of a sprue can be an enjoyable experience... or it can feel like a really bad day due to the plastic. Regardless, good quality tools can really make a difference.
Happy modeling!🍺
mike
obg153
Joined: April 07, 2009
KitMaker: 1,063 posts
Armorama: 1,049 posts

Posted: Saturday, July 11, 2020 - 06:03 AM UTC
In addition to the great info already offered, I'd take a page from carpenters/construction gurus (slightly altered),,, measure twice,, cut once. Removing 60 roadwheels, or 600 track links from their sprues can cause one to rush it just to get it over with,, so take your time. Good luck in your efforts!

Scarred
Joined: March 11, 2016
KitMaker: 1,792 posts
Armorama: 1,186 posts
Posted: Saturday, July 11, 2020 - 06:34 AM UTC
As the others have said do a 'rough' cut to remove the part from the tree then remove the rest of the remaining sprue with a knife, precision cutters, or by sanding. I will always clean up a attachment point with files or sandpaper to make sure I get it all. I got a pair of these a while back and the are great at getting fragile, small parts clear of sprue.
http://umm-usa.com/onlinestore/product_info.php?cPath=21_28&products_id=3749
http://umm-usa.com/onlinestore/product_info.php?cPath=21_28&products_id=3749
Petro
Joined: November 02, 2003
KitMaker: 984 posts
Armorama: 846 posts
Posted: Saturday, July 11, 2020 - 06:35 AM UTC
in regards to the AK dust effects.
paint up a scrap piece of plastic card and experiment.
straight from the bottle it is very heavy.
i cut it with thinner and sprayed it on a SDKFZ 251 Tamiya kit.
i am still not sure i like it.
paint up a scrap piece of plastic card and experiment.
straight from the bottle it is very heavy.
i cut it with thinner and sprayed it on a SDKFZ 251 Tamiya kit.
i am still not sure i like it.
Kevlar06
Joined: March 15, 2009
KitMaker: 3,670 posts
Armorama: 2,052 posts
Posted: Saturday, July 11, 2020 - 07:40 AM UTC
Dan, see my post above for more detail if you havent already. But I wanted to give you a look at Paul Budziks excellent tutorial on Sprue cutters and nippers in particular. As I said, Robin has done a great job with his tutorial above, but this might give you more information on purchasing:
http://paulbudzik.com/tools-techniques/sprue-cutter-review/sprue-cutter-review.html
I really recommend Pauls website for lots of questions. But keep in mind, Paul doesnt go in for a lot of weathering, youll have to look elsewhere for that (although he has a discussion on it, including a link to an entire book on the subject Ive linked below).
http://paulbudzik.com/tools-techniques/Weathering/weathering_armor_guide.html
VR, Russ
UpperCanadian
Joined: June 28, 2020
KitMaker: 152 posts
Armorama: 133 posts
Posted: Saturday, July 11, 2020 - 08:23 AM UTC
Thanks for all the helpful replies.
Today I tried spraying Tamiya Panzer yellow on an old scrap tank.
I had a hard time with the paint consistency. Have to check it when it's fully dry, but it was pooling on the tank.
I was told to thin Tamiya paints with the X-20 thinner so that you put enough thinner in to fill up to the top lid.
Used my respirator and my portable spray booth.
Could still smell some of the tamiya paint though, even with the respirator. Not sure why. That gets me a bit worried.
RobinNilsson
Joined: November 29, 2006
KitMaker: 6,693 posts
Armorama: 5,562 posts
Posted: Saturday, July 11, 2020 - 09:12 AM UTC
Forgot to mention one aspect: Not all injection gates were created equal.
In some cases they end neatly against an edge, sometimes they extend over the part and cover details.

In this case it is not simply "snipping it off", this one may require "sculpting" to restore that thin edge if the edge is supposed to be there. At least one of those rivets or boltheads are in immediate danger of being damaged.
Image from Matthew Lentons build blog:
https://armorama.kitmaker.net/forums/286441&page=1
In some cases they end neatly against an edge, sometimes they extend over the part and cover details.
In this case it is not simply "snipping it off", this one may require "sculpting" to restore that thin edge if the edge is supposed to be there. At least one of those rivets or boltheads are in immediate danger of being damaged.
Image from Matthew Lentons build blog:
https://armorama.kitmaker.net/forums/286441&page=1
phil2015
Joined: July 27, 2015
KitMaker: 502 posts
Armorama: 325 posts
Posted: Saturday, July 11, 2020 - 09:23 AM UTC
Great questions and great responses. Please continue!

Grauwolf

#084
Joined: September 14, 2005
KitMaker: 2,485 posts
Armorama: 743 posts

Posted: Saturday, July 11, 2020 - 09:46 AM UTC
Quoted Text
I was told to thin Tamiya paints with the X-20 thinner
Tamiya X20 is an ENAMEL PAINT THINNER, if you are spraying
Tamiya Acrylics, you need to use their X-20A which is
made for their acrylic line of paints.
These paints also work very well with their lacquer thinner(yellow cap)
but you may not like the extra smell of the lacquer thinner.
Cheers,

ColinEdm
Joined: October 15, 2013
KitMaker: 1,355 posts
Armorama: 1,229 posts
Posted: Saturday, July 11, 2020 - 10:21 AM UTC
I just thin my Tamiya paints with IPA, works great, 50/50 mix.

Simple64

Joined: January 13, 2008
KitMaker: 33 posts
Armorama: 33 posts
Posted: Saturday, July 11, 2020 - 11:08 AM UTC
I concur wholeheartedly with Russ's comments.
This is the best website along with Aeroscale for members willing to share info & techniques.
You don't just get the standard "Google is your friend" reply BS like on other forums that I won't mention.
Sometimes I feel a bit guilty as I don't contribute as much as I gain from here though.
This is the best website along with Aeroscale for members willing to share info & techniques.
You don't just get the standard "Google is your friend" reply BS like on other forums that I won't mention.
Sometimes I feel a bit guilty as I don't contribute as much as I gain from here though.

Scarred
Joined: March 11, 2016
KitMaker: 1,792 posts
Armorama: 1,186 posts
Posted: Saturday, July 11, 2020 - 02:47 PM UTC
I recommend following Tamiya's recommendation for thinning before using any non-Tamiya thinners. This is to get comfortable using and handling their products before you start attempting to mix your paint with anything anyone recommends. It may be a bit more expensive but it will save you money because you won't be buying new paint to replace the ones you destroyed, you won't have to strip paint from a bad paint job and you won't throw your hands up in frustration because someone's concoction didn't work for you. Though if you got the money to throw away then go ahead. I can't afford to trash kits so I go the cautious route most of the time. Nearly 50 years of building have backed me up.
UpperCanadian
Joined: June 28, 2020
KitMaker: 152 posts
Armorama: 133 posts
Posted: Saturday, July 11, 2020 - 04:15 PM UTC
Quoted Text
Quoted TextI was told to thin Tamiya paints with the X-20 thinner
Tamiya X20 is an ENAMEL PAINT THINNER, if you are spraying
Tamiya Acrylics, you need to use their X-20A which is
made for their acrylic line of paints.
These paints also work very well with their lacquer thinner(yellow cap)
but you may not like the extra smell of the lacquer thinner.
Cheers,
Thanks.
I actually meant X-20A
UpperCanadian
Joined: June 28, 2020
KitMaker: 152 posts
Armorama: 133 posts
Posted: Saturday, July 11, 2020 - 05:56 PM UTC
Maybe I will start posting pictures as I go.
I'm building a 1/35th Tamiya Pz. III ausf. N.
I just put the dark yellow base coat on today. Looks good. Happy with it.
I'm doing a vehicle from Kursk, with red brown and dark green stripes. I've never done camo w. an airbrush, and I'm hoping I didn't bite off more than I could chew. I tried spraying some camo lines on my practise Tiger I hull. But both the red and green splattered and generally didn't give me anything like a fine line of the kind required.
Kevlar06
Joined: March 15, 2009
KitMaker: 3,670 posts
Armorama: 2,052 posts
Posted: Saturday, July 11, 2020 - 08:51 PM UTC
Quoted Text
Maybe I will start posting pictures as I go.
I'm building a 1/35th Tamiya Pz. III ausf. N.
I just put the dark yellow base coat on today. Looks good. Happy with it.
I'm doing a vehicle from Kursk, with red brown and dark green stripes. I've never done camo w. an airbrush, and I'm hoping I didn't bite off more than I could chew. I tried spraying some camo lines on my practise Tiger I hull. But both the red and green splattered and generally didn't give me anything like a fine line of the kind required.
Dan, I find 90% of airbrush paint problems are generally tied to air pressure and thinning. Also, the old saw about cleanliness is next to Godliness really does apply to airbrushes. Most folks start out by trying to turn their air pressure up and spraying thick paint out the nozzle. All this does is clog it up, as high air pressure has a tendency to dry the paint right out of the nozzle. Its better to work with thinner paint (I usually use a formulation of thinner to paint at 6:4, sometimes as high as 7:3) and, and I turn my air pressure down to about 10-15 PSI. Experiment around with your airbrush with paints And thinners mixed at different ratios, and different air pressures, and see what works best for you. Keep a log for reference later.
VR, Russ

SSGToms
Joined: April 02, 2005
KitMaker: 3,608 posts
Armorama: 3,092 posts

Posted: Sunday, July 12, 2020 - 04:55 AM UTC
Filling a new Tamiya bottle the rest of the way with X20A should give you about a 60/40 mix, which is close to perfect for Tamiya. If you airbrushed with that spraybooth and a respirator, and you report paint pooling on the model and you can smell the paint through the respirator, that indicates to me a clear problem - you are putting out way too much paint at way too high a pressure. Cut your air pressure in half and turn down your needle pre-set knob. Play with your needle setting until it sprays a nearly invisible mist at that air pressure. Don't just keep turning up the air pressure until your airbrush is spurting out visible clouds of paint; you might as well just open the paint jar and throw it at the model. Practice on some newspaper until you get the pressure / needle right and you can control your spray patterns. None of us learned this overnight, it takes years to get good at airbrushing. And sometimes when the stars are not aligned, even the best of us have a day when our airbrushes are our worst enemies.

UpperCanadian
Joined: June 28, 2020
KitMaker: 152 posts
Armorama: 133 posts
Posted: Sunday, July 12, 2020 - 05:52 AM UTC
Quoted Text
Filling a new Tamiya bottle the rest of the way with X20A should give you about a 60/40 mix, which is close to perfect for Tamiya. If you airbrushed with that spraybooth and a respirator, and you report paint pooling on the model and you can smell the paint through the respirator, that indicates to me a clear problem - you are putting out way too much paint at way too high a pressure. Cut your air pressure in half and turn down your needle pre-set knob. Play with your needle setting until it sprays a nearly invisible mist at that air pressure. Don't just keep turning up the air pressure until your airbrush is spurting out visible clouds of paint; you might as well just open the paint jar and throw it at the model. Practice on some newspaper until you get the pressure / needle right and you can control your spray patterns. None of us learned this overnight, it takes years to get good at airbrushing. And sometimes when the stars are not aligned, even the best of us have a day when our airbrushes are our worst enemies.
After the first attempt I realized there was too much paint and turned down the PSI. My Iwata NEO Air kit has three PSI settings. No more mist.
I will adjust the pre-set knob next time I try. Thanks very much for the advice.
UpperCanadian
Joined: June 28, 2020
KitMaker: 152 posts
Armorama: 133 posts
Posted: Sunday, July 12, 2020 - 05:59 AM UTC
Is the needle pre-set knob the piece at the back of the airbrush (under the metal cover) which holds in the needle?
SSGToms
Joined: April 02, 2005
KitMaker: 3,608 posts
Armorama: 3,092 posts
Posted: Sunday, July 12, 2020 - 08:40 AM UTC
NO. That is the needle chuck nut. Your NEO does not have a pre-set knob. You'll just have to learn not to haul back on the trigger so far, so as not to release so much paint. If you pull back easy, you can do those little pencil lines you want to do. Try practicing signing your name with the airbrush over and over until it looks exactly like your signature in pen. Then you'll be ready to do those lines on your model.
UpperCanadian
Joined: June 28, 2020
KitMaker: 152 posts
Armorama: 133 posts
Posted: Sunday, July 12, 2020 - 09:19 AM UTC
Quoted Text
NO. That is the needle chuck nut. Your NEO does not have a pre-set knob. You'll just have to learn not to haul back on the trigger so far, so as not to release so much paint. If you pull back easy, you can do those little pencil lines you want to do. Try practicing signing your name with the airbrush over and over until it looks exactly like your signature in pen. Then you'll be ready to do those lines on your model.
Ok. Thanks again.
 |

WEB HOSTING BY


Copyright ©2021 Armorama and Kitmaker Network, a subsidiary of Silver Star Enterprises
All Rights Reserved. Please read our Conditions of Use and Privacy Policy.
All Rights Reserved. Please read our Conditions of Use and Privacy Policy.