England - North East, United Kingdom
Joined: June 22, 2010
KitMaker: 1,224 posts
Armorama: 1,207 posts
Posted: Tuesday, September 01, 2020 - 01:38 AM UTC
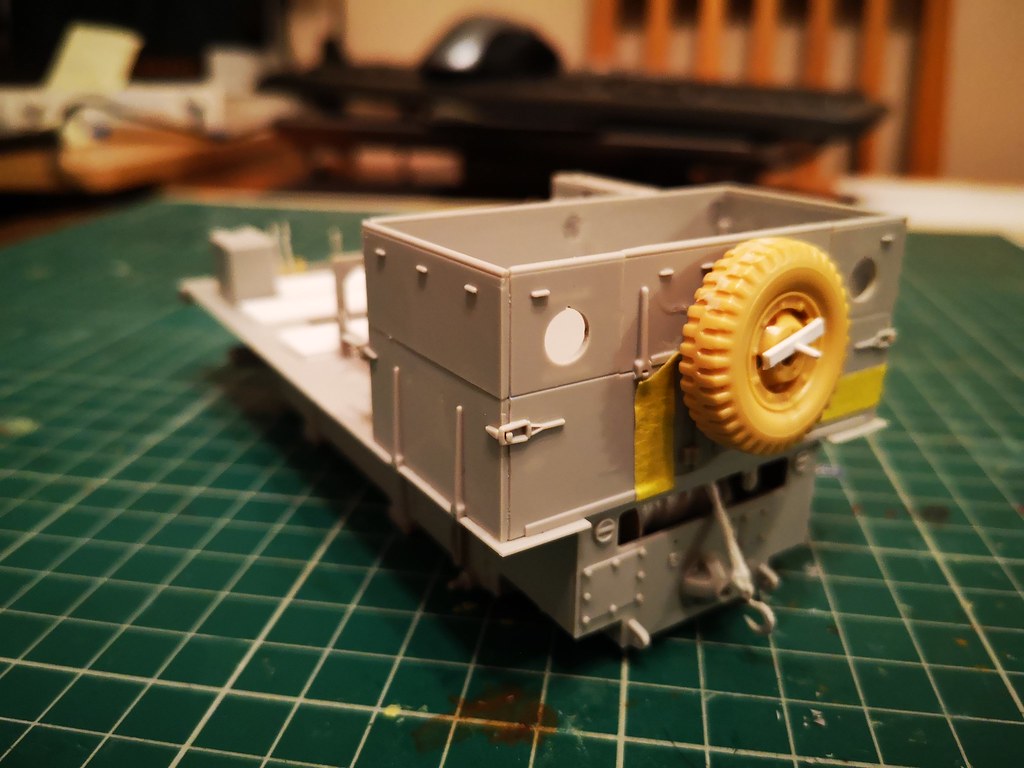
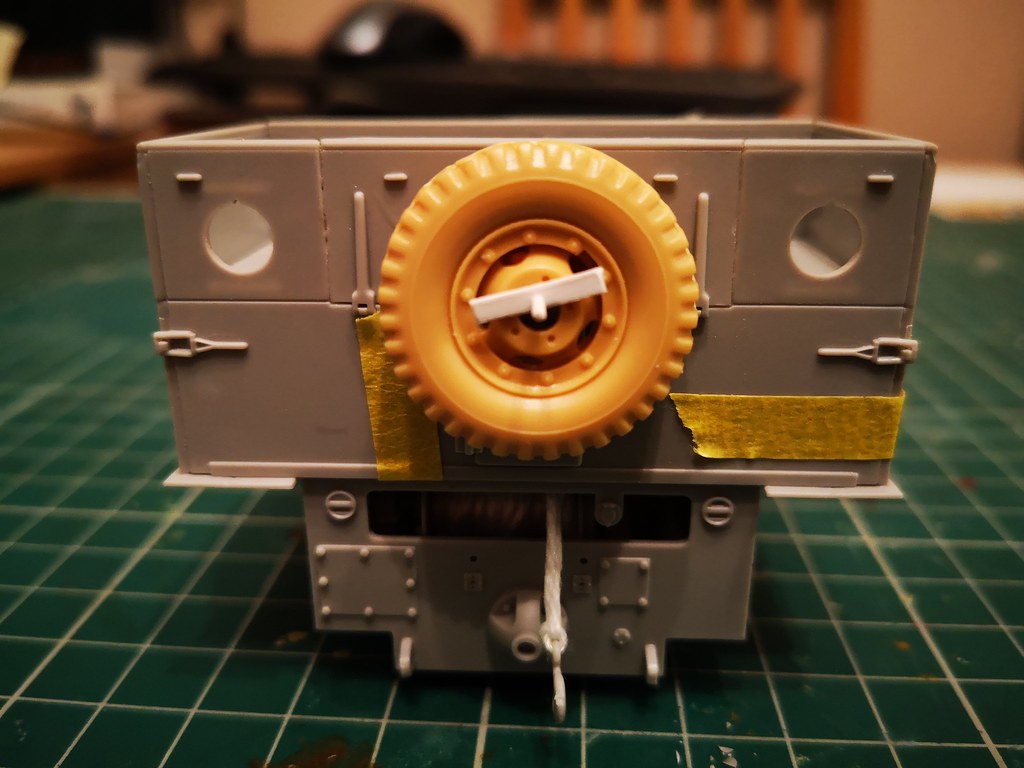
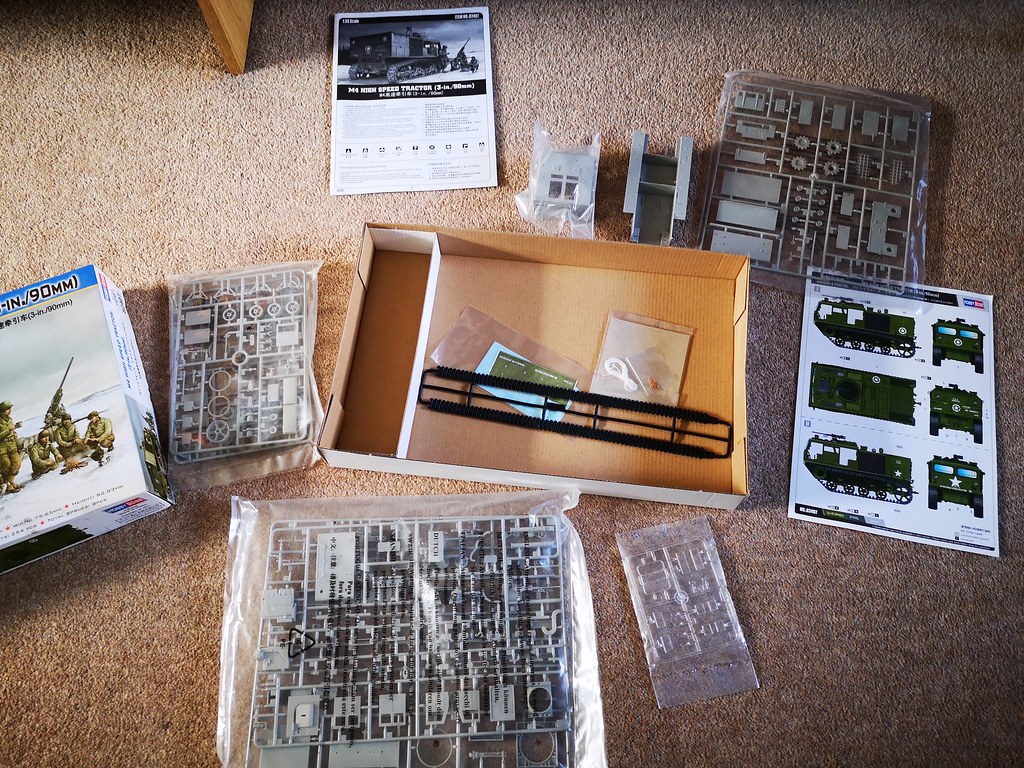
Everything else is heading to decals & weathering so time to start he next kit. Going with the Hobby Boss M4 HST (most likely in straight OD). It may eventually have something to tow (thinking a captured 88mm AA unit).
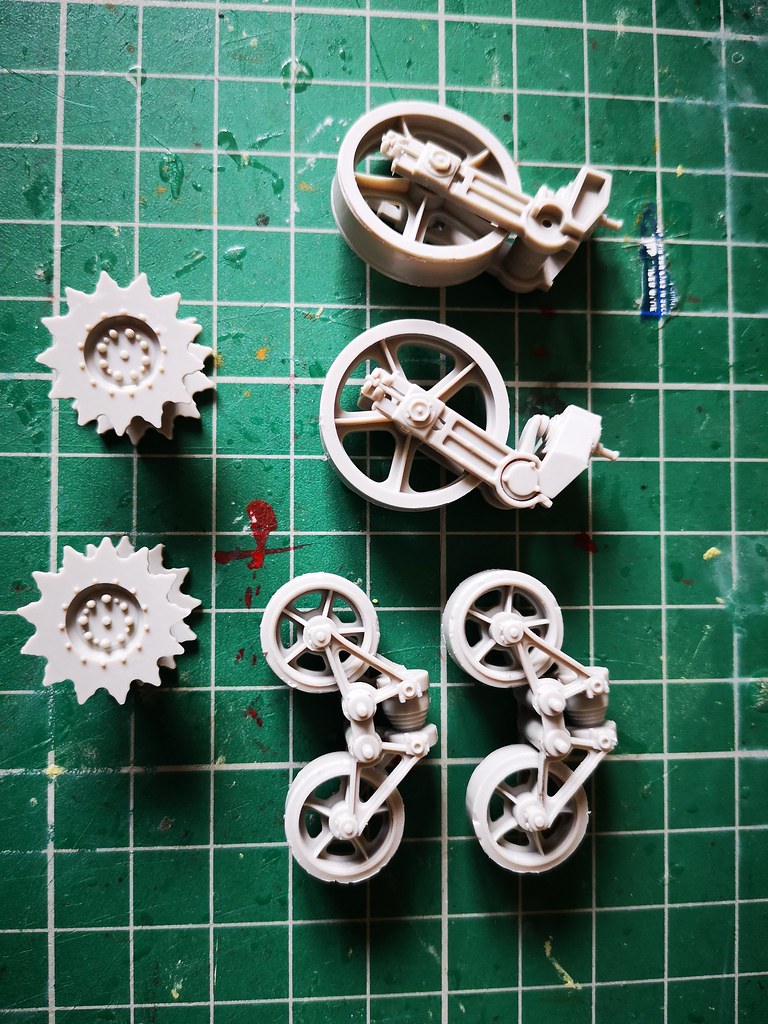
Usual box art/sprue shot to start

Wisconsin, United States
Joined: April 05, 2007
KitMaker: 2,023 posts
Armorama: 1,234 posts
Posted: Tuesday, September 01, 2020 - 02:25 AM UTC
Thanks Robert for starting this one. During the virus quarantine I've been clearing out all of the shelf queens. Inspired by your build this one may move to the top of the pile.
Have fun !

On the bench :
A whole bunch of figures, Too many half built kits and a (gasp) wing thing
Arizona, United States
Joined: June 16, 2005
KitMaker: 83 posts
Armorama: 79 posts
Posted: Tuesday, September 01, 2020 - 04:43 AM UTC
This is one that I want to follow
Attica, Greece / Ελλάδα
Joined: June 12, 2015
KitMaker: 921 posts
Armorama: 919 posts
Posted: Tuesday, September 01, 2020 - 05:12 AM UTC
Germany
Joined: October 24, 2009
KitMaker: 104 posts
Armorama: 103 posts
Posted: Wednesday, September 02, 2020 - 06:50 AM UTC
Hi all HST4 fans,
I'd like to point out a few things concerning the HB kits that I haven't found in the reviews I've read - in no special order:
The roof stowage box behind the manhole can be opened from that opening, not the way HB wants it to be mounted. The PE engine grilles have "frames" at top and bottom that don't appear on the prototype. The kit-supplied chain is of the flattened kind, not correct. The instructions don't mention that the volute springs' thinner ends have to point to the back on both sides, and holes should be drilled into both end caps.
To correct these and other things, Ampersand's and Tankograd's books together with primeportal and Toadman's pictures are indispensable, and here are a few more references:
[url]http://put.url.here[https://www.wk1963.at/m4_highspeedtractor_hkfw/hBA8D4A4C#hba8d4a6b
https://www.youtube.com/watch?v=WxAHIdpJfNw http://usautoindustryworldwartwo.com/allis-chalmers.htm http://preservedtanks.com/Image.aspx?PhotoID=5828&UniqueID=1833&Page=3/url] Hoping this'll work,
Peter
England - North East, United Kingdom
Joined: June 22, 2010
KitMaker: 1,224 posts
Armorama: 1,207 posts
Posted: Wednesday, September 02, 2020 - 07:05 AM UTC
Quoted Text
Hi all HST4 fans,
I'd like to point out a few things concerning the HB kits that I haven't found in the reviews I've read - in no special order:
The roof stowage box behind the manhole can be opened from that opening, not the way HB wants it to be mounted. The PE engine grilles have "frames" at top and bottom that don't appear on the prototype. The kit-supplied chain is of the flattened kind, not correct. The instructions don't mention that the volute springs' thinner ends have to point to the back on both sides, and holes should be drilled into both end caps.
To correct these and other things, Ampersand's and Tankograd's books together with primeportal and Toadman's pictures are indispensable, and here are a few more references:
[url]http://put.url.here[https://www.wk1963.at/m4_highspeedtractor_hkfw/hBA8D4A4C#hba8d4a6b
https://www.youtube.com/watch?v=WxAHIdpJfNw
http://usautoindustryworldwartwo.com/allis-chalmers.htm
http://preservedtanks.com/Image.aspx?PhotoID=5828&UniqueID=1833&Page=3/url]
Hoping this'll work,
Peter
Thanks Peter, I will have a look and document any changes I make as I go along. I had heard that the instructions did sometimes miss parts out (so their in picture but not mentioned)
England - North East, United Kingdom
Joined: September 07, 2014
KitMaker: 63 posts
Armorama: 63 posts
Posted: Wednesday, September 02, 2020 - 08:35 AM UTC
Cool looking machine, i built it a few years ago.
Canada
Joined: January 07, 2019
KitMaker: 110 posts
Armorama: 95 posts
Posted: Thursday, September 03, 2020 - 10:12 AM UTC
Nordrhein-Westfalen, Germany
Joined: July 21, 2007
KitMaker: 521 posts
Armorama: 514 posts
Posted: Thursday, September 03, 2020 - 07:27 PM UTC
Count me in for following this one! And post the pics as they are coming, I'm really interested to actually
watch it come together

England - North East, United Kingdom
Joined: June 22, 2010
KitMaker: 1,224 posts
Armorama: 1,207 posts
Posted: Thursday, September 03, 2020 - 08:42 PM UTC
Germany
Joined: October 24, 2009
KitMaker: 104 posts
Armorama: 103 posts
Posted: Thursday, September 03, 2020 - 08:57 PM UTC
England - North East, United Kingdom
Joined: June 22, 2010
KitMaker: 1,224 posts
Armorama: 1,207 posts
Posted: Thursday, September 03, 2020 - 09:03 PM UTC
evil man ;-) may have to look to see if there are some parts to do. I am on a deadline as it is for a group build elsewhere and needs to be completed by the end of November (well noone will die if it isn't so may have to see)
England - East Midlands, United Kingdom
Joined: April 29, 2004
KitMaker: 1,336 posts
Armorama: 1,137 posts
Posted: Thursday, September 03, 2020 - 09:59 PM UTC
Interesting build here, I'll keep an eye in.
A pity there isn't a 3in/90mm AA in plastic to go with this version, as there are subtle differences in the rear ammo box between that & the 155mm/8in version.
Mitglied: East Mids Model Club Show: 24th March 2013
Arizona, United States
Joined: June 16, 2005
KitMaker: 83 posts
Armorama: 79 posts
Posted: Friday, September 04, 2020 - 04:25 AM UTC
Quoted Text
A pity there isn't a 3in/90mm AA in plastic to go with this version, as there are subtle differences in the rear ammo box between that & the 155mm/8in version.
A pity indeed. I do especially hope that somebody comes out with the 90mm gun, as my dad crewed on those in the 50s.
The suspension parts are looking good so far.
California, United States
Joined: October 27, 2005
KitMaker: 20 posts
Armorama: 20 posts
Posted: Friday, September 04, 2020 - 06:27 AM UTC
Commander's makes a 90mm AA gun:
http://ironshipwrights.com/armor/90mm.htmlI've not seen it in person, so can't comment on the quality or accuracy.
One slight nit that I have with the HobbyBoss kit are the engine screens:
http://www.toadmanstankpictures.com/m4_hst25.jpgThe actual screens have depth and look more like the riveted grating used on catwalks:
https://www.designerpages.com/products/133489/It would be difficult to reproduce this in scale, so I don't have a solution. Given how much I really like the rest of the HB HST kit, I'm inclined to just squint a bit when I look at the screens.
Arizona, United States
Joined: June 16, 2005
KitMaker: 83 posts
Armorama: 79 posts
Posted: Friday, September 04, 2020 - 02:57 PM UTC
England - North East, United Kingdom
Joined: June 22, 2010
KitMaker: 1,224 posts
Armorama: 1,207 posts
Posted: Sunday, September 06, 2020 - 05:46 AM UTC
Germany
Joined: October 24, 2009
KitMaker: 104 posts
Armorama: 103 posts
Posted: Sunday, September 06, 2020 - 08:09 PM UTC
Hi Robert,
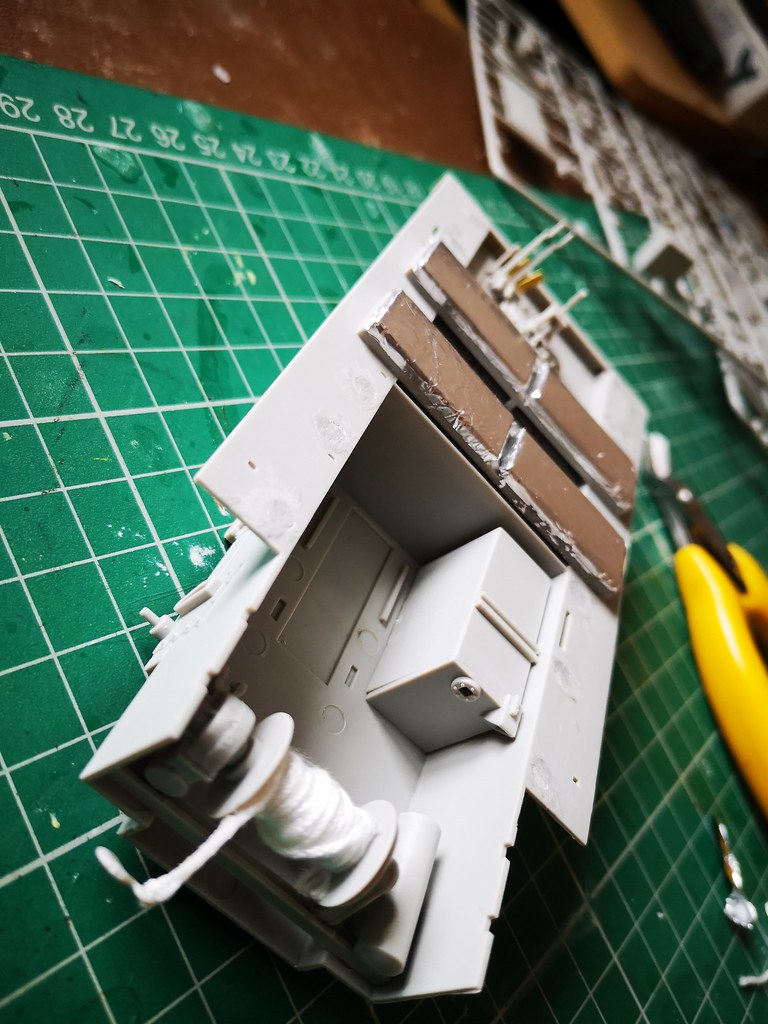
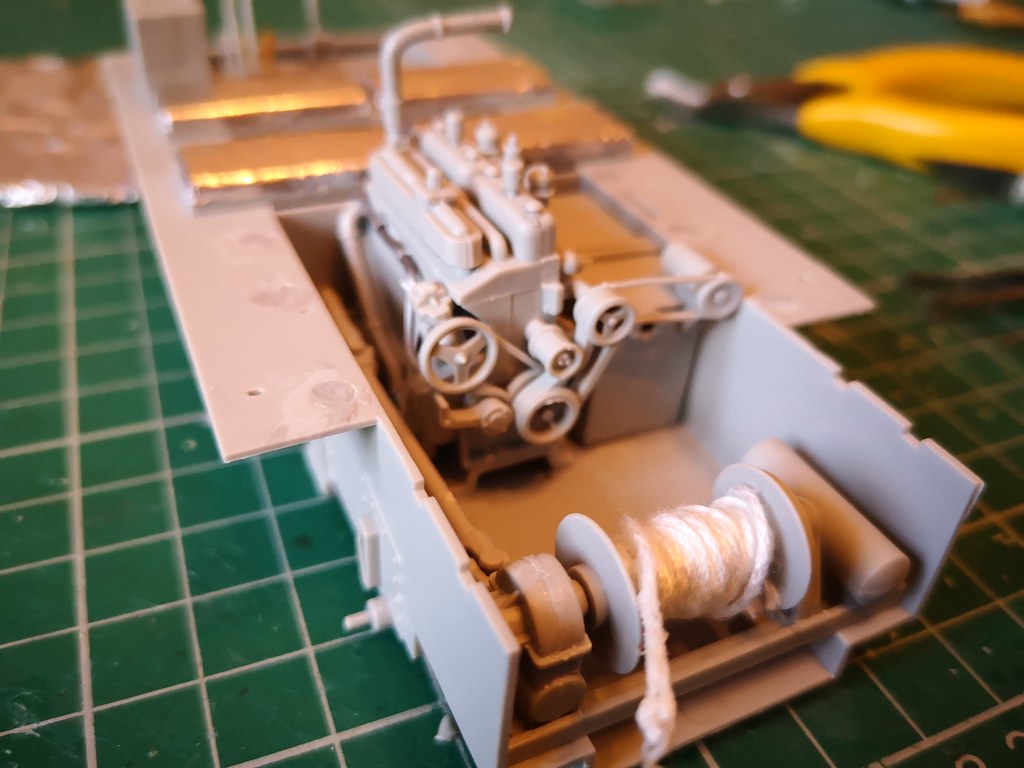
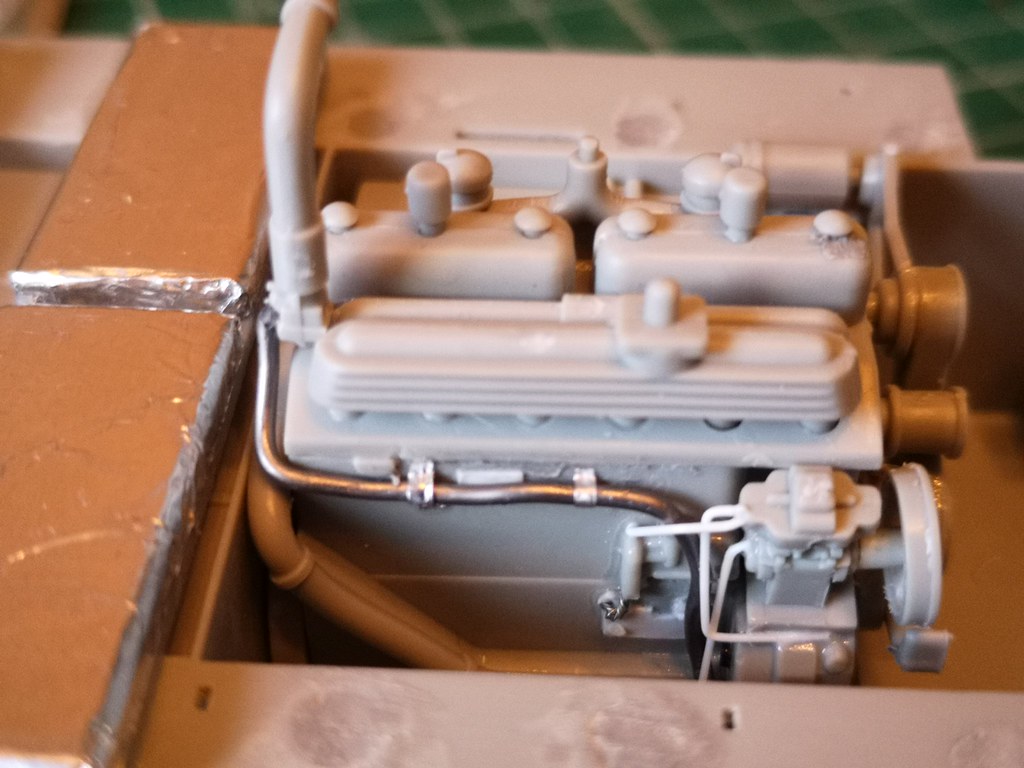
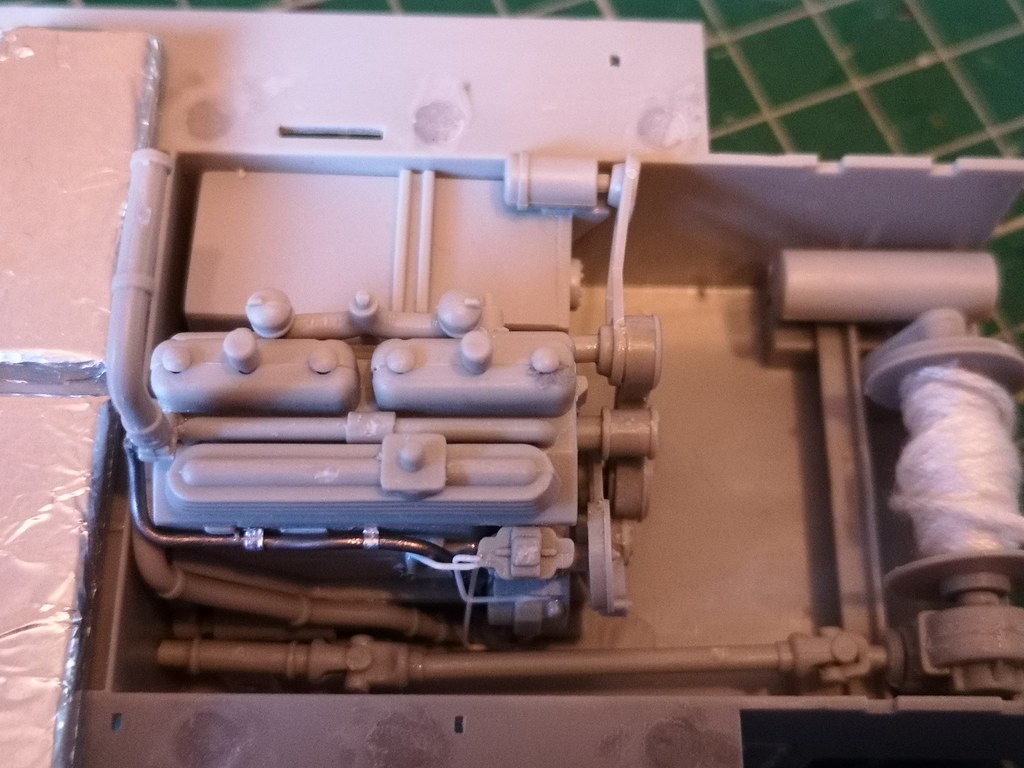
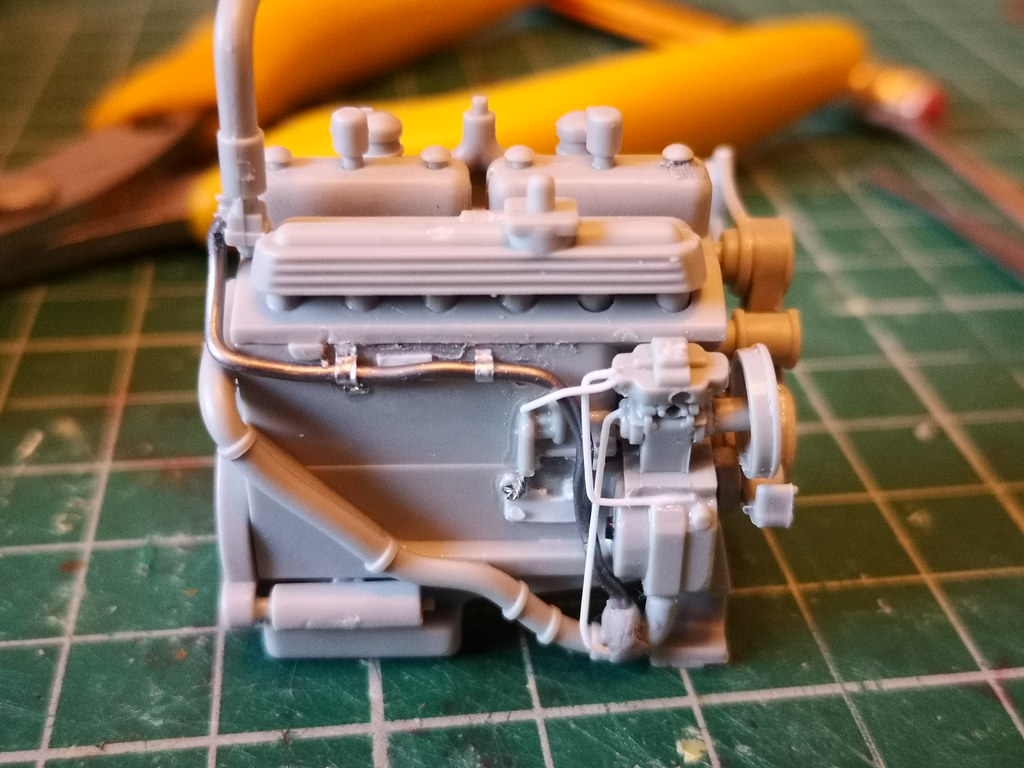
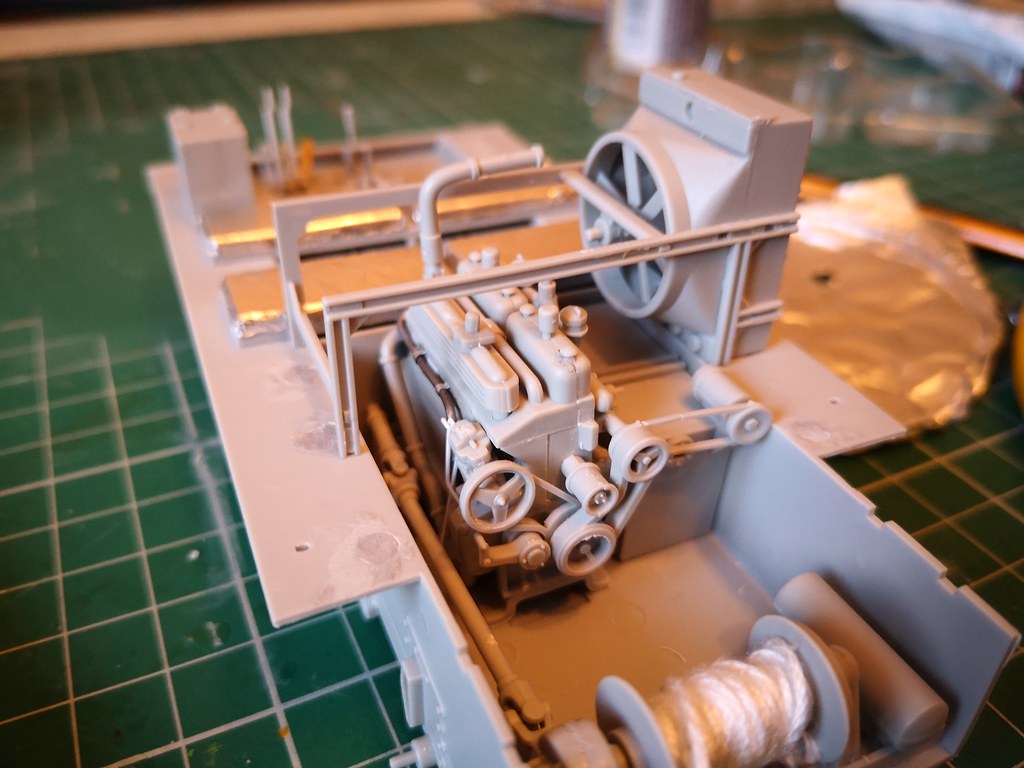
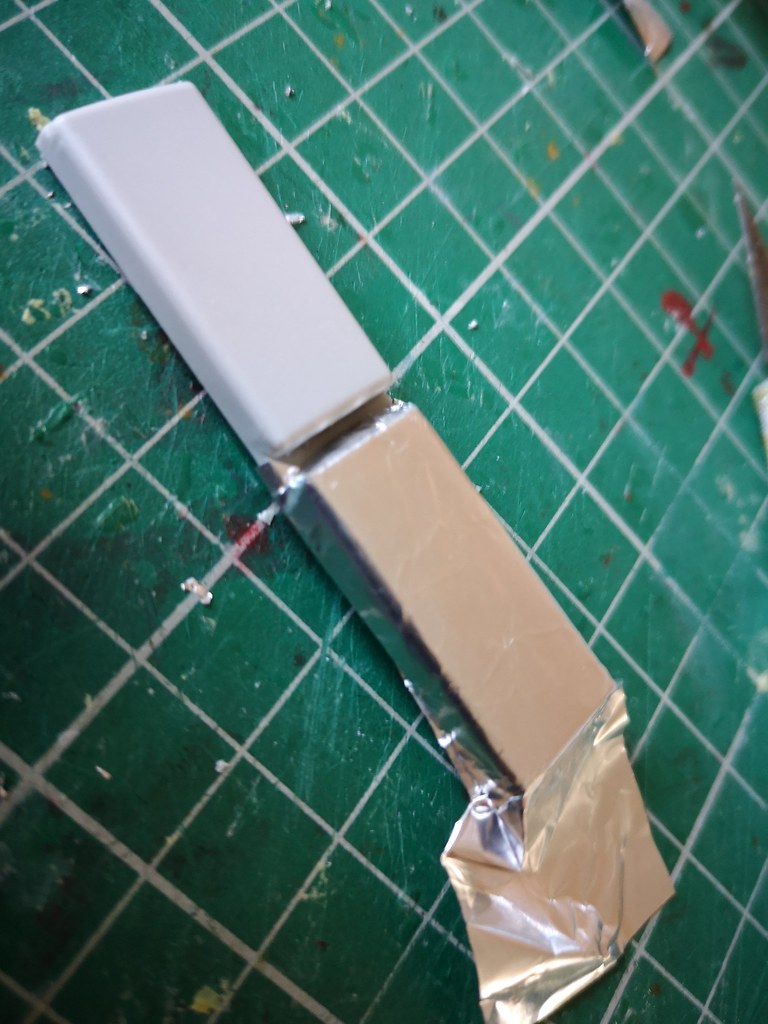
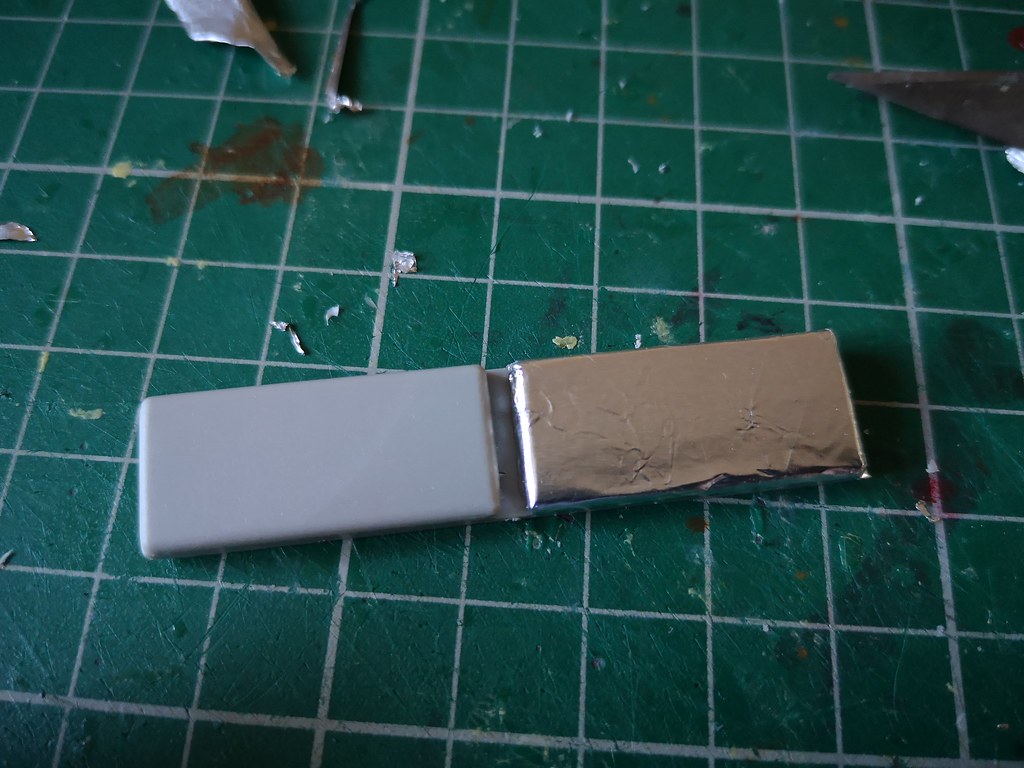
Nice progress on your build, I especially like the metal tube on the engine. Wrapping the seats in aluminum foil is a good idea, too, but:
In the HST, everybody had their separate seats, consisting of square zippered canvas bags that were stuffed with blankets or something similar. Plus all seats had safety belts.
Just telling, while you can still get at them ...
Happy modeling,
Peter
England - North East, United Kingdom
Joined: June 22, 2010
KitMaker: 1,224 posts
Armorama: 1,207 posts
Posted: Sunday, September 06, 2020 - 08:22 PM UTC
Quoted Text
Hi Robert,
Nice progress on your build, I especially like the metal tube on the engine. Wrapping the seats in aluminum foil is a good idea, too, but:
In the HST, everybody had their separate seats, consisting of square zippered canvas bags that were stuffed with blankets or something similar. Plus all seats had safety belts.
Just telling, while you can still get at them ...
Happy modeling,
Peter
yeah did see that - but after I had glued the seat in place... I may be able to rescue them and then create something out of miliput...
Germany
Joined: October 24, 2009
KitMaker: 104 posts
Armorama: 103 posts
Posted: Monday, September 07, 2020 - 04:24 AM UTC
Robert,
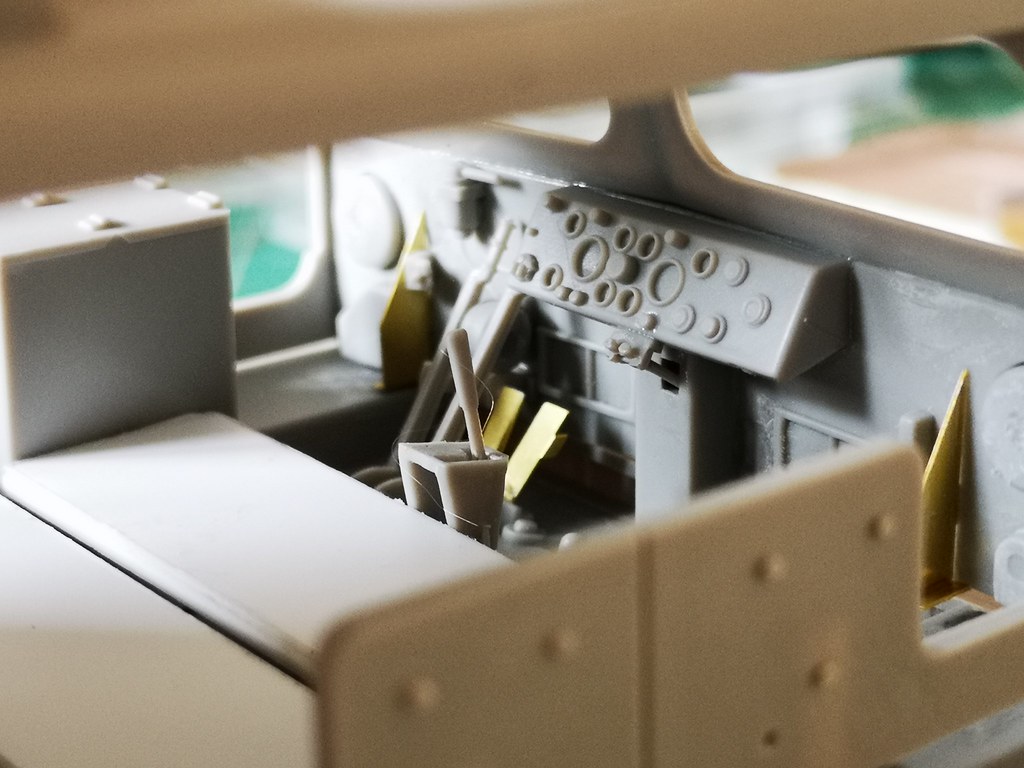
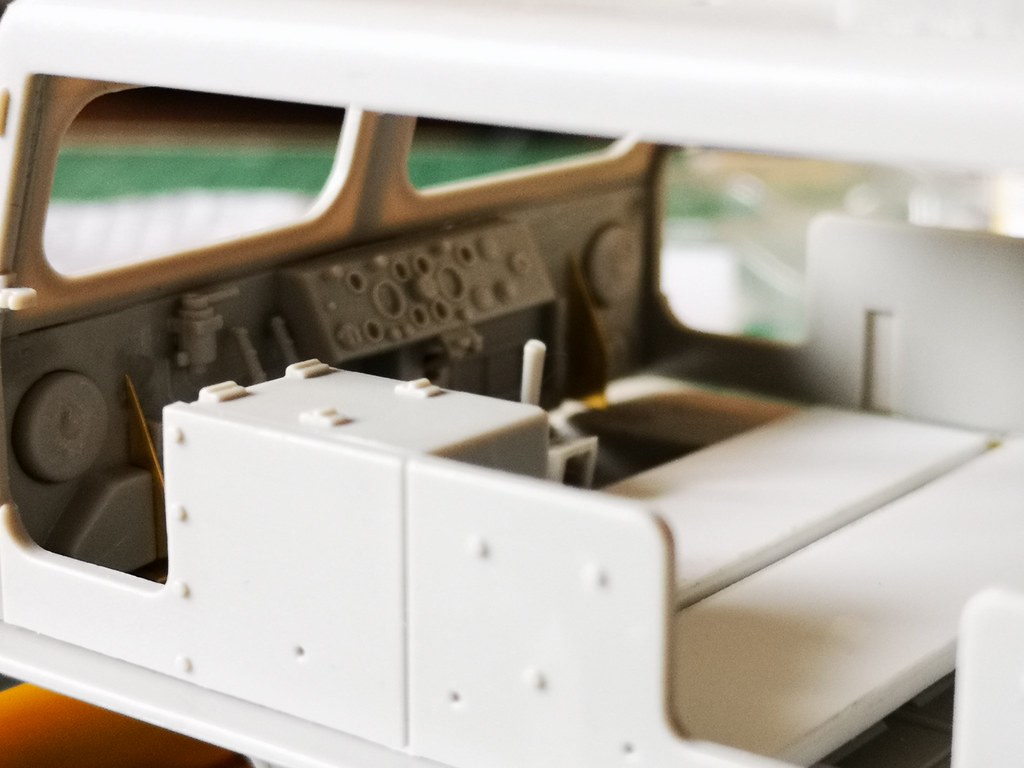
After another study of your build - congrats that you found the right loaction for B19 although the instructions don't mention it. If you play with the thought of leaving the engine room open, the engine TM shows what B19 should look like (p.127), and at primeportal you can see where it's linked to.
To live up to my image of evil man: The "channel" on top of tank B30/C64 is where a scratchbuilt "fan belt tightener" should be installed, illustrated on page 111 of the TM. Another picture can be seen on page 9 of Mike Koenig's Mack NO6 build:
https://armorama.kitmaker.net/forums/196219&page=9#2198988 I guess by now you can tell that I, too, am building the HST - but I'm too dumb to load up photos here, not even following Darren's step-by-step instructions.
Keep chastising yourself!
Peter
England - North East, United Kingdom
Joined: June 22, 2010
KitMaker: 1,224 posts
Armorama: 1,207 posts
Posted: Monday, September 07, 2020 - 04:46 AM UTC
Quoted Text
Robert,
After another study of your build - congrats that you found the right loaction for B19 although the instructions don't mention it. If you play with the thought of leaving the engine room open, the engine TM shows what B19 should look like (p.127), and at primeportal you can see where it's linked to.
To live up to my image of evil man: The "channel" on top of tank B30/C64 is where a scratchbuilt "fan belt tightener" should be installed, illustrated on page 111 of the TM. Another picture can be seen on page 9 of Mike Koenig's Mack NO6 build:
https://armorama.kitmaker.net/forums/196219&page=9#2198988
I guess by now you can tell that I, too, am building the HST - but I'm too dumb to load up photos here, not even following Darren's step-by-step instructions.
Keep chastising yourself!
Peter
thanks Peter... I found B19 (plus the part on top of B30/C64) in another build thread (where I also found the photo for inspiration to mount a spare halftrack type front wheel and a wooden box on the roof).
I will have a look at the tightener....
England - North East, United Kingdom
Joined: June 22, 2010
KitMaker: 1,224 posts
Armorama: 1,207 posts
Posted: Monday, September 07, 2020 - 05:01 AM UTC
Quoted Text
Quoted Text
Robert,
After another study of your build - congrats that you found the right loaction for B19 although the instructions don't mention it. If you play with the thought of leaving the engine room open, the engine TM shows what B19 should look like (p.127), and at primeportal you can see where it's linked to.
To live up to my image of evil man: The "channel" on top of tank B30/C64 is where a scratchbuilt "fan belt tightener" should be installed, illustrated on page 111 of the TM. Another picture can be seen on page 9 of Mike Koenig's Mack NO6 build:
https://armorama.kitmaker.net/forums/196219&page=9#2198988
I guess by now you can tell that I, too, am building the HST - but I'm too dumb to load up photos here, not even following Darren's step-by-step instructions.
Keep chastising yourself!
Peter
thanks Peter... I found B19 (plus the part on top of B30/C64) in another build thread (where I also found the photo for inspiration to mount a spare halftrack type front wheel and a wooden box on the roof).
I will have a look at the tightener....
having looked at the tightener I can't work out how it goes vs the belt (I assume it is like the 2 on the rear of the engine so the belts run over it it).
Think I will give that a miss (or leave it for a while)
England - North East, United Kingdom
Joined: June 22, 2010
KitMaker: 1,224 posts
Armorama: 1,207 posts
Posted: Monday, September 07, 2020 - 07:28 AM UTC
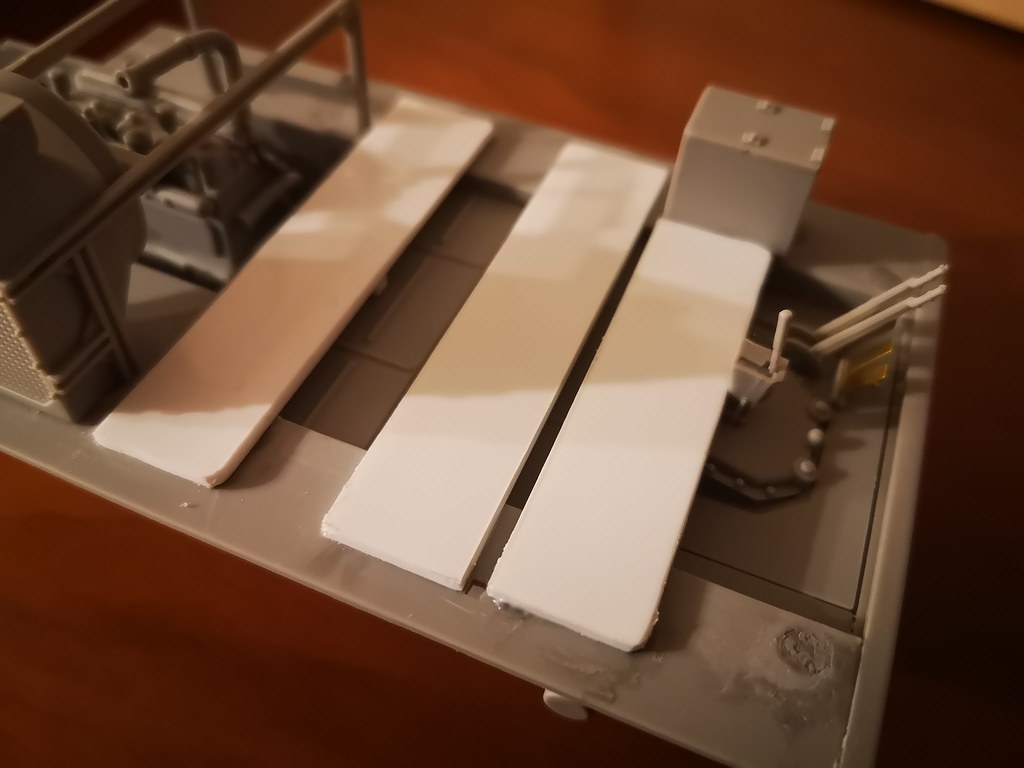
as has been pointed out above the seat pads in the M4 HST were individual (bench seating was a restoration choice) made up with zipped bags filled with crew blankets/soft stowage so removed the kit provided one as started on 3 replacements. Benches in place, cushions will be made from milliput at some point. Will also look at the seat backs (plus in some photos there are pads on the side walls too)....
England - North East, United Kingdom
Joined: June 22, 2010
KitMaker: 1,224 posts
Armorama: 1,207 posts
Posted: Saturday, September 12, 2020 - 02:29 AM UTC
England - North East, United Kingdom
Joined: June 22, 2010
KitMaker: 1,224 posts
Armorama: 1,207 posts
Posted: Wednesday, September 16, 2020 - 08:29 AM UTC


 those are very cool,i have 2 kits in my stash.