Hi All,
Been awhile since I've posted anything really new here. I just got the new Rye Field T-34/85 Model 1945 No. 174 Factory tank model today, and wondering if anyone here has built this yet. My experience with Rye Field models has been really positive, so I took kind of a shot in the dark by getting this tank without a whole lot of reviews having been posted. It looks good in the box, but wondering if anyone has any hands on experience with this guy yet.
Hosted by Darren Baker
Anyone Built the Rye Field T-34/85 No. 174?

cabasner

Joined: February 12, 2012
KitMaker: 1,083 posts
Armorama: 1,014 posts

Posted: Friday, October 16, 2020 - 12:29 PM UTC

airborne1

Joined: April 15, 2006
KitMaker: 915 posts
Armorama: 797 posts

Posted: Saturday, October 24, 2020 - 01:15 PM UTC
Hi Curt,
Have just ordered the T-34/85 No. 174 and if its anything like the detail that is in the M4a3 E8 with interior it will be a great build out of the Box.
The exceptional detail in the Sherman is Fantastic in quality.
As soon as it arrives it's going in the new Forum as a build blog out of the box.
Michael
Oddball69

Joined: August 16, 2020
KitMaker: 6 posts
Armorama: 6 posts
Posted: Saturday, October 24, 2020 - 01:30 PM UTC
Hello I have it 99% done very nice kit. After building their Syrian 122 I knew it would be. I can’t figure out how to upload pics but I could email them
Oddball69

Joined: August 16, 2020
KitMaker: 6 posts
Armorama: 6 posts
Posted: Saturday, October 24, 2020 - 01:32 PM UTC
Only fiddly parts is commander cuppola exterior vision ports and no detail in the cupola other than that sweet kit

cabasner

Joined: February 12, 2012
KitMaker: 1,083 posts
Armorama: 1,014 posts

Posted: Sunday, October 25, 2020 - 05:50 AM UTC
Thanks, Michael and Rick! I'll look forward to your build log, Michael, as I won't be getting to my T-34 for awhile yet. I also got the photo etch set for it. I'm curious if you've ever built a Tasca/Asuka Sherman, which is, to this point, the only Sherman I have built, and how that compares to the Rye Field. At least at the time, the Tasca Sherman was supposed to have been THE Sherman model kits to have, and by my experience, I would have to agree...spectacular fit and finish. If Rye Field beats that, wow!
Rick, my e-mail is cabasner@earthlink.net, if you get some time to send some pictures...many thanks!
Rick, my e-mail is cabasner@earthlink.net, if you get some time to send some pictures...many thanks!
Oddball69

Joined: August 16, 2020
KitMaker: 6 posts
Armorama: 6 posts
Posted: Sunday, October 25, 2020 - 08:22 AM UTC
Pics sent my friend

cabasner

Joined: February 12, 2012
KitMaker: 1,083 posts
Armorama: 1,014 posts

Posted: Sunday, October 25, 2020 - 09:12 AM UTC
Quoted Text
Pics sent my friend
Thank you sir! Pictures are fabulous, great job on the T-34! I really appreciate you sending the photos, as I've not seen any pictures of this tank model built. It looks great, and you you did a VERY nice job building it! Thank you SO MUCH!
sam_dwyer

Joined: November 03, 2008
KitMaker: 294 posts
Armorama: 291 posts

Posted: Sunday, October 25, 2020 - 11:56 AM UTC

cabasner

Joined: February 12, 2012
KitMaker: 1,083 posts
Armorama: 1,014 posts

Posted: Sunday, October 25, 2020 - 12:20 PM UTC
Thanks, Sam, now I've got an embarrassment of riches with your pictures and Rich's. It looks really nice...now I'm even more excited to begin the build! I just have too many airplanes in progress, and I'd like to finish my Rye Field M1A1 full interior build, which is about 60% done, before I begin another tank. But this T-34 sure is enticing!!!! I also have a set of metal tracks, the Fruil version, all completed and ready to go. I was going to use them on the Italeri T-34/85 that I got before I knew about the Rye Field kit, but the way the kit supplied plastic tracks look in Rich's pictures, I may hold off and use the kit tracks.
Generic

Joined: April 30, 2020
KitMaker: 3 posts
Armorama: 3 posts

Posted: Sunday, October 25, 2020 - 11:50 PM UTC
Maybe this could help a bit.
Step 5:
- Check hole marks, bottom part shows correct positions;
- Use J10 instead of J9, later steps also show J10 part and it's a proper one for that era tank.
Step 7:
- C41 C40 (switch parts) and use C39 instead of C38 (or build from wire).
Step 9:
- D22 is the J52 part and additional bolts from sprue D are too small, so additional scratch built will be needed.
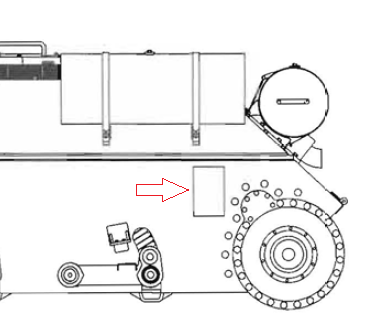
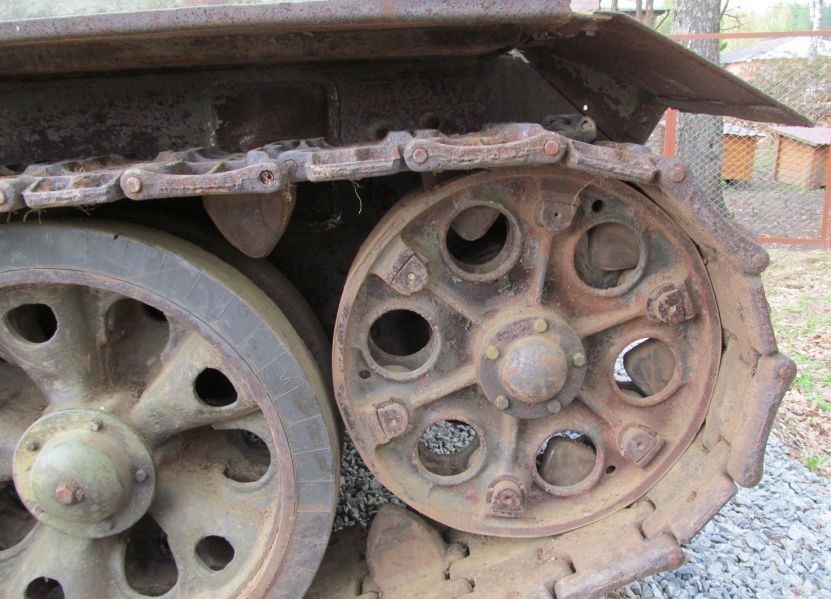
And if you want to add more details, you could also scratch build plate to bump the track pins back:


The part should be around 8x6.5mm and about 1mm thick at the thickest point.
Step 5:
- Check hole marks, bottom part shows correct positions;
- Use J10 instead of J9, later steps also show J10 part and it's a proper one for that era tank.
Step 7:
- C41 C40 (switch parts) and use C39 instead of C38 (or build from wire).
Step 9:
- D22 is the J52 part and additional bolts from sprue D are too small, so additional scratch built will be needed.
And if you want to add more details, you could also scratch build plate to bump the track pins back:


The part should be around 8x6.5mm and about 1mm thick at the thickest point.
 |


.jpg-width=1920-height=1080-fit=bounds)
.jpg-width=1920-height=1080-fit=bounds)
.jpg-width=1920-height=1080-fit=bounds)


