_GOTOBOTTOM
Constructive Feedback
For in-progress or completed build photos. Give and get contructive feedback!
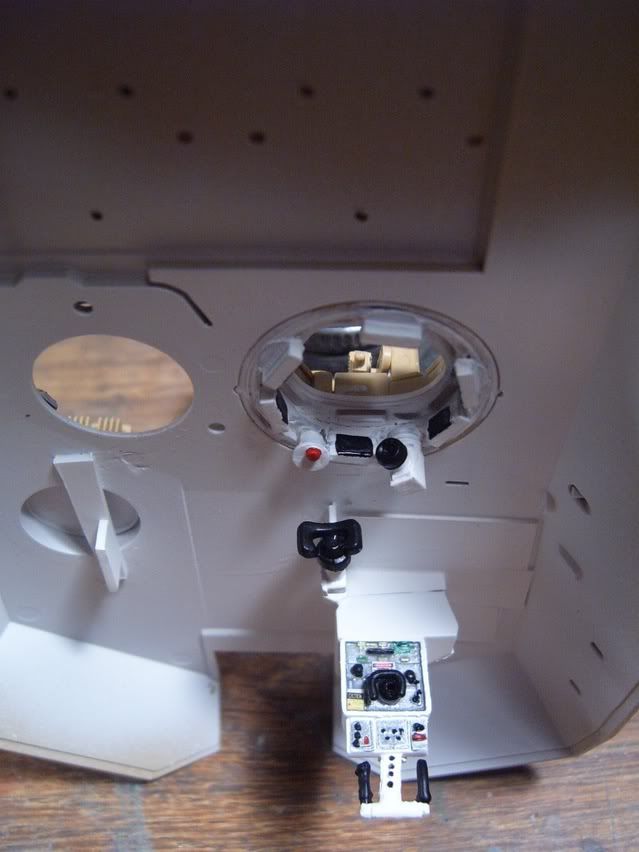
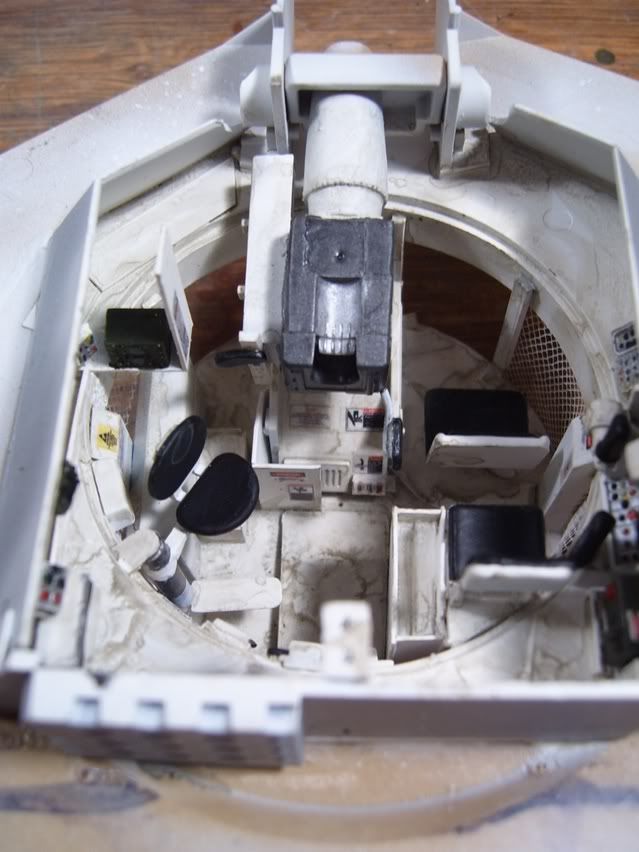
M1A1 turret and driver's interior...
HeavyArty
Visit this Community
Florida, United States
Joined: May 16, 2002
KitMaker: 17,694 posts
Armorama: 13,742 posts
Posted: Wednesday, September 14, 2005 - 03:13 PM UTC
Here are a few pics of the M1A1 turret and driver's interior that I added to a customer's USMC M1A1HC. Most of it is scratch and the interior piecs from a Dragon M1A1 kit. The whole lower turret basket is scratch. The mech on the basket is made out of bridal veil toole. This is the same way I made the basket and interior for my USMC M1A1HC "Angry American" as well. I just forgot to get any in-progress pics of it.


Hope you like them.


More here.
Crackshot53
Visit this Community
Nevada, United States
Joined: March 27, 2005
KitMaker: 143 posts
Armorama: 0 posts
Posted: Wednesday, September 14, 2005 - 03:25 PM UTC
Wow. That is awsome. great weathering.
bison126
Visit this Community
Correze, France
Joined: June 10, 2004
KitMaker: 5,329 posts
Armorama: 5,204 posts
Posted: Wednesday, September 14, 2005 - 11:44 PM UTC
Hi Gino,
it reminds me of something familiar to me !
Nice job you did there and if I'm correct all is scratchbuilt there, no PE parts.

Congrats.
olivier
Dixon66
Visit this Community
New Hampshire, United States
Joined: December 12, 2002
KitMaker: 1,500 posts
Armorama: 289 posts
Posted: Thursday, September 15, 2005 - 01:17 AM UTC
Gino,
Honey I Shrunk the M1A1.....Wow, beautiful job!!
Just one question, did you create the placard and instrument panel decals yourself or are they AM. If AM, whose?

Dave S.

HeavyArty
Visit this Community
Florida, United States
Joined: May 16, 2002
KitMaker: 17,694 posts
Armorama: 13,742 posts
Posted: Thursday, September 15, 2005 - 01:51 AM UTC
Thanks guys.

Olivier, yup. Looks similar to yours. I used your pics as a guide, as well as many other referance photos. And you are correct, all scratch. No PE, no resin AM parts, all styrene and a few resin pour plugs and scraps and good 'ol fashioned modeling.

David, I made all the plackards myself on white, inkjet decal paper. I copied the images from the internet and resized them, then printed them out. Lots of great stuff out there on the web to do this kind of stuff with, give it a try.
Henk
Visit this Community
England - South West, United Kingdom
Joined: August 07, 2004
KitMaker: 6,391 posts
Armorama: 4,258 posts
Posted: Thursday, September 15, 2005 - 02:13 AM UTC
Gino, amazing work yet again. It's images like these that make me want to start on the interior of my M88, but I keep putting it off. Not enough confidence ( or skill... ) with scratch building such a large amount yet.
I love the Drivers and Gunners stations, I bet you can see a T-60 through that sight.. . I just wondered about the weathering in the turret, looks a bit 'runny'?
I think it looks fine on the turret floor, wet and slightly dirty, as if the crew has come in whilst is was raining cats and dogs. Not sure about the bit by the ammo storage, might need a bit of drybrushing. Or a bit of graphite?

Cheers
Henk
VonDodenburg
Visit this Community
Virginia, United States
Joined: August 09, 2005
KitMaker: 128 posts
Armorama: 0 posts
Posted: Thursday, September 15, 2005 - 02:27 AM UTC
Great work. Reminds me of my days in one.

For added realism you can always weather the Tank Commander's seat, and its back which can fold down. I used to stand on the seat to get a better view out the hatch. That meant a lot of wear and tear on it.

Great work.
Burik
Visit this Community
New Jersey, United States
Joined: March 12, 2002
KitMaker: 1,437 posts
Armorama: 1,303 posts
Posted: Thursday, September 15, 2005 - 08:50 AM UTC
Gino. I love it. All the major components are there and more. When it comes to interiors, it is more a matter of choice than anything since you have to weigh the value of putting so much detail into something most will never see except what little can be seen through hatches.

Thus, things like the ammunition tray that goes over the breach block are unnecessary.

It appears you are done, but if you are crazy enough to try this again on a future build you might want to add the many thick wires that run along the turret wall. That would help give it a more cluttered look. Also, there are some prominant bolts and whatnot on the turret race. Finally, you might want to add with black painted paper the lip that appears under the commanders station below the periscopes and the TC's weapon manual drive assembly knob (both shown in the attached photo). By no means do these need added as the interior is superb, but these things could be added without changing what is already there, or can be considered for a future build.

I'm jealous. I have been wanting to do an Abrams interior and have been too lazy to dive in. One of these days I am going to do a maintenance dio with a tricked out interior too, but at the rate I build it would take me two years to do such a project.

Bob


HeavyArty
Visit this Community
Florida, United States
Joined: May 16, 2002
KitMaker: 17,694 posts
Armorama: 13,742 posts
Posted: Thursday, September 15, 2005 - 09:06 AM UTC
Bob, you are right on some of the smaller details. I added most of them, lik ethe coax ammo chute and the coax, etc on mine, but they can't be seen once the turret goes together. So I left them off this one. This one is done. Maye in the future, I will do another and add all the bolt heads and smaller details. For now, having done two of the Abrams interiors is enough.

Thaks for all the comments though.
Burik
Visit this Community
New Jersey, United States
Joined: March 12, 2002
KitMaker: 1,437 posts
Armorama: 1,303 posts
Posted: Thursday, September 15, 2005 - 09:17 AM UTC
And I forgot to mention too about the warning labels. Great job on that. I don't recall seeing anybody in the many publications doing that detail, which sure helps add a bit of color and realism to an all white interior.
Trisaw
Visit this Community
California, United States
Joined: December 24, 2002
KitMaker: 4,105 posts
Armorama: 2,492 posts
Posted: Thursday, September 15, 2005 - 11:54 AM UTC
Looks very realistic to me ! Nice job!
Grumpyoldman
Staff MemberConsigliere
KITMAKER NETWORK
Visit this Community
Florida, United States
Joined: October 17, 2003
KitMaker: 15,338 posts
Armorama: 7,297 posts
Posted: Thursday, September 15, 2005 - 03:15 PM UTC
Nice job Gino.
oldstl1000
Visit this Community
Colorado, United States
Joined: March 23, 2005
KitMaker: 83 posts
Armorama: 0 posts
Posted: Thursday, September 15, 2005 - 05:07 PM UTC
Great job... I wish I had a tenth of your talent.


USArmy2534
Visit this Community
Indiana, United States
Joined: January 28, 2004
KitMaker: 2,716 posts
Armorama: 1,864 posts
Posted: Friday, September 16, 2005 - 04:55 AM UTC
Since your customer won't really get a feel of how much beautiful detail is in there, you might want to include a sort of portfolio of interior and other in progress pics.

Great job, but nothing that I wouldn't expect to come from you.

Jeff
animal
Visit this Community
Joined: December 15, 2002
KitMaker: 4,503 posts
Armorama: 3,159 posts
Posted: Friday, September 16, 2005 - 05:14 AM UTC
I don't usually post on the Rivet thread, but I have to make an exception with this one. I can't find anything wrong or any way to improve on your workmanship. But Darn man I love what you do!!!! I wish there was a way to make a clear top on the Turret so that all the detail will not get lost. Bravo Gino and three cheers
HeavyArty
Visit this Community
Florida, United States
Joined: May 16, 2002
KitMaker: 17,694 posts
Armorama: 13,742 posts
Posted: Friday, September 16, 2005 - 05:21 AM UTC
Thanks guys. Glad you all like it.

Jeff, I have been sending the buyer in-progress and completed photos, have been keeping him posted as well.

Dave, you can actually see quite a bit of the interior through the open hatches, more tha I expected as well. Clear turret roof would look pretty cool too, but I prefer to keep it looking like an actual tank. Guess a cut-away or removable panel would also work to show off more detail. Maybe on a future build with even more interior detailing in it.

jazza
Visit this Community
Singapore / 新加坡
Joined: August 03, 2005
KitMaker: 2,709 posts
Armorama: 1,818 posts
Posted: Friday, September 16, 2005 - 05:21 AM UTC
Nice job once again Gino.

Im surprised no one has asked you this already but where did you get the reference pictures of the interior for the Abram?

Google and Alltheweb came up mainly with exterior pictures.
HeavyArty
Visit this Community
Florida, United States
Joined: May 16, 2002
KitMaker: 17,694 posts
Armorama: 13,742 posts
Posted: Friday, September 16, 2005 - 05:29 AM UTC
Tanxheaven has interior shots of 2 different tanks. Check here:
http://tanxheaven.com/m1a1/interior/i1/interior1.htm
http://www.tanxheaven.com/m1a1aim/m1a1aim1.htm
Nick6570
Visit this Community
Georgia, United States
Joined: September 18, 2005
KitMaker: 20 posts
Armorama: 0 posts
Posted: Friday, September 23, 2005 - 09:14 AM UTC
im sure i sound like a broken record, but how did u get the weathering effects on the inside of the turett
HeavyArty
Visit this Community
Florida, United States
Joined: May 16, 2002
KitMaker: 17,694 posts
Armorama: 13,742 posts
Posted: Friday, September 23, 2005 - 10:10 AM UTC

Quoted Text

im sure i sound like a broken record, but how did u get the weathering effects on the inside of the turett


A wash of a dirty brown color, then a drybrush of the base white, and a drybrush of sand on the seats.
GunTruck
Visit this Community
California, United States
Joined: December 01, 2001
KitMaker: 5,885 posts
Armorama: 3,799 posts
Posted: Friday, September 23, 2005 - 02:10 PM UTC
I'm coming in late on the thread Gino - but I like it too! Inspirational. I'll give one a try myself one day soon...

Gunnie
HeavyArty
Visit this Community
Florida, United States
Joined: May 16, 2002
KitMaker: 17,694 posts
Armorama: 13,742 posts
Posted: Friday, September 23, 2005 - 04:21 PM UTC

Quoted Text

I'm coming in late on the thread Gino - but I like it too! Inspirational. I'll give one a try myself one day soon...

Gunnie


Thanks Jim. Let me know if you need any pointers.
 _GOTOTOP