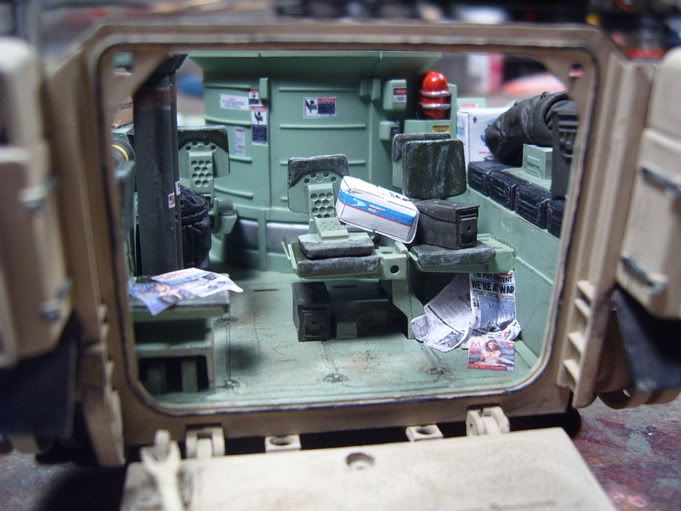
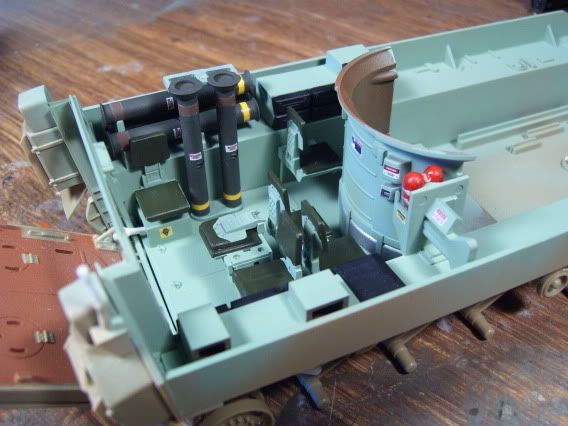
Im trying to build an M2A2 with a detailed interer and turrert. I need help with decals for the interer. Also need ID decals for a track from the 5th ID, 10th IR, 2bat Delta Co. Any help and or ideas would be great.
thanks
Hosted by Darren Baker
M2A2
Savoy19

Joined: October 28, 2006
KitMaker: 42 posts
Armorama: 34 posts

Posted: Sunday, October 29, 2006 - 06:53 AM UTC

HeavyArty


Joined: May 16, 2002
KitMaker: 17,694 posts
Armorama: 13,742 posts

Posted: Sunday, October 29, 2006 - 08:29 AM UTC
I don't have exact markings for a 2-10 IN Bn, 5th ID Brad, but I can give an educated guess.
Here is a pic of an M3A1 from 5th ID. The bumper #'s for it are a good indication as to how the ones would be for 2-10 IN.

Your bumper #s would most likely be as follows:
Left side: 5-I-2-10-I
Right side D-11, D-21, D-33, etc., where D is the Company, and the vehicle number is 11-14 for 1st PLT, 21-24 for 2nd PLT, or 31-34 for 3rd PLT.
For interior plackards, I copied a bunch of warning and danger plackards from photos and images on the net, resized and grouped them, and then printed them off on white decal paper. You can see mine on my Brads below and at my Photo Bucket site.


By the way, are you sure it isn't 3-10 IN? I can't find a 2-10 IN assigned to the 5th Div from '79 till they were inactivated in Nov '92. There was a 3-10 IN assigned to them the whole time as part of 1st BDE though.
Good luck and I hope that helps.
Here is a pic of an M3A1 from 5th ID. The bumper #'s for it are a good indication as to how the ones would be for 2-10 IN.
Your bumper #s would most likely be as follows:
Left side: 5-I-2-10-I
Right side D-11, D-21, D-33, etc., where D is the Company, and the vehicle number is 11-14 for 1st PLT, 21-24 for 2nd PLT, or 31-34 for 3rd PLT.
For interior plackards, I copied a bunch of warning and danger plackards from photos and images on the net, resized and grouped them, and then printed them off on white decal paper. You can see mine on my Brads below and at my Photo Bucket site.


By the way, are you sure it isn't 3-10 IN? I can't find a 2-10 IN assigned to the 5th Div from '79 till they were inactivated in Nov '92. There was a 3-10 IN assigned to them the whole time as part of 1st BDE though.
Good luck and I hope that helps.
Savoy19

Joined: October 28, 2006
KitMaker: 42 posts
Armorama: 34 posts

Posted: Sunday, October 29, 2006 - 07:30 PM UTC
Heavy,
Can you give me more details on making the decals? Im not real good with computers and my printer is KIA. Trying to get new one but no $ in the budget for one yet. And yes you were right on 3-10 I just have fat fingers when I type.
Thanks
Can you give me more details on making the decals? Im not real good with computers and my printer is KIA. Trying to get new one but no $ in the budget for one yet. And yes you were right on 3-10 I just have fat fingers when I type.
Thanks
Manchu34

Joined: March 08, 2002
KitMaker: 493 posts
Armorama: 361 posts

Posted: Sunday, October 29, 2006 - 10:45 PM UTC
Quoted Text
I don't have exact markings for a 5th ID Brad, but I can give an educated guess.
Here is a pic of an M3A1 from 5th ID. The bumper #'s for it are a good indication as to how the ones would be for 2-10 IN.
Your bumper #s would most likely be as follows:
Left side: 5-I-2-10-I
Right side D-11, D-21, D-33, etc., where D is the Company, and the vehicle number is 11-14 for 1st PLT, 21-24 for 2nd PLT, or 31-34 for 3rd PLT.
For interior plackards, I copied a bunch of warning and danger plackards from photos and images on the net, resized and grouped them, and then printed them off on white decal paper. You can see mine on my Brads below and at my Photo Bucket site.
By the way, are you sure it isn't 3-10 IN? I can't find a 2-10 IN assigned to the 5th Div from '79 till they were inactivated in Nov '92. There was a 3-10 IN assigned to them the whole time as part of 1st BDE though.
Good luck and I hope that helps.
Actually if you look at the left rear bumper closely, you'll discover this bradley doesn't belong to any Infantry Battalion.
The numbers read 5-I-3-1-CAV.
Translate to 3 Squadron 1 CAv 5 Inf Div

Sabot
Joined: December 18, 2001
KitMaker: 12,596 posts
Armorama: 9,071 posts
KitMaker: 12,596 posts
Armorama: 9,071 posts

Posted: Sunday, October 29, 2006 - 11:22 PM UTC
Quoted Text
He was telling the original poster to use the bumper numbers as a guide to creating his own, not that they are bumper numbers to an infantry unit.Actually if you look at the left rear bumper closely, you'll discover this bradley doesn't belong to any Infantry Battalion.
The numbers read 5-I-3-1-CAV.
Translate to 3 Squadron 1 CAv 5 Inf Div

HeavyArty


Joined: May 16, 2002
KitMaker: 17,694 posts
Armorama: 13,742 posts

Posted: Monday, October 30, 2006 - 12:00 AM UTC
Thanks Sabot, yup, just using them as a guide to 5ID bumper #s.
As to making the decals, you need to get some computer printer decal paper. Most well-stocked hobby shops carry them. I have used Testors and sheets from Papilio Art Supply. All you do is copy, resize, and save the images you want into the graphics file of your chioce, I prefer Power Point. Load the decal paper into your printer, make sure it is the type for your type of printer, ie. inkjet or laserjet. They are not interchangable. Print the image onto your decal paper and let the ink dry. Once dry, seal it on with clear acrylic spray. They make decal sealers, but I prefer Krylon Crystal Clear acrylic spray. Let the sealer dry and then cut them out and apply like any other water-slide decal. The only thing that you have to do differently is to trim right up to your image since the carrier film is a solid sheet, not divided up into individual decals as they are on commercially made decals. Also, home printers don't print white ink. To make a decal with white in it, you have to use white decal paper and either trim it well, or use a surround color to cover up the white.
Good luck.
 |


