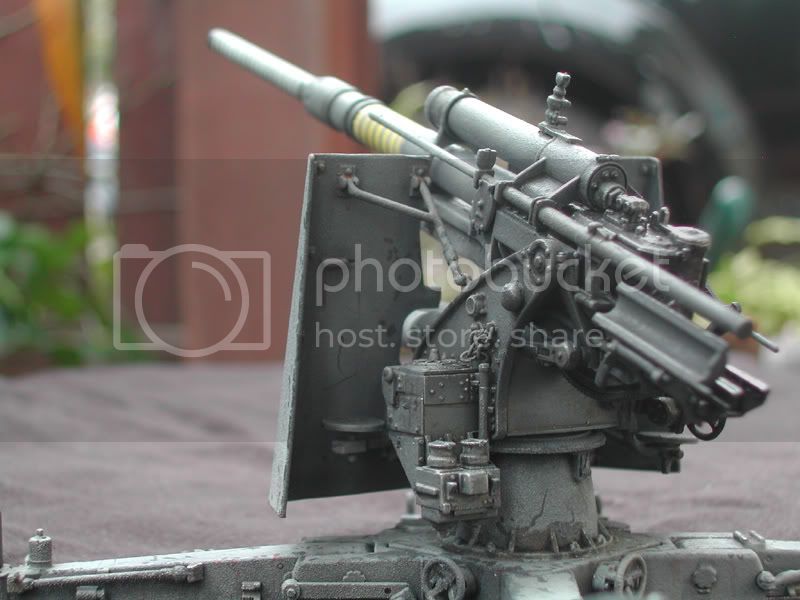
1/35 DML Flak 36 build OOTB
cheers,
Zaidi
Hosted by Darren Baker
Dragon AMOM Feb - Silantra
Silantra
Putrajaya, Malaysia
Joined: March 04, 2004
KitMaker: 2,511 posts
Armorama: 913 posts
Joined: March 04, 2004
KitMaker: 2,511 posts
Armorama: 913 posts
Posted: Monday, February 05, 2007 - 10:54 AM UTC
pottz88
New South Wales, Australia
Joined: July 24, 2005
KitMaker: 233 posts
Armorama: 209 posts
Joined: July 24, 2005
KitMaker: 233 posts
Armorama: 209 posts
Posted: Tuesday, February 06, 2007 - 12:21 PM UTC
I bought the Tamiya version a while back not reading any reviews on it and will buy the DML version now.
Your build looks fine but a few less scratches might be in order on the paintwork in certain area's and the rust stains look to be painted on so maybe a little less heavier on the brush and bleed them out to almost nothing.
Other than that good subject to throw on the mantle.
Cheers
Your build looks fine but a few less scratches might be in order on the paintwork in certain area's and the rust stains look to be painted on so maybe a little less heavier on the brush and bleed them out to almost nothing.
Other than that good subject to throw on the mantle.
Cheers
2t2_crash
Okinawa-ken, Japan / 日本
Joined: December 23, 2006
KitMaker: 29 posts
Armorama: 23 posts
Joined: December 23, 2006
KitMaker: 29 posts
Armorama: 23 posts
Posted: Tuesday, February 06, 2007 - 12:52 PM UTC
Did you assemble the entire model and then paint it? or did you paint in sections? I dig the top coat. It is thick and looks like field painted snow camo. What did you do to get this appearance?
thanks.
Crash
thanks.
Crash
Silantra
Putrajaya, Malaysia
Joined: March 04, 2004
KitMaker: 2,511 posts
Armorama: 913 posts
Joined: March 04, 2004
KitMaker: 2,511 posts
Armorama: 913 posts
Posted: Tuesday, February 06, 2007 - 01:51 PM UTC
Quoted Text
I bought the Tamiya version a while back not reading any reviews on it and will buy the DML version now.
Your build looks fine but a few less scratches might be in order on the paintwork in certain area's and the rust stains look to be painted on so maybe a little less heavier on the brush and bleed them out to almost nothing.
Other than that good subject to throw on the mantle.
Cheers
thanks Dan your your constructive critism..i agree with you and after the photo is taken i noticed a few area that need a few touch up and repair..
Quoted Text
Did you assemble the entire model and then paint it? or did you paint in sections? I dig the top coat. It is thick and looks like field painted snow camo. What did you do to get this appearance?
thanks.
Crash
John, yup i assembled them all before i paint it. I got the effect accidently buy maybe bad stock of spray paint (can type)..
2t2_crash
Okinawa-ken, Japan / 日本
Joined: December 23, 2006
KitMaker: 29 posts
Armorama: 23 posts
Joined: December 23, 2006
KitMaker: 29 posts
Armorama: 23 posts
Posted: Tuesday, February 06, 2007 - 02:56 PM UTC
what method did you use to replicate the chipped paint and worn spots?
to bad it was an accident, LOL, turned out good!
Silantra
Putrajaya, Malaysia
Joined: March 04, 2004
KitMaker: 2,511 posts
Armorama: 913 posts
Joined: March 04, 2004
KitMaker: 2,511 posts
Armorama: 913 posts
Posted: Wednesday, February 07, 2007 - 05:43 AM UTC
Quoted Text
what method did you use to replicate the chipped paint and worn spots?
to bad it was an accident, LOL, turned out good!
i used valejjo black grey applied with my #000 brush and with fine wire..just dab and scratch all over the place...
Danial
Singapore / 新加坡
Joined: May 23, 2005
KitMaker: 693 posts
Armorama: 275 posts
Joined: May 23, 2005
KitMaker: 693 posts
Armorama: 275 posts
Posted: Wednesday, February 07, 2007 - 07:50 AM UTC
Nice built.
I saw the instruction sheet, i got a headache after reading a few steps. :-)
I find it too complicated and intimidating. :-)
I saw the instruction sheet, i got a headache after reading a few steps. :-)
I find it too complicated and intimidating. :-)