A couple of weeks ago I asked Monroe Perdu Studios, from Simi Valley in California, whether or not they had scheduled new releases for 2004. Soon after I popped the question, they replied that they where finalizing a new vignette called "New Paint". In their email they also provided a "sneak peak" picture of the box art they where going to use for their new vignette. I must admit, that when I saw the picture, my heart started to beat faster.
What I saw was a vignette with a piece of a building, but not just one of those brick colored buildings we know so well from the WWII scenes that dominate today's"diorama territory". What I did see, was a beautifully colored part of a building. Hey, wait a minute... there was more on that picture than the building alone.
When I looked at the picture a bit longer, I noticed I saw a whole scene on it, with only one thing missing... a figure. Why no figure? It would have made the scene so much more complete... Would it ? It looked like the painter had gone for a new can of paint, or... a larger ladder.
When I realized the figure could have been gone for a reason, it became clear to me that this scene was really well thought over. It WAS complete... or would it be just another fancy commercial "box art trick" in order to make things bigger and better than they really are?
Well, it wouldn't take long before I would find the answer to that last question. Monroe Perdu Studios offered me the chance to review their latest release. Only a couple of days later the mailman handed me the package with the helmet logo on it.
In this review I'll open the box and show you what's inside. You can be the judge on whether or not this kit can be called "a complete scene".
The Kit: Opening the box
When I took the kit out of the postman's hands, I decided, like I always do with new parcels, to run it through a simple test and... I gently shook the box. Nothing moved though. After I overcame my initial thought that the parcel could be empty, I weighed it by hand and I must admit if felt quite heavy considering the small size of the box.
Since the riddle of "The Complete Scene versus The Fancy Commercial Box Art Trick" was still puzzling me, I decided not to wait any longer and I immediately opened the box.
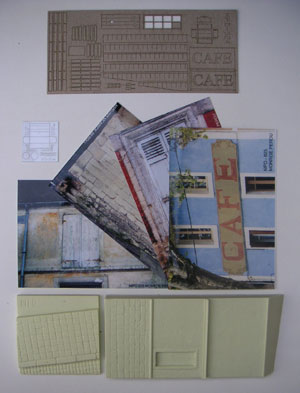
When I opened the box, I fount the listed items below (items can be seen on the picture on the right) :
An Instruction sheet (not on picture)
The vignette base, wrapped in tissue
The vignette house wall, wrapped in tissue
A set of 4 original photographs
A brown, cardboard style, sheet with laser cut items
A little bag with a silver, metal style, sheet with laser cut items and a paint can
In the next paragraphs I will describe each of the listed items in detail. Before I start that, I'll have to mention the way the goods where packed.
The Kit: Packaging
What the mailman handed me, was a firm cardboard box that was filled with foam chips.
In the middle of the foam chips was the actual box that contained the kit. When I opened the kit, I immediately found out that they paid special attention to the packaging of the kit. The photographs and laser cut items where flat on the bottom of the box and on top of those I found the resin pieces, each resin piece carefully wrapped in a thick layer of firm, but soft, tissue.
I think they used an effective and safe way to pack the goods in order to guarantee a safe journey across the globe and therefore minimizing the risk of pieces getting damaged during transport.
The Kit : The Resin Base
The first thing I unwrapped, was the resin base.
The square base depicts a small street scene with a small piece of the road and a normal sized sidewalk. The solid resin base measures 7,7 x 7,7 centimeters (3" x 3") and is casted in a mint green colored resin.
The base is absolutely free of air bubbles and has nice sharp edges. Very, very little flash can be detected and a quick sanding of the sides is really all that it needs.
Both the sidewalk and the street have an excellent structure. The "stones" that are used, are excellent to represent the WWII streets, but also any other era during the last hundred years or so.
The Kit: The Resin Wall
The second part that came out of the box, was the resin wall.
The wall is also casted in a mint green color and is, since it's a solid resin piece, quite heavy. It offers almost the same quality as the base does, in other words, it's almost free of air bubbles. Am I trying to say that this piece does have air bubbles then...Yes, I do, but the two or three bubbles I noticed where so tiny that I had to use a magnifying glass to find them. Regarding the two or three tiny bubbles, I still consider this part as "Very High Quality".
The wall measures 7,7 x 17 centimeters ( 3" x 6.7") and at the thickest point it is 2 centimeters (0.8") thick.
The front side of the wall is, as you can see on the picture on the right, "divided" into three parts, a bottom-, middle, and top part.
The bottom part depicts the stones where the building is built on, while the middle and top parts show the worn off plastered walls that are so common in some parts of the world.
The stones, in the bottom part, are carved very well. They have a real natural look and the plaster on the upper parts of the building really looks to be wearing off. This is beautifully casted in our model. I really love this part of our kit and I must admit that, when I examined the piece, I wanted to start building and painting it right away
When you assemble the wall to the base, you'll find that they fit very well and that there are no gaps between them. The only thing you need is a bit of super-, or epoxy glue to make this work. For some extra strength you can drill some holes in both parts and insert some metal rod, but since the bonding surface is large enough, I really don't think that's necessary.
My conclusion about the resin pieces can only be that they are beautifully detailed items. They are the main ingredients to make an excellent vignette, even without the use of the other goodies that are reviewed next.
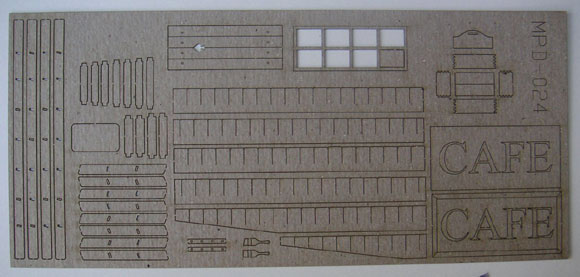
The Kit : The Cardboard Style Laser cut Items
This is a wonderful, but delicate part of the kit. It has a lot of excellent, crisp detailed, parts.
What do we see on this card, that measures 18 x 8 centimeters:
- A Wood Tool Box
- Two 3 dimensional Cafe" signs
- A Window Frame
- A Window Shutter
- Roof Shingles
- A Step Ladder
- A Tall Ladder
- Two Paint Brushes
- And Two Shutter Braces
The material that is used to make this card, looks like a sort of cardboard. All items on this part are laser cut, what stands for excellent and crisp detail. As it comes to detail, laser cut items can be compared with photo-etch products, except these laser cut items don't need the expensive folding tools to bend them.
While the resin parts in this kit are suited for modelers of all levels, I feel these laser cut parts are more delicate and therefore are more something for the intermediate and experienced modelers.
The parts on this card however will not only spice up this kit, but they can and will do it to any other scene in 1/35, 1/32 and 54mm scale. This part of the kit provides some excellent materials to be used in all kinds of dioramas and vignettes.
I had a go at the wood toolbox and with just a knife, a tiny bit of white glue, a toothpick and some patience, I made my first ever toolbox...and what a smashing toolbox it is. These laser cut items add some real value to the kit.
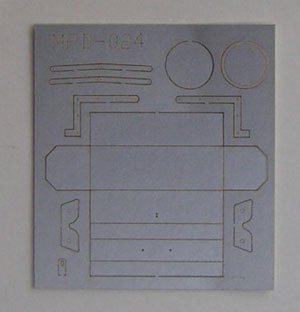
The Kit : The Metal Style Laser cut Items
Another wonderful, and less delicate (compared to the cardboard style parts), item in this kit. The hard paper card looks to have a sort of metal coating on it, making the items more firm than the cardboard pieces. Comparing it with the cardboard pieces, I must say they equally well detailed, making it another excellent addition to this kit. Let's have a look at what this little 3,5 x 4 centimeters (1.4" x 1.6") card brings us :
1 Metal Toolbox
2 Step Ladder Hinges
1 Paint Can Bottom
1 Paint Can Top
2 Window Hinges
2 Step Ladder Side Plates
1 Toolbox Latch
Concerning the small size of this item, I must say that, I'm (yes again !! ...) very impressed with the detail it offers. Like the other laser cut items, these parts can really spice up any type of vignette, diorama or any other model. What I try to say here, is that there is absolutely no reason to build the same scene as you see on the box art. The parts that are added to the kit are multifunctional and they can be used in almost any scene at all. What about the stepladder and the metal toolbox in a scene where they are used to do some repairs on a broken down Sherman or Tiger.... a simple vignette with a civilian carpenter carrying a wooden tool box.... the ideas are endless.
The Extras: The Photographs
Every Monroe Perdu kit includes several original photographs. These photographs can be used as a color and weathering reference for this, and other, products.
Inside this kit I found 4 different photographs depicting similar building structures. From these photographs it became clear to me, that the building could be painted in almost any color, creating a totally new look with each new paint scheme.
The Extras: The Instruction Sheets
Inside the box I also found a, double side printed, instruction sheet. The instruction sheets provides background information on the kit and the depicted scene.
Besides the backgrounds, it also deals with the instructions on how to work with resin and laser cut parts, what tools can be used and how you can paint the kit and the individual parts. Another good thing I noticed, is a detailed drawing of the laser cut cards, identifying the individual items. On the back of the instruction sheet we find the very detailed assembly instructions of the laser cut parts.
When I have a look at the kits from a lot of other manufacturers, the instruction sheet is hardly ever there. The information provided with the kits from Monroe Perdu is a welcome difference with the other kits I know. I just love to get a bit of background on the things I'm working on.
When you use different colors than the colors on the box art, you can make a totally different building. This building is, because of the plastered walls, excellent for experimenting with colors on buildings.
conclusions
Well, with the part about the instruction sheets, we came to the end of my "walk trough". Now the time has come to evaluate things. Now the time has come to answer my major question from the start of this article: "New Paint"... a complete kit, or just another fancy commercial "Box Art Trick ?"
Without any doubt I call this A Complete Kit!
The Box Art is just a perfect example of What You See Is What You Get ! The kit can be used without a figure, like in the box art, or you could add one or more figures, a dog or whatever... the scene provides unlimited possibilities
The contents of the box represents a building that could be found all over Europe and in North America over the last hundred years or so. The general setting and the choice of building makes this kit perfect for a vignette depicting any scene during the last century. The kit includes all items that are shown on the box art.
The quality of the kit is just excellent; No mass production items, but items that where developed and produced with great care. A simple look at the casting quality, the original concept, the personal care that was given to the packaging and the real photographs, tells you that you are dealing with something good.
In my opinion this kit invites the modeler to experiment with colors and weathering techniques and it also challenges the modelers creativity when creating a scene. With the use of different colors, you can make the exact same scene look totally different, and just imagine the creative possibilities this simple scene offers with different types of figures, small animals or ...whatever.
Does the kit offer value for money?
This new release will be sold at a price of $42.00. When you group the last three paragraphs together, it gives you my personal opinion on what I think this kit has to offer you. Since I don't want this review to end up as a riddle, I'll tell you what I think about this product.
I think this kit is a complete, high quality, scene that will invite the modeler to experiment with colors and techniques and that it will challenge his creativity in order to make that special scene. It will also offer him hours and hours of fun modeling. Therefore I can say with all of my heart that this kit absolutely offers value for money and...more!
I would like to thank Monroe Perdu for the opportunity to examine this kit. I think this kit is a great addition to their growing product range!
SUMMARY
This kit is a complete, high quality, scene that will invite the modeler to experiment with colors and techniques and that it will challenge his creativity in order to make that special scene.
Percentage Rating
90%
Scale:
1:35
Mfg. ID:
MPD024
Suggested Retail:
$42.00 USD
PUBLISHED:
Mar 04, 2005
NETWORK-WIDE AVERAGE RATINGS
THIS REVIEWER:
83.33%
MAKER/PUBLISHER:
90.43%
About Danny Wennekes (Eagle) FROM: NOORD-BRABANT, NETHERLANDS
I started modeling at the age of 10. When I was 22 my work forced me to quit the hobby until I returned to the modeling frontline at the age of 36.
Nowadays I model dioramas, but in the land of modeling I admire the figure painters.... so skilled and most of them are great guys too....
My favo...