I have changed my plans a little bit on my first diorama. I am planning to do some GIs passing an abandoned and damaged Wespe close to some tank turret bunkers. I have started on the Wespe and I am going to pimp it up a little bit with some PE.
Pictures will follow over the weekend...
Campaigns
Where Armorama group builds can be discussed, organized, and updates posted.
Where Armorama group builds can be discussed, organized, and updates posted.
Hosted by Darren Baker, Richard S.
Borders of the Fatherland
Posted: Friday, February 08, 2008 - 12:06 PM UTC
Posted: Saturday, February 09, 2008 - 09:25 AM UTC
Not yet.
I have some time tomorrow and I'll try it again, I have some ideas, so I'll see.
Any help would be great.
Thanks
I have some time tomorrow and I'll try it again, I have some ideas, so I'll see.
Any help would be great.
Thanks

Lee-Enfield

Joined: February 25, 2007
KitMaker: 272 posts
Armorama: 222 posts

Posted: Saturday, February 09, 2008 - 06:04 PM UTC
Jesper, I know how plans can change... I had wanted to do a damaged jeep, but for a couple of reasons can't and won't. The idea fits, but now I look at the "lay of the land" on my dio-form, it would just be too much going on in there. Ah, well. I'll be posting a WIP momentarily. I'm looking forwards to seeing your Wespe! Especially after seeing what one fellow did with a King Tiger in Fine Scale Modeller. He sure nailed that burnt-out tank...
Eric, what I find easiest for posting images is to use a second tab open to where my images are, and then when you click on the (img) button below, I take the shortcut from the second tab and paste it in. If you host them on a site like Photobucket, there's a link that shows the different shortcuts, like "Direct Link" and a few others. That's what works for me, anyway.
Cheers, folks!
Lewis
Roy

Joined: April 21, 2003
KitMaker: 230 posts
Armorama: 64 posts

Posted: Saturday, February 09, 2008 - 09:50 PM UTC
Hello,
I have some sort of problem when I tried to upload my photos in the KitMaker Gallery for B.o.t.F. campaign:
Fatal error: Allowed memory size of 33554432 bytes exhausted (tried to allocate 10368 bytes) in /home/kitmaker/gallery/image-inc.php on line 116
Help, please....
/Christer
I have some sort of problem when I tried to upload my photos in the KitMaker Gallery for B.o.t.F. campaign:
Fatal error: Allowed memory size of 33554432 bytes exhausted (tried to allocate 10368 bytes) in /home/kitmaker/gallery/image-inc.php on line 116
Help, please....
/Christer

Posted: Saturday, February 09, 2008 - 11:31 PM UTC
@Christer, looks like you have used all your space. You probably need to delete some old pictures.
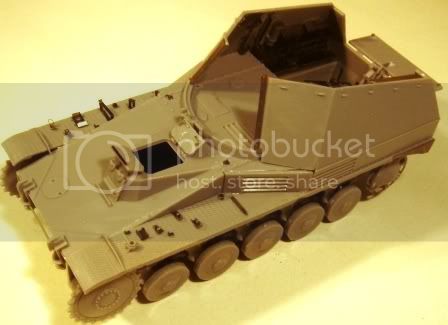
Here is the first posting on my Wespe. I am building the old Alan Hobbies kit. It is a dog of a kit fighting you all the way. I have decided to use some Eduard PE to update especially the tools and the fighting compartment. This also turned out to be a little bit of a problem as the Eduard set is designed for the Tamiya Wespe. Therefore a lot of things are different and the layout of the fighting compartment is quite different. I checked my references and it turns out there were quite a few minor variantions in the Wespe design although the name of the vehicle did not change. Anyway, I am quite satisfied with the end result.
I am building the kit without any tools, smaller caliber weapons or tracks. Tools were often removed and used by the capturing forces.
I am going to show the vehicle having been hauled to an allied assembly area for captured equipment. A lot of the vehicles in these areas had the tracks removed to pull them there without having to put them in "neutral" to make the drive sprocket turn as the vehicle were towed away. I guess it is easier to tow a vehicle without tracks.
Next to the vehicle will be the tracks, some ammunition removed from the Wespe and some other captured stuff: 32cm rockets, Tiger tracks etc.
During the week I will probably take some pictures of the overall layout of the diorama. More to follow....


Roy

Joined: April 21, 2003
KitMaker: 230 posts
Armorama: 64 posts

Posted: Sunday, February 10, 2008 - 12:59 AM UTC
OK, thanks Jesper. I
'll try to delete some old ones.
Nice Wespe you got there!
/Christer

'll try to delete some old ones.
Nice Wespe you got there!
/Christer

Posted: Sunday, February 10, 2008 - 01:36 AM UTC
Borders of the Fatherland: M4A3E2 Jumbo
Part 1: Plan of Attack
Yah!! got it to work....I don't get what happen but hay here it is!
(This is a repost from 9 Dec 2007 to get things started and easier to follow)
For the Boarders of the Fatherland campaign the subject will be the up-armored M4A3E2 Sherman Jumbo. While this will not be a full on diorama it will be more akin to a smaller vignette. The main kit will be the older Tamiya Jumbo, even with its known problems. I will use the Tank Workshop Conversion kit that supplies a new turret, transmission and road wheels. To help out with the detailing a little I’ll also throw in a set of photo etched from Eduard.

The primary goal here is to finish this kit and employ several ideas that I have wanted to try out but keep things light and easy. While I will not be adding or correcting every little detail I will strive to produce a good representation of the Jumbo. The Verlinden Siegfried Line kit, which I have had for quite sometime will be used for the display.

The parts break down is quit small, which makes this a good project to get back into model building. I picked up a Jumbo kit off of ebay that had been started by the previous owner. I had to replace the lower hull but fortunately I had an old one on hand. My original plan called for using the kit supplied rubber band tracks. While waiting for the campaign to begin I started thinking that I will use a set of Individual links as the over all detail will be far superior to the rubber ones.
One of the goals of this project is to build up a nice little vignette to display the finished model. While I do not what the display to over shadow the model I what something a little more then just a grassy field to set the jumbo in. As the Jumbo was intended to engage fortifications I felt something that alluded to that would be appropriate. I came across the following photograph, which is quit famous, and knew that this would make a great setting for the vignette.

As I mentioned earlier I have the old Verlinden Siegfried Line kit, which would work quite well here. Note the date and price on the sale tag

Next I had to come up with a good layout. I used PowerPoint to help visualize the lay out for the vignette.

With the layout plan completed I can now press on with the building of the Jumbo.
Part 1: Plan of Attack
Yah!! got it to work....I don't get what happen but hay here it is!
(This is a repost from 9 Dec 2007 to get things started and easier to follow)
For the Boarders of the Fatherland campaign the subject will be the up-armored M4A3E2 Sherman Jumbo. While this will not be a full on diorama it will be more akin to a smaller vignette. The main kit will be the older Tamiya Jumbo, even with its known problems. I will use the Tank Workshop Conversion kit that supplies a new turret, transmission and road wheels. To help out with the detailing a little I’ll also throw in a set of photo etched from Eduard.

The primary goal here is to finish this kit and employ several ideas that I have wanted to try out but keep things light and easy. While I will not be adding or correcting every little detail I will strive to produce a good representation of the Jumbo. The Verlinden Siegfried Line kit, which I have had for quite sometime will be used for the display.

The parts break down is quit small, which makes this a good project to get back into model building. I picked up a Jumbo kit off of ebay that had been started by the previous owner. I had to replace the lower hull but fortunately I had an old one on hand. My original plan called for using the kit supplied rubber band tracks. While waiting for the campaign to begin I started thinking that I will use a set of Individual links as the over all detail will be far superior to the rubber ones.
One of the goals of this project is to build up a nice little vignette to display the finished model. While I do not what the display to over shadow the model I what something a little more then just a grassy field to set the jumbo in. As the Jumbo was intended to engage fortifications I felt something that alluded to that would be appropriate. I came across the following photograph, which is quit famous, and knew that this would make a great setting for the vignette.

As I mentioned earlier I have the old Verlinden Siegfried Line kit, which would work quite well here. Note the date and price on the sale tag

Next I had to come up with a good layout. I used PowerPoint to help visualize the lay out for the vignette.

With the layout plan completed I can now press on with the building of the Jumbo.
Jumpmaster1a

Joined: September 22, 2004
KitMaker: 108 posts
Armorama: 102 posts

Posted: Sunday, February 10, 2008 - 08:55 AM UTC
Great idea, Eric! I have a similar diorama in mind. My Jumbo will be traversing a belt of dragons teeth while supporting infantrymen move up. Best wishes on your project. Dave
Posted: Sunday, February 10, 2008 - 01:01 PM UTC
Quoted Text
Nice Wespe you got there!
/Christer

Thanks, Christer. I appreciate it

Eric, very good layout of your diorama - and very professional drawing
 Looking forward to see more.
This campaign is really of to a good start

Posted: Monday, February 11, 2008 - 10:23 PM UTC
Hi guys
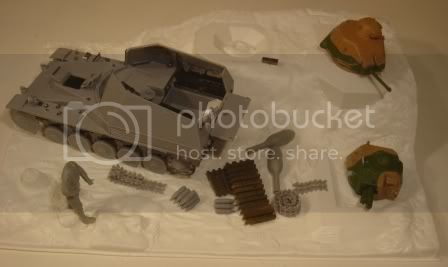
A little planning update on my diorama. I have been playing around with the layout a little bit. Below you can see what the general layout will be. Later some more GIs will be added.
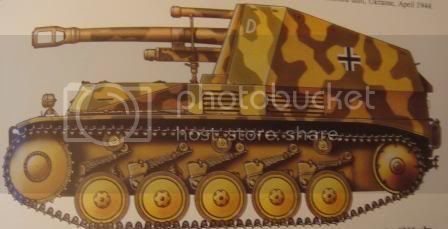
Also I have posted the B/W picture that gave me the idea for the diorama to start with. It is from the Eastern Front, but I have seen similar pictures were AFVs captured by the allies that were transported without the tracks.
I think I will also paint the Wespe in the hard edged green camouflage or just overall dark yellow. I have not decided yet.
More to follow....


CaptainA

Joined: May 14, 2007
KitMaker: 3,117 posts
Armorama: 564 posts

Posted: Tuesday, February 12, 2008 - 02:59 AM UTC
Jesper- Great start. What else can I say? As always, you seem to have things well in hand and you are making good progress
Eric- I like your plan. Should come out great. I really like the picture and I think it will result in a very workable diorama.
I got some of my figures in the mail yesterday. Kampfgruppe Peiper to be specific. I also have 4 panzer grenadiers painted. I have not started the diorama or the KT yet. I will try to draw up my plans and post them.
CaptainA

Joined: May 14, 2007
KitMaker: 3,117 posts
Armorama: 564 posts

Posted: Tuesday, February 12, 2008 - 03:34 AM UTC
Quoted Text
I was looking for the enlistment sight for this campaign. Could not find it anywhere. Then, there it was, under concluded campaigns, with an ending date of November 30th, 1999. I am slow, but I dont think I'm 8 years behind. Seven years, maybe, but not eight.


If sombody can fix this, more people will be able to enlist.
Posted: Tuesday, February 12, 2008 - 12:12 PM UTC
Quoted Text
Jesper- Great start. What else can I say? As always, you seem to have things well in hand and you are making good progress
I got some of my figures in the mail yesterday. Kampfgruppe Peiper to be specific. I also have 4 panzer grenadiers painted. I have not started the diorama or the KT yet. I will try to draw up my plans and post them.
Thanks for the comment, Carl. Appreciate it

I have also ordered the Peiper group for another diorama. Are they the usual high Dragon figure quality?
CaptainA

Joined: May 14, 2007
KitMaker: 3,117 posts
Armorama: 564 posts

Posted: Wednesday, February 13, 2008 - 12:55 AM UTC
I did open them up to look at them, and they appear to be exactly what you would expect from DML. I think a few Archer Rank insignia, strategicly placed will make them very convincing.

Lee-Enfield

Joined: February 25, 2007
KitMaker: 272 posts
Armorama: 222 posts

Posted: Wednesday, February 13, 2008 - 11:44 AM UTC
Folks, this is looking promising! I like what I'm seeing! Cool!
On a business note, I just PM'd Mark asking him about our enlistment problem, as I have been unable to resolve it on my own. I'm sure either I'll have an answer or a fix from him fairly soon.
For my own progress, I've got the basic form for my dio built, (it's easy when you're using styrofoam insulation and a coping saw! ) a Dodge 1 1/2 ton truck built, and an MG tower that I think I'll eliminate from my plans, after all. Looking at the size of things, it will end up too crowded if I leave it in, so I'll just drop my fortifications back to a pair of AT nests, a bunker, and an MG nest or two. This may again change!
  I've got a whole whack of German figures on the go, but I haven't gotten around to taking pics of them yet... hard to do much modelling when SWMBO is getting ready to leave for a conference in Vegas! But while she's gone... I'll have an old war movie night, and the rest is modellin' time!
Here's the pics:
Dio form:

MG tower that I'm sort of eliminating:

And for now, I'll end off with the Dodge truck:

On a business note, I just PM'd Mark asking him about our enlistment problem, as I have been unable to resolve it on my own. I'm sure either I'll have an answer or a fix from him fairly soon.
For my own progress, I've got the basic form for my dio built, (it's easy when you're using styrofoam insulation and a coping saw!
 ) a Dodge 1 1/2 ton truck built, and an MG tower that I think I'll eliminate from my plans, after all. Looking at the size of things, it will end up too crowded if I leave it in, so I'll just drop my fortifications back to a pair of AT nests, a bunker, and an MG nest or two. This may again change!
  I've got a whole whack of German figures on the go, but I haven't gotten around to taking pics of them yet... hard to do much modelling when SWMBO is getting ready to leave for a conference in Vegas! But while she's gone... I'll have an old war movie night, and the rest is modellin' time!
Here's the pics:
Dio form:

MG tower that I'm sort of eliminating:

And for now, I'll end off with the Dodge truck:


endrju007

Joined: December 05, 2007
KitMaker: 2,435 posts
Armorama: 1,256 posts

Posted: Wednesday, February 13, 2008 - 12:44 PM UTC
@ Lewis - it looks that you're building quite big diorama... what is the size of it? I'm planning to build something much smaller - just to match the King Tiger's size  .
.
@ Jesper - great progress! I have to catch up... I did not even started yet (just removed old paint from the model and built the tree for diorama...). BTW, who is producer of the diorama basis? Looks very interesting.
Andrzej
 .
.@ Jesper - great progress! I have to catch up... I did not even started yet (just removed old paint from the model and built the tree for diorama...). BTW, who is producer of the diorama basis? Looks very interesting.
Andrzej

Posted: Wednesday, February 13, 2008 - 02:33 PM UTC
Quoted Text
@ Jesper - great progress! I have to catch up... I did not even started yet (just removed old paint from the model and built the tree for diorama...). BTW, who is producer of the diorama basis? Looks very interesting.
Andrzej
Thanks, Andrzej
 The diorama base is made by Mirage, which is actually a Polish company as I recall so it should be easy for you to get hold of. It is cheap and will look good with some extra details etc.

Lee-Enfield

Joined: February 25, 2007
KitMaker: 272 posts
Armorama: 222 posts

Posted: Thursday, February 14, 2008 - 10:34 AM UTC
Folks, I'm going to publicly thank Mark for fixing our enlistment problem. Once again, we show as an active campaign, but we now have a modified ending date of November 2008. That's okay by me; it may allow more participants, and if you're like me, you may end up building a couple of dios.  Just cuz. Mark: thank you, sir!
Andrzej, the dio measures 22 1/2 inches by 46 1/2 inches (or for anybody who understands metric better, roughly 57 cm x 118 cm). It will be occupied by (for sure!) a Dragon PaK 40, an Italeri PaK 38, a bunker, Italeri's Dodge truck, Tamiya's M4A3E8 (Easy Eight, which I'm still waiting for,) a US anti-tank team (Dragon,) parts of Tamiya's US Gun & Mortar Team, US Infantry Assault team (again Tamiya,) and a host of German soldiers, made by a combination of Tamiya, Trumpeter, and Dragon. And as I said, I may, but probably will not, use the MG tower that I built. A week without SWMBO around should let me make some serous progress....
 Just cuz. Mark: thank you, sir!
Andrzej, the dio measures 22 1/2 inches by 46 1/2 inches (or for anybody who understands metric better, roughly 57 cm x 118 cm). It will be occupied by (for sure!) a Dragon PaK 40, an Italeri PaK 38, a bunker, Italeri's Dodge truck, Tamiya's M4A3E8 (Easy Eight, which I'm still waiting for,) a US anti-tank team (Dragon,) parts of Tamiya's US Gun & Mortar Team, US Infantry Assault team (again Tamiya,) and a host of German soldiers, made by a combination of Tamiya, Trumpeter, and Dragon. And as I said, I may, but probably will not, use the MG tower that I built. A week without SWMBO around should let me make some serous progress....

Posted: Saturday, February 16, 2008 - 05:11 AM UTC
M4A3E2 Jumbo: Part 2: Lower Hull and Bogey Assemblies
The lower hull for this project is quit simple and straightforward. The main challenge here was the mating of the Tank Workshop (TWS) transmission to the kit hull. I was pleasantly surprised with the good fit between the two parts right out of the box and vary little cleanup was needed. The Tamiya design of the kit leaves two large holes on the sides that require filling. I used a combination of sheet plastic and epoxy putty to fill them and sanded smooth. Then bolt heads where made with a punch and die set and added to the hull where the transmission and hull meet.

The transmission of the Jumbo is a huge casting, I wanted to add some surface detail. I first taped off the bolt heads at the top of the transmission and then applied a coat of Mr. Surfacer 500. After setting for 24 hours I lightly sanded it to remove any high points.

Next I built up the bogey assemblies and added some small details. The bogeys where not given a full detail treatment as my weathering plan calls for them to be packed with mud, much as the real ones would have appeared. The big additions are the TWS road wheels and the three bolts on the bottom of the bogeys.


Next up will be the fitting of the lower hull to the upper hull
The lower hull for this project is quit simple and straightforward. The main challenge here was the mating of the Tank Workshop (TWS) transmission to the kit hull. I was pleasantly surprised with the good fit between the two parts right out of the box and vary little cleanup was needed. The Tamiya design of the kit leaves two large holes on the sides that require filling. I used a combination of sheet plastic and epoxy putty to fill them and sanded smooth. Then bolt heads where made with a punch and die set and added to the hull where the transmission and hull meet.

The transmission of the Jumbo is a huge casting, I wanted to add some surface detail. I first taped off the bolt heads at the top of the transmission and then applied a coat of Mr. Surfacer 500. After setting for 24 hours I lightly sanded it to remove any high points.

Next I built up the bogey assemblies and added some small details. The bogeys where not given a full detail treatment as my weathering plan calls for them to be packed with mud, much as the real ones would have appeared. The big additions are the TWS road wheels and the three bolts on the bottom of the bogeys.


Next up will be the fitting of the lower hull to the upper hull
Posted: Sunday, February 17, 2008 - 02:37 PM UTC
I have changed my plans again. I am going for a smaller and more compact diorama. Basically because I got another idea for the bunker emplacements that I had planned to use as a base earlier.
Below is the new layout of the diorama. The camouflage for the Wespe I am still planning to do in the same way as my previous post.

Below is the new layout of the diorama. The camouflage for the Wespe I am still planning to do in the same way as my previous post.

Martinnnn

Joined: April 26, 2004
KitMaker: 5,435 posts
Armorama: 2,762 posts

Posted: Monday, February 18, 2008 - 08:32 PM UTC
Done a lot of research these days. I'm quite familiar with Atlantikwall bunkers but Westwall bunkers have some features that were new for me.
Almost done with preparations, like calculating the bunkers' dimensions in 1/35, gathering materials, drawing out the diorama etc...
Now all I need is some time
Almost done with preparations, like calculating the bunkers' dimensions in 1/35, gathering materials, drawing out the diorama etc...
Now all I need is some time

Posted: Saturday, February 23, 2008 - 02:47 AM UTC
I haven't progressed much beyond the planning stage, and even that isn't set in stone yet... I'm still acquiring things for the project, more to follow. 

Posted: Sunday, February 24, 2008 - 07:38 PM UTC
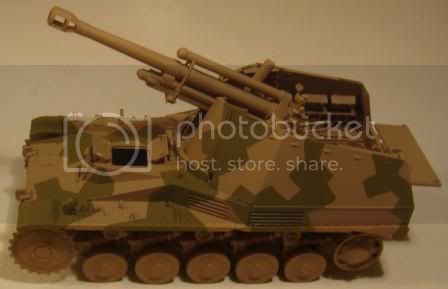
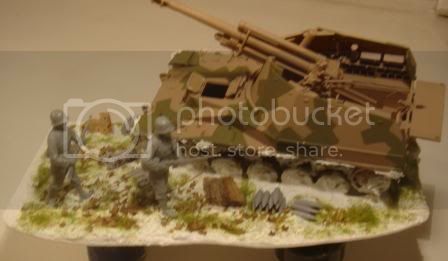
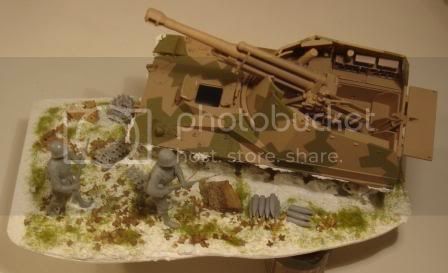
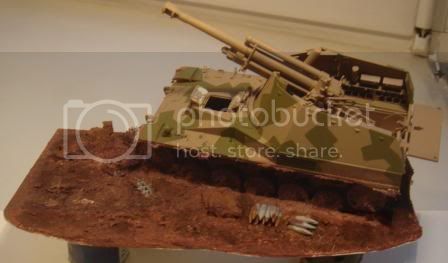
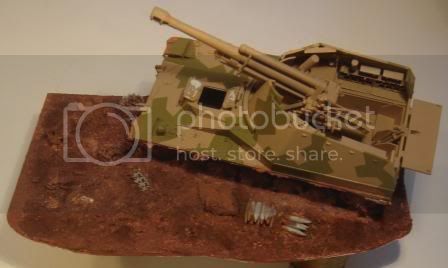
Here is an update on my small diorama. Things are moving ahead well although I expect my modelling time will be extremely limited the next two weeks.
I am petty satisfied how the "splinter" camouflage on the Wespe turned out. I painted it freehand by brush. I gave it two layers of slightly thinned paint to reduce any brushstrokes.
I still need to add some extra ground work on top of the current ground work in some places. Just to make the ground a little more uneven and the "tie" in some of the elements better.
More to follow.....


rcnpthfndr

Joined: February 15, 2006
KitMaker: 284 posts
Armorama: 264 posts

Posted: Monday, February 25, 2008 - 02:05 AM UTC
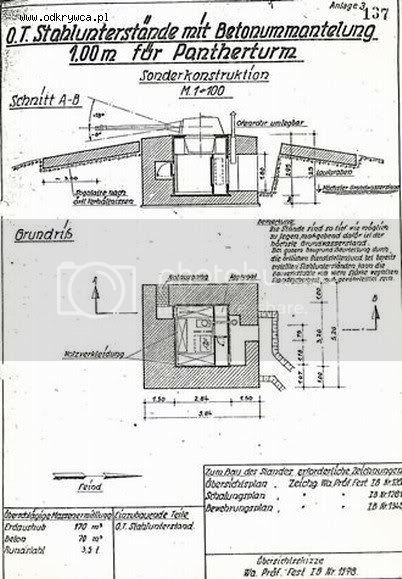
this might help some of you

rcnpthfndr

Joined: February 15, 2006
KitMaker: 284 posts
Armorama: 264 posts

Posted: Monday, February 25, 2008 - 02:13 AM UTC
couple more


 |


