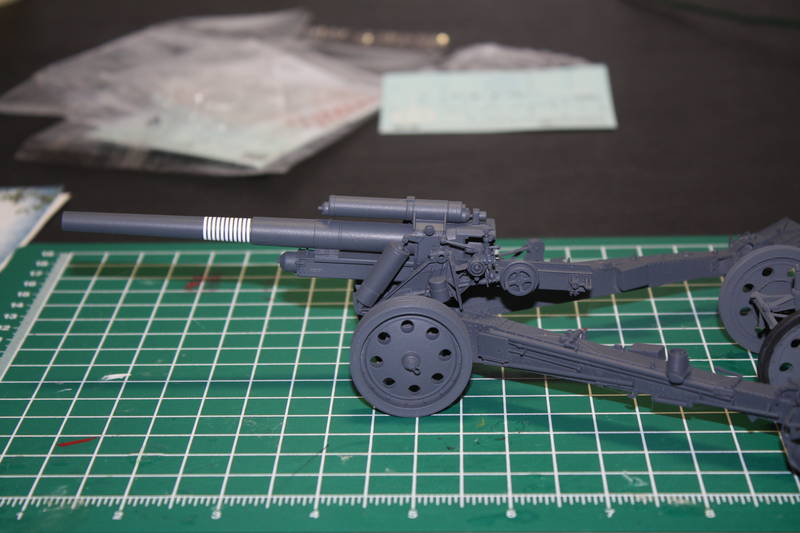
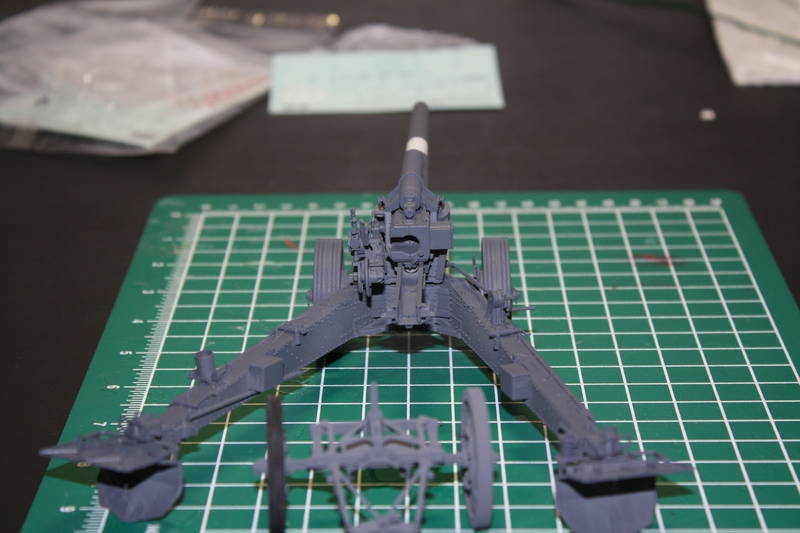
That is a crap pot full of PE.
You are insane.
As are they to even think somebody would want to do all that stuff.
Like saying the kits is garbage and just use a few plastic parts and the rest PE.
Totally insane.
Good luck and still looking good.
Constructive Feedback
For in-progress or completed build photos. Give and get contructive feedback!
Hosted by Darren Baker, Dave O'Meara
Dragon's 1/35 German sFH 18 Howitzer W/Limber
sgtreef
Oklahoma, United States
Joined: March 01, 2002
KitMaker: 6,043 posts
Armorama: 4,347 posts
Joined: March 01, 2002
KitMaker: 6,043 posts
Armorama: 4,347 posts
Posted: Wednesday, August 19, 2009 - 12:13 PM UTC
Taco
Iowa, United States
Joined: July 28, 2003
KitMaker: 17 posts
Armorama: 8 posts
Joined: July 28, 2003
KitMaker: 17 posts
Armorama: 8 posts
Posted: Wednesday, August 19, 2009 - 12:18 PM UTC
While my howitzer is not of the same caliber as this one, it sits pretty well in the firing position and the arms stay down with no extra added weight. My difficulty was with attaching the gun to the base and not having extra slop (leans forward some, reducing firing angle). I need to glue the gun to the base to keep it elevated higher.
GALILEO1
Maryland, United States
Joined: April 18, 2006
KitMaker: 1,794 posts
Armorama: 1,431 posts
Joined: April 18, 2006
KitMaker: 1,794 posts
Armorama: 1,431 posts
Posted: Wednesday, August 19, 2009 - 01:26 PM UTC
Quoted Text
Hey Rob nice build!!
I have one question. Did you run into any issues regarding the metal barrel or the front weighing the gun down and forward? Only reason I ask is because I did this kit about a year and a half ago and I had that problem. Even in the firing position it was weighed down, and I had to add lead weights inside the trailer arms so it would not tip.
Hi James,
Thanks for the feedback. Regarding the weighing down from the front, I did notice a bit of it when I dry-fitted the gun but didn't seem major. I'll take a look at it once more just in case so I can add some weights to at least one of the arms. Thanks for the reminder!
Rob
GALILEO1
Maryland, United States
Joined: April 18, 2006
KitMaker: 1,794 posts
Armorama: 1,431 posts
Joined: April 18, 2006
KitMaker: 1,794 posts
Armorama: 1,431 posts
Posted: Wednesday, August 19, 2009 - 01:47 PM UTC
Quoted Text
That is a crap pot full of PE.
You are insane.
As are they to even think somebody would want to do all that stuff.
Like saying the kits is garbage and just use a few plastic parts and the rest PE.
Totally insane.
Good luck and still looking good.
REPLY
REPLY & QUOTE
Yeah, I think may have gone overboard of bit! I'm stil trying to decide though whether I should go with the Voyager basic set for this rather than this one from Griffon. Althought I don't have plans to buy another kit of this gun that may change if I decide to save the Griffon set.
The kit is really good overall but it does suffer from a few 'less-then-nice' details (specially in the trail arms and the gun base) so improving them is something I've been thinkinng about doing.
Rob
GALILEO1
Maryland, United States
Joined: April 18, 2006
KitMaker: 1,794 posts
Armorama: 1,431 posts
Joined: April 18, 2006
KitMaker: 1,794 posts
Armorama: 1,431 posts
Posted: Wednesday, August 19, 2009 - 01:56 PM UTC
Quoted Text
While my howitzer is not of the same caliber as this one, it sits pretty well in the firing position and the arms stay down with no extra added weight. My difficulty was with attaching the gun to the base and not having extra slop (leans forward some, reducing firing angle). I need to glue the gun to the base to keep it elevated higher.
Hi Brent,
I would love to get a pic of your gun! I sure need some inspiration to get mine moving
Rob
GALILEO1
Maryland, United States
Joined: April 18, 2006
KitMaker: 1,794 posts
Armorama: 1,431 posts
Joined: April 18, 2006
KitMaker: 1,794 posts
Armorama: 1,431 posts
Posted: Thursday, August 20, 2009 - 06:57 AM UTC
Hi all,
Another small twist to this little story....
I was doing some 'soul searching' last night when I got home on the use of the Griffon set fort this build. Anyway, I ended up deciding that, after closely examining where I am now and actually looking at the kit, that it was going to be more of a hassle trying to fit all of the PE components included in the set to this basically already built up piece. So, I decided that since I still wanted some details (on the trail arms mainly) that I would go with this set:
It's got nice enough details on the arms and limber to still provide a good look so this will be what I'll use to complete the build. I'll save the Griffon set for another of these s.F.H. 18s when I get around to gettting another one in the future.
Thanks again for the feedback so far!
Rob
guygantic
Antwerpen, Belgium
Joined: August 19, 2006
KitMaker: 7,084 posts
Armorama: 970 posts
Joined: August 19, 2006
KitMaker: 7,084 posts
Armorama: 970 posts
Posted: Thursday, August 20, 2009 - 07:39 AM UTC
You made a masterpiece of it. This will be a great help when I start mine ! Thanks for sharing this super topic !
GALILEO1
Maryland, United States
Joined: April 18, 2006
KitMaker: 1,794 posts
Armorama: 1,431 posts
Joined: April 18, 2006
KitMaker: 1,794 posts
Armorama: 1,431 posts
Posted: Thursday, August 20, 2009 - 08:00 AM UTC
Quoted Text
You made a masterpiece of it. This will be a great help when I start mine ! Thanks for sharing this super topic !
You are too kind, Guy, thanks much for the nice comments!! You'll enjoy the kit for sure!
Regards,
Rob
Gorizont
Sachsen, Germany
Joined: November 28, 2007
KitMaker: 1,462 posts
Armorama: 1,289 posts
Joined: November 28, 2007
KitMaker: 1,462 posts
Armorama: 1,289 posts
Posted: Thursday, August 20, 2009 - 08:42 PM UTC
I like Dragon´s way, for the wheels of the gun and limber.
Trumpeter´s version has rubber parts, which can make problems.
Also the style of adding the 2 wheel-parts here seems to be a better solution.
There are resin-replacement-wheels for the earlier and later (wheel-profile) types, but perhaps only in the US.
greetings...
Soeren
Trumpeter´s version has rubber parts, which can make problems.
Also the style of adding the 2 wheel-parts here seems to be a better solution.
There are resin-replacement-wheels for the earlier and later (wheel-profile) types, but perhaps only in the US.
greetings...
Soeren
GALILEO1
Maryland, United States
Joined: April 18, 2006
KitMaker: 1,794 posts
Armorama: 1,431 posts
Joined: April 18, 2006
KitMaker: 1,794 posts
Armorama: 1,431 posts
Posted: Tuesday, August 25, 2009 - 08:33 AM UTC
Quoted Text
There are resin-replacement-wheels for the earlier and later (wheel-profile) types, but perhaps only in the US
Can you tell me where I can find these resin wheels, Soeren? I've just purchased another Dragon s.F.H.18 (on its way from Luckymodel) and it will be nice to use the early style wheel for it to just give it a 'different' look. I won't be working on this second gun any time soon but just want to begin thinking about anything extra I can get to make it unique!
On this current build, I am still working on removing a few pieces here and there from the trail arms to prepare them for their PE replacements from Voyager (set has not arrived yet). I am also scratchbuilding a couple of pieces (tube-shape things that go toward the rear and under the arms) in brass and stock to give the area a better look. Will post pics as soon as I get them finished and installed.
Thanks, Rob
Taco
Iowa, United States
Joined: July 28, 2003
KitMaker: 17 posts
Armorama: 8 posts
Joined: July 28, 2003
KitMaker: 17 posts
Armorama: 8 posts
Posted: Tuesday, August 25, 2009 - 02:33 PM UTC
let's see if i can add photos. Then see if they are worthwhile. If they show up, you can see i still need to to some hand painting (tires, tools, etc.) and removing of the spider web.
" TARGET="_blank">http://gallery.kitmaker.net/showphoto.php/photo/321581]
" TARGET="_blank">http://gallery.kitmaker.net/showphoto.php/photo/321582]
" TARGET="_blank">http://gallery.kitmaker.net/showphoto.php/photo/321581]
" TARGET="_blank">http://gallery.kitmaker.net/showphoto.php/photo/321582]
GALILEO1
Maryland, United States
Joined: April 18, 2006
KitMaker: 1,794 posts
Armorama: 1,431 posts
Joined: April 18, 2006
KitMaker: 1,794 posts
Armorama: 1,431 posts
Posted: Tuesday, August 25, 2009 - 04:25 PM UTC
Here are your pics, Brent.
Your build is suberb!
I really like the color your used for it. That's sort of the color I think I'd like to go with as well. What did you use?
I'll be using your kit as reference for sure!
Thanks much!!!
Rob
Your build is suberb!
I really like the color your used for it. That's sort of the color I think I'd like to go with as well. What did you use?
I'll be using your kit as reference for sure!
Thanks much!!!
Rob
Gorizont
Sachsen, Germany
Joined: November 28, 2007
KitMaker: 1,462 posts
Armorama: 1,289 posts
Joined: November 28, 2007
KitMaker: 1,462 posts
Armorama: 1,289 posts
Posted: Tuesday, August 25, 2009 - 11:23 PM UTC
Can you tell me where I can find these resin wheels, Soeren? I've just purchased another Dragon s.F.H.18 (on its way from Luckymodel) and it will be nice to use the early style wheel for it to just give it a 'different' look. I won't be working on this second gun any time soon but just want to begin thinking about anything extra I can get to make it unique!
...
Thanks, Rob
Hi Rob, the resin-wheels are from "R&J Products". The company have an own webpage, but perhaps their products are available in stores on the net.
http://www.rjproducts.com/
As I planned, to change my dio for my gun, I also think about reworking the 10cm s. K 18 itself... removing some tools and so on.
Link to build-log is here:
https://armorama.kitmaker.net/forums/129752#1074354
greetings...
Soeren
GALILEO1
Maryland, United States
Joined: April 18, 2006
KitMaker: 1,794 posts
Armorama: 1,431 posts
Joined: April 18, 2006
KitMaker: 1,794 posts
Armorama: 1,431 posts
Posted: Wednesday, August 26, 2009 - 05:44 AM UTC
Found the wheels! Thanks Soeren!
I have to say though that they don't look all that 'sharp' to me as in the pics you can see some heavy mold lines on the treads and what seems to be small chunks on the side of the reams missing. Wish I could get better pics of one of these RJ wheels so I can make a decision....
Your blog on the Trump s.K.18 is a nice inspiration. Thanks for sharing a link to it!
Rob
Taco
Iowa, United States
Joined: July 28, 2003
KitMaker: 17 posts
Armorama: 8 posts
Joined: July 28, 2003
KitMaker: 17 posts
Armorama: 8 posts
Posted: Wednesday, August 26, 2009 - 01:58 PM UTC
Color of build is German Grey by Tamiya: XF-63. I airbrushed it, with no attempt to lighten the color with white.
I sometimes(not always) will lighten the colors with white. That's how I ended up with a King Tiger with Green, Sand, and Dark PINK (instead of red-brown).
Thanks for getting the pictures into the post.
Brent
I sometimes(not always) will lighten the colors with white. That's how I ended up with a King Tiger with Green, Sand, and Dark PINK (instead of red-brown).
Thanks for getting the pictures into the post.
Brent
GALILEO1
Maryland, United States
Joined: April 18, 2006
KitMaker: 1,794 posts
Armorama: 1,431 posts
Joined: April 18, 2006
KitMaker: 1,794 posts
Armorama: 1,431 posts
Posted: Thursday, August 27, 2009 - 01:24 AM UTC
I agree on not adding white, Brent. Adding white would make it, I think, too light. From pics I've seen these guns were really dark, almost black really. See these two pictures below:
*** For discussion only ***
*** For discussion ony ***
Notice the really dark grey color to them. Don't know if I'll be using Tamiya's XF-63 as it seems not dark enough to me but will see. Perhaps I can use Tamiya's Nato Black and a bit ot white to see if I can get close enough...
Thanks!
Rob
*** For discussion only ***
*** For discussion ony ***
Notice the really dark grey color to them. Don't know if I'll be using Tamiya's XF-63 as it seems not dark enough to me but will see. Perhaps I can use Tamiya's Nato Black and a bit ot white to see if I can get close enough...
Thanks!
Rob
bhutch
Alabama, United States
Joined: August 28, 2009
KitMaker: 2 posts
Armorama: 1 posts
Joined: August 28, 2009
KitMaker: 2 posts
Armorama: 1 posts
Posted: Friday, August 28, 2009 - 11:01 AM UTC
Hi Rob,
This is a great build article. I have the kit , the Griffon set and the Dragon Sdkfz 7 (Late) to tow it and I am anxious to follow along using your article.
I have a question for everyone before I start in on it. I have not found a clear enough picture showing the end of the piston rod when it is disengaged from the breech and the barrel is in travel mode position. I assume the end has some type of groves are threads in it. Also, is the cable that is used to pull the barrel back unhooked and wound up on the winch after the barrel is locked into travel mode? I think I saw a picture with it attached but with slack in the cable.
Thank you for any help on my questions. This is my first post in this forum.
Brian
This is a great build article. I have the kit , the Griffon set and the Dragon Sdkfz 7 (Late) to tow it and I am anxious to follow along using your article.
I have a question for everyone before I start in on it. I have not found a clear enough picture showing the end of the piston rod when it is disengaged from the breech and the barrel is in travel mode position. I assume the end has some type of groves are threads in it. Also, is the cable that is used to pull the barrel back unhooked and wound up on the winch after the barrel is locked into travel mode? I think I saw a picture with it attached but with slack in the cable.
Thank you for any help on my questions. This is my first post in this forum.
Brian
GALILEO1
Maryland, United States
Joined: April 18, 2006
KitMaker: 1,794 posts
Armorama: 1,431 posts
Joined: April 18, 2006
KitMaker: 1,794 posts
Armorama: 1,431 posts
Posted: Saturday, August 29, 2009 - 02:22 PM UTC
Quoted Text
Hi Rob,
This is a great build article. I have the kit , the Griffon set and the Dragon Sdkfz 7 (Late) to tow it and I am anxious to follow along using your article.
I have a question for everyone before I start in on it. I have not found a clear enough picture showing the end of the piston rod when it is disengaged from the breech and the barrel is in travel mode position. I assume the end has some type of groves are threads in it. Also, is the cable that is used to pull the barrel back unhooked and wound up on the winch after the barrel is locked into travel mode? I think I saw a picture with it attached but with slack in the cable.
Hi Brian. Thanks very much for the comments! You will surely enjoy this one very much! I too have the late Sdkfz 7 so perhaps I'll use for this as well (although I'm still waiting on the standard prime mover). The Griffon set looks super complex but its surely awsome! Please post some pics of your work as you get started.
As to the end of the piston rod, here's a pic (from Rossagraph's s.F.H.18 Monograph)
*** For Discussion Only ***
With regards to the cable, I have no idea, sorry. Perhaps someone can shed some light on this as I too would be intereted in finding out.
Take care,
Rob
Gorizont
Sachsen, Germany
Joined: November 28, 2007
KitMaker: 1,462 posts
Armorama: 1,289 posts
Joined: November 28, 2007
KitMaker: 1,462 posts
Armorama: 1,289 posts
Posted: Tuesday, September 01, 2009 - 08:11 AM UTC
I´m not sure, which part you exactly mean.
I try to explain, what I think. ;-)
I think, you mean the "rod" which is not connected to the "breach and barrel-part" on your photo.
While in travelling, the barrel is moved full back, to make the vehicle-gun-combination shorter and "handier" (easier to move).
While shooting, the barrel is attached to a cylinder (above the barrel), filled with oil and compressed air, -using this rod-, to make movement of the barrel possible, when firing.
(from Acemodel.com.ua)
greetings...
Soeren