Hi guys !
Well the LVT-4 kit arrived, as has the Bison Decal set, the Fruilmodel tracks, and the Concord Zaloga Book on Amphibious Vehicles including LVT's.
I'm definately leaning towards one of the Bison Decal LVT's and probably USMC A24 from Tinian, I thought that these machine were basically Olive Drab, but now see that this particular machine is Ocean Grey (Base) and Sand.
Any suggestions on a Tamiya mix for these colors ? It'd be very much appreciated !!!
The other LVT-4's also in the decal sets are Olive Drab, Sand, and Red Brown. Any tips on the sand and red brown (Tamiya) ?
I now need to finish the JagdPanzer Kanone, and then the C2 Mexas before I can get right into this one
Any tips on a walkaround for a LVT-4 so I can see colors and details in the interior, the tracks / wheels, and the drive sprockets would be MUCH APPRECIATED !!!!
Cheers
Paul
PS: The Fruilmodel tracks have a little jig for assembly, but the assembly process is a lot more complex than other "Fruils". They require pin 'entry' from the inside of each side individual link (2 per link @ 2.5 mm pin each ). Ouch !!
Campaigns
Where Armorama group builds can be discussed, organized, and updates posted.
Hosted by Darren Baker, Richard S.
Campaign in the Pacific
ppawlak1
Victoria, Australia
Joined: March 14, 2006
KitMaker: 1,973 posts
Armorama: 1,843 posts
Joined: March 14, 2006
KitMaker: 1,973 posts
Armorama: 1,843 posts
Posted: Thursday, April 08, 2010 - 08:57 PM UTC
BobCard
Florida, United States
Joined: August 09, 2006
KitMaker: 1,008 posts
Armorama: 847 posts
Joined: August 09, 2006
KitMaker: 1,008 posts
Armorama: 847 posts
Posted: Friday, April 09, 2010 - 03:03 AM UTC
Vince,
Kind of confusing but what you want to do is totally up to you.
Main differences in the kits seem to be the turret, nose and engine deck.
First off the M4 and M4A2 hull have a bunch in common so a donor kit might be the Tarawa M4A2; you just have to correct the nose, engine deck and turret. That was an example.
ONE
TWO
The one with the least amount of bashing seems to be the M4 Normandy kit, Dragon, 6511. An in box review from Armorama;
THREE
Everything is there except the sharp nose and turret with no pistol port. Depending on your quantity of spare parts you should have a sharp nose available; a lot of kits came with both the rounded and sharp nose. I believe I have one if needed. Biggest problem seems to be the turret with no pistol port.
I found this description of how to fill in the M4 Composite pistol port for another site;
FOUR
The problem of course is the work involved in sanding the thing down. If you can find one of those turrets where the pistol port has to be glued completely on, not just the door but the whole thing, that would be easier to fill in.
If you want to take that additional step I can recommend the Formations Turret, T030, Low bustle 75mm turret no pistol port, is perfect but you might have to sand down the thickened cheek armor. And the Late Single Piece Cast Double Brake Sherman Transmission Cover – F053 seems to be a good choice for the nose.
Remember I am by no means an expert. Good luck,
Billy,
Excellent job, the details are still impressive. Looking forward to more,
Paul,
Nice to hear from you again. Paint suggestions, Tamiya Med Blue XF18 and Buff XF57. But it should fit your choice so maybe a bit lighter or darker either way. Remember these faded fast and Tinian was the second use of these vehicles, they first went to Saipan then invaded Tinian.
Letterman Publications put out a book called “LVT 4 Model Tech Manual” TM-HP003. It has everything you need. If you can’t find it or need some info let me know and I can e-mail you what you need. Try and find it first, it is an excellent reference to have.
I feel your pain on the tracks, these are too much work and frustration and Hardcorpsmodels are a bit out of my price range, I just stick to the originals and place them in dioramas, those scoops are either covered with water, or picking up loads of dirt-mud-sand, if you know what I mean, just have to really connect them together well.
Thanks for the updates guys, really enjoy the progress shots,
Bob
flipper21
Delaware, United States
Joined: October 29, 2006
KitMaker: 268 posts
Armorama: 144 posts
Joined: October 29, 2006
KitMaker: 268 posts
Armorama: 144 posts
Posted: Friday, April 09, 2010 - 04:04 AM UTC
Bob, Thanks again for the info.
"Remember I am by no means an expert." If your not an expert, you certainly are well informed .......Vince
TheDiggs
Illinois, United States
Joined: April 25, 2008
KitMaker: 338 posts
Armorama: 75 posts
Joined: April 25, 2008
KitMaker: 338 posts
Armorama: 75 posts
Posted: Friday, April 09, 2010 - 04:58 AM UTC
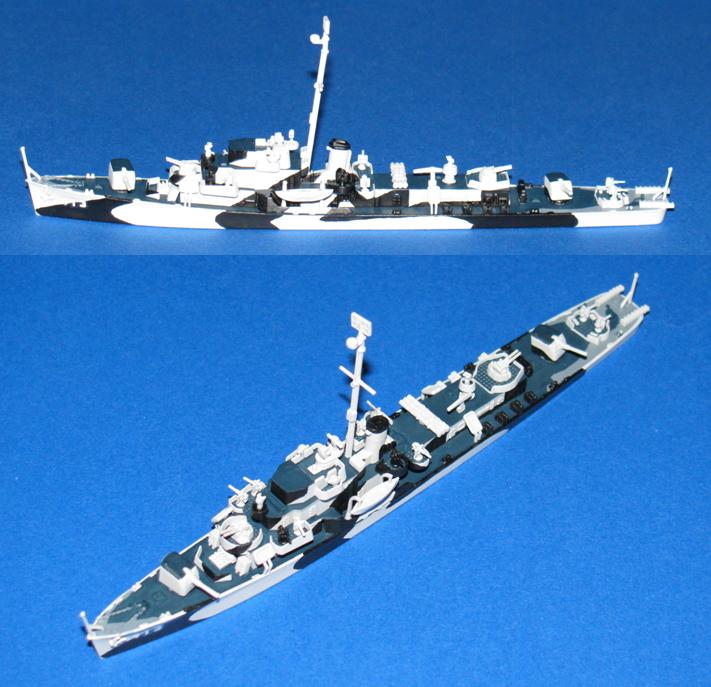
Well I have finished my USS Samuel B Roberts DE-413 as she was at the Battle Off Samar. The photo section seems to be broken right now. When it gets fixed I'll post an in progress pic and a finished pic.
Bigrip74
Texas, United States
Joined: February 22, 2008
KitMaker: 5,026 posts
Armorama: 1,604 posts
Joined: February 22, 2008
KitMaker: 5,026 posts
Armorama: 1,604 posts
Posted: Friday, April 09, 2010 - 07:44 AM UTC
@ Bob: NICE information and pictures that I understand.
@David: Cant wait to see your USS Samuel B Roberts DE-413 , one of my favorite books is :LAST OF THE TIN CAN SAILORS".
I am putting some OD on my M3 now and will try some pics if the gallery will work.
Bob
@David: Cant wait to see your USS Samuel B Roberts DE-413 , one of my favorite books is :LAST OF THE TIN CAN SAILORS".
I am putting some OD on my M3 now and will try some pics if the gallery will work.
Bob
mopnglo
United States
Joined: January 07, 2006
KitMaker: 452 posts
Armorama: 271 posts
Joined: January 07, 2006
KitMaker: 452 posts
Armorama: 271 posts
Posted: Friday, April 09, 2010 - 08:26 AM UTC
I hope you guys don't mind if I join up a little late. I just finished a project and I've got some time to burn until the Sherman campaign starts in July, so I figured I'd join up. I've been looking to build something for a friend who is a retired Marine, and I've decided on Colorado from C Company on Tarawa. So far, my references include a M4A2 build log by Steve Zaloga that contains two photos of Colorado and Tarawaontheweb.org.
Here's what I'll be working with:
Michael
Here's what I'll be working with:
Michael
tread_geek
Ontario, Canada
Joined: March 23, 2008
KitMaker: 2,847 posts
Armorama: 2,667 posts
Joined: March 23, 2008
KitMaker: 2,847 posts
Armorama: 2,667 posts
Posted: Friday, April 09, 2010 - 09:24 AM UTC
Hi Michael. Nice to see someone building the big brother of my kit.
Diminutive progress on my Sherman, pun intended.
Here's a picture of the hull front with a periscope by the lower (right) hatch.
Prior to working on the hatch I put on a few tools.
Back to the assistant drivers hatch. Periscope is in the hatch, the little cover is in front of the hatch and I put the hatch spring on. I decided to use the styrene periscope guard as the PE one was too impossible to bend right. Spent half a frustrating hour on the PE one without success.
The last picture was taken with a 4X macro filter and 2X teleconvertor for the lens. This little tyke has 127 styrene parts and I doubt I have half of them on. I tried fitting the DS tracks and it looks like they'll need to be trimmed by one or two links to fit properly. I might make the drivers hatch in the open position so that the internal hatch details can be seen.
Cheers,
Jan
Bigrip74
Texas, United States
Joined: February 22, 2008
KitMaker: 5,026 posts
Armorama: 1,604 posts
Joined: February 22, 2008
KitMaker: 5,026 posts
Armorama: 1,604 posts
Posted: Friday, April 09, 2010 - 09:41 AM UTC
Hi Michael glad to have you here, nice pick for a build.
@Jan: WOW! nice pictures, I can see all of the detail of that braille scale mouse
Bob
@Jan: WOW! nice pictures, I can see all of the detail of that braille scale mouse
Bob
mopnglo
United States
Joined: January 07, 2006
KitMaker: 452 posts
Armorama: 271 posts
Joined: January 07, 2006
KitMaker: 452 posts
Armorama: 271 posts
Posted: Friday, April 09, 2010 - 02:00 PM UTC
Thanks for the welcome! I'm getting ready to crack open the box tonight.
Jan, I've been watching your build, because I'm planning on Dragon's 1:72 M4 75mm for the Sherman Campaign later this year. It will be my first attempt at a braille scale kit.
Thanks again, guys!
Michael
Jan, I've been watching your build, because I'm planning on Dragon's 1:72 M4 75mm for the Sherman Campaign later this year. It will be my first attempt at a braille scale kit.
Thanks again, guys!
Michael
Bigrip74
Texas, United States
Joined: February 22, 2008
KitMaker: 5,026 posts
Armorama: 1,604 posts
Joined: February 22, 2008
KitMaker: 5,026 posts
Armorama: 1,604 posts
Posted: Friday, April 09, 2010 - 05:47 PM UTC
I have been applying rivets to my M3 and I am just about ready to throw it against the wall to see how many parts it will break into This is no fun at all. I will need therapy after this build
Bob
Bob
tread_geek
Ontario, Canada
Joined: March 23, 2008
KitMaker: 2,847 posts
Armorama: 2,667 posts
Joined: March 23, 2008
KitMaker: 2,847 posts
Armorama: 2,667 posts
Posted: Friday, April 09, 2010 - 06:08 PM UTC
Quoted Text
I have been applying rivets to my M3 and I am just about ready to throw it against the wall to see how many parts it will break into This is no fun at all. I will need therapy after this build
Bob
Hang in there Robert. It's supposed to be fun! I dropped a driver gear from my build and it is HUGE compared to other parts. Took my SWMBO and me almost 15 min. to find the darn thing. Breath deep and think how much you enjoy this past time.
Cheers,
Jan
ppawlak1
Victoria, Australia
Joined: March 14, 2006
KitMaker: 1,973 posts
Armorama: 1,843 posts
Joined: March 14, 2006
KitMaker: 1,973 posts
Armorama: 1,843 posts
Posted: Friday, April 09, 2010 - 10:46 PM UTC
Quoted Text
Paul,
Nice to hear from you again. Paint suggestions, Tamiya Med Blue XF18 and Buff XF57. But it should fit your choice so maybe a bit lighter or darker either way. Remember these faded fast and Tinian was the second use of these vehicles, they first went to Saipan then invaded Tinian.
Letterman Publications put out a book called “LVT 4 Model Tech Manual” TM-HP003. It has everything you need. If you can’t find it or need some info let me know and I can e-mail you what you need. Try and find it first, it is an excellent reference to have.
I feel your pain on the tracks, these are too much work and frustration and Hardcorpsmodels are a bit out of my price range, I just stick to the originals and place them in dioramas, those scoops are either covered with water, or picking up loads of dirt-mud-sand, if you know what I mean, just have to really connect them together well.
Bob
Hey Bob,
thanks for the reply
I've ordered XF18 and I'm going to use the kit tracks this time....
The pics you provided earlier will be great for the Camo scheme.
I've also ordered the Toadman LVT-4 CD with pics which will be handy I think...
Before I get that, I'm interested in knowing if the tracks wheels had tyres / rubber around them, or of they are all steel... any ideas ?
Cheers
Paul
Bigrip74
Texas, United States
Joined: February 22, 2008
KitMaker: 5,026 posts
Armorama: 1,604 posts
Joined: February 22, 2008
KitMaker: 5,026 posts
Armorama: 1,604 posts
Posted: Saturday, April 10, 2010 - 05:06 AM UTC
[quote] Hang in there Robert. It's supposed to be fun! I dropped a driver gear from my build and it is HUGE compared to other parts. Took my SWMBO and me almost 15 min. to find the darn thing. Breath deep and think how much you enjoy this past time. [quote]
Jan I am breathing deeply and all its doing is getting me drunk Adivce taken and I will slow down to smell the roses.
Bob
Jan I am breathing deeply and all its doing is getting me drunk Adivce taken and I will slow down to smell the roses.
Bob
Bigrip74
Texas, United States
Joined: February 22, 2008
KitMaker: 5,026 posts
Armorama: 1,604 posts
Joined: February 22, 2008
KitMaker: 5,026 posts
Armorama: 1,604 posts
Posted: Saturday, April 10, 2010 - 07:20 AM UTC
Bigrip74
Texas, United States
Joined: February 22, 2008
KitMaker: 5,026 posts
Armorama: 1,604 posts
Joined: February 22, 2008
KitMaker: 5,026 posts
Armorama: 1,604 posts
Posted: Sunday, April 11, 2010 - 06:31 AM UTC
russamotto
Utah, United States
Joined: December 14, 2007
KitMaker: 3,389 posts
Armorama: 2,054 posts
Joined: December 14, 2007
KitMaker: 3,389 posts
Armorama: 2,054 posts
Posted: Sunday, April 11, 2010 - 11:30 AM UTC
Robert, I think it looks great. Your work with the rivets may have been maddening but it looks like it was well worth it.
russamotto
Utah, United States
Joined: December 14, 2007
KitMaker: 3,389 posts
Armorama: 2,054 posts
Joined: December 14, 2007
KitMaker: 3,389 posts
Armorama: 2,054 posts
Posted: Sunday, April 11, 2010 - 01:16 PM UTC
Forgot to mention this earlier. For those who live in the desert southwest. If you can find fernbush, it looks like it would be very nice for use as small palms. I found it at Walnut Canyon National Monument in Arizona, but couldn't collect any because of restrictions on Park Service land.
BobCard
Florida, United States
Joined: August 09, 2006
KitMaker: 1,008 posts
Armorama: 847 posts
Joined: August 09, 2006
KitMaker: 1,008 posts
Armorama: 847 posts
Posted: Monday, April 12, 2010 - 07:03 AM UTC
Great, everyone else is moving along and I’m stuck power washing all weekend. Worked a total of 0 minutes on my build this weekend.
Michael welcome aboard.
Tarawa is one of my favorites. You can’t go wrong with Steve’s write-up, but make sure you get those water cans for the rear and not petrol. I built Chicago myself; (Finally put it in water)
And just to show you how much I’m interested in Tarawa; (My office)
And the rest;
Jan, I showed those photos to SWMBO and the first thing she said was that no way was I going to restock! Little does she know I can’t see that small. I do have one on my shelf to build but I’ve had it out 3 times and put it back each time, I really have to get better magnifiers and plenty more Band-Aids. If you leave one of the hatches open were you going to put in the driver?
Robert, at one point in my life I also had the feeling I had to add details that were missing so I started putting the rivets on the road wheels that are not molded on, needless to say after the first 3 it was amazing but there appeared mud where the rivets used to be. I know you can’t hide the ones you had to do but I would have cut off the sides of another M3 that had the rivets already there before I did another one, the bolt heads on the back of the M4’s are bad enough. More power to you, you’re doing a great job, and it’s looking great.
Paul, Photo shows them to be rubber (From David Harper’s LVT-4 model tech manual)
Russ, The biggest problems I’ve ever had is using real plants on a diorama. I know it’s a bunch cheaper and there have been some great method posts on making organic palms and plants, but for me they rot, change colors, or draw bugs. I use Hart of the South items for palm tree leaves, best ones I’ve found so far, and make the trunks out of bamboo skewers, string and plastered on toilet paper, seems to work out.
I’d better get off my behind and start doing some more important work,
Thanks for the great updates guys,
Bob
TheDiggs
Illinois, United States
Joined: April 25, 2008
KitMaker: 338 posts
Armorama: 75 posts
Joined: April 25, 2008
KitMaker: 338 posts
Armorama: 75 posts
Posted: Tuesday, April 13, 2010 - 12:30 PM UTC
Woohoo I can finally upload pictures.
Here is an in-progress pic:
Everything is OOB except I modified the gun and torpedo turrets to make them rotate freely
Here is the finished product:
Here is the only good picture that I could find to use a reference:
here
Here is an in-progress pic:
Everything is OOB except I modified the gun and torpedo turrets to make them rotate freely
Here is the finished product:
Here is the only good picture that I could find to use a reference:
here
russamotto
Utah, United States
Joined: December 14, 2007
KitMaker: 3,389 posts
Armorama: 2,054 posts
Joined: December 14, 2007
KitMaker: 3,389 posts
Armorama: 2,054 posts
Posted: Saturday, April 24, 2010 - 02:44 PM UTC
Anyone have updates? I put the heads together and started trying to paint them, but I've been busy around the house with spring cleaning and yard work. I even put Future on a floor. Now I'm watching our two year old so I don't dare get a kit out. I'll get back to work soon I hope.
BobCard
Florida, United States
Joined: August 09, 2006
KitMaker: 1,008 posts
Armorama: 847 posts
Joined: August 09, 2006
KitMaker: 1,008 posts
Armorama: 847 posts
Posted: Monday, April 26, 2010 - 02:48 AM UTC
I know what you mean Russ. I've been power washing the entire block, feels that way. Looks like rain this weekend so I’ll at least be able to work some then.
David, this ship has a great History and I recommend that everyone take a look at this site; USS SAMUEL B. ROBERTS (DE 413)
, just to get a better idea of what the Roberts accomplished. Great work on the ship and the camo, I am an old Tin Can Sailor myself and this was one Great Ship.
I see that David posted his completed photo and in work photo in the Pacific Campaign Gallery. Thanks, (Which makes David the First to complete the Campaign Requirements) For everyone else it's here; Pacific Campaign
Hope everyone is still attempting to get some modeling time in, let us know how you’re doing,
Bob
mopnglo
United States
Joined: January 07, 2006
KitMaker: 452 posts
Armorama: 271 posts
Joined: January 07, 2006
KitMaker: 452 posts
Armorama: 271 posts
Posted: Monday, April 26, 2010 - 03:24 AM UTC
I've been able to get some work done on my Sherman, but I haven't had a chance to take photos. I ended up with a huge gap where the transmission cover meets the bolt strip. I mean huge gap. I don't know what I did wrong, but I ended up filling the gap with plastic strip. It looks sure looks funny. I'll try to take photos this week.
Bob, thanks for the photos of your Tarawa build! I also got to see the photos of your office before they disappeared. I'm really getting into the history of this build.
Russ, I have two year old twin boys, so I end up doing most of my work after the family goes to bed. How do two year olds have so much energy?!
Michael
BobCard
Florida, United States
Joined: August 09, 2006
KitMaker: 1,008 posts
Armorama: 847 posts
Joined: August 09, 2006
KitMaker: 1,008 posts
Armorama: 847 posts
Posted: Friday, April 30, 2010 - 07:11 AM UTC
Michael,
Looking forward to those pics. Weird problem you ran into and would like to see how things went.
Since I might actually get a chance to work on my projects this weekend I think I'll do the May History update now;
May
May 1, 1942 - Japanese occupy Mandalay in Burma.
May 1, 1945 Battle of Tarakan was the first stage in the Borneo campaign of 1945. It began with an amphibious landing by Australian forces on 1 May, code-named Operation Oboe One
May 3, 1942 - Japanese take Tulagi in the Solomon Islands.
May 5, 1942 - Japanese prepare to invade Midway and the Aleutian Islands.
May 6, 1942 - Japanese take Corregidor as Gen. Wainwright unconditionally surrenders all U.S. And Filipino forces in the Philippines.
May 7-8, 1942 - Japan suffers its first defeat of the war during the Battle of the Coral Sea off New Guinea - the first time in history that two opposing carrier forces fought only using aircraft without the opposing ships ever sighting each other.
May 10, 1943 - U.S. Troops invade Attu in the Aleutian Islands.
May 12, 1942 - The last U.S. Troops holding out in the Philippines surrender on Mindanao.
May 14, 1943 - A Japanese submarine sinks the Australian hospital ship CENTAUR resulting in 299 dead.
May 20, 1942 - Japanese complete the capture of Burma and reach India.
May 20, 1945 - Japanese begin withdrawal from China.
May 27, 1944 - Allies invade Biak Island, New Guinea.
May 31, 1943 - Japanese end their occupation of the Aleutian Islands as the U.S. completes the capture of Attu.
May 25, 1945 - U.S. Joint Chiefs of Staff approve Operation Olympic, the invasion of Japan, scheduled for November 1.
For a more detailed listing go to;
1942
1943
1944
1945
Hope every one gets a chance this weekend, looking forward to some updates,
Bob
tread_geek
Ontario, Canada
Joined: March 23, 2008
KitMaker: 2,847 posts
Armorama: 2,667 posts
Joined: March 23, 2008
KitMaker: 2,847 posts
Armorama: 2,667 posts
Posted: Saturday, May 01, 2010 - 11:18 AM UTC
Greetings all! Bob, you are doing a fine job of motivating this campaign. As I have found from running my own (first) campaign, it's not as easy as it seems.
Anyway, I took a break today from my M40 build to work on the M4A2. Feeling masochistic I decided to try my hand at the PE again. First up though is the easy plastic lift rings in the front hull. In trying to cut the first off I ended up cutting it in two pieces. The sprue gates were larger than the part. This caused me to stop and go to the LHS to get a Xuron Micro-shear; FABULOUS tool.
Close up of the damaged one:
And finally the PE that took an hour of fiddling to fold and put in place. I found a new way to fold the periscope guards by making a jig.
May not look like much but it sure takes a long time.
Cheers,
Jan
mopnglo
United States
Joined: January 07, 2006
KitMaker: 452 posts
Armorama: 271 posts
Joined: January 07, 2006
KitMaker: 452 posts
Armorama: 271 posts
Posted: Saturday, May 01, 2010 - 02:23 PM UTC
Bob, it was a weird problem. I'm sure I made a mistake in the fit somewhere, but I can't figure it out. If you see what I did wrong, let me know so I'll be aware on future builds. The gap is big and looks really bad, but I'm moving forward with it. I'm still sanding it down and will try to disguise it with a bit of texture.