Rich,
The Tasca tracks I've seen have raised lumps from injection - roughly three per length. I cut them flush with sprue cutters, but you could use a very sharp X-acto blade instead. I don't have any holes to fill, but as the tracks are supposedly gluable I think you could use putty or such - as long as you don't flex them afterwards. Can you "park" the tracks so any marks are hidden by the wheels? There's always an application of good old mud if all else fails.
Tom
Campaigns
Where Armorama group builds can be discussed, organized, and updates posted.
Where Armorama group builds can be discussed, organized, and updates posted.
Hosted by Darren Baker, Richard S.
Sherman Campaign
Posted: Thursday, September 16, 2010 - 11:14 PM UTC

PvtMutt

Joined: July 01, 2006
KitMaker: 614 posts
Armorama: 601 posts

Posted: Friday, September 17, 2010 - 05:35 AM UTC
I stuck the parts together and defused the light so these pics are somewhat better.


Thanks
Tony the Mutt


Thanks
Tony the Mutt


vonHengest

Joined: June 29, 2010
KitMaker: 5,854 posts
Armorama: 4,817 posts

Posted: Friday, September 17, 2010 - 09:19 AM UTC
Much better Tony!
War_Machine

Joined: February 11, 2003
KitMaker: 702 posts
Armorama: 385 posts

Posted: Friday, September 17, 2010 - 10:35 AM UTC
Here's the latest on my M7 build. Construction is finally completed.


I had to do some major fixing to the front superstructure plate as it didn't line up at all with the differential cover. I don't know if it was because of mistakes in the kit, lack of compatability of components from different companies, or different profiles between cast and 3-piece differential housings, but whatever the case I had to add sheet plastic to the front of the superstructure. Plenty of filling and sanding later, and it looked about right.


The headlights were a bit of a challenge because earlier M7s have what appear to be larger lights. Fortunately I had parts in my spares box that fit the bill. I scratchbuilt the brush guards from sheet lead and plastic strip, and yes it was as big of a pain as it sounds.
After that it was a case of addiing final details before capping things off with weld seams made with homemade thinned putty and a few rivets to replace those that came off in the process of contruction.
Next up is painting and making up some crew figures.
I had to do some major fixing to the front superstructure plate as it didn't line up at all with the differential cover. I don't know if it was because of mistakes in the kit, lack of compatability of components from different companies, or different profiles between cast and 3-piece differential housings, but whatever the case I had to add sheet plastic to the front of the superstructure. Plenty of filling and sanding later, and it looked about right.
The headlights were a bit of a challenge because earlier M7s have what appear to be larger lights. Fortunately I had parts in my spares box that fit the bill. I scratchbuilt the brush guards from sheet lead and plastic strip, and yes it was as big of a pain as it sounds.

After that it was a case of addiing final details before capping things off with weld seams made with homemade thinned putty and a few rivets to replace those that came off in the process of contruction.
Next up is painting and making up some crew figures.

Posted: Friday, September 17, 2010 - 10:57 AM UTC
Tony & Ed,
The progress on your M7s puts me to shame! I've gotta get back to mine and post some pics...
Tom
The progress on your M7s puts me to shame! I've gotta get back to mine and post some pics...
Tom

PvtMutt

Joined: July 01, 2006
KitMaker: 614 posts
Armorama: 601 posts

Posted: Friday, September 17, 2010 - 11:25 AM UTC
Wow Weeee Ed that looks to much like work.  Great work but work none the less.
Tom my intentions were to have you get out ahead of me so I could follow your example but my anticipation is just too great to hold back.
Later boys
Tony the Mutt
 Great work but work none the less.
Tom my intentions were to have you get out ahead of me so I could follow your example but my anticipation is just too great to hold back.

Later boys
Tony the Mutt

War_Machine

Joined: February 11, 2003
KitMaker: 702 posts
Armorama: 385 posts

Posted: Friday, September 17, 2010 - 11:34 AM UTC
Thanks Tony  Yes, it was a lot of effort to get that relic looking like I wanted, but it was worth it. Pushing myself like that helps keep the old skills sharp, plus it gives me plenty of excuses to dig through my spare parts, which is always better than doing real work around the house.
  Nice work on your M7 build too.
 Yes, it was a lot of effort to get that relic looking like I wanted, but it was worth it. Pushing myself like that helps keep the old skills sharp, plus it gives me plenty of excuses to dig through my spare parts, which is always better than doing real work around the house.
  Nice work on your M7 build too.
Posted: Friday, September 17, 2010 - 12:05 PM UTC
Battlewagon M4A3E8 ETO: Part 7-Making Tracks
Greeting Everyone!!
With out of town guests, long hours at work and a nice trip to Oregon, I have been out of pocket for little over a month. I have been keeping tabs on all the work being done here and let me say that it has just been fantastic!! One thing that really struck me is the camaraderie of all the participants and sharing of ideas along with great positive feedback given by so many.
Link-to-link tracks for many people are without question the most intimidating part of the building process, myself included. The key here is being patient and having a good plan of attack. The decision was made to assemble the tracks so that they can be removed, painted and weathered and then attached, with hopefully only minor touchups, to the suspension components. T66 tracks are a single track link connected with a pin that makes them somewhat easier to assemble then the other VVSS type tracks that use end connectors.
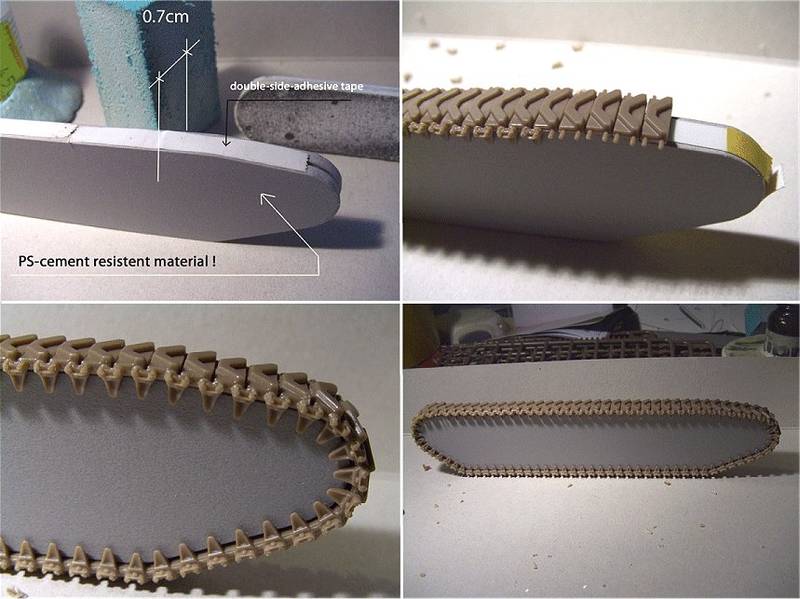
A simple jig was constructed from basswood to assist in the assembly of the track. The track was built in groups of five links and then attached to form the long bottom and top runs. For the drive sprockets and idler wheels, groups of four to five links are assembled and attached to the respective sprocket/idler. The track runs from the first and last road wheels to the sprockets/idlers, which are made of five to seven links. Once the glue had dried a bit but is still pliable, the lengths were test fitted…lots of test fitting will be required to get it right.
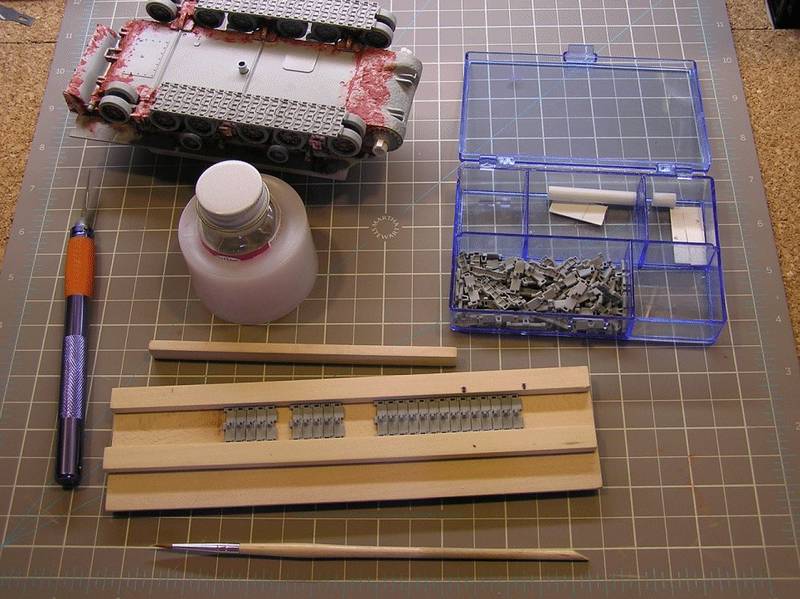
Even with all the test fitting there was still a gap at the end of the run. Narrowing a link, with a little carving and filing, the gap was filled and hopefully not too noticeable.
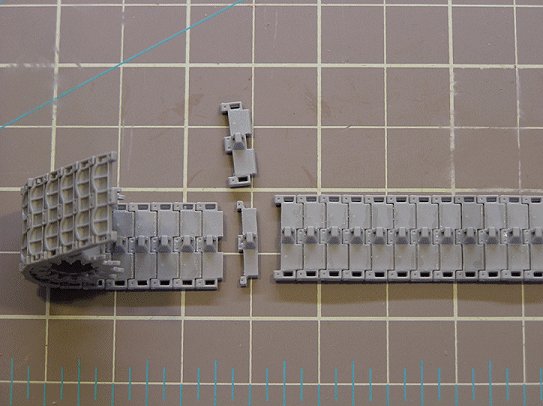
The dark links are from an earlier generation Dragon M4A3E8 kit. Additional links for storage on the upper hull are needed, so with a little extra filing and proper placement on the kit, the substituted links will not even be seen.
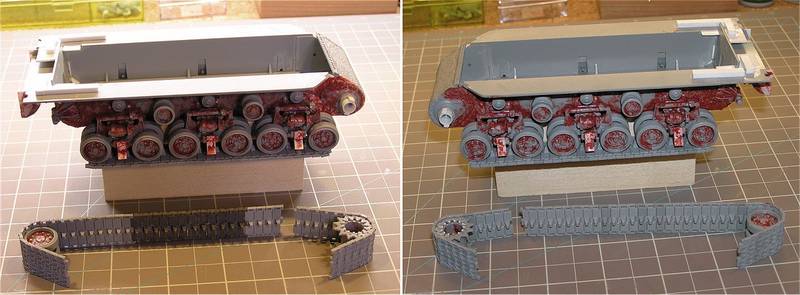
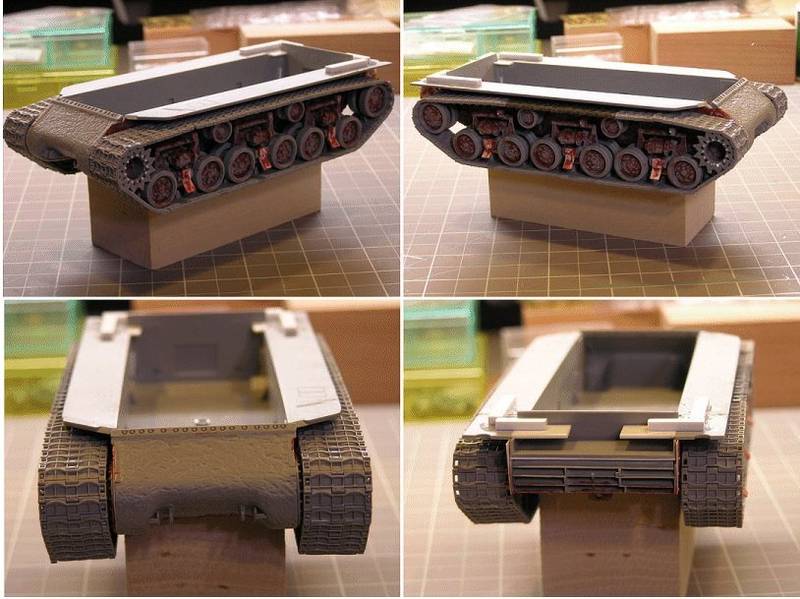
As typical, once finished I came across a post by Peter Nepio on Missing-Lynx.com that would have been very helpful with the process.
I included it here, as the accompanying photos are no longer displayed due to exceeded bandwidth.
Sherman track tool
September 8 2010 at 6:08 AM
http://www.network54.com/Forum/110741/message/1283940520/Sherman+track+toll
hi all
made last evening to simplify the work with the afv track links.
the problem is the correct adjustment of the end connectors.
they tend to remain in a not real correct direction and angle.
the end-connector track has its own tension, what we can see at the end of a laying track during repairs. one complete track was made in ca.50min.
I left it dry over night...safe is safe ...and I stil hate sherman track links...
I moulded the tool today in the morning and will cast it to have two sets to speed the work because the over-night-drying is important for a save work with it the next day.if someone is interested so let me know.
best regards
Peter
Great tip Peter, thanks.
I’ll be giving this a try on my next Sherman. It also appears that a commercial version of this tool is available from Hobby Trax and a product review is posted on the AMPS web site.
www.hobbytrax.net/
www.amps-armor.org/ampssite/reviews/showReview.aspx?ID=1366&Type=TR
That’s it for this round.
Great Job Everyone!!!
Greeting Everyone!!
With out of town guests, long hours at work and a nice trip to Oregon, I have been out of pocket for little over a month. I have been keeping tabs on all the work being done here and let me say that it has just been fantastic!! One thing that really struck me is the camaraderie of all the participants and sharing of ideas along with great positive feedback given by so many.
Link-to-link tracks for many people are without question the most intimidating part of the building process, myself included. The key here is being patient and having a good plan of attack. The decision was made to assemble the tracks so that they can be removed, painted and weathered and then attached, with hopefully only minor touchups, to the suspension components. T66 tracks are a single track link connected with a pin that makes them somewhat easier to assemble then the other VVSS type tracks that use end connectors.
A simple jig was constructed from basswood to assist in the assembly of the track. The track was built in groups of five links and then attached to form the long bottom and top runs. For the drive sprockets and idler wheels, groups of four to five links are assembled and attached to the respective sprocket/idler. The track runs from the first and last road wheels to the sprockets/idlers, which are made of five to seven links. Once the glue had dried a bit but is still pliable, the lengths were test fitted…lots of test fitting will be required to get it right.

Even with all the test fitting there was still a gap at the end of the run. Narrowing a link, with a little carving and filing, the gap was filled and hopefully not too noticeable.

The dark links are from an earlier generation Dragon M4A3E8 kit. Additional links for storage on the upper hull are needed, so with a little extra filing and proper placement on the kit, the substituted links will not even be seen.


As typical, once finished I came across a post by Peter Nepio on Missing-Lynx.com that would have been very helpful with the process.
I included it here, as the accompanying photos are no longer displayed due to exceeded bandwidth.
Sherman track tool
September 8 2010 at 6:08 AM
http://www.network54.com/Forum/110741/message/1283940520/Sherman+track+toll
hi all
made last evening to simplify the work with the afv track links.
the problem is the correct adjustment of the end connectors.
they tend to remain in a not real correct direction and angle.
the end-connector track has its own tension, what we can see at the end of a laying track during repairs. one complete track was made in ca.50min.
I left it dry over night...safe is safe ...and I stil hate sherman track links...
I moulded the tool today in the morning and will cast it to have two sets to speed the work because the over-night-drying is important for a save work with it the next day.if someone is interested so let me know.
best regards
Peter

Great tip Peter, thanks.
I’ll be giving this a try on my next Sherman. It also appears that a commercial version of this tool is available from Hobby Trax and a product review is posted on the AMPS web site.
www.hobbytrax.net/
www.amps-armor.org/ampssite/reviews/showReview.aspx?ID=1366&Type=TR
That’s it for this round.
Great Job Everyone!!!

PvtMutt

Joined: July 01, 2006
KitMaker: 614 posts
Armorama: 601 posts

Posted: Friday, September 17, 2010 - 01:23 PM UTC
You've got that right,there's a whole bunch of good lookin work going on around this joint.
Started on the drivers compartment today and noticed something amiss. Was there a radio and where did it mount??????

My back feels broke
Tony the Mutt
Started on the drivers compartment today and noticed something amiss. Was there a radio and where did it mount??????

My back feels broke

Tony the Mutt


opsguy

Joined: April 18, 2010
KitMaker: 55 posts
Armorama: 54 posts

Posted: Friday, September 17, 2010 - 03:50 PM UTC
So I goofed.
I must have misread, or ignored the instructions....
I wanted to paint the tank in a sand/OD camo pattern for Sicily. According to the instructions, the tank should have a one piece nose, and I built a 3 piece.
I'm wondering if it would be beyond the realm of possibility that the nose got damaged, and would have been replaced with a 3 piece? I could weather the rest of the tank more heavily, and do a straight OD 3 piece nose, with less weathering to depict that at some point, the whole deal had to be replaced.
Good idea?

HONEYCUT

Joined: May 07, 2003
KitMaker: 4,002 posts
Armorama: 2,947 posts

Posted: Friday, September 17, 2010 - 04:06 PM UTC
Nice fit out Ed; wil be good to see a couple of M7s finished up after the WIPs here... Tom, get yours in the mix as well!
Cal,welcome back, and get some pics up
Tony, the interior looks the part; I want to hop in!
Nice jig Eric, and looks to be coming along nicely... I'd probably lessen the depth of the casting effect on the transmission cover?
Rich, I'd stick with the one piece cover. So long as it is the 'rounded nose' as opposed to the later sharper type, you'd be good to go for Sicily. I've seen pics of 2AD 67th tanks with this cover in place. Sure it would be in the minority, but they definitely had this configuration.
Brad
Cal,welcome back, and get some pics up

Tony, the interior looks the part; I want to hop in!
Nice jig Eric, and looks to be coming along nicely... I'd probably lessen the depth of the casting effect on the transmission cover?
Rich, I'd stick with the one piece cover. So long as it is the 'rounded nose' as opposed to the later sharper type, you'd be good to go for Sicily. I've seen pics of 2AD 67th tanks with this cover in place. Sure it would be in the minority, but they definitely had this configuration.
Brad
Posted: Saturday, September 18, 2010 - 09:57 AM UTC
Guys,
Some great work popping up here! (I'll get another update on my M7 blog soon, honest!...)
Tony, I'm not sure the M7 had a radio. They would have travelled as a battery of vehicles, presumably led by headquarters staff in something with map tables and comms gear, so the actual gun carriages didn't need separate radios. I could be wrong...
Tom
PS: I gave up on Dragon's springy tow cable and replaced it with brass picture wire this evening...

vonHengest

Joined: June 29, 2010
KitMaker: 5,854 posts
Armorama: 4,817 posts

Posted: Saturday, September 18, 2010 - 11:33 AM UTC
I was not expecting to see so many M7's in this campaign, especially not so close together. This is great stuff!!

PvtMutt

Joined: July 01, 2006
KitMaker: 614 posts
Armorama: 601 posts

Posted: Saturday, September 18, 2010 - 02:27 PM UTC

Not really wrong Tom. I've found out in the last two days they used portable radio phones. They did mount short waves in the Pacific and Korea though.

That DML cable wire is a bummer.
Grab your hat Jer, it's bound to get better and better.
SPGs Forever
Tony Lee


vonHengest

Joined: June 29, 2010
KitMaker: 5,854 posts
Armorama: 4,817 posts

Posted: Saturday, September 18, 2010 - 04:11 PM UTC
Great stuff Tony, if finances allow I'll see if I can pick one up for the campaign myself 

MichaelSatin

Joined: January 19, 2008
KitMaker: 3,909 posts
Armorama: 510 posts

Posted: Sunday, September 19, 2010 - 11:47 AM UTC
OK, well, I'm actually still alive and semi-active! 
I see that at least one other has taken up the mantle of the Tasca M4A1 mid, 67th Armd.Regt. Sicily; and good for you! So, I've turned back to the M4A1E8 IDF 1967. Again, using the Dragon M4A1(76), original M51 and AFV HVSS suspension kits. I've added some detail to the rear hull, stuck the bottom tub onto the hull shell, and cleaned up the seams somewhat (seeing as it's going to have the HVSS wide track, I didn't get too worked up about it)


So, here's a general modeling question. About a year ago I decided, in a misguided effort to save a few of my measly total of brain cells, to switch to acrylic paint. I'm feeling more comfortable with Tamiya, but is anyone else here able to use ModelMaster acrylics without clogging up the airbrush EVERY TIME?!
Sigh.
Michael

I see that at least one other has taken up the mantle of the Tasca M4A1 mid, 67th Armd.Regt. Sicily; and good for you! So, I've turned back to the M4A1E8 IDF 1967. Again, using the Dragon M4A1(76), original M51 and AFV HVSS suspension kits. I've added some detail to the rear hull, stuck the bottom tub onto the hull shell, and cleaned up the seams somewhat (seeing as it's going to have the HVSS wide track, I didn't get too worked up about it)
So, here's a general modeling question. About a year ago I decided, in a misguided effort to save a few of my measly total of brain cells, to switch to acrylic paint. I'm feeling more comfortable with Tamiya, but is anyone else here able to use ModelMaster acrylics without clogging up the airbrush EVERY TIME?!

Sigh.
Michael

AgentG

Joined: December 21, 2008
KitMaker: 1,109 posts
Armorama: 1,095 posts

Posted: Sunday, September 19, 2010 - 01:00 PM UTC
I have used MM paints in the airbrush with no issues. I thin them with windex, which makes cleanup even easier.
G
G

AgentG

Joined: December 21, 2008
KitMaker: 1,109 posts
Armorama: 1,095 posts

Posted: Sunday, September 19, 2010 - 01:22 PM UTC
I had another extremely busy week. It was so bad that the crew filming "Las Vegas Jailhouse" got to know me by first name. If it doesn't disappear in editing, the last prisoner I booked might be included on the show. 
Here's Doris as she stands right now. I gloss coated with Future, used oils for washes, and drybrushing, and flat coated with MM acrylic flat.


I really like how the resin trunks mated with my scratchbuilt exhaust hood.


Now the fun begins. I previously matched DML's duckbill tracks to Tamiya's sprockets and found widthwise they would work. Now I have to see if they are too long or too short. If nothing else I'll use the kit tracks, as not all had the duckbills.
G

Here's Doris as she stands right now. I gloss coated with Future, used oils for washes, and drybrushing, and flat coated with MM acrylic flat.


I really like how the resin trunks mated with my scratchbuilt exhaust hood.


Now the fun begins. I previously matched DML's duckbill tracks to Tamiya's sprockets and found widthwise they would work. Now I have to see if they are too long or too short. If nothing else I'll use the kit tracks, as not all had the duckbills.
G
TonyDz

Joined: December 13, 2009
KitMaker: 420 posts
Armorama: 419 posts

Posted: Sunday, September 19, 2010 - 03:49 PM UTC
Quoted Text
They did mount short waves in the Pacific and Korea though.

If this pic is supposed to be an example of radio setups in M7s in the PTO and Korea, you are badly mistaken. That is a pic of an Israeli M7 used post war.

AgentG

Joined: December 21, 2008
KitMaker: 1,109 posts
Armorama: 1,095 posts

Posted: Sunday, September 19, 2010 - 04:26 PM UTC
Quoted Text
Quoted TextThey did mount short waves in the Pacific and Korea though.
If this pic is supposed to be an example of radio setups in M7s in the PTO and Korea, you are badly mistaken. That is a pic of an Israeli M7 used post war.
Wow! aren't we just a ray of frikkin' sunshine....

G
TonyDz

Joined: December 13, 2009
KitMaker: 420 posts
Armorama: 419 posts

Posted: Sunday, September 19, 2010 - 06:33 PM UTC
Quoted Text
Wow! aren't we just a ray of frikkin' sunshine....
And your problem is? Sorry if I did not use some goofy emoticons


 while correcting bogus information.
JokerNinjay

Joined: August 26, 2010
KitMaker: 125 posts
Armorama: 112 posts

Posted: Sunday, September 19, 2010 - 07:28 PM UTC
Hey, Wayne your phone pouch looks a little irregular with the bigger "phone" letters. In my opinion I don't think it looks that realistic which is opposed by a very good looking tank. Maybe it's just me or the picture but it looks a tad unrealistic and am wanted someone else to take a look at it. Good luck and talk to you later 


opsguy

Joined: April 18, 2010
KitMaker: 55 posts
Armorama: 54 posts

Posted: Sunday, September 19, 2010 - 11:39 PM UTC
DISASTER!
So who has two thumbs, and a built Sherman that's soaking in a tub of isopropyl alcohol?
THIS GUY.
The good news is, I get to practice painting some more!
So who has two thumbs, and a built Sherman that's soaking in a tub of isopropyl alcohol?
THIS GUY.
The good news is, I get to practice painting some more!
Posted: Monday, September 20, 2010 - 01:49 AM UTC
Great looking build so far, Wayne. I really like the look of the tank and the many modifications.
Looking forward to see more.
Looking forward to see more.


HONEYCUT

Joined: May 07, 2003
KitMaker: 4,002 posts
Armorama: 2,947 posts

Posted: Monday, September 20, 2010 - 02:28 AM UTC
Quoted Text
Quoted TextWow! aren't we just a ray of frikkin' sunshine....
And your problem is? Sorry if I did not use some goofy emoticons

while correcting bogus information.
Where do you get off 'Tony'? If that is "just the way you is" then no one here really needs/wants your assistance. Let's have a look at your build here. Have a link?


 |


