Ah yes, Jay, I forgot, as Jeremy said: one thing you will need building armour is a pin vise and a set of small drills ranging from 0.3 to maybe 1.0 Diameter in 0.1mm steps. Both really not expensive and probably easily to obtain at a hardware store.
When you got that you measure the wire you are using (for hatches i use 0.4 wire) and drill the exact same diameter hole. This way - providing you bent the handle the way i described - it's really easy to position the handle vertically (meaning it sits parallel to the hull) as well as horizontally (meaning for example its in the middle of the motor deck's frame and parallel to the grilles) as the handle kind of sticks in its position.
As i remember you were asking about the right colour, this here is really a nice article:
http://www.militarymodelling.com/news/article.asp?a=4536
Main thing is: you got to like your tank after spraying and it doesn't look too dark.
Tony's example is perfect for my tastes. But that's me.
Keep on modeling!
Campaigns
Where Armorama group builds can be discussed, organized, and updates posted.
Where Armorama group builds can be discussed, organized, and updates posted.
Hosted by Darren Baker, Richard S.
Sherman Campaign
Posted: Friday, September 24, 2010 - 11:52 PM UTC

HONEYCUT

Joined: May 07, 2003
KitMaker: 4,002 posts
Armorama: 2,947 posts

Posted: Friday, September 24, 2010 - 11:55 PM UTC
Hey Bob
Your main problem in representing the kit in question is the turret. The resin turret you have is a late prduction high bustle turret, which is more suited to a M4A3 late hull. You can see in the book drawing that there is no pistol port present as the obvious indicator. (The turret top and hatches are difficult to see from side on) What you need is the early low bustle turret with pistolport included, the early split hatch for the commander and no loader's hatch.
Here are some M4 rears from some of my WIPs.


Brad
Your main problem in representing the kit in question is the turret. The resin turret you have is a late prduction high bustle turret, which is more suited to a M4A3 late hull. You can see in the book drawing that there is no pistol port present as the obvious indicator. (The turret top and hatches are difficult to see from side on) What you need is the early low bustle turret with pistolport included, the early split hatch for the commander and no loader's hatch.
Here are some M4 rears from some of my WIPs.


Brad
beefy66

Joined: October 22, 2007
KitMaker: 971 posts
Armorama: 280 posts

Posted: Saturday, September 25, 2010 - 01:57 AM UTC
So many great builds here Tony great m7 will have to put that on the list for the next show in Nov. Here is the progress I,v been making with my calliope added more sandbags and a stowage box at the rear wired the tubes with fine copper wire and replaced the hoses on the sides of the support arms.


PvtMutt

Joined: July 01, 2006
KitMaker: 614 posts
Armorama: 601 posts

Posted: Saturday, September 25, 2010 - 04:13 AM UTC
Keith that Sherman variant has always fascinated me.
Terror on tracks
Tony the Mutt
Terror on tracks
Tony the Mutt


Bigrip74

Joined: February 22, 2008
KitMaker: 5,026 posts
Armorama: 1,604 posts

Posted: Saturday, September 25, 2010 - 04:24 AM UTC
Bradley, thanks for the info. back to the drawing board.
Bob
Bob
Posted: Saturday, September 25, 2010 - 08:36 AM UTC
I have completed my Sherman! First ever campaign entry and just wanted to try something simple for my first attempt. Hope you enjoy the pictures and feel free to comment, complain or send beer!
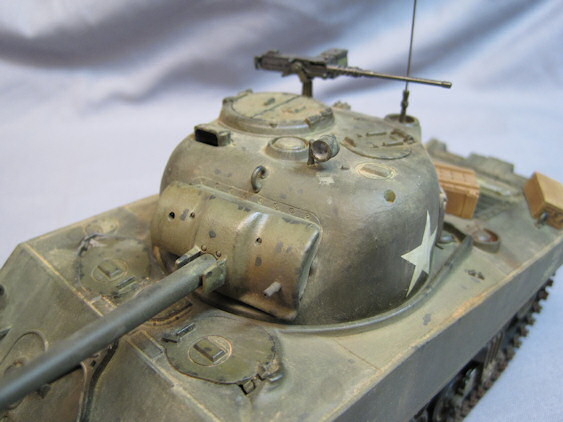
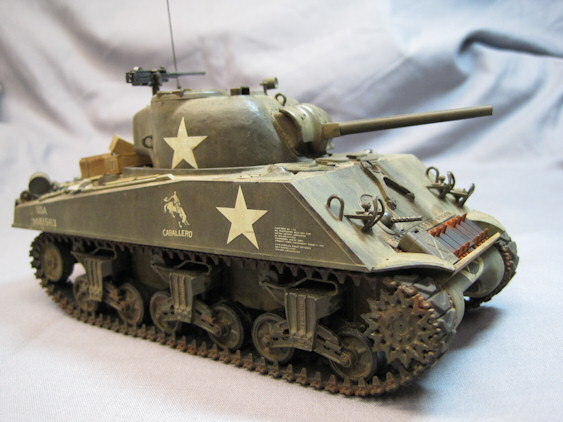
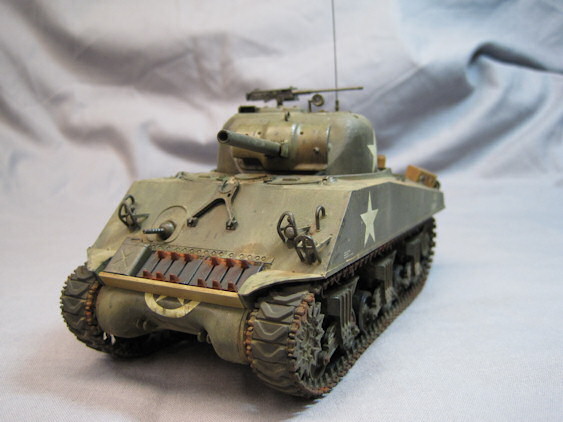
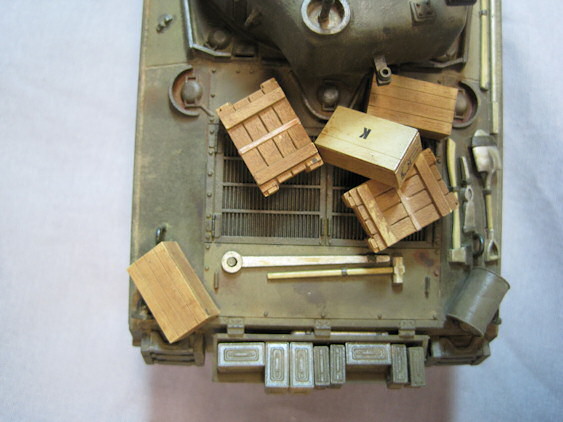
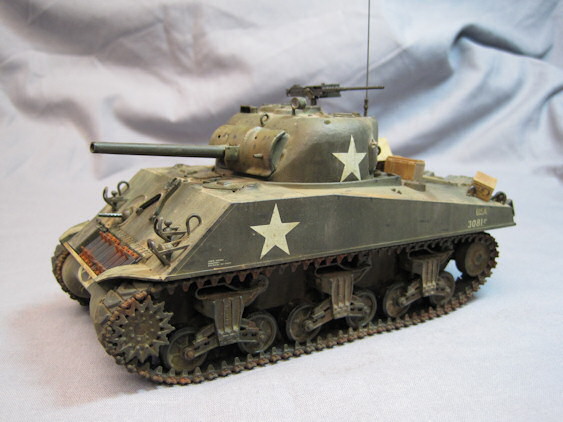


Mike


Mike

PvtMutt

Joined: July 01, 2006
KitMaker: 614 posts
Armorama: 601 posts

Posted: Saturday, September 25, 2010 - 09:27 AM UTC
First time use of DS tracks and choppin out two links was not as bad as I thought it would be. 
A picture is worth a thousand words:

Now i'll let the glue cure and test fit before painting.
Tony the Mutt

A picture is worth a thousand words:

Now i'll let the glue cure and test fit before painting.
Tony the Mutt

thebear

Joined: November 15, 2002
KitMaker: 3,960 posts
Armorama: 3,579 posts

Posted: Saturday, September 25, 2010 - 10:30 AM UTC
Hi Guys ... Tony great base color ..lookin good sir ...
Graeme ..good start ... I think I might have glued the bogey rear panels to the hull instead of the bogeys but to each his own ...I'm sure it will work just fine ..
Bob ...bummer about the turret but just think you got half an m4A3 already done ..so you'll just have to build both... Not easy to figure out these shermy thingies...
Brad ... How many M4's have you got going at once man??? They all look great... awesome work as always... The one with the resin engine deck...did you start with the M4a2 kit way back before they brought out the M4?
Keith ..two thumbs up ...Looks good but I'd love to see some close ups of the details ..looks great from here so far...
Micheal ...Nice job great paint job and nice job on the weathering ..Amazing how just a nice finish can make a great looking model ...One thing though...you better tie down that stuff on the back or they'll lose it ...
Tony ...it's always fun to shorten tracks but it's not that hard with a sharp new blade ..It's slicing the two links in half to make the joint that can be tricky ...(little secret ..if you cut off one of the two halfs ,then you only need to cut one of the opposite pads in half to join the tracks...Might not be as solid but if you don't plan to play with it in the sandbox, it should be fine..)
Rick
Graeme ..good start ... I think I might have glued the bogey rear panels to the hull instead of the bogeys but to each his own ...I'm sure it will work just fine ..
Bob ...bummer about the turret but just think you got half an m4A3 already done ..so you'll just have to build both...
 Not easy to figure out these shermy thingies...
Brad ... How many M4's have you got going at once man??? They all look great... awesome work as always... The one with the resin engine deck...did you start with the M4a2 kit way back before they brought out the M4?
Keith ..two thumbs up ...Looks good but I'd love to see some close ups of the details ..looks great from here so far...

Micheal ...Nice job great paint job and nice job on the weathering ..Amazing how just a nice finish can make a great looking model ...One thing though...you better tie down that stuff on the back or they'll lose it ...
Tony ...it's always fun to shorten tracks but it's not that hard with a sharp new blade ..It's slicing the two links in half to make the joint that can be tricky ...(little secret ..if you cut off one of the two halfs ,then you only need to cut one of the opposite pads in half to join the tracks...Might not be as solid but if you don't plan to play with it in the sandbox, it should be fine..)
Rick

PvtMutt

Joined: July 01, 2006
KitMaker: 614 posts
Armorama: 601 posts

Posted: Saturday, September 25, 2010 - 11:28 AM UTC
I don't understand what you just said Bear but these work for me. 


Now that that's done I can sleep tonight.
Tony the Mutt


Now that that's done I can sleep tonight.

Tony the Mutt


Bigrip74

Joined: February 22, 2008
KitMaker: 5,026 posts
Armorama: 1,604 posts

Posted: Saturday, September 25, 2010 - 11:51 AM UTC
@ Richard: [quote] Bob ...bummer about the turret but just think you got half an m4A3 already done ..so you'll just have to build both... Not easy to figure out these shermy thingies...[quote] I put the mess away for another day/build and opened up an Italeri M4 A3 Calliope to attempt.
@ Tony: those treads look really good, how were they to assemble?
Bob
@ Tony: those treads look really good, how were they to assemble?
Bob

JokerNinjay

Joined: August 26, 2010
KitMaker: 125 posts
Armorama: 112 posts

Posted: Saturday, September 25, 2010 - 11:53 AM UTC
Well Leo I wasn't questioning the OD I was trying to find out what color to use for the wood portions on the shovels and if you glue the attachments on before or after painting the wood and such? Thanks and hope you get back to me. 


PvtMutt

Joined: July 01, 2006
KitMaker: 614 posts
Armorama: 601 posts

Posted: Saturday, September 25, 2010 - 12:16 PM UTC
Tony: those treads look really good, how were they to assemble?
Awww it weren't a very tall step for a high stepper.
Jay there are a lot of different ways,one is to paint like a dark yellow or sand or buff or deck tan base acrylic and let it dry. Then brush on some Raw Umber or Burnt Umber or Sienna oil paint right from the tube.
Let this oil soak into the base paint for say 20 or so minutes then wipe or brush off
as much of the oil paint as you like to get the wood effect.
Hope this is of help to you
Tony the Mutt
Awww it weren't a very tall step for a high stepper.

Jay there are a lot of different ways,one is to paint like a dark yellow or sand or buff or deck tan base acrylic and let it dry. Then brush on some Raw Umber or Burnt Umber or Sienna oil paint right from the tube.
Let this oil soak into the base paint for say 20 or so minutes then wipe or brush off
as much of the oil paint as you like to get the wood effect.
Hope this is of help to you
Tony the Mutt

Posted: Saturday, September 25, 2010 - 12:22 PM UTC
Quoted Text
Micheal ...Nice job great paint job and nice job on the weathering ..Amazing how just a nice finish can make a great looking model ...One thing though...you better tie down that stuff on the back or they'll lose it ...
Rick
Rick,
I did think about doing tie downs for the cargo. The one thing that bothered me about doing it was I really was hesitant about how to do it. I guess they just tied the stuff down to anything they could. Also did the crews weld on extra holding points on their Sherman’s? That could be another option for tying down.
thebear

Joined: November 15, 2002
KitMaker: 3,960 posts
Armorama: 3,579 posts

Posted: Saturday, September 25, 2010 - 01:01 PM UTC
Tony ...errrhhh never mind ...they look great!! 
Micheal ..The crew would usually just tie everything together using the lifting hooks .light guards and handles all over the rear deck ,but I`m sure someone might have welded something back there ...they did that a lot on the sides of the turret...
Jay ...painting tools is up to you on whether or not you glue them down before or after .. I used to always paint them before but lately I`ve been gluing everything and painting afterwards...Tony`s got my method of painting tools so listen to him ..You can also paint the tools OD as well since it was very common to see .. If you decide to go that way I suggest you vary the OD color to get some contrast ...
I just glued my last pieces on my kit ...I'll let everything dry for a few days and then it's on to the painting part...Guess I should decide on my camo and decals
Rick

Micheal ..The crew would usually just tie everything together using the lifting hooks .light guards and handles all over the rear deck ,but I`m sure someone might have welded something back there ...they did that a lot on the sides of the turret...

Jay ...painting tools is up to you on whether or not you glue them down before or after .. I used to always paint them before but lately I`ve been gluing everything and painting afterwards...Tony`s got my method of painting tools so listen to him ..You can also paint the tools OD as well since it was very common to see .. If you decide to go that way I suggest you vary the OD color to get some contrast ...
I just glued my last pieces on my kit ...I'll let everything dry for a few days and then it's on to the painting part...Guess I should decide on my camo and decals

Rick

HONEYCUT

Joined: May 07, 2003
KitMaker: 4,002 posts
Armorama: 2,947 posts

Posted: Saturday, September 25, 2010 - 01:02 PM UTC
Hey Michael a nice worn dusty finish you have achieved on your M4A3 mate. The stowage as Rick has brought up has to be tied down, and also not covering the engine intake grilles on the deck. (Specific to this engine) Photos you see of stowage on these marks has it piled up and over the rear stowage rack and over the sledge hammer and track adjusting tool. It is generally piled so there is still unhindered traversal of the guntube. Much of it can be covered with a tarp or similar and lashed over and then through the lifting eyes on the rear sides and even to the taillight guards. There was probably no set method, but to still make it look 'natural' on your model I'd suggest a bit of planning and to think like the crew who have valuables amongst the items and don't want them strewn and lost  Oh, and here's a
Rick, all these Sherman pics are from the past and not in this campaign, and yes, the Formations converted a Sherman Mk. III before there was a M4 twinkle in the firelizard's eye...
Brad
 Oh, and here's a
Rick, all these Sherman pics are from the past and not in this campaign, and yes, the Formations converted a Sherman Mk. III before there was a M4 twinkle in the firelizard's eye...

Brad

JokerNinjay

Joined: August 26, 2010
KitMaker: 125 posts
Armorama: 112 posts

Posted: Saturday, September 25, 2010 - 01:11 PM UTC
Well, thanks everyone for all your help, mostly I was trying for an easier way to do the painting but like you said it probably doesn't matter. What is a more realistic look to an Okinawa Sherman regarding the dust effect or whatever else I might take into my brain on the tools or handles? Anything else that would look realistic on this type of tank that I might be forgetting just let me know. Everything is appreciated and I thank everyone for the help on this subject. 

Posted: Saturday, September 25, 2010 - 01:43 PM UTC
Quoted Text
Micheal ..The crew would usually just tie everything together using the lifting hooks .light guards and handles all over the rear deck ,but I`m sure someone might have welded something back there ...they did that a lot on the sides of the turret...
The kit came with lots of extras like packs and such. The instructions only showed them attached to the turret. I did not use them becuse there were no logical attachment points.
Quoted Text
Hey Michael a nice worn dusty finish you have achieved on your M4A3 mate. The stowage as Rick has brought up has to be tied down, and also not covering the engine intake grilles on the deck. (Specific to this engine) Photos you see of stowage on these marks has it piled up and over the rear stowage rack and over the sledge hammer and track adjusting tool. It is generally piled so there is still unhindered traversal of the guntube. Much of it can be covered with a tarp or similar and lashed over and then through the lifting eyes on the rear sides and even to the taillight guards. There was probably no set method, but to still make it look 'natural' on your model I'd suggest a bit of planning and to think like the crew who have valuables amongst the items and don't want them strewn and lost Oh, and here's a
Well I glued the storage stuff down with clear glue. I'm afraid to take the stuff off as it will probably ruin the finish. I'll leave it as is and make sure I plan things out better for the next one I build. I do have a Tasca Sherman waiting in the wings.
Thanks for the kind comments on the weathering. I used MIg pigments and really do like them alot.
Drinking that Beer now!!

Mike

HONEYCUT

Joined: May 07, 2003
KitMaker: 4,002 posts
Armorama: 2,947 posts

Posted: Saturday, September 25, 2010 - 01:46 PM UTC
Hey Jay I like to add my tools before painting. If you use a sliver of paper such as a cigarette paper you can slide this under the tool handles and paint away with a 'drop sheet' in place. There is no right or wrong way of doing it; painting before attaching or the above way are common throughout. As for the OD, the tools would have been covered with OD from the get go and especially for any field mods such as camouflage bands. There would be no removal of tools or masking to prevent their coverage in paint. BUT as far as the modeller is concerned, the bare wood finish is well liked for the fact it gives the modeller a chance to display some timber painting techiniques and gives god contrast to what is primarily an all over OD tank. Tony's method from what I have seen yields the best results. Good luck...
Brad
Brad

JokerNinjay

Joined: August 26, 2010
KitMaker: 125 posts
Armorama: 112 posts

Posted: Saturday, September 25, 2010 - 01:57 PM UTC
Well, that certainly makes sense and I'll probably go with the wood finish to kind of get an eye popper on my tank. It would look a lot better than OD on everything. Thanks for the "drop cloth" idea I would of went about my business never thinking about that. Thanks for all your help and I'll see what I can do. 


HONEYCUT

Joined: May 07, 2003
KitMaker: 4,002 posts
Armorama: 2,947 posts

Posted: Saturday, September 25, 2010 - 01:59 PM UTC
Quoted Text
The kit came with lots of extras like packs and such. The instructions only showed them attached to the turret. I did not use them becuse there were no logical attachment points.
Hey Mike the actual tank you have depicted here definitely had 2 horizontal bars welded to the turret on both sides. For reference, the highest bar on the left side was level with the top edge of the pistol port door, and the lower was level with the bottom edge of same. They ran from say 1 scale foot distance from the pistolport and look about 4' each in length?There look to stand off the hull by about 4" and the ends curve to attach to the turret and there is a centre bar welded on to join also. Next time me reckons...

Brad
Posted: Saturday, September 25, 2010 - 02:29 PM UTC
Quoted Text
Quoted Text
The kit came with lots of extras like packs and such. The instructions only showed them attached to the turret. I did not use them becuse there were no logical attachment points.
Hey Mike the actual tank you have depicted here definitely had 2 horizontal bars welded to the turret on both sides. For reference, the highest bar on the left side was level with the top edge of the pistol port door, and the lower was level with the bottom edge of same. They ran from say 1 scale foot distance from the pistolport and look about 4' each in length?There look to stand off the hull by about 4" and the ends curve to attach to the turret and there is a centre bar welded on to join also. Next time me reckons...
Brad
Wow. Wish I had known that before I painted and weathered. I would of add that feature. Funny thing was I never saw that on the limited collection of photographs I have. Certainly noted for my next build. Again thanks for the information.
Mike

vonHengest

Joined: June 29, 2010
KitMaker: 5,854 posts
Armorama: 4,817 posts

Posted: Saturday, September 25, 2010 - 06:04 PM UTC
I need some input from you guys. What are your thoughts on the Dragon #6807 M4A3 HVSS POA-CWS-H5 Flamethrower kit?

HONEYCUT

Joined: May 07, 2003
KitMaker: 4,002 posts
Armorama: 2,947 posts

Posted: Saturday, September 25, 2010 - 11:23 PM UTC
Quoted Text
I need some input from you guys. What are your thoughts on the Dragon #6807 M4A3 HVSS POA-CWS-H5 Flamethrower kit?
Hey Jeremy
Haven't built it myself, but for a good look at what it contains have a Captain's at Marcos' thread
here
Brad

HONEYCUT

Joined: May 07, 2003
KitMaker: 4,002 posts
Armorama: 2,947 posts

Posted: Saturday, September 25, 2010 - 11:46 PM UTC
Ok so here is another offering on the bench...
It is the DML Premium edition M4A3(76)W which I have embellished with after market brass and my own tweaks...
An overview. It is about 90% done as far as building is concerned. It has Aber brass and Formations tools.
It is representing an early wet stowage M4A3 76mm.

The kit guards were pants and the Aber were too flimsy. So here are my own made from brass bar.

I braved the Aber stowage rack. Like Grasshopper snatching a pebble from Master Po, I found it time to leave it and move on following the success...

The solid air intake between the hatches needed some serious reworking. I carved it back and made a new lid out of brass with small arms to show the gap between.

I tried to have a crack at scratching my own antenna mount as I needed it to bend on it's spring so I could show the aerial lashed down to the .50cal storage bracket on the turret rear. Some various wire, brass tube and a few beads later I have a rough version ready and in place.

Brad
It is the DML Premium edition M4A3(76)W which I have embellished with after market brass and my own tweaks...
An overview. It is about 90% done as far as building is concerned. It has Aber brass and Formations tools.
It is representing an early wet stowage M4A3 76mm.

The kit guards were pants and the Aber were too flimsy. So here are my own made from brass bar.

I braved the Aber stowage rack. Like Grasshopper snatching a pebble from Master Po, I found it time to leave it and move on following the success...

The solid air intake between the hatches needed some serious reworking. I carved it back and made a new lid out of brass with small arms to show the gap between.

I tried to have a crack at scratching my own antenna mount as I needed it to bend on it's spring so I could show the aerial lashed down to the .50cal storage bracket on the turret rear. Some various wire, brass tube and a few beads later I have a rough version ready and in place.

Brad
Kiwi_Modeller

Joined: August 13, 2010
KitMaker: 188 posts
Armorama: 121 posts

Posted: Sunday, September 26, 2010 - 12:20 AM UTC
hey that looks good Brad , heres mine todate i got to wait for me etch folder to turn up now so i can do the sand shields and soldier em up , damn this pe is fiddly stuff theres a few tiny little nuts for the rear hull but there so small i pick the buggas up  so they can stay off


least its 90% built , i have the base tan color on tonight and will try an get the grey on tomorrow then weather all the running gear before i get the shields on.
the lights an tools will go on last its easier.
one question what kind of dirt/dust do they have in sicily? ive never even seen pics of that area, i thought it was fairly rocky? plus im guessing at the time it might have been summer so maybe not wet mud or the likes?
cheers,
Graham
 so they can stay off


least its 90% built , i have the base tan color on tonight and will try an get the grey on tomorrow then weather all the running gear before i get the shields on.
the lights an tools will go on last its easier.
one question what kind of dirt/dust do they have in sicily? ive never even seen pics of that area, i thought it was fairly rocky? plus im guessing at the time it might have been summer so maybe not wet mud or the likes?
cheers,
Graham
 |


