Texas, United States
Joined: February 22, 2008
KitMaker: 5,026 posts
Armorama: 1,604 posts
Posted: Saturday, October 30, 2010 - 08:13 AM UTC
Hey D., I threw my M4 Calliope into the dust bin / trash can / file 13, or what ever you call it. I had the chassis assembled and the tubes installed on the turret then I knocked it off of the bookshelf when I took down the Hasagawa P3 box

to get it ready for the "Anti-Shipping campaign, and especially after my neices dog used it for a play mate

I will watch your build to see how you progress with that trackie-thingie thing.
Bob
If it aint broke dont fix it.
Quebec, Canada
Joined: November 15, 2002
KitMaker: 3,960 posts
Armorama: 3,579 posts
Posted: Saturday, October 30, 2010 - 09:36 AM UTC
Great work guys ...This campaign isn't half over and there are some great builds ...If it keeps up I might just have to build another before it's over...
AussieReg
 Associate Editor
#007
Victoria, Australia
Joined: June 09, 2009
KitMaker: 8,156 posts
Armorama: 194 posts
Posted: Saturday, October 30, 2010 - 10:19 AM UTC
Quoted Text
Hey D., I threw my M4 Calliope into the dust bin / trash can / file 13, or what ever you call it. I had the chassis assembled and the tubes installed on the turret then I knocked it off of the bookshelf when I took down the Hasagawa P3 box  to get it ready for the "Anti-Shipping campaign, and especially after my neices dog used it for a play mate
I will watch your build to see how you progress with that trackie-thingie thing.
Bob
Hey Bob, you need to get your P3 over the water, it' supposed to be Anti-Shipping and NOT Anti-Tank

I'm enjoying the build so far, there's a few spots that need attention before I get to throwing the paint at it, then it's on to the Calliope assembly

A question for those more learned that I (that means everybody here !) . . . I have a few spare track links in the kit that are meant for the side of the turret, but the Calliope stops that. I thought I might make up some racks from strip stock and stow them on either side of the hull but a quick web image search didn't bring any pics I could use. Does anybody have any pics, or any comments on me doing that ??
Cheers, D
ON the bench
Revell 1/24 '53 Corvette (building as '54)
Revell 1/24 BMW 507 Coupe and Cabrio
Italeri 1/48 Me262 B-1a/U1 Nightfighter
Monogram 1/24 '57 Chevy Nomad
Dragon 1/350 USS Frank Knox DD-742
AussieReg
 Associate Editor
#007
Victoria, Australia
Joined: June 09, 2009
KitMaker: 8,156 posts
Armorama: 194 posts
Posted: Saturday, October 30, 2010 - 06:45 PM UTC
Smee again, the annoying armour noob. I had a bit more of a play today and came up with this from a few scraps . . . .

to carry a few spare cans . . .

Now this is where I am thinking of stowing the spare tracks . . .

but the instructions seem to tell me to just glue them in place. Should I mount them in frames like the ones on the front of the tank, or how would they have been held in place here ?
Thanks in advance, D
ON the bench
Revell 1/24 '53 Corvette (building as '54)
Revell 1/24 BMW 507 Coupe and Cabrio
Italeri 1/48 Me262 B-1a/U1 Nightfighter
Monogram 1/24 '57 Chevy Nomad
Dragon 1/350 USS Frank Knox DD-742
Victoria, Australia
Joined: March 14, 2006
KitMaker: 1,973 posts
Armorama: 1,843 posts
Posted: Saturday, October 30, 2010 - 09:30 PM UTC
Hi Damian,
I can't say I've seen anything on side mounted spare tracks like that.
For M4A3's, it's normally on the turret, or in racks on the back....
Perhaps someone else can share some insight

Oddball, Turk, and Moriarity are happy to finally be in this "Mother beautiful tank".
Here they are celebrating


Keep up the great work and posts - I think this Campaign has already has a record in the number of hits for a Campaign and we're only a third of the way

Cheers,
Paul
OddBall: "It's a wasted trip baby. Nobody said nothing about locking horns with no Tigers"
KIlgore: " I love the smell of napalm in the morning. ...The smell, you know that gasoline smell, the whole hill. Smelled like... victory."
AussieReg
 Associate Editor
#007
Victoria, Australia
Joined: June 09, 2009
KitMaker: 8,156 posts
Armorama: 194 posts
Posted: Saturday, October 30, 2010 - 10:39 PM UTC
Hey Paul, Oddball says . . . . .

Your figures are superb mate !!
How were the tracks supported on the side of the Turret ? Perhaps I can replicate that on the side of the hull. This is NOT going to be a historically correct Sherman, but an intro to armor modelling for me, so I want to experiment a bit and try a few different techniques of building and weathering that don't fit with Wingy-Thingys.
Thanks for your help, D
ON the bench
Revell 1/24 '53 Corvette (building as '54)
Revell 1/24 BMW 507 Coupe and Cabrio
Italeri 1/48 Me262 B-1a/U1 Nightfighter
Monogram 1/24 '57 Chevy Nomad
Dragon 1/350 USS Frank Knox DD-742

#057
Bayern, Germany
Joined: May 11, 2010
KitMaker: 248 posts
Armorama: 119 posts
Posted: Saturday, October 30, 2010 - 10:55 PM UTC
Damian, welcome to the dark side! We have cookies! (yeah, a genuine Banksy, I went to London recently).
Did this step before you only a coupla months and let me tell you: it's nice! No sanding and repriming and sanding again deep into the night, no throwing on a paint coat on an f-15 only to discover the mother-friggin backbone seem is rearing it's ugly tail..... Just FUN! And I'll be happy to see another Wingnut (haha) crashing the party with nice clean tank builds!
Craig, I must say, your italy paint job is just wonderful. Didn't get the tones: is it dark yellow and OD? Just marvellous!
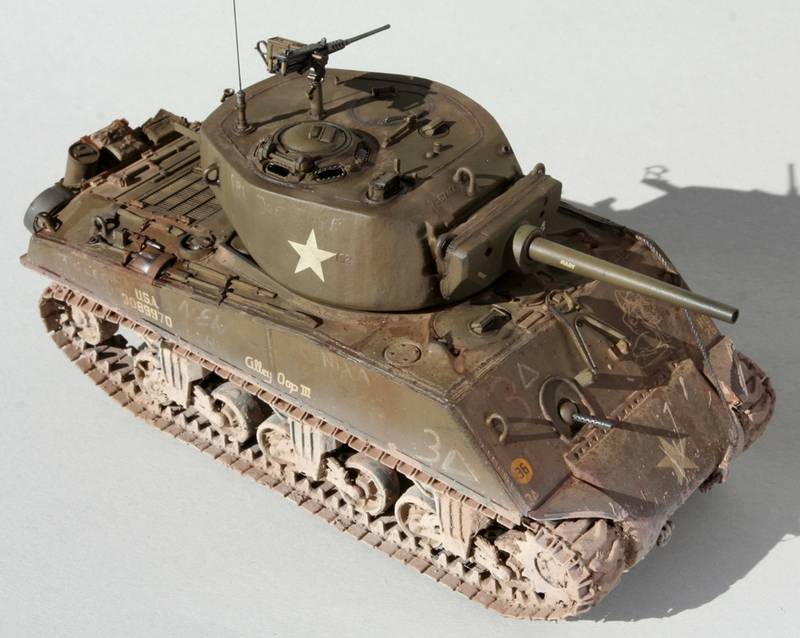
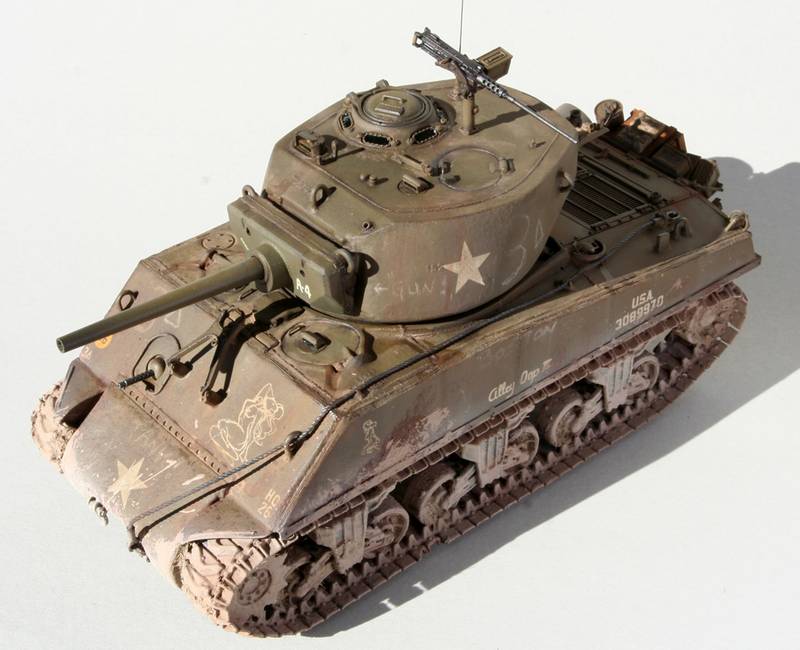
Here's my finished Jumbo:

Shot the pics in bright sunlight, I wanted the mud to look kind of frozen and the tank bathed in harsh sunlight on a cold winter day in France.
More to come.
If thou art pained by any external thing, it is not this that disturbs thee, but thy own judgment about it.
Marcus Aurelius

#057
Bayern, Germany
Joined: May 11, 2010
KitMaker: 248 posts
Armorama: 119 posts
Posted: Saturday, October 30, 2010 - 10:58 PM UTC
Paul, as always your figure painting skill just doesn't cease to stun. Really nice... It shurely will take me years of practice....sheesh...
Here another one:

If thou art pained by any external thing, it is not this that disturbs thee, but thy own judgment about it.
Marcus Aurelius

#057
Bayern, Germany
Joined: May 11, 2010
KitMaker: 248 posts
Armorama: 119 posts
Posted: Saturday, October 30, 2010 - 11:01 PM UTC
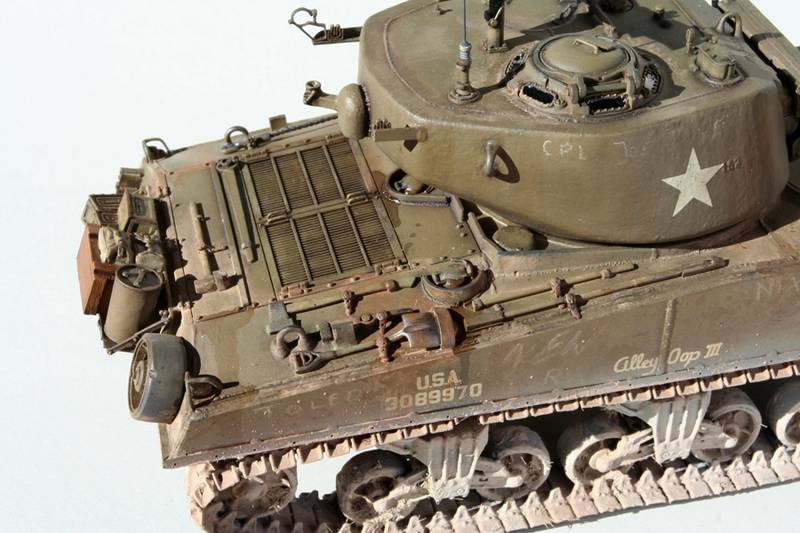
And two detail shots:

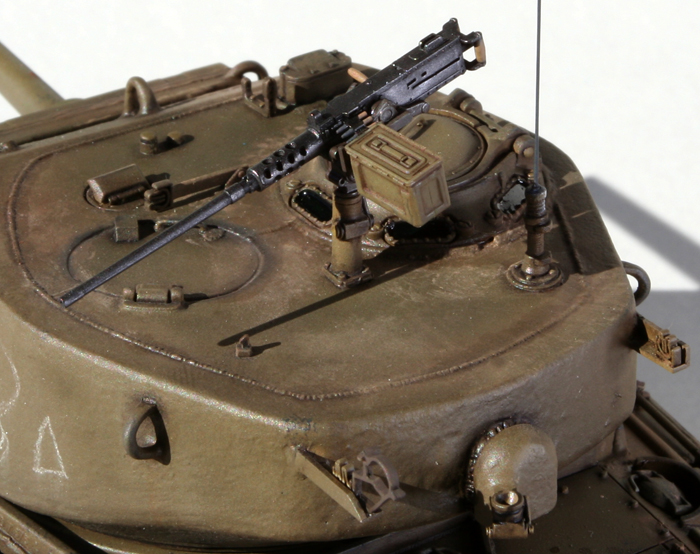
Tasca Cal50. E real gem:

Will put the Jumbo in the gallery, but this is not the last sherm I'll do for this campaign. I was thinking of a Firefly, but there already are some on the way. So maybe a pacific m4a1?
If thou art pained by any external thing, it is not this that disturbs thee, but thy own judgment about it.
Marcus Aurelius
Massachusetts, United States
Joined: August 15, 2004
KitMaker: 252 posts
Armorama: 146 posts
Posted: Sunday, October 31, 2010 - 05:03 PM UTC
Rebilda....that .50 cal looks incredible. I love the subtle paint job you did on it. Would you mind sharing what paints you used on it?
Thanks!
Brian

#057
Bayern, Germany
Joined: May 11, 2010
KitMaker: 248 posts
Armorama: 119 posts
Posted: Sunday, October 31, 2010 - 10:05 PM UTC
Well, thanks, Brian, but the Cal50 is Tasca's doing really. Strictly out of box, nothing added. You even get a small adjustable amo belt - duh!!!!
As for paints: it's what i love best. Coming from airplanes I have a knack for making it complicated. So strap in, here comes:
1 (and always!!) the angel's fluid: Tamiya rattle can primer fine. Just short blasts and VERY quick passes, dries instantly and makes for a really smooth surface
2 Vallejo OD (usually Gunze OD, this build was an experiment) in lots of thinnly sprayed patches,squiggles and spots; every patch another new mixture with dark yellow
3 a little of shading and colour modulation by mixing with black
4 clear gloss (ALLWAYS Gunze, though trying out Vallejo)
5 decals
6 clear matte(whatever you like best, still haven't found my loved one, but leaning towards Gunze or Vallejo)
7 filters, homemade (a pinhead-sized amount of oil mixed in a few drops of the appropriate thinnners) green, brown and dark brown; hatches and adjacent panels a different colour
8 pinwash (Vandyke Brown)
9 clear matte (not necessarily)
10 pigments to your liking (very few on the turret, good amount on the upper hull. lots on the lower hull)
11 rainmarks and streaks with a light beige oil colour
12 splashes and more streaks by running a brush with thinners trough the pigments and splashing thinners on
12b more pigments
13 mud on the tracks is a combination of Tamiya acrylics (flat erth and buff) with plaster, railway grass, pigments and sifted dirt
14 enjoy
If thou art pained by any external thing, it is not this that disturbs thee, but thy own judgment about it.
Marcus Aurelius
Massachusetts, United States
Joined: August 15, 2004
KitMaker: 252 posts
Armorama: 146 posts
Posted: Monday, November 01, 2010 - 11:54 AM UTC
Thanks Rebilda. Could you also share how you got that great finish on the .50 cal?
Victoria, Australia
Joined: May 07, 2003
KitMaker: 4,002 posts
Armorama: 2,947 posts
Posted: Monday, November 01, 2010 - 06:05 PM UTC
Paul such wonderful figure painting mate! You have made the film come alive that little bit more...
Damien, I'd leave the tracklinks off the side hull mate. For the turret they would have been tack welded directly to the turret surface...
Leo, really really nice finishing on your M4A3E2! The subtlety can be seen with the quality of the photography, and the effort you have put in to each step really shows...
Good stuff peoples
Brad
"There never was a good war, or a bad peace."
Benjamin Franklin
Texas, United States
Joined: February 22, 2008
KitMaker: 5,026 posts
Armorama: 1,604 posts
Posted: Monday, November 01, 2010 - 07:29 PM UTC
Paul, Animal was great in that movie (one of my favorites) I went to see it when it first came out and did not know any thing about it. Boy was I suprised they had to scrape me off of the floor. Nice figure painting BTW.
@ Rebilda: fantastic Jumbo and the paint job is also great. Thanks for your method of color.
Bob
If it aint broke dont fix it.

#057
Bayern, Germany
Joined: May 11, 2010
KitMaker: 248 posts
Armorama: 119 posts
Posted: Tuesday, November 02, 2010 - 03:22 AM UTC
Thank you all for the kind words. Really means a lot to me being a novice!!
Sorry, Brian, I misunderstood. So, now, the Cal50:
1 Tamiya Primer Grey Fine (the basis of my modeling life...)
2 Vallejo flat black (the only use besides mixing that I have for FB)
3 Mig Pigment 'Gun Metal'' and a little ground up pencil Graphite; all applied with an artist's Paper tip (looks like a pencil but made from paper, they use it so smear and rub drawing coals); really really take your time doing that and always step back and look at it if already enough; nothing looks more stupid than a glistening shiny gun, at least IMHO
4amo crate (some Lifecolor OD), directly on this coat a LIGHT pin wash with VanDyke or Burnt Umber (don't remember, but not important); be shure to trace the crevices really lightly an let the matt OD soak up the wash, repeat when dry if necessary
5 wood handles with Panzer Aces 'Old Wood', light pin wash on that with some reddish brown (Abt. 502 Shaddow brown i think)
6 amo belt: feed chain flat black, again a LITTLE graphite, bullets Vallejo German Grey, Casing Orange Brown (even more childish than shiny gun: copper-metallic-bling-bling on MG amo casing; at least to me)
7 enjoy
If thou art pained by any external thing, it is not this that disturbs thee, but thy own judgment about it.
Marcus Aurelius
United States
Joined: January 07, 2006
KitMaker: 452 posts
Armorama: 271 posts
Posted: Tuesday, November 02, 2010 - 04:20 AM UTC
Leo, what a fantastic build! Between this and your Pacific Campaign Sherman, I'm a real fan of your work. Thanks for the helpful tips, too!
Nevada, United States
Joined: December 21, 2008
KitMaker: 1,109 posts
Armorama: 1,095 posts
Posted: Tuesday, November 02, 2010 - 05:35 AM UTC
Lasci la pistola. Porti le cannoli.
Utrecht, Netherlands
Joined: December 14, 2006
KitMaker: 2,679 posts
Armorama: 313 posts
Posted: Wednesday, November 03, 2010 - 08:39 AM UTC
Damn nice figures paul,
Leo, I love you Jumbo, thanks for sharing you method with us.
here is a small update:
I've tried something new. To make a "wet" tank like after a short rain period


Martin
Pennsylvania, United States
Joined: March 01, 2006
KitMaker: 358 posts
Armorama: 304 posts
Posted: Wednesday, November 03, 2010 - 09:30 AM UTC
Heres my start to Dragons 105 kit


My other vehicle is a Stryker
Texas, United States
Joined: June 29, 2010
KitMaker: 5,854 posts
Armorama: 4,817 posts
Posted: Wednesday, November 03, 2010 - 04:47 PM UTC
Great stuff guys!!
Martin: I'm digging the freshly rained on look you have going on there, very cool!
Wayne: Wow, that's one fast start!
Victoria, Australia
Joined: March 14, 2006
KitMaker: 1,973 posts
Armorama: 1,843 posts
Posted: Wednesday, November 03, 2010 - 10:37 PM UTC
Oh Dear Team !!
Look at this from Tasca !!
 Jumbo M4A3E2 Sherman
 Why Oh why does this happen when ever I get a resin conversion


I've preordered !!
Cheers
Paul
OddBall: "It's a wasted trip baby. Nobody said nothing about locking horns with no Tigers"
KIlgore: " I love the smell of napalm in the morning. ...The smell, you know that gasoline smell, the whole hill. Smelled like... victory."
Hunedoara, Romania
Joined: May 06, 2008
KitMaker: 354 posts
Armorama: 343 posts
Posted: Wednesday, November 03, 2010 - 11:38 PM UTC
Hi to all!
I want to do a british Sherman MK III,"SHEYK",in Italy,for another Campaign-Blitzkrieg 3-Italy.Can someone help me with some pictures?
Thanks in advance!
Dani

Victoria, Australia
Joined: May 07, 2003
KitMaker: 4,002 posts
Armorama: 2,947 posts
Posted: Thursday, November 04, 2010 - 12:35 AM UTC
Hey Martin
The rain streks is an interesting attempt! You are much braver than me for attempting it... That said I think you have achieved a pretty good result.
This would also mean the dust would run instreaks also, and would probably look a dark brown until dry later?
This could be a good opportunity to try and have some dust on the numbers, and have the water streaks run though them leaving clear lines?
Brad
"There never was a good war, or a bad peace."
Benjamin Franklin

#041
Kobenhavn, Denmark
Joined: July 20, 2006
KitMaker: 10,069 posts
Armorama: 4,677 posts
Posted: Thursday, November 04, 2010 - 02:21 AM UTC
Very nice rain finish, Martin. Could you explain your process for this effect. Is it just some painting with a clear gloss varnish?
Love the Jumbo, Leo. Very nice weathering!
Campaign'oholic - 252+ campaigns completed
Massachusetts, United States
Joined: August 15, 2004
KitMaker: 252 posts
Armorama: 146 posts
Posted: Friday, November 05, 2010 - 12:50 PM UTC
Thanks Rebilda.....can't wait to try it out.
Brian
 to get it ready for the "Anti-Shipping campaign, and especially after my neices dog used it for a play mate


 to get it ready for the "Anti-Shipping campaign, and especially after my neices dog used it for a play mate


to get it ready for the "Anti-Shipping campaign, and especially after my neices dog used it for a play mate


