@Bill
The build is pretty straight forward. I've done some older Pz III Imperial Series kits and this is light years ahead. No flash and minimal clean up on the wheels and other parts. With the upper hull being in three pieces and the two fenders getting it all to line up straight takes some time and a little bit of patience. Thanks for the comments!
Campaigns
Where Armorama group builds can be discussed, organized, and updates posted.
Hosted by Darren Baker, Richard S.
Tank Destroyer/SPG Campaign
BigSmitty
Minnesota, United States
Joined: October 01, 2008
KitMaker: 597 posts
Armorama: 439 posts
Joined: October 01, 2008
KitMaker: 597 posts
Armorama: 439 posts
Posted: Sunday, September 09, 2012 - 04:15 AM UTC
retiredyank
Arkansas, United States
Joined: June 29, 2009
KitMaker: 11,610 posts
Armorama: 7,843 posts
Joined: June 29, 2009
KitMaker: 11,610 posts
Armorama: 7,843 posts
Posted: Sunday, September 09, 2012 - 10:02 AM UTC
I have added a steel filter to give the paint a worn look. I may appear that I applied too much, but the "dust" filter will tone it down. I have also covered the canopy with tissue. I will finish the gun, tomorrow. Hopefully, have the base kit build done by Wednesday. And, a little surprise at the end.
I have also made some stowage, but will have to pick up some thinner wire bits to attach it.
Almost forgot; the stowage as it stands:
I have also made some stowage, but will have to pick up some thinner wire bits to attach it.
Almost forgot; the stowage as it stands:
Tojo72
North Carolina, United States
Joined: June 06, 2006
KitMaker: 4,691 posts
Armorama: 3,509 posts
Joined: June 06, 2006
KitMaker: 4,691 posts
Armorama: 3,509 posts
Posted: Sunday, September 09, 2012 - 11:40 AM UTC
Hi Matt,I never heard of a "steel wash" but it looks effective,I usually dry brush steel paint to show wear,but I might have to try your method.How to do it ?
retiredyank
Arkansas, United States
Joined: June 29, 2009
KitMaker: 11,610 posts
Armorama: 7,843 posts
Joined: June 29, 2009
KitMaker: 11,610 posts
Armorama: 7,843 posts
Posted: Sunday, September 09, 2012 - 11:56 AM UTC
Anthony: I thinned MM Steel enamel about 10:1 and sprayed using a large tip from about a foot away. I'll be dry brushing steel and red oxide to show more worn areas. I happened upon this technique from a True earth review.
toinou
France
Joined: July 21, 2010
KitMaker: 38 posts
Armorama: 41 posts
Joined: July 21, 2010
KitMaker: 38 posts
Armorama: 41 posts
Posted: Wednesday, September 12, 2012 - 11:49 AM UTC
Hi guys,
I post one of my lav1st model, i m steel working on but hope u like the results
http://m1115.photobucket.com/albumview/albums/toinou4/DSC038533.jpg.html?o=4&newest=1
http://m1115.photobucket.com/albumview/albums/toinou4/DSC038623.jpg.html?o=3&newest=1
http://m1115.photobucket.com/albumview/albums/toinou4/DSC038573.jpg.html?o=0&newest=1
kruppw
Texas, United States
Joined: March 17, 2006
KitMaker: 1,117 posts
Armorama: 1,115 posts
Joined: March 17, 2006
KitMaker: 1,117 posts
Armorama: 1,115 posts
Posted: Wednesday, September 12, 2012 - 12:06 PM UTC
Thanks guys for the great comments so far, it’s been a real joy to paint this model.
Here is my latest installment, almost finished with everything. Just need to finish up the tracks which I’m currently assembling right now and I can call it done.
JediWookie
South Australia, Australia
Joined: November 26, 2011
KitMaker: 113 posts
Armorama: 79 posts
Joined: November 26, 2011
KitMaker: 113 posts
Armorama: 79 posts
Posted: Wednesday, September 12, 2012 - 07:17 PM UTC
Everyones builds are looking great.
I have finished my Jagdtiger , as a new-bee i have a lot to learn. The build went together fairly easy but as usual i had problems with getting the colors correct.
I used a sand color instead of Dark Yellow as the base color, i thought it would look OK but it was to light.
I tried some weathering for the first time with mixed results but i now have a better idea how to approach my next build. I am fairly happy with the end result but a lot of improvement is needed.
Gary
SaxonTheShiba
United States
Joined: February 01, 2009
KitMaker: 1,233 posts
Armorama: 557 posts
Joined: February 01, 2009
KitMaker: 1,233 posts
Armorama: 557 posts
Posted: Friday, September 14, 2012 - 11:34 AM UTC
Wow....great looking builds in this campaign! I am going to get into the arena with a 1/35th scale Trumpeter M-1134 TOW Stryker since I love wheeled vehicles.....especially wheeled tank killers.
Regards, Ian
Regards, Ian
kruppw
Texas, United States
Joined: March 17, 2006
KitMaker: 1,117 posts
Armorama: 1,115 posts
Joined: March 17, 2006
KitMaker: 1,117 posts
Armorama: 1,115 posts
Posted: Saturday, September 15, 2012 - 05:04 PM UTC
Well I’m calling this one done and have even constructed a simple base for the tank to sit on. Hope you all like, this kit was a real joy to build and something unique for my collection.
Posted: Sunday, September 16, 2012 - 03:50 PM UTC
I'm building an early US Army M966 TOW Missile system carrier. This image is the inspiration for my kitbash build:
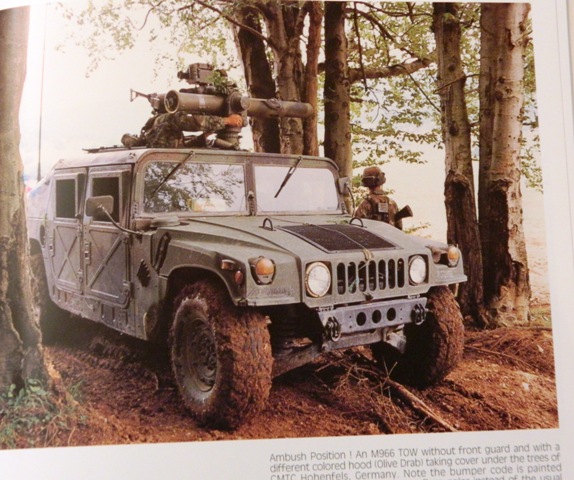
The photo is from Verlinden Productions book Warmachines No. 15 3/325 ABCT Airborne Battalion Combat Team "Blue Falcons" in action.
Several things appeal to me about the vehicle in this image.
1. All green engine hood (bonnet as some call it).
2. Early style side mirrors
3. Early style M249 SAW with 'skeleton' rear stock.
4. Secondary weapon mounted with the TOW system.
The model build will be a kitbash of the following:
Base kit- Tamiya M1046 TOW Missile Carrier
Parts from-
a. Tamiya M1025 Early Armored Doors
b. M249 from Tamiya Modern U.S. Accessory Set
c. Secondary weapon mount from Academy M1025
d. I'm pondering using an EDUARD M1046 PE Set but am not
sure if I want to go that deep into the project.
I will have some work to do to figure out how to mount the secondary weapon system on the turret ring. Unfortunately, I don't have a completely clear photo of the way it is mounted. The book has a photo of TOW Carriers with M60's mounted also, I could decide to use that instead.
I'm going to start a WIP thread in the 'Armor' section of the website and will post back here periodically.
PantherF
Indiana, United States
Joined: June 10, 2005
KitMaker: 6,188 posts
Armorama: 5,960 posts
Joined: June 10, 2005
KitMaker: 6,188 posts
Armorama: 5,960 posts
Posted: Sunday, September 16, 2012 - 09:58 PM UTC
What a neat idea for this Camapaign! Never would have thought outside the box like this and using that vehicle.
This should be a good one to learn from too.
~ Jeff
This should be a good one to learn from too.
~ Jeff
BigSmitty
Minnesota, United States
Joined: October 01, 2008
KitMaker: 597 posts
Armorama: 439 posts
Joined: October 01, 2008
KitMaker: 597 posts
Armorama: 439 posts
Posted: Monday, September 17, 2012 - 03:26 PM UTC
StuG update time once again. Worked almost 70 hours last week (Mon-Fri) and spent the weekend "up north" away from everything; a good little break. The progress so far:
Wheels are pressed on just to make sure it sits level. The roof on the casemate and the commander's cupola are both dry fit. The hardest part is going to be getting the breech assembly inside and then the gun through the outside. I will probably be snipping away and sliding the breech assembly in from the front and gluing the gun in place.
I also dug this out of my top shelf (it's where my aftermarket parts go to die peacefully) and figured I'd use it for the crew:
I got this used for $5.00 at a swap meet I think. Somebody had already started painting (badly I might add) the body of the standing tanker. A quick dip in acetone and I got most of the paint off (I'm guessing acrylic since it came off pretty easy with some scrubbing with an old toothbrush). I have a couple of options on how to pose them. I could go with the standard box art:
Or I could use them to portray an action, such as handing down sausage and bread to the two remaining crew members in the StuG:
Not sure how I'll work that out, maybe just a pair of hands coming up from the hatches for a bit of humor...
I like the M966 build for the campaign. Should be a really nice change of pace from the tracked big gun vehicles we've seen so far, Brent!
corsair924
New Hampshire, United States
Joined: August 11, 2008
KitMaker: 403 posts
Armorama: 322 posts
Joined: August 11, 2008
KitMaker: 403 posts
Armorama: 322 posts
Posted: Wednesday, September 19, 2012 - 02:06 PM UTC
Alright, so after some kitbashing I found myself with a spare Panther II hull (oh what a dilemma!)
I was interested in copying an idea I had seen previously posted elsewhere, a JadgPather II mounting an 88mm L100 gun.
So my ingredient list includes
the Panther II hull,
properly dressed,
aftermarket barrel intended for the E-75,
various accessories found in the Flakpanther kit (thank you very much Cyberhobby)
Mix them together:
add a couple more ingredients like a spare copula and a long rangefinder,
and I'm liking the outcome so far.
erhntly
Izmir, Turkey / Türkçe
Joined: June 11, 2004
KitMaker: 1,426 posts
Armorama: 464 posts
Joined: June 11, 2004
KitMaker: 1,426 posts
Armorama: 464 posts
Posted: Saturday, September 22, 2012 - 02:47 AM UTC
Hi dear friends,
I'm building a Jagdtiger for this campaign. Dragon 1/72 scale Jagdtiger .
erhntly
Izmir, Turkey / Türkçe
Joined: June 11, 2004
KitMaker: 1,426 posts
Armorama: 464 posts
Joined: June 11, 2004
KitMaker: 1,426 posts
Armorama: 464 posts
Posted: Saturday, September 22, 2012 - 02:53 AM UTC
Some photo about Step by step building..
I think this camouflage...
retiredyank
Arkansas, United States
Joined: June 29, 2009
KitMaker: 11,610 posts
Armorama: 7,843 posts
Joined: June 29, 2009
KitMaker: 11,610 posts
Armorama: 7,843 posts
Posted: Saturday, September 22, 2012 - 08:16 AM UTC
Finally got back to this one. Added some rust pigment and what passes for red oxide. I'll go ahead and apply the filter either today or tomorrow.
retiredyank
Arkansas, United States
Joined: June 29, 2009
KitMaker: 11,610 posts
Armorama: 7,843 posts
Joined: June 29, 2009
KitMaker: 11,610 posts
Armorama: 7,843 posts
Posted: Saturday, September 22, 2012 - 12:09 PM UTC
I have applied the filter and done some more weathering on the front. Tomorrow, I will apply more weathering to the entire kit. I may have to remove the dash to paint it.
WARDUKWNZ
Auckland, New Zealand
Joined: June 01, 2011
KitMaker: 1,716 posts
Armorama: 1,638 posts
Joined: June 01, 2011
KitMaker: 1,716 posts
Armorama: 1,638 posts
Posted: Saturday, September 22, 2012 - 01:50 PM UTC
Beautiful work so far Matt,,,super clean and man this is gonna look seriously good when its done ..smooth as hell paint to man
Phill
Phill
PantherF
Indiana, United States
Joined: June 10, 2005
KitMaker: 6,188 posts
Armorama: 5,960 posts
Joined: June 10, 2005
KitMaker: 6,188 posts
Armorama: 5,960 posts
Posted: Sunday, September 23, 2012 - 12:25 AM UTC
Lots of good work going on here as well and Erhan, I like the camo pattern you have selected. Those 1/72 kits are starting to become more attractive to me these days... especially with the DS tracks!
Oh yeah, and hang in there Matt and take it easy too! Working 70 hours is a serious thing and we must rest up before working on a model!
~ Jeff
Oh yeah, and hang in there Matt and take it easy too! Working 70 hours is a serious thing and we must rest up before working on a model!
~ Jeff
erhntly
Izmir, Turkey / Türkçe
Joined: June 11, 2004
KitMaker: 1,426 posts
Armorama: 464 posts
Joined: June 11, 2004
KitMaker: 1,426 posts
Armorama: 464 posts
Posted: Sunday, September 23, 2012 - 10:16 AM UTC
Quoted Text
Lots of good work going on here as well and Erhan, I like the camo pattern you have selected. Those 1/72 kits are starting to become more attractive to me these days... especially with the DS tracks!
..............
~ Jeff
Hi Jeff, DS tracks and Braille Scale.. good idea... You can build only Dragon
Cheers
robw_uk
England - North East, United Kingdom
Joined: June 22, 2010
KitMaker: 1,224 posts
Armorama: 1,207 posts
Joined: June 22, 2010
KitMaker: 1,224 posts
Armorama: 1,207 posts
Posted: Sunday, September 23, 2012 - 06:47 PM UTC
@Matt. Love the demag and Pak 38, have the kit to build. Is this oob or did you have the dragon pe set? Any thing I should watch out for when I build mine?
SaxonTheShiba
United States
Joined: February 01, 2009
KitMaker: 1,233 posts
Armorama: 557 posts
Joined: February 01, 2009
KitMaker: 1,233 posts
Armorama: 557 posts
Posted: Monday, September 24, 2012 - 06:33 AM UTC
Well, I began work on my Trumpeter M-1134 TOW-STRYKER. A trouble-free build so far although Trumpeter has several errors in the instruction sheet regarding the part numbers. Nonetheless, it is going well.
Best wishes, Ian
Best wishes, Ian
PantherF
Indiana, United States
Joined: June 10, 2005
KitMaker: 6,188 posts
Armorama: 5,960 posts
Joined: June 10, 2005
KitMaker: 6,188 posts
Armorama: 5,960 posts
Posted: Monday, September 24, 2012 - 11:12 PM UTC
That looks good Ian. I need to get a Stryker someday to build.
~ Jeff
~ Jeff
SaxonTheShiba
United States
Joined: February 01, 2009
KitMaker: 1,233 posts
Armorama: 557 posts
Joined: February 01, 2009
KitMaker: 1,233 posts
Armorama: 557 posts
Posted: Monday, September 24, 2012 - 11:26 PM UTC
Thanks Jeff! They are fun kits and there are so many different variants too which makes it even better. They are really neat vehicles.
Best wishes , Ian
Best wishes , Ian
Posted: Tuesday, September 25, 2012 - 09:17 PM UTC
Some update pics,