Almost ready for paint.....
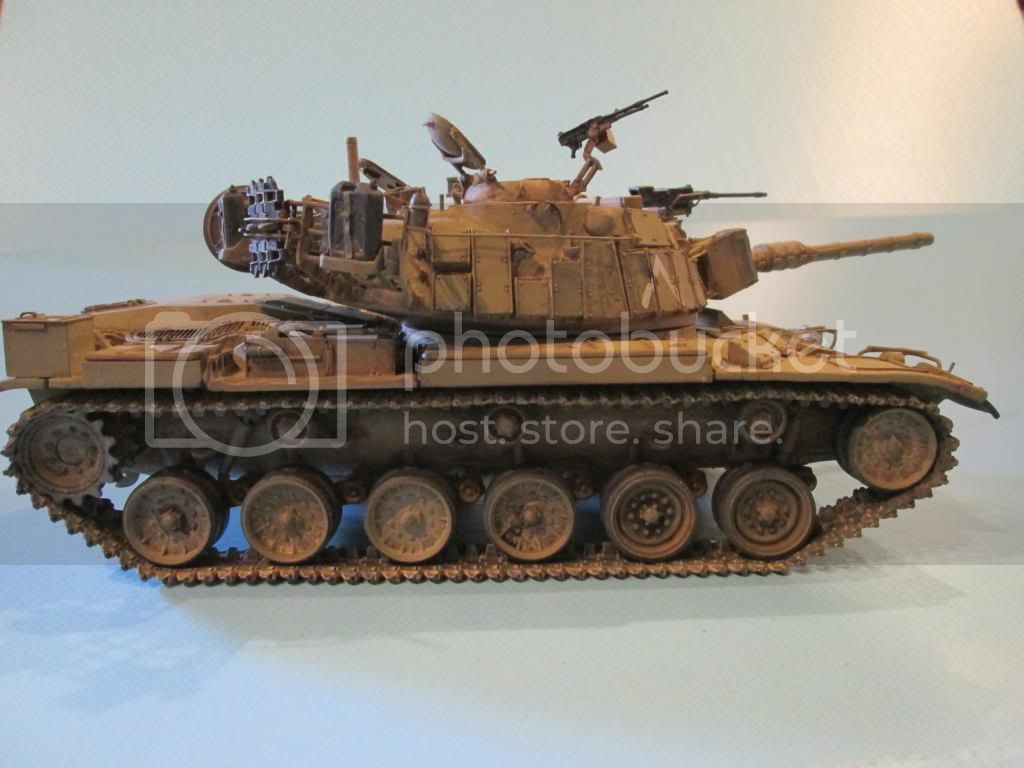
This is the Legends 6-MEM conversion on an old Tamiya (or maybe Academy, I forgot) M60 that I did OOB a number of years ago. Road wheels are Italeri, various bits from the spares box, substituted for short-shots or very badly warped parts in the Legends kit. I also replaced some of the etch with plastic where I felt the etch parts were under-scale (too thin) or too flimsy to work with, mainly in the turret basket. I also scratched the spare track hanger on the basket since I couldn't get the Legends part out of its casting block without breaking it. Comments always welcomed!
I'm already drooling over the sprue shots of Academy's -6 Gal-Batash.....
Constructive Feedback
For in-progress or completed build photos. Give and get contructive feedback!
Hosted by Darren Baker, Dave O'Meara
Magach6- MEM
rfbaer
Texas, United States
Joined: June 12, 2007
KitMaker: 1,866 posts
Armorama: 1,696 posts
Joined: June 12, 2007
KitMaker: 1,866 posts
Armorama: 1,696 posts
Posted: Thursday, November 07, 2013 - 09:54 AM UTC
Anatoli
United States
Joined: September 27, 2012
KitMaker: 85 posts
Armorama: 85 posts
Joined: September 27, 2012
KitMaker: 85 posts
Armorama: 85 posts
Posted: Thursday, November 07, 2013 - 11:52 AM UTC
Could you link some of those sprue shots?
rfbaer
Texas, United States
Joined: June 12, 2007
KitMaker: 1,866 posts
Armorama: 1,696 posts
Joined: June 12, 2007
KitMaker: 1,866 posts
Armorama: 1,696 posts
Posted: Thursday, November 07, 2013 - 04:44 PM UTC
Anatoli
United States
Joined: September 27, 2012
KitMaker: 85 posts
Armorama: 85 posts
Joined: September 27, 2012
KitMaker: 85 posts
Armorama: 85 posts
Posted: Thursday, November 07, 2013 - 05:18 PM UTC
Looks like Academy did their research on this one. The new tool sprockets, the BCF fire extinguisher, the air cleaner shovel, spare oil box, ammunition readiness boxes, the wind sensor, and finally a correct GPS are nice. On the other hand, there's the lack of anti-skid, and it looks like the old kit tracks are still being used. The TC's FN MAG also needs to be reworked. Otherwise, it's an awesome release that's been a looong time coming.
rfbaer
Texas, United States
Joined: June 12, 2007
KitMaker: 1,866 posts
Armorama: 1,696 posts
Joined: June 12, 2007
KitMaker: 1,866 posts
Armorama: 1,696 posts
Posted: Friday, November 08, 2013 - 04:02 AM UTC
Agreed. The inside of the T/C's and loader's hatches also look pretty nice. I don't mind doing my own anti-slip either.
If Academy were to use a material similar to what Tamiya now uses for the tracks, they might even be usable, but I seriously doubt it. Thinking, though, I do have a set of Friuls in the stash. I also hear about people canning the 1-piece tracks Meng supplies in the Merkave3 with the mine roller, nicely done, but not being used by quite a few since they're not "indies". I'll probably try and score a couple sets of those; same thing, and should be easy enough to shorten to fit a Magach.
Back on topic, I shot primer last night, but still have to examine everything for needed repair of faults/boo-boos/goofs before I get any color on. I also added the wire hoop for the mantlet MG casing bag. I paln to display this one parked on tarmac, no stowage, closed ammo cans, antenna up.
rfbaer
Texas, United States
Joined: June 12, 2007
KitMaker: 1,866 posts
Armorama: 1,696 posts
Joined: June 12, 2007
KitMaker: 1,866 posts
Armorama: 1,696 posts
Posted: Saturday, November 09, 2013 - 04:54 AM UTC
BBD468
Texas, United States
Joined: March 08, 2010
KitMaker: 2,465 posts
Armorama: 2,383 posts
Joined: March 08, 2010
KitMaker: 2,465 posts
Armorama: 2,383 posts
Posted: Thursday, November 14, 2013 - 05:13 PM UTC
Lookin great brother. Work it Russ, WORK IT!!
rfbaer
Texas, United States
Joined: June 12, 2007
KitMaker: 1,866 posts
Armorama: 1,696 posts
Joined: June 12, 2007
KitMaker: 1,866 posts
Armorama: 1,696 posts
Posted: Friday, November 15, 2013 - 04:02 AM UTC
Thanks, Gary.
I shot gloss this morning before I left for work, next steps are decals, a pin wash and detail painting.
I do not plan to use an overall wash on this one as I really like the base color. I may shade some of the recessed and semi-hidden areas just to create some depth, but that'll be about it.
I shot gloss this morning before I left for work, next steps are decals, a pin wash and detail painting.
I do not plan to use an overall wash on this one as I really like the base color. I may shade some of the recessed and semi-hidden areas just to create some depth, but that'll be about it.
Armored76
Bayern, Germany
Joined: September 30, 2013
KitMaker: 1,615 posts
Armorama: 1,500 posts
Joined: September 30, 2013
KitMaker: 1,615 posts
Armorama: 1,500 posts
Posted: Saturday, November 16, 2013 - 04:22 AM UTC
Looks great so far, Russel! The only thing is the green... I'm building one of these myself, right now (Italeri's one) and did some reading on the colors. Most sources say green is a no-no, while Humbrol 87 (sand) is the one to use here. Did you have another source on this, except for the box art?
rfbaer
Texas, United States
Joined: June 12, 2007
KitMaker: 1,866 posts
Armorama: 1,696 posts
Joined: June 12, 2007
KitMaker: 1,866 posts
Armorama: 1,696 posts
Posted: Monday, November 18, 2013 - 04:17 AM UTC
Thanks Cristian.
The color reference came mostly from the Desert Eagle Book on the -6Gal and a couple of Concord books. Granted that right now it looks too green, but after dusting with dry pigments, it'll get more tan. Plus, I've used tans before and they work nicely for right around the Peace for Galilee operation but the color seems to have gotten quite a bit more "greenish" after that, and I'm depicting a tank from that later period. I'll be using the "digital" unit numbers also.
Re. your Magach: Italeri/Esci kitted kind of a mixture of features. The easiest way to make it more accurate is to use a non-shrouded main barrel, as the shrouded barrel was used concurrently with the "Gal" fire control system. This upgrade also included the enlarged turret basket. Alternately, the M60A3-based Magachs used that model's original shrouded barrel and the original US turret basket, with all the -A3 fire control systems. Additionally, the -Gal upgrade included steel, M48-style road wheels on active unit tanks. Training units commonly retained the aluminum wheels. This is all from the Desert Eagle book mentioned above, and backed up by various other references. Of course, as with most things Israeli, I'm told there are exceptions.
You have a very good start on your Magach, keep going!
Cheers!
rfbaer
Texas, United States
Joined: June 12, 2007
KitMaker: 1,866 posts
Armorama: 1,696 posts
Joined: June 12, 2007
KitMaker: 1,866 posts
Armorama: 1,696 posts
Posted: Monday, December 09, 2013 - 04:54 AM UTC
Well, bad weather equals bench time, good for me. Decals on and sealed, detail painting mostle done, wash on. I'm starting to see the light at the end of the tunnel on this one, finally.
I wanted to give the impression that some of the Blazer packs had been replaces, so they got a quick, light coat of different Vallejo greenish-tan and then a light scrub, for visual interest and to try and give a little "provenance" or back-story to this build. I then hand-painted the lost portion of the chevrons. Markings are from various kit decal sheets and Echelon.
The "Yanush stripe" was done with acrylic and then partially removed, also to give an impression of age. I'm starting an M113 Fitter and plan to display the two on tarmac, as if the Magach is the recent beneficiary of some much-needed work.
I am very much impressed with the level of detail on the Legends parts, very visible with a light wash. I also have to say the skill involved in the making of the masters had to have been phenomenal. If only the casting quality was similar....
Next will be dry pigments, for dust effects and to put a little tan tint on everything.
Thanks, for looking, as always!
Zhaezzy
Pennsylvania, United States
Joined: November 11, 2013
KitMaker: 14 posts
Armorama: 10 posts
Joined: November 11, 2013
KitMaker: 14 posts
Armorama: 10 posts
Posted: Monday, December 09, 2013 - 02:10 PM UTC
Looking good I think Academy makes a kit already like that now. I was thinking of getting it.
rfbaer
Texas, United States
Joined: June 12, 2007
KitMaker: 1,866 posts
Armorama: 1,696 posts
Joined: June 12, 2007
KitMaker: 1,866 posts
Armorama: 1,696 posts
Posted: Tuesday, December 10, 2013 - 03:56 AM UTC
Thanks.
Academy currently has a Magach6, sort of a mixed bag with features from a -6 and -6Gal, but not accurate for either out of the box. They have a -6Gal Batash on the way that looks very good, should have accurate details as kitted. I'll be purchasing that one as soon as I can get my grubby paws on it.
rfbaer
Texas, United States
Joined: June 12, 2007
KitMaker: 1,866 posts
Armorama: 1,696 posts
Joined: June 12, 2007
KitMaker: 1,866 posts
Armorama: 1,696 posts
Posted: Monday, December 16, 2013 - 08:01 AM UTC
Lateral-G
United States
Joined: November 25, 2007
KitMaker: 96 posts
Armorama: 89 posts
Joined: November 25, 2007
KitMaker: 96 posts
Armorama: 89 posts
Posted: Monday, December 16, 2013 - 01:09 PM UTC
Very nice. I like it!
rfbaer
Texas, United States
Joined: June 12, 2007
KitMaker: 1,866 posts
Armorama: 1,696 posts
Joined: June 12, 2007
KitMaker: 1,866 posts
Armorama: 1,696 posts
Posted: Tuesday, December 17, 2013 - 06:46 AM UTC
Thanks!
Maki
Senior Editor
Croatia Hrvatska
Joined: February 13, 2002
KitMaker: 5,579 posts
Armorama: 2,988 posts
Joined: February 13, 2002
KitMaker: 5,579 posts
Armorama: 2,988 posts
Posted: Tuesday, December 17, 2013 - 06:51 AM UTC
Well done. The color looks really good and I love the weathering. Keep us posted on the progress.
Mario
Mario
rfbaer
Texas, United States
Joined: June 12, 2007
KitMaker: 1,866 posts
Armorama: 1,696 posts
Joined: June 12, 2007
KitMaker: 1,866 posts
Armorama: 1,696 posts
Posted: Tuesday, December 17, 2013 - 07:20 AM UTC
Thank you, sir. Will do!
rfbaer
Texas, United States
Joined: June 12, 2007
KitMaker: 1,866 posts
Armorama: 1,696 posts
Joined: June 12, 2007
KitMaker: 1,866 posts
Armorama: 1,696 posts
Posted: Friday, December 20, 2013 - 04:01 AM UTC
I have a little more with pigments to report. The whole thing got a shot of clear flat, then the areas that needed lightening and more accumulation got a second application of a slightly lightened pigment. I still have some staining to add, than some cleanup in high-traffic areas, but it's coming along. Thanks for looking, comments always welcomed!
rfbaer
Texas, United States
Joined: June 12, 2007
KitMaker: 1,866 posts
Armorama: 1,696 posts
Joined: June 12, 2007
KitMaker: 1,866 posts
Armorama: 1,696 posts
Posted: Monday, December 23, 2013 - 07:00 AM UTC