

1⁄35Realistic Tarps!
69
Comments
Washing
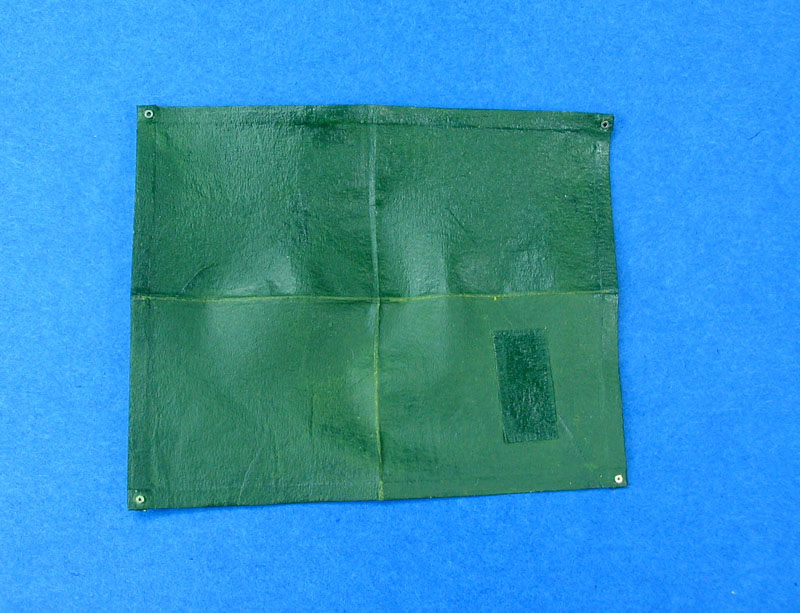
Now lighten some of your 1:1 mix with some XF-60 Dark Yellow (Do not use white!), mix with water 1:9 and paint some the squares formed to show areas of more exposure (Photo 13). Remember these exposed panels will be next to each other, not diagonally opposite. With a thin wash of straight XF-60 (again 1:9) gently highlight each of the RAISED folds (Photo 14).Fitting
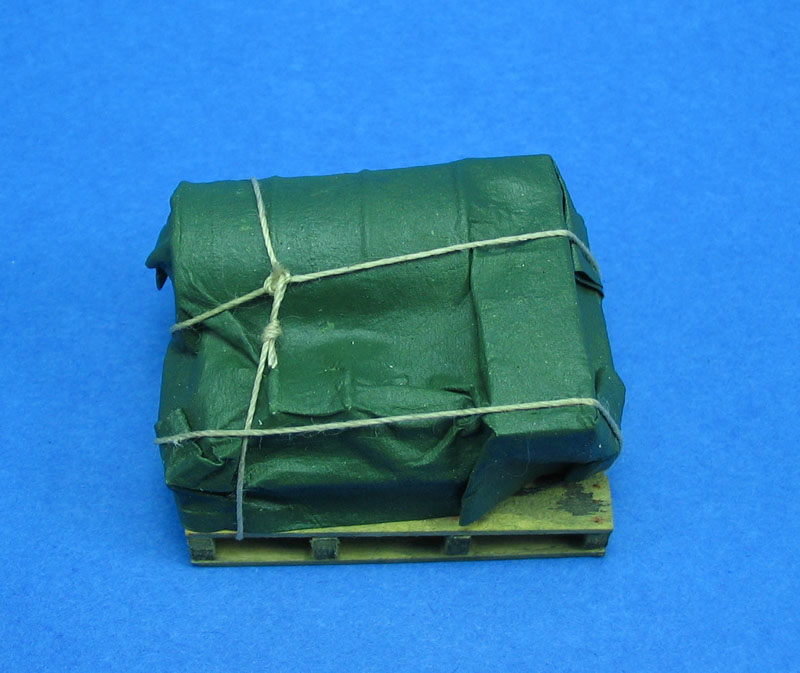
This is where using the sealant really comes into its own. You can now mould the tarp around the items as any times as you wish, and it will hold in place if you are not happy, smooth it back out with finger pressure, and do it again. When happy, start at one side of the model and glue the tarp down with CA, ensuring folds, creases, depressions etc are formed as you go. You can now rope the tarp down, pulling quite hard to create the creases formed by the rope (dont worry the tarp is indestructible). Now rub all raised areas with fingertip to reveal detail. (Photo 15).Painting and weathering
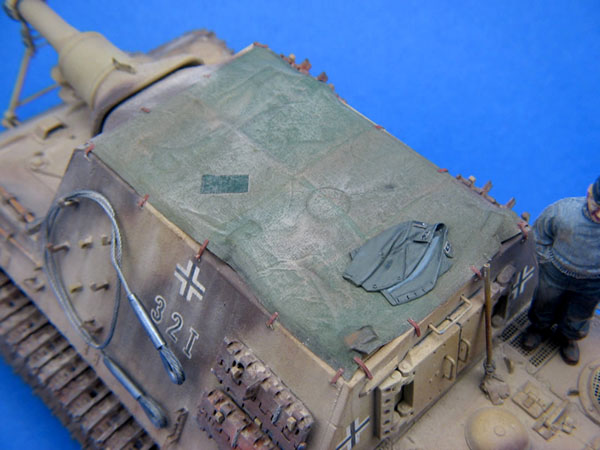
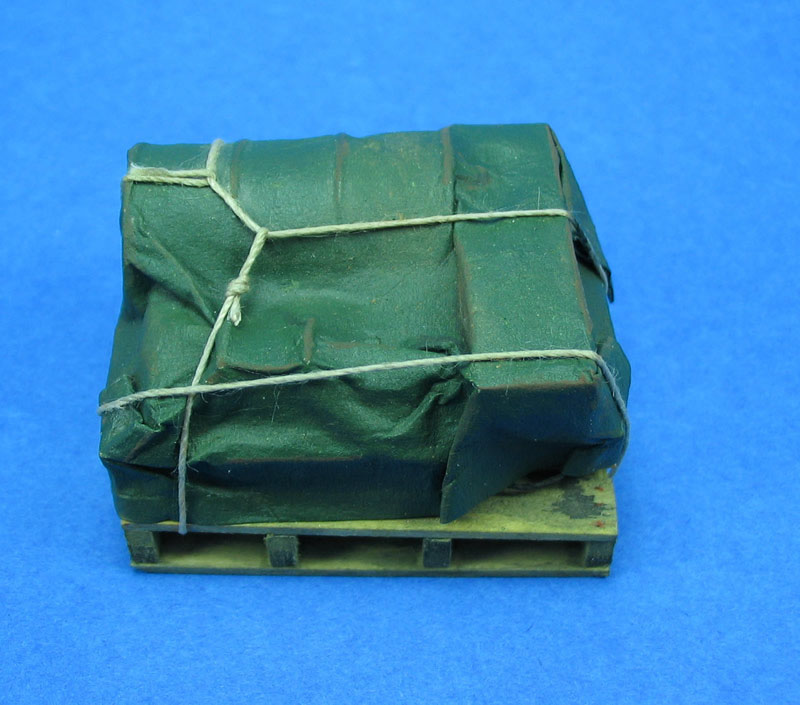
First you need to decide your environment and proceed accordingly. This project will be in Europe in autumn/winter so there will be dirt and water. First, highlights and shadows are put in (not many as the tarp is pretty realistic anyway). Raised contours and fold edges are given a wash with XF-64 Red Brown (Photo 16). The whole surface is then washed with a thin solution of Mig Dark earth. I then take pure water and paint this wash downwards to make the pigment run into depressions and crevices (Photo 17) dont worry, you can use lots of water as the tarp really is waterproof. Once this has dried, I add Woodland Scenics water to a couple of areas to show rainwater collection (Photo 18). For a drier, dusty environment, the tarp was drybrushed with MMP Sand (I found the Mig to be too sticky), and the surface rubbed back with a fingertip to force the powder into the small depressions in the tissue. Then I added small splotches of Mig pigments (European dust, Dark mud), and rubbed them back with the paintbrush (dont use a finger as it smears). (Photo 19).Conclusion
The method is quick (start to finish in 90 min), and produces a totally realistic, and waterproof, tarpaulin. Because the treated surface of the tissue is so robust, its virtually untearable, and any weathering errors can be washed off and redone without soaking and destroying the tarp.Polycell Squeeze and Seal (Kitchen and Bathroom) availability outside the UK
This product is WATER based/miscible. When I wrote the article I had no idea that water based sealants were not common worldwide or I would have mentioned it. Having done some research I have now discovered the following: The reason this sealant is water based is because EU law states that by 2012 all such products must be water based (i.e have the solvents removed). It is therefore possible that in other countries, they may not produce a water based product because they do not have to. Polycell is a UK company that is part of the ICI group. They do not do much exporting outside of the UK, and that is mostly to Europe. Your local ICI company may be able to tell you if they produce an equivalent. ICI did tell me that another global company Masterchem produce many similar products, and they may have one in your country. If you do not have water based sealant in your country there are two options: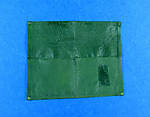 Photograph 13
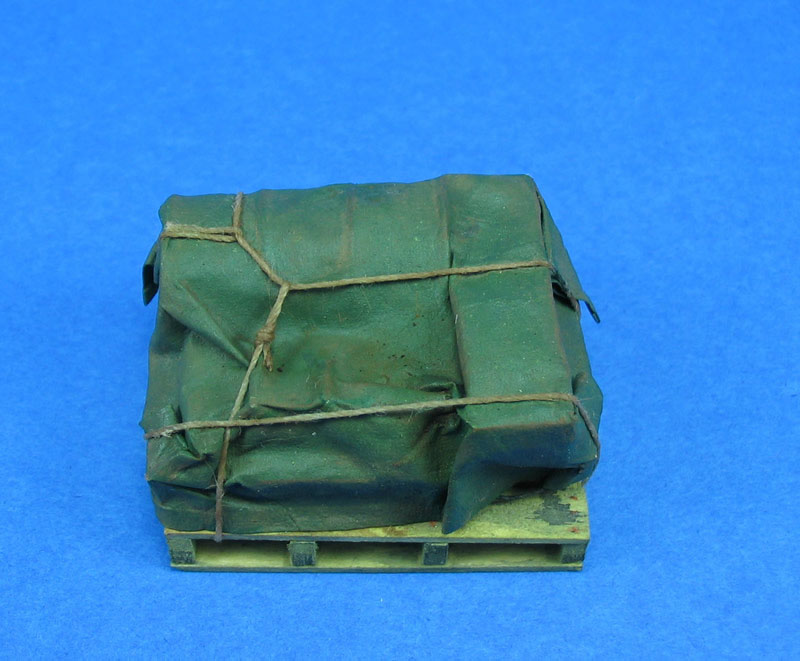
 Photograph 14
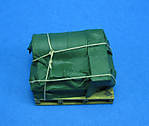 Photograph 15
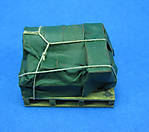 Photograph 16
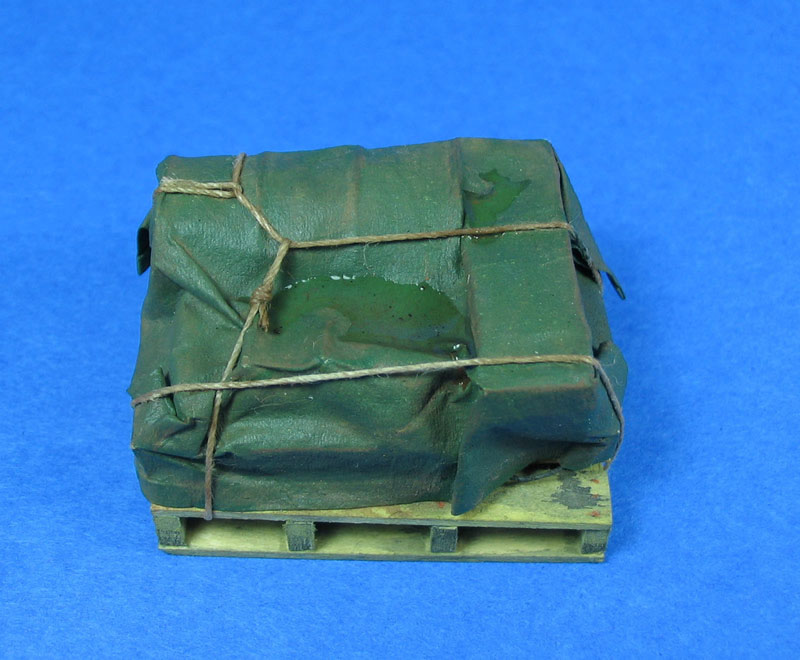
 Photograph 17
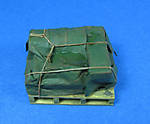 Photograph 18

About the Author


FROM: ENGLAND - EAST MIDLANDS, UNITED KINGDOM
Spent time in specialised sales to militay, non-destructive testing, risk engineering, engineering underwriting surveys on mines and mineral processing plants. Modelling from Airfix days, I took a 25yr break and came back to the hobby 18month ago. Currently working on a Sturmtiger with fully detaile...
Comments


I happend to have an old Fug5 radio fret from Aber and it had a few 'rings' on it. If anyone has any thoughts on where to get more eyelets of this size in bulk I would love to hear. Its possible I could have a fret made commercially by Scalelink that would have hundreds on it, but there would need to be a demand. As tarps are common across several modelling areas (air, ships etc) maybe we could get them interested. Or if there was something else currently unavailable I could add it to the fret to increase demand and commercial viability. Thoughts?
Brian[/quote]
Another thought is the BRAVO 6 Smoke Grenade set as the pull rings for the grenade pins are small rings of PE.[/quote]
Good source is the Royal Model 1/35 PE eyelet set, here:
LINK
DEC 26, 2015 - 03:16 PM

Anyone tried this with acrylic Gesso in place of the sealer? I mixed water and clear gesso on a glass plate to spread the tissue on. It came out with a kind of smooth texture, but still experimenting here. Just wonder if others have tried? Seems very durable and easy to shape after drying over night
DEC 29, 2015 - 11:34 AM

Never even heard of Gesso. I'll have to look and see if they have anything like that at the local DIY store.
DEC 29, 2015 - 07:20 PM
The brand I tried was Liquitex medium clear gesso acrylic. It is a paint base and thickener that is available at most art supply places such as Blicks or Hobby Lobby. Many use this for water effects like ripples or wave shapes. If it is thinned with water then it soaks into the tissue for a tarp. My issue was how to carefully get out the wrinkles without tearing when first wetting the tissue. A glass plate seems to help.
DEC 29, 2015 - 07:35 PM
Might have to give it a try.
I used wax paper as a work surface. Seems to work okay, but you're right; trying to do much with the tarp soon after painting it with your rubberizing medium of choice is tricky work.
DEC 29, 2015 - 07:39 PM
I've found a single tissue gives enough material for many projects.
I have also found that once it is completely dry I can form it into whatever rough shape I want and then paint it with isopropyl alcohol to soften it up enough to be able to precisely tune the shape. Worked like a charm for making a new canvas roof for a quad tractor and a spare tire cover for a scout car.
FEB 10, 2016 - 05:44 PM

Resurrecting this old thread because the final product looks so good. I tried it twice with facial and wrapping tissue but could not get it to work.
Questions for those in the US that got it to work:
1. What exact product did you use?
2. What surface did you use under the tissue when applying the liquid? (I used wax paper.) How do you lift the wet paper off the surface without tearing?
3. How do you dry it? Is it on the surface? How do you keep it from bonding to the surface when dry?
Thanks,
KL
DEC 22, 2018 - 07:38 AM

Kurt, here's what I do with Vinnie's EXCELLENT technique.
First you must use a good quality smooth tissue - I use the stuff that comes with men's shirts.
The latex I use here in Canada (I'm sure similar stuff is available in USA) is DAP brand Acrylic Latex Caulk Plus Silicone. I mix it 50/50 with water to make a very dilute "solution".
I do not apply it on a hard surface. Instead I have a 4" by 6" frame onto which I tape a piece of tissue. Then using a broad 3/4" to 1" wide SOFT brush I wet one side and gently dry it with a small hair dryer, which takes only a minute or two. Repeat on the other side. It is during these first two applications that you are most likely to tear the wet tissue . . . so be careful. I then do two more double sided coats. I'll do a fourth if I plan to cut the tissue into strips for belts, etc as it a little stronger.
The "cloth" takes acrylic paints very well. There are photos of this technique used to make a canvas roof of my Schwimmwagen on Missing-lynx 3 Sept 2018. Good luck . . . you only need it for the first coats.
DEC 22, 2018 - 09:49 AM
Thanks Tom!
I was thinking of attaching it to a frame. I have been using an acrylic caulk that is listed as "paintable". The small pieces that have survived the previous experiments did seem to be pretty durable, even with just a single coat. I will try this tomorrow.
Thanks,
KL
DEC 22, 2018 - 04:05 PM
Copyright ©2021 by Brian Balkwill. Images and/or videos also by copyright holder unless otherwise noted. The views and opinions expressed herein are solely the views and opinions of the authors and/or contributors to this Web site and do not necessarily represent the views and/or opinions of Armorama, KitMaker Network, or Silver Star Enterrpises. All rights reserved. Originally published on: 2006-06-12 00:00:00. Unique Reads: 46067

WEB HOSTING BY


Copyright ©2021 Armorama and Kitmaker Network, a subsidiary of Silver Star Enterprises
All Rights Reserved. Please read our Conditions of Use and Privacy Policy.
All Rights Reserved. Please read our Conditions of Use and Privacy Policy.