

1⁄35A Dash for Cover
22
Comments

Composition
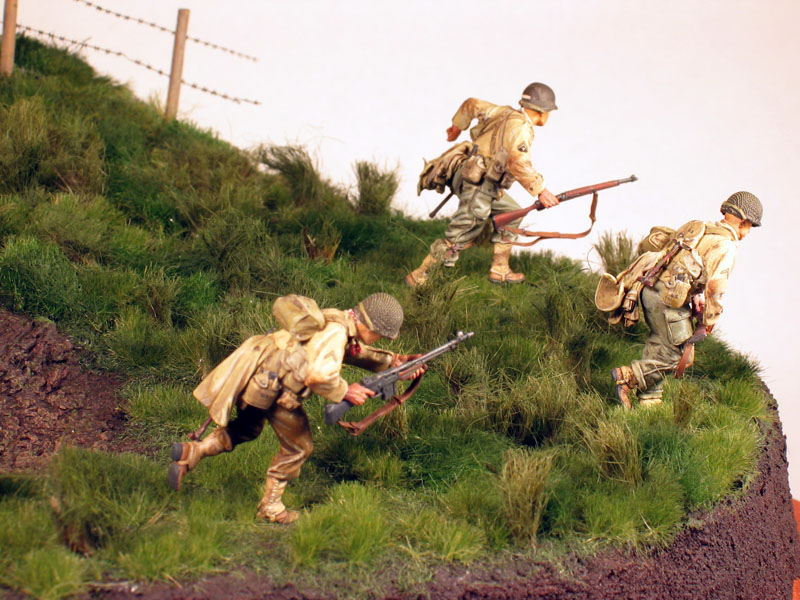
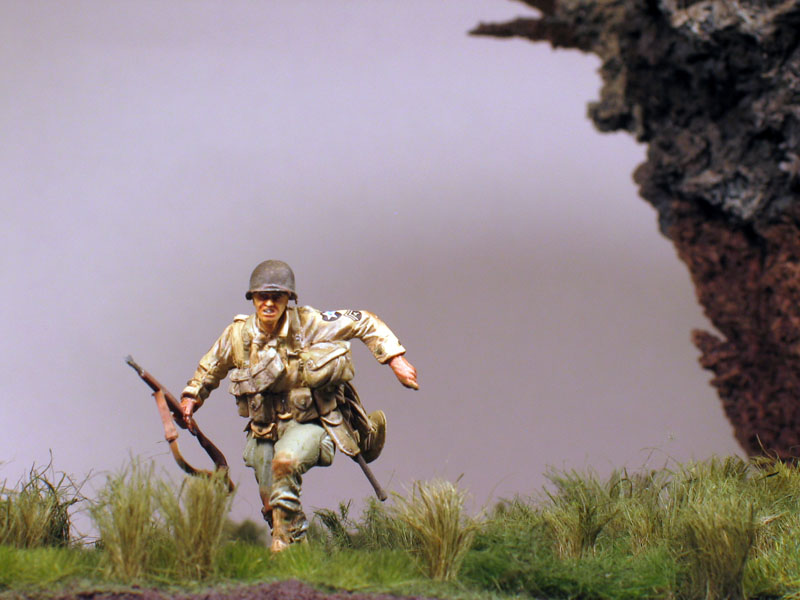
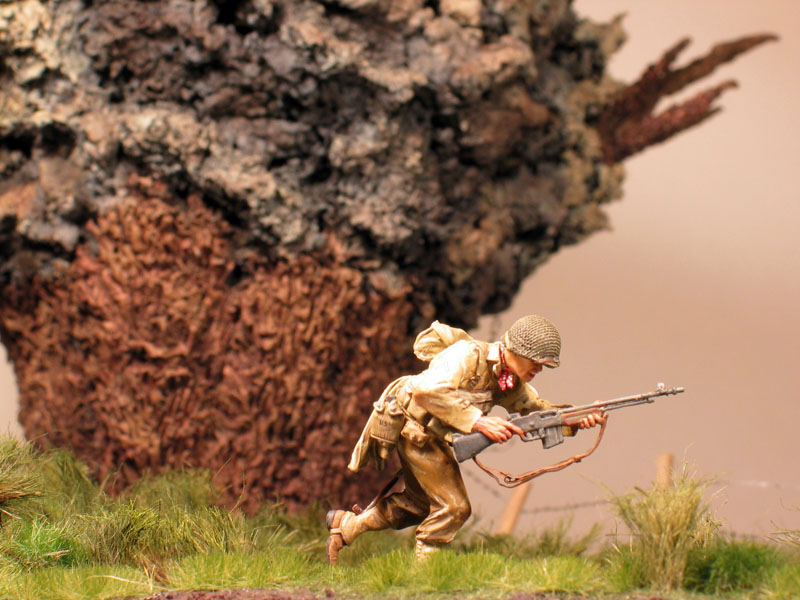
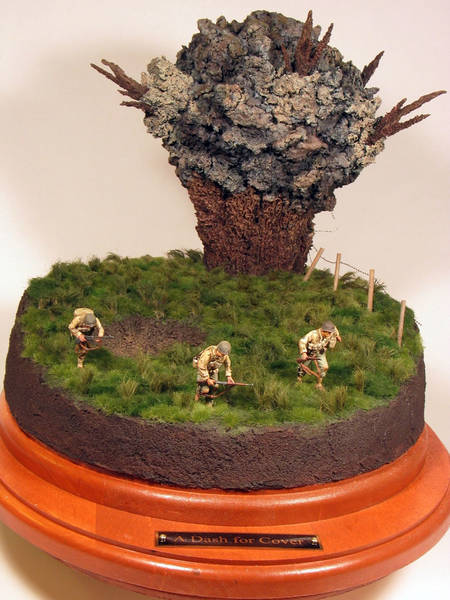
As this piece didnt lend itself to in- progress photos, I thought Id take the opportunity to discuss the genesis of a diorama/vignette, at least how I go through the process of developing an idea. These are my own personal methods and Im certainly not claiming these are any better than someone elses. Understandably, most articles concentrate on the how-to aspect of the piece in question and the more esoteric aspects usually take a back seat. Since this piece is so ridiculously simple, it offers a chance to explore some of the fuzzier elements. Every diorama builder has their own source(s) of inspiration when preparing for the next project. Some base an idea around a particular vehicle, some a period photo, etc. My personal inspiration always starts with an attempt to convey human emotion, whether humour, pathos, anger or, in this case, fear. I try to put myself into the situation and think about what Id be doing or how Id be reacting if I was actually there in the moment. From reading and listening to many WW2 veterans interviews and after watching Band of Brothers, the sheer terror of an artillery barrage started to form in my mind as a subject for a vignette. The idea of being caught in the open, exposed and vulnerable, and hearing the sound of that first round ripping the air mustve been just awful. Man, nobody wouldve had to tell me to beat cheeks. It would literally be a race against death. So that was the start of the idea, but of course putting it into 3 dimensions is a bit tougher to do, and I let it rattle around in my head for awhile before settling on a composition. Some quick sketches always help me refine the idea until I feel comfortable that Im heading in the right direction. Many diorama builders use study sketches and they can be very useful. The final composition consisted of 3 basic elements the explosion located at the extreme rear of the base, the vertical rise of the groundwork to act as a partial shield against shrapnel, and the soldiers running for their lives at the extreme front of the base. Everything else was details.Breaking the rules
There are rules that diorama builders are expected to follow. Never position elements parallel to the base, dont leave dead space, etc. These are all valid objectives and have been developed over the years for good reasons, but I submit there are occasionally valid compositional reasons for breaking one or more of the rules. This piece is an example of composition overriding the rules. As you can see, there is a lot of dead space. This is not accidental. As I said, the goal in this piece was to convey the danger and vulnerability of soldiers crossing a large exposed area. Artillery was and is the foot soldiers deadliest adversary. In WW2 artillery accounted for the majority of the trigger pullers casualties, if my references are correct. So, in this piece, the dead space serves to accentuate the exposure of the soldiers, and also to create some distance between the figures and the explosion hopefully suggesting that the figures could reasonably have survived. This was reinforced by putting the figures on the downside of a small knoll. The recent shell hole in the meadow helps reinforce the idea of an ongoing barrage.Building the scene
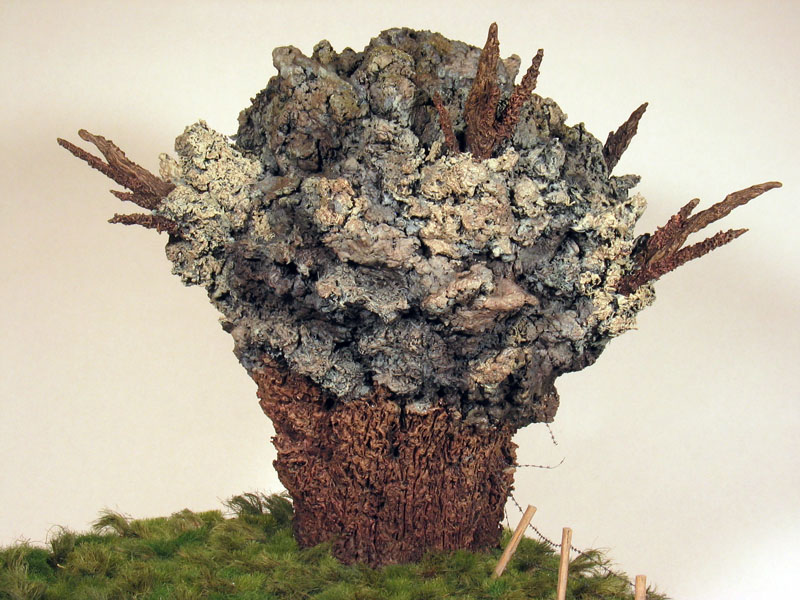
Fuzzy stuff aside, heres how this piece came together. Id been thinking about trying to do an artillery hit frozen at the moment of impact, that is, how the heck to do it? I settled on making an armature which was constructed using a wood dowel and different sized little Styrofoam balls bought at a craft store. The balls were drilled and slipped over the dowel. When done, it looked sort of like the Michelin man. Next, copper wire was dipped in epoxy and jammed into the armature at different angles and levels. More Styrofoam balls were pushed onto the wire, completing the guts of the explosion. I had figured on putting an initial layer of paper mache and then sculpting the final smoke/debris with epoxy putty, but after seeing the texture of the paper mache I decided to leave it as the finished surface. The jets of debris were made using epoxy putty over copper wire epoxied into the paper mache. The lower part of the explosion, the soil erupting from the meadow, would be made from epoxy putty after the explosion was attached to the base. I set the explosion aside and started on the base and groundwork. The base is 3 oval wood plaques screwed together and stained/sealed. I usually put a slightly smaller piece of wood either an additional plaque or plywood under the main plaque to allow a finger hold on the base and to give a shadow line under it. Pieces of Styrofoam were glued to the base in a rough approximation of the finished contours and more paper mache was applied to finish off the groundwork. I mix powdered tempera paint into the mache to eliminate the dreaded white specks. The shell hole was carved into the base Styrofoam before the groundwork was applied, and it was finished with epoxy putty. To add a bit of action to the scene, I dug out a Verlinden PE fret of barbed wire Id had for years. After airbrushing the fret with gunmetal gray, I cut it from the frame. I used some rough wood pieces scavenged from some long forgotten project for the posts, which were epoxied into the groundwork. The wire was attached in 3 strands and long ends were left to later be inserted into the epoxy putty part of the explosion. I next moved to building the figures. Id had these 3 Nemrod guys in my drawer for quite some time, just waiting for the right piece. They are separate figures but are clearly meant to be used as a set. The details are exceptional ( the inclusion of G.I. raincoats stuffed into the cartridge belts, and especially the auxiliary ammo bags which G.Is often used as a replacement for a field pack or musette bag) and the sculpting is top notch. The poses were also perfect for my needs. The only thing I had to do was remove the rifle grenade from the figure closest to the front of the base. I did add rifle slings from lead foil and PE slip fittings using a photo of a M-1 Garand with its sling. Those who have seen my other articles are familiar with my painting methods, so I wont belabour that part of the project. I will reiterate the suggestion of using the terrific Hudson and Allen water slide decals of the US web gear imprints, and the Archer unit and rank markings. They are the cherry on top as far as Im concerned. After attaching the explosion to the rear of the base using the wood dowel inserted into a hole drilled into the base, the application of epoxy putty began. I had made the decision to portray the explosion in a most sinister and evil manner so a massive upheaval of soil was what I was shooting for. The putty was poked and prodded with my favourite tool, a round pointed toothpick, until I was satisfied with the texture. The painting of the explosion was next. All kinds of Gray's, umbers, and tans were used, as well as selected areas that received flat black washes, until it seemed to look right. I used the few photos Id found as a guide to the colours, but understandably there arent an awful lot of pictures whos going to be taking pictures with all that stuff flying around? The final step was the meadow. A layer of static grass was glued onto the base with diluted Elmers white glue, then dry brushed with Testors Medium Green and straight Yellow. Silfor grass clumps were glued into irregular and random patches, with longer/denser matting cut and glued in selected spots. Thick twine was unravelled and cut to size for the longer field grass and everything received a wash of the medium green to help tie it all together. It may not be very noticeable in the pictures, but I laid the field grass back in a radius around the explosion in an effort to portray the concussion/blast. I'm not going to go into the painting and building of the figure as i want this article to concentrate on the creation of the scene, there are plenty of good articles available on painting figures on the site, but maybe its an article for another time if any one's really interested, suffice to say the figures were attached to the base secured by copper wire pins, and the piece was done.Epilogue
I consider this to be a fun experiment, fully realising that I may have created something that most people wont get without the explanation. Dioramas/vignettes shouldnt need any explanation, so ultimately this may become a stepchild of sorts. But, hey, at least Im not boring myself with endless repetitions of tankers on break and such. Once in awhile its good to go out on a limb, even if it snaps.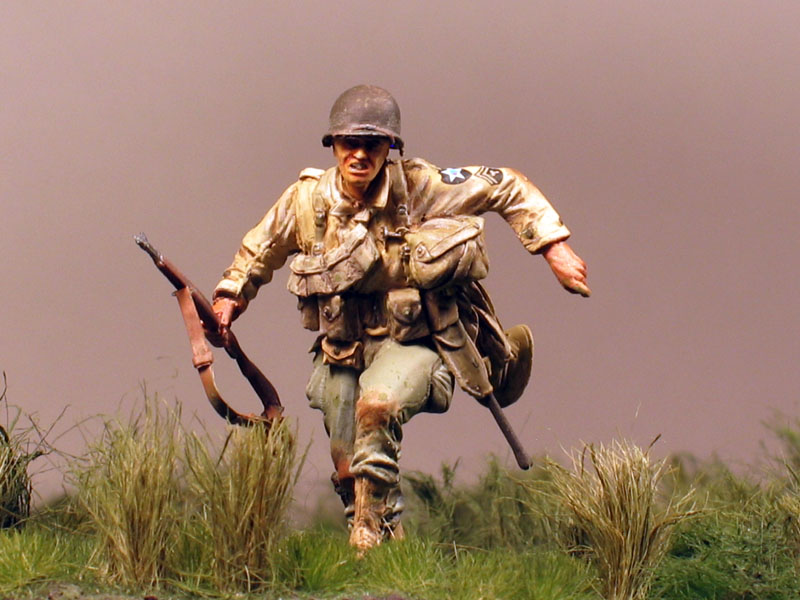


About the Author


Comments

Hi guys,
Well, this kind of thing is pretty difficult to tackle for obvious reasons, but I thought I'd give it a shot. I sctually had some advice on the shell hole from a guy who looks at them for a living (!) and decided to take his advice on how to show the darn thing, but maybe should have taken some license on that?
Appreciate the supprt.
Barry
MAY 13, 2007 - 06:16 PM


Amazing! Actually, kind of good timing too. I was just wondering to myself how you would pull something like this off convincingly. There was a thread on Naval shell splases fairly recently, and I was wondering if it could be done for an artillery explosion. Thanks for proving it can work, and telling us how you did it.
MAY 14, 2007 - 03:50 AM

Hi Barry! I liked your diorama...it is very vell looked,anything superfluous on it is not present!
MAY 17, 2007 - 11:56 PM

I dont want to be rude,Barry--I love your stuff...buut I think that the explosion could have been improved by adding some clumps of grass,especially at the base and some up higher in the blast. There could have been "cracks" in the sod radiating outward from the blast itself. The previous crater needs some remnants of the explosion that created it,like clumps of dirt and sod,rocks,etc. To me,its too "clean". Maybe the guys could have had some dirt on their shoulders,etc. Like I said I dont want to be rude and you have way more talent then I do, but I am being honest.
MAY 18, 2007 - 02:27 AM
Hi Mike,
Nothing rude about your comments. When trying something like this, which is attempting to freeze a very ephemeral moment, it's not hard to miss the mark. I knew that going in, and figured there would be one of two reactions - "huh?", or "oh, I get it". I asked questions about stuff like dirt being thrown, and what a fresh shell crater would look like and so forth, and tried to incorporate what prople who knew a lot more about it told me, but in the end, even if it's "correct", if it doesn't look right, well....
Hey, it's just modeling, right? I'll just move on to the next idea, play my horn some, finish the book I'm reading, work on the yard, wax my car, etc.
Regards,
Barry
MAY 20, 2007 - 07:18 PM

Fantastic! I have had the same idea but neer knew how to execute it. You did what I was never able to figure out how to do. Great job
MAY 21, 2007 - 08:09 AM

Barry,
Your "Dash for Cover" is very impresive. Trying to show an explosion - a very transitory event - in a frozen form was not easy. My observations of explosions has been that they are a good deal more "explosive."
By that I mean there is dirt and smoke moving very rapidly away from the core. This leaves gaps where the dirt/smoke is almost transparent. If I were to try to do one, I think perhaps using cotton on some sort of armature for holding the shape, then airbrushed and maybe some dirt or other debris added would reduce the problem of looking like some sort of tree (which was my first impression also).
Congratulations for trying something out of the ordinary!
Geezer34
JUN 26, 2007 - 04:13 AM

Nice Job, I like the thinking behind this project and the bomb blast is super.
JUN 27, 2007 - 12:25 PM
Copyright ©2021 by Barry Gazso. Images and/or videos also by copyright holder unless otherwise noted. The views and opinions expressed herein are solely the views and opinions of the authors and/or contributors to this Web site and do not necessarily represent the views and/or opinions of Armorama, KitMaker Network, or Silver Star Enterrpises. All rights reserved. Originally published on: 2007-05-11 00:00:00. Unique Reads: 29868

WEB HOSTING BY


Copyright ©2021 Armorama and Kitmaker Network, a subsidiary of Silver Star Enterprises
All Rights Reserved. Please read our Conditions of Use and Privacy Policy.
All Rights Reserved. Please read our Conditions of Use and Privacy Policy.