1⁄1Weathering Russian Armor
11
Comments
introduction
The subject for this short article on how I weather Russian armor is the MiniArt T-70 late built mostly out of the box except the grills and scratch built fender straps. The model itself however is not the focus of this exercise. This is really about getting past the notion that Russian green is boring and using tried and tested methods consisting mainly of oil washes and touch of pigments, I am going to try and prove just that.Step by Step
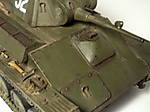
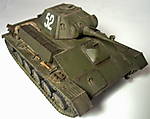
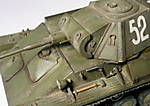
I began the painting with a primer coat of "red oxide" using generic rattle-can automotive paint. This was followed by a couple of light coats of Model Master acrylic "dark green". This was then lightened a bit with ModelMaster "insignia yellow" and a couple more overall thin coats applied until the coverage and color I wanted was achieved. Next I wanted to add some depth and variance to the base color. Using the "dot" method, O applied a filter using "yellow ochre" and "van dyke brown" oil paints. These were applied with a toothpick then, using a brush and thinner, I began working the paints in. This is done using up and down strokes, cleaning off the excess paint as you go. As the thinner began to dry, the effects of the filter start to become apparent. The beauty of this method is you have plenty of work time to work the paint in and clean as much or as little off as you like. Now the whole model received a coat of future in preparation for the decals which were then applied. I proceeded to paint the wheels and tracks using generic acrylic craft paints and a fine brush. I added some wear and tear along the edges of the model using the "sponge" method which consists of a small piece of the green scouring pad that comes attached to regular kitchen sponges. I used straight "Van Dyke brown" oil paint and dipped the sponge in the paint, blotting the excess off on paper, then dabbed around the edges of the model with it as needed. After this, the whole model received another coat of future to seal everything in. Then I gave the model a coat of Testors "dull cote" to get it ready for the following oil washes as I prefer to do my washes on a dull surface vs. a glossy one. After the dull cote was dry, it was time for some oil washes. I began with an overall sloppy wash using "Van dyke brown" followed by several more precise washes of the same color, cleaning off the excess as I went. Once I had the build-up of color I was looking for, I moved onto the second wash. This used a mixture of "Van dyke brown" and "White" applied heavily then, as it began drying, I again cleaned off the excess using downward strokes with a clean brush and continuously cleaning it off on a paper towel, creating a dirty streaky appearance. At this time I painted the muffler using straight "Van dyke brown" and then dabbing in some brown pigments before it dried to create a little texture. With the model now getting a nice dirty look to it, it was time to add some worn metal to it while I still had a chance to weather it down afterward. I lightly dry-brushed select areas on the model using Reaper Masterseries "Shadowed steel". I followed it with an "ivory black" wash and then another "van dyke brown" wash, knocking the shine off the dry-brushed steel in the process. After this had dried, I finished painting the details. For the wood handles, I first did a base coat of acrylic craft paint "stone". Then, using a mix of oil paint "van dyke brown" "white" and "yellow ochre", I painted the wood effect. I also added some "burnt sienna" to the muffler. As a final touch, I used "Dustbowl brown" colored pigments from Bragdon to give the model a dry dusty used look and helping to blend all the previous colors together. The pigments were applied with a small brush and then scrubbed lightly into the finish where desired, brushing away the loose pigment in the process.Conclusion
The finished model to me looks like a well used dusty, dirty vehicle without being too overly done. It has some nice variations to the otherwise "boring Russian green" and, while this look may not be for everyone, using the techniques described there are many possibilities as to the outcome if you experiment!Paints and accessories used
Generic "red oxide" autoprimer ModelMaster acrylics, "Dark Green" and "insignia yellow" Future, floor polish Generic acrylic craft apints "black" "nutmeg brown" and "stone" Oil paints, "Van dyke brown" "Yellow ochre" "Burnt sienna" and "Ivory black" Oil Thinner, "Gemini Masterpiece" (purchased from hobby lobby) Reaper Masterseries acrylic "Shadowed steel" Bragdon enterprises pigments "dustbowl brown" Testors "Dullcote"Comments
Ron,
Great write-up and exceptional build. I have this kit and will be building it soon, particularly after your article on painting and weathering. When you have a bit of time could you let me know how you fixed/replaced the kit grills to make them better?
Thanks,
Chuck Willis
2nd VP - AMPS East
AUG 30, 2007 - 12:13 AM
Very nice write up. It is always helpful to see models in my interest range being used for demo. Gives me a good baseline to shoot for.
AUG 30, 2007 - 01:09 AM
Great job Ron. Glad you got it up, it is very well written and helpfull. I am working through your technique right now.
AUG 30, 2007 - 02:30 AM
Ron, very nice job on the article, and obviously on the tank as well! It is amazing how much you really can do with "Russian green", "panzer Gray", and olive drab to make them look less "boring"
AUG 30, 2007 - 03:37 AM
Great article, Ron. Thanks!
BTW, what brand of oil paints do you use for your weathering?
Thanks!
AUG 30, 2007 - 05:19 AM
Thanks for the great article. I will be experimenting wiht the oil paint filters/washes, and this is an excellent example.
Thanks.
AUG 30, 2007 - 07:16 AM
Thanks Bill putting this up it looks great,
Thanks everyone for the comments and i really hope it is of some use to somebody and i look forward to sharing your results , the oils used are a mix of winsor and newton and daler~rowney "georgian" both seem to work about the same.
Ron.
AUG 30, 2007 - 10:46 AM
Nice article Ron.
My question concerns your application of the oil paints for the filter. Before you added the dots of paint, did you apply a protective coat over the paint? And if so, was it a dull coat or gloss coat? The reason I ask is this, I have tried this technique on an unprotected base coat only to have the dots of paint stain the base coat.. Was I a bit perturbed at those results to say the least.
Dave
AUG 30, 2007 - 11:05 AM
Hi Dave, the filter was done directly over the base coat no protective coat was applied, ive used this method this way many times without any problem, if the paint ever seemed stubborn i just applied more thinner. Maybe its specific types of paints that do this?
Ron.
AUG 30, 2007 - 03:05 PM
Copyright ©2021 by Ron Goins. Images and/or videos also by copyright holder unless otherwise noted. The views and opinions expressed herein are solely the views and opinions of the authors and/or contributors to this Web site and do not necessarily represent the views and/or opinions of Armorama, KitMaker Network, or Silver Star Enterrpises. All rights reserved. Originally published on: 2007-08-28 00:00:00. Unique Reads: 25441


