1⁄1Accident SdKfz 232
7
Comments
Introduction:
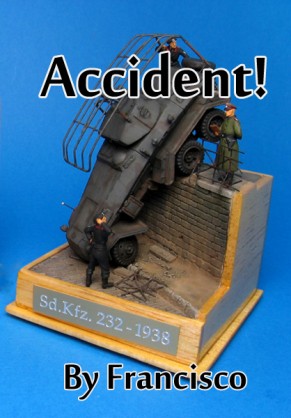
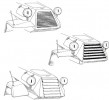
The idea behind building this diorama came after I found a photograph in an online forum. What seemed to be theoretically easy to create proved to be quite challenging to research. Some questions still remain unanswered. I was able to find out this accident occurred on the 20th of March 1938 after contacting the owner of one of the original photos, since it had a small inscription on the back. This helped me plan the paint job, as I already knew these armoured vehicles had only started to be painted overall dark grey after June 1940, therefore I’d have to paint it in a two tone scheme of dark grey and dark brown. Someone else pointed out that it was a vehicle built by Magirus. With this I was able to investigate the differences comparing two Italeri kits, which depicts a vehicle built by Bussin-Nag.After June 1929, when the Heereswaffenamt Der Reichswehr issued the military specifications for a six-wheeled vehicle. Three firms built the Sd.Kfz 232 and Sd.Kfz 231 (without radio equipment), the third being Daimler-Benz. These were all quite similar but, for example, one of the main differences between each chassis was their length, with the Magirus M 206 having the shortest one, measuring 2,50 meters from the front axle to the middle axle, and the Daimler-Benz G3a having the longest one, with an axle spacing of 3,00 meters. Other minor exterior differences were the longer front fenders and the presence of return-rollers on vehicles built by Magirus, or the trapeze-shaped radiator flaps on Daimler-Benz and Bussing-NAG vehicles. All of them suffered many changes throughout their serving period: post production modifications included mounting the Notek headlight and convoy taillight in 1940, removing the triangular armour plates used to protect the rear wheel hubs and mounting a different turret front flat plate, with the 2cm BMK machine cannon now to the right of the Mg. 13, and with no lookout. These minor differences were not applied at the same time, resulting in many mixed types.
The Kit:
I started by converting the kit’s radiator flaps to the Magirus-style ones and then scratch-building the front and rear return-rollers on the chassis, which already had seen its carter protection reshaped. The front mudguards were also lengthened with “plasticard” and glued in the correct place, with their stowage boxes already removed. After this, the side radiator flaps were modeled with stretched sprue. The chassis wasn’t shortened since the difference would have been of only two or three millimeters and would involve a major reshape of the front steering system.The rest of the kit suffered minor changes as well, with the support for the Notek-light being removed and the top engine access hatch being sanded off and re-scribed. The turret received a new front plate made of “plasticard”, which would hold no weapons like on the photos of the accident. The wheel rims were reworked to receive new hubs and recast in resin which proved to be much faster than converting one at a time. The rear suspension was repositioned so it would show the weight of the hanging wheels once the model was glued in place. The spare wheel on the rear was removed and the rear access door was scribed, with the spare wheel mounting mechanism being built from “plasticard”, while Magic Sculpt was used to make the wheel covering.
After all this, the kit was ready to receive a coat of primer, as I chose to glue the copper wire width indicators and maneuver standard rack in the end. However, something looked odd and after the primer was on I realized that the big frame antenna was too thick. A new one was made out of wire using the plastic part as a template, and it actually changed the appearance of the vehicle.
Everything was ready for the paint stage so, a coat of lightened Tamiya XF-63 was sprayed and protected with a thin coat of acrylic floor wax, so it could be masked without the risk of damaging the surface before it received the brown patches. In this type of camouflage, the brown colour usually covered 1/3 of the vehicle in a cloud pattern, however, some photos show vehicles with unevenly distributed, irregular shaped brown patches, and this seemed to happen on mine. It was almost impossible to distinguish them correctly so a bit of “artistic license” was in order. A couple of drops of Tamiya Flat Brown were added to the previously mixed panzer-grey and sprayed with the help of masks made of some Blu-Tak and Maskol. After this dried, another thin coat of acrylic floor wax was applied with an nº2 flat brush to prepare the surface for the decals, which were also sealed with the same product to protect them from the weathering process. Very diluted Raw Umber and Burnt Umber artist oils were used as filters, that were left to dry for a couple of days before a final coat off Modelsmaster Flat Lacquer varnish. A few scratches with Vallejo 995 German Grey were added and Mig pigments were applied with an old nº1 brush to achieve the weathered look.
Comments
Great piece of work. As usual it took me a while to relaise it was in Braille scale.
NOV 05, 2009 - 11:31 PM
Hi fransisco,
Thanks for the feature. Superbe work in tiny scale. When i see your setup for the painting, LOL, well done!
Cheers
Claude
NOV 10, 2009 - 03:00 AM
Francisco,
Absolutely 1/35 quality!)) Nice perspective, good compression of space. Well done.
NOV 10, 2009 - 08:17 AM
Copyright ©2021 by Francisco. Images and/or videos also by copyright holder unless otherwise noted. The views and opinions expressed herein are solely the views and opinions of the authors and/or contributors to this Web site and do not necessarily represent the views and/or opinions of Armorama, KitMaker Network, or Silver Star Enterrpises. All rights reserved. Originally published on: 2009-11-03 00:00:00. Unique Reads: 33800


