

1⁄35Winter Line Italy 1944
11
Comments

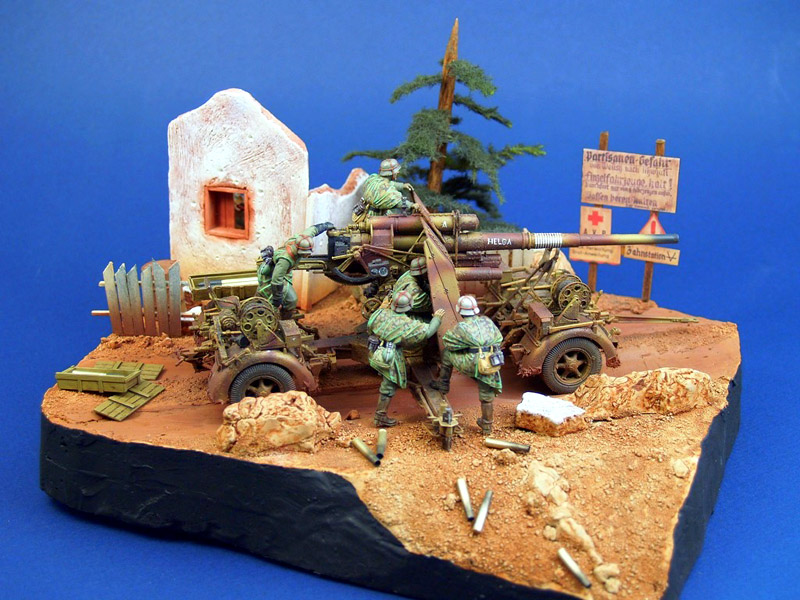
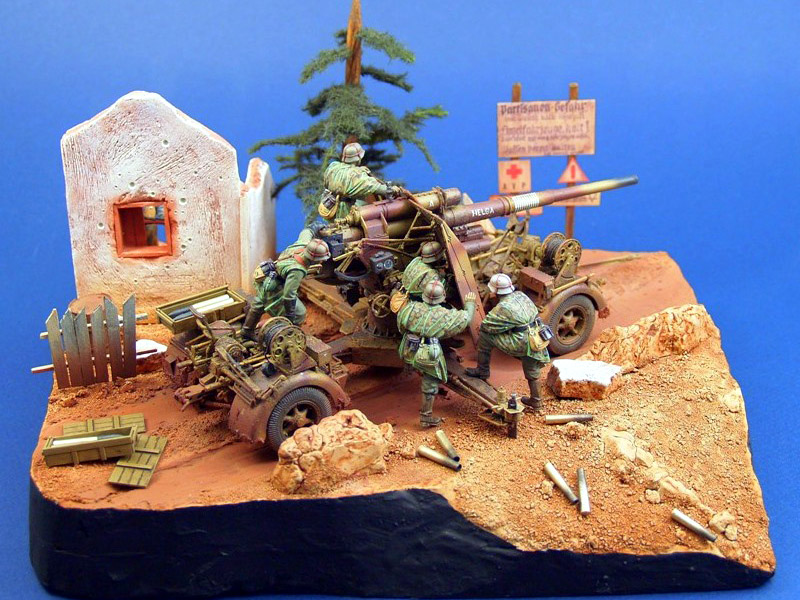
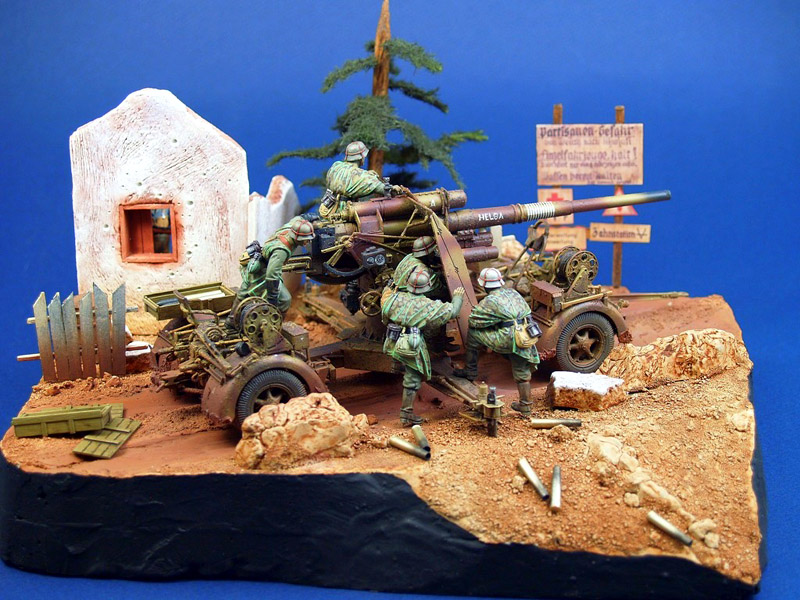
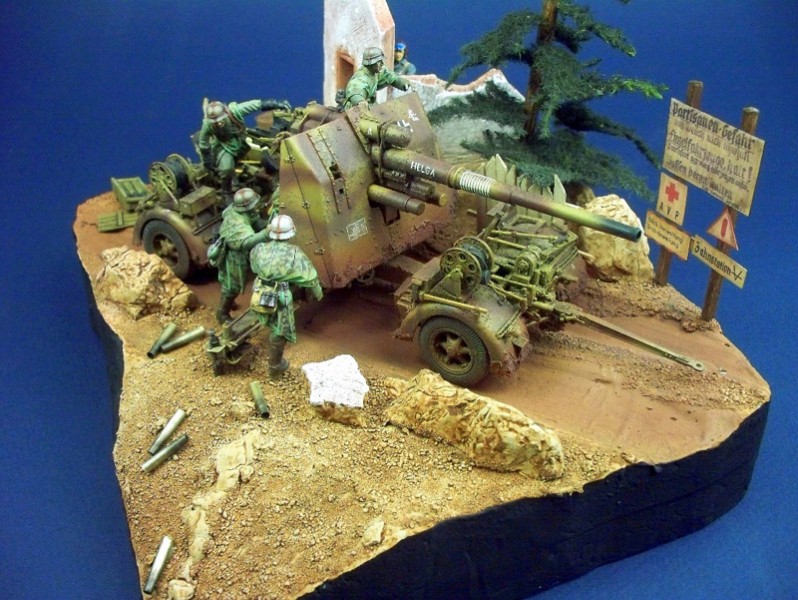
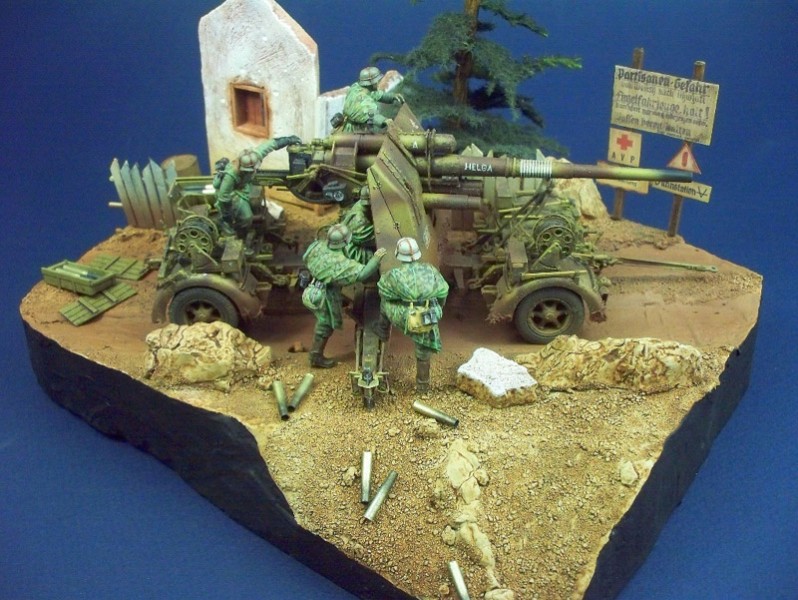
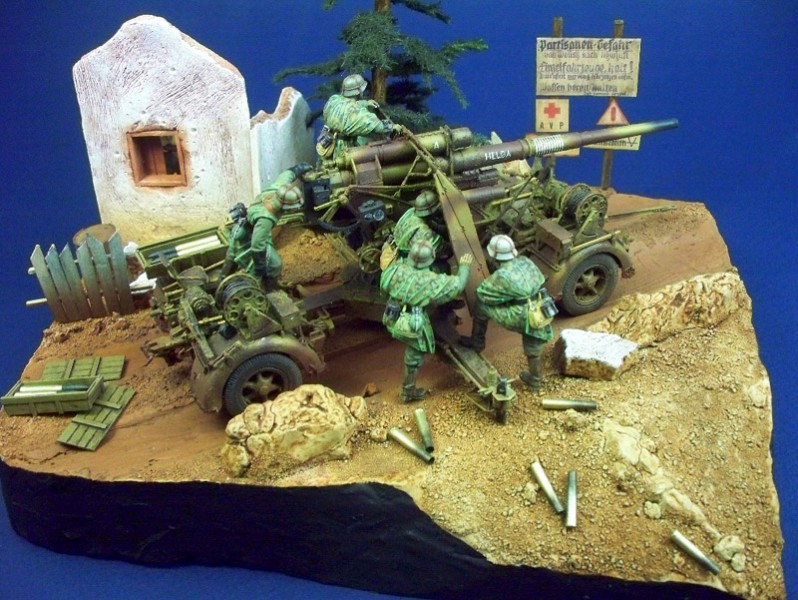
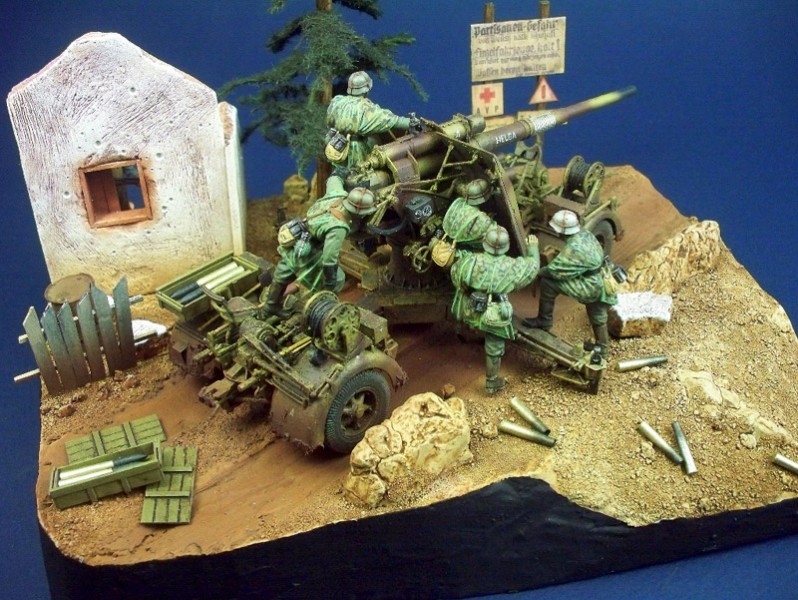
Diorama Winter Line Italy 1944
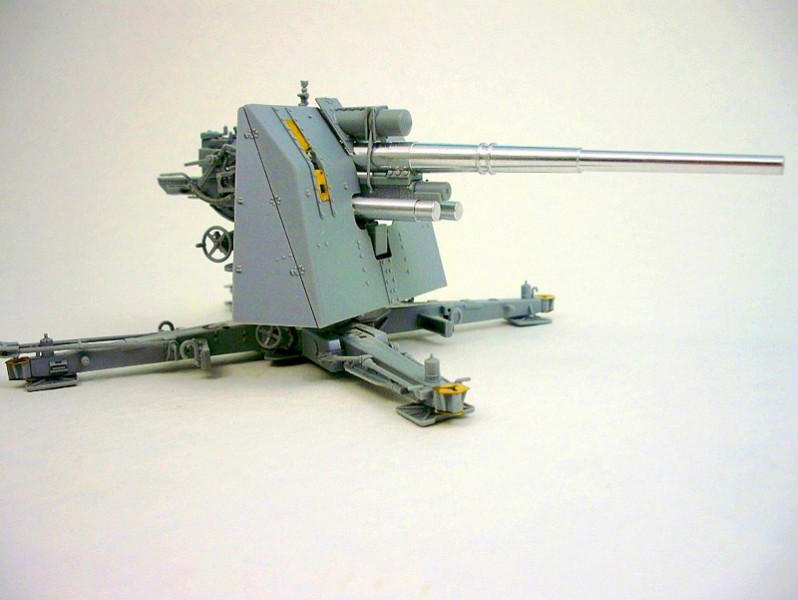
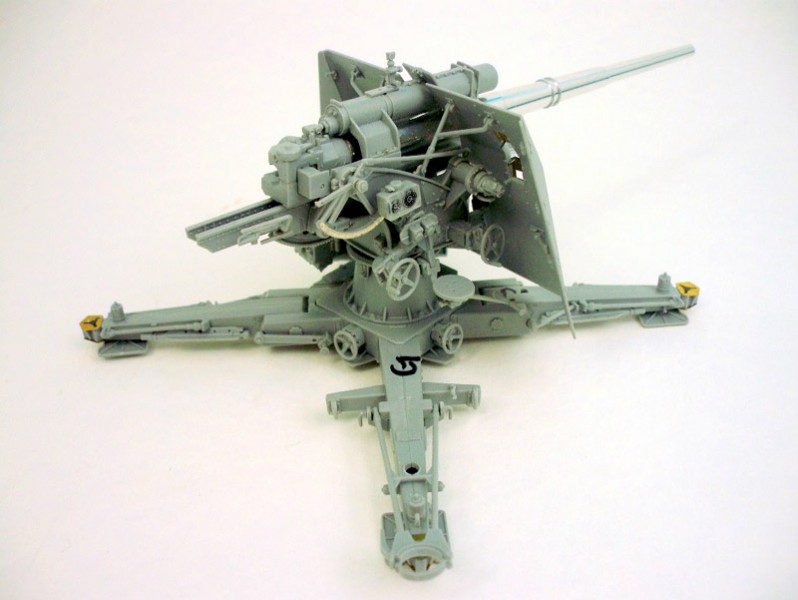
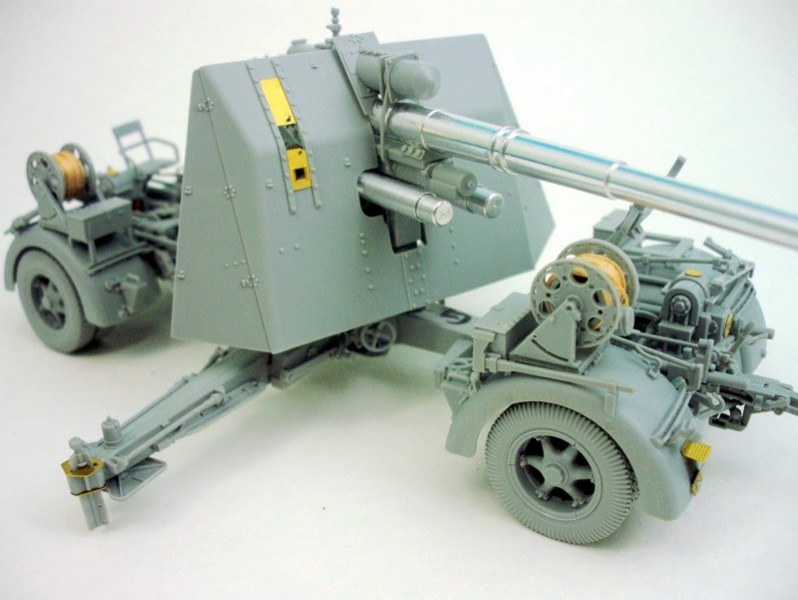
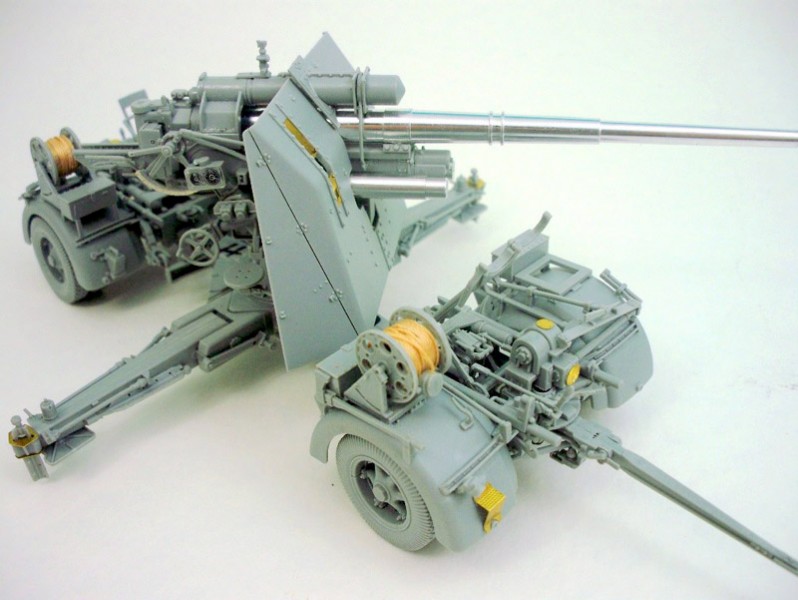
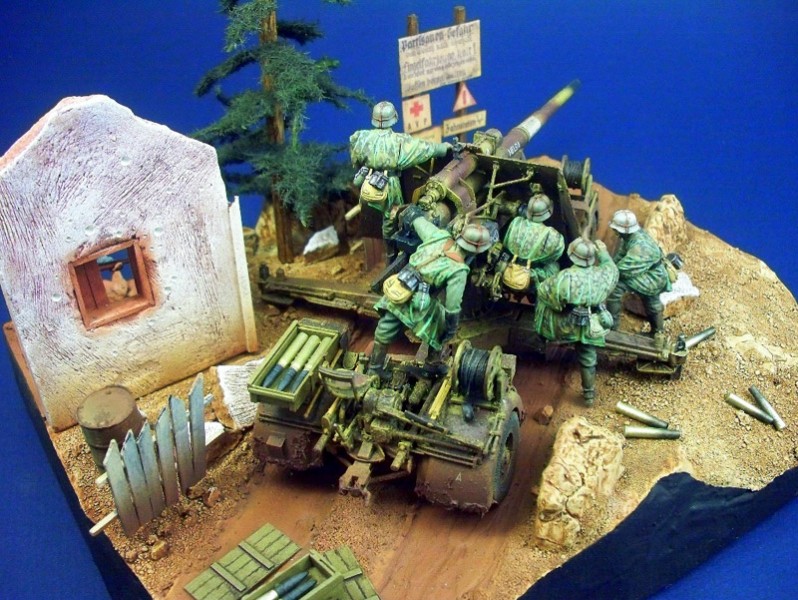
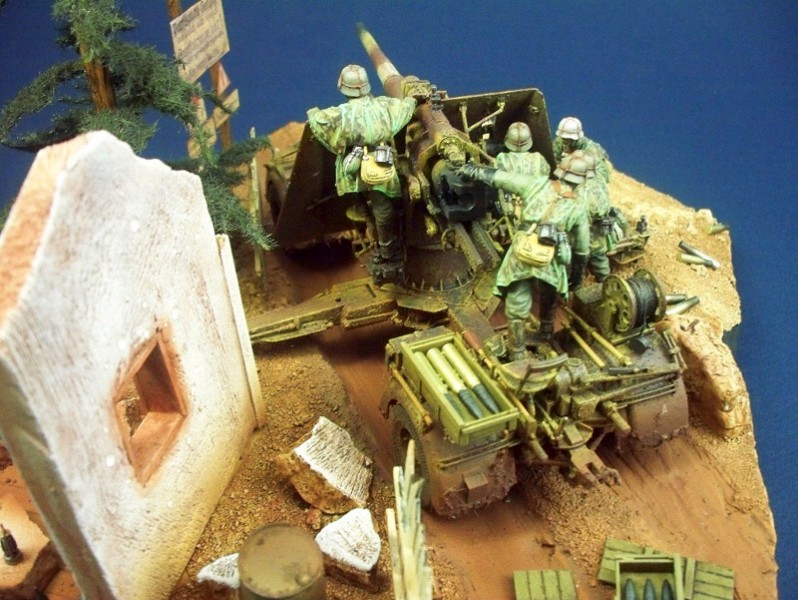
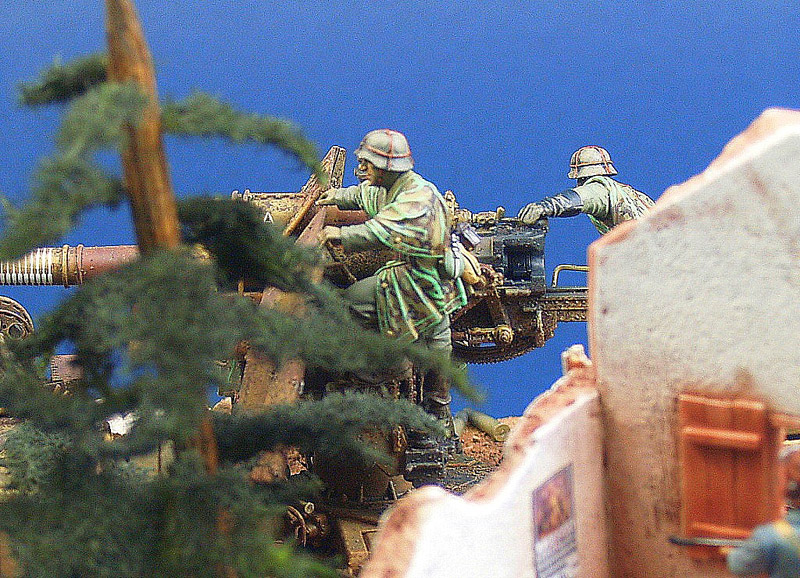
Krupps 88mm FLAK 37, which combined the Flak 41 gun barrel with the Flak 37 carriage was the final version of this battlefield terror. This was primarily due to technical problems which resulted in only thirteen being produced. As the Second World War was winding down the emergence of so many innovative German weapons was truly remarkable. One can only imagine how powerful the forces of the Wehrmacht might have become had they not been smashed upon the rocks of Hitlers lust for power and real estate.Towards the later months of 1944, running through the windswept, rocky crags of the Apennine Mountains, several defensive lines were established by defending German forces which comprised the Winter Line. So well were these designed that some still had not been breached by the end of the conflict. The close quarters combat of these engagements was the inspiration for this diorama. At times, due to the limited amount of flat terrain forces tended to co-mingle. And especially after dark, there were numerous times when Allied and Axis forces passed each other literally at arms length.
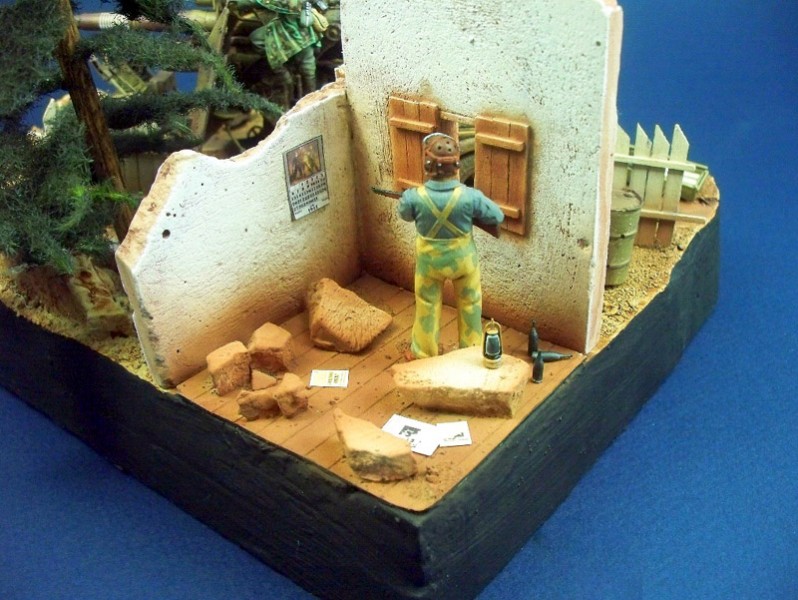
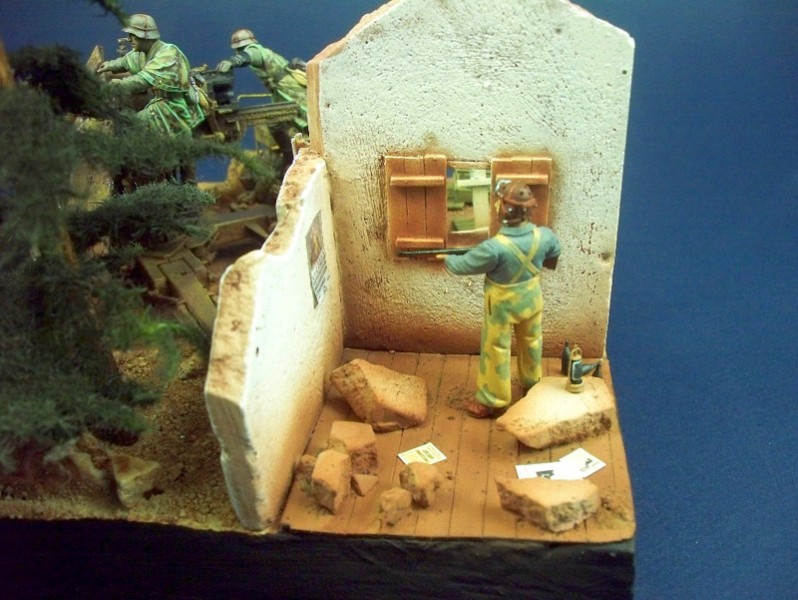
In this scene, an American tanker, evidently cutoff, or more likely out scavenging for vino, has been intruded upon by a very dangerous adversary .the dreaded eighty-eight as they were commonly referred to. His quandary, whether to reveal himself and fire upon the enemy, or quietly sneaky out the back way? I would guess he chose the latter but who knows? For this build I chose Dragon kit no. 6287 88mm FLAK 37 along with the fantastic Hobby Fan FLAK Set #3 kit no. HF571. The US Tanker is from Verlinden kit no. 1971 No Glory.
The Build
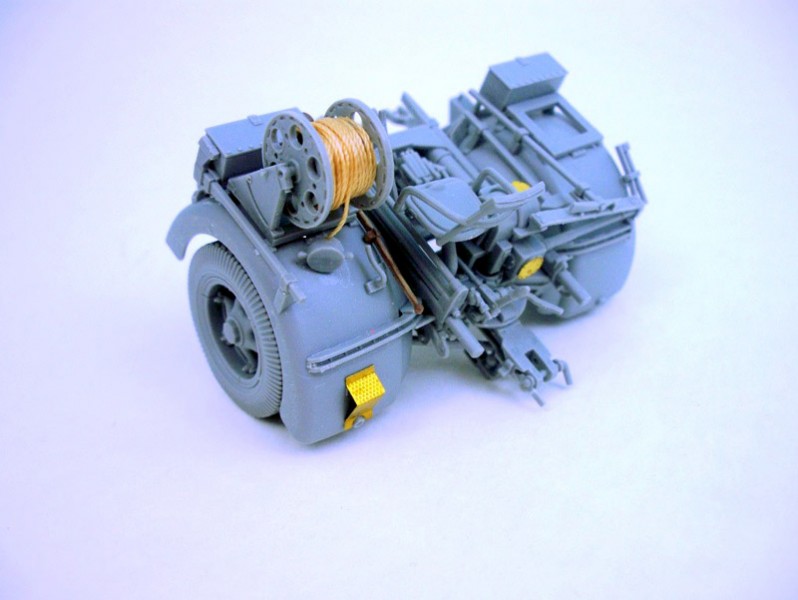
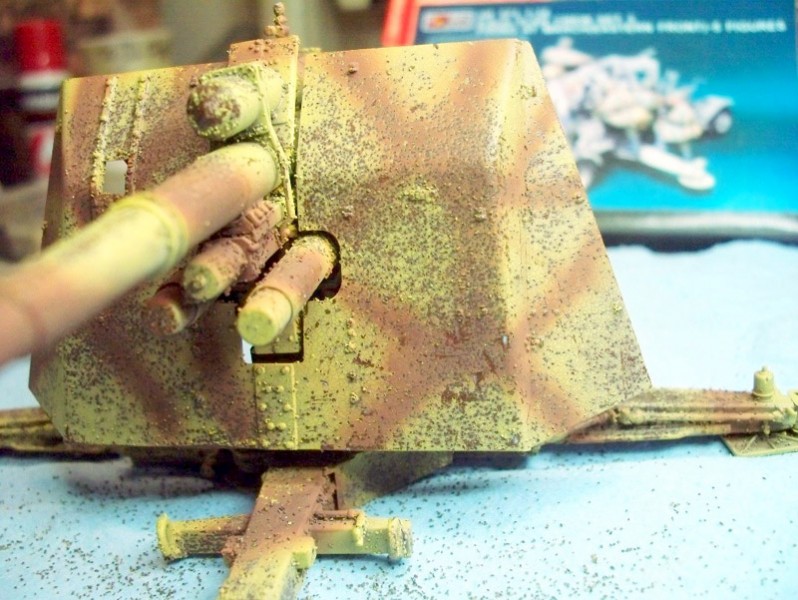
The kit construction is very tedious on this gun; very close attention must be paid to every step and diagram. As there are three different versions offered of the build the directions can be very challenging even though they are color coded. The two carriages were each a challenge and with the main gun more or less a smooth build. The numerous carriage pieces are very delicate and removing sprue stubs should be done with extreme care. For the gun barrel there are actually four different options, with optional metal or plastic parts. I chose the single piece aluminum option.Painting
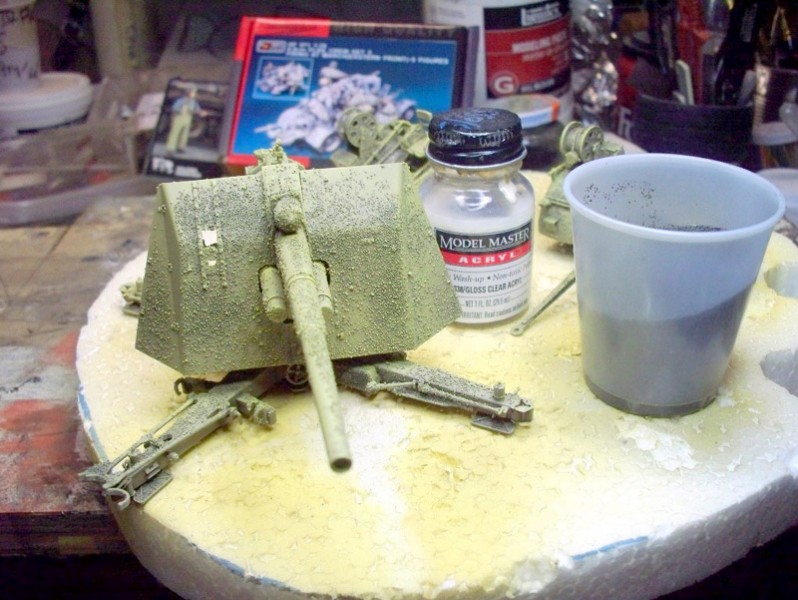
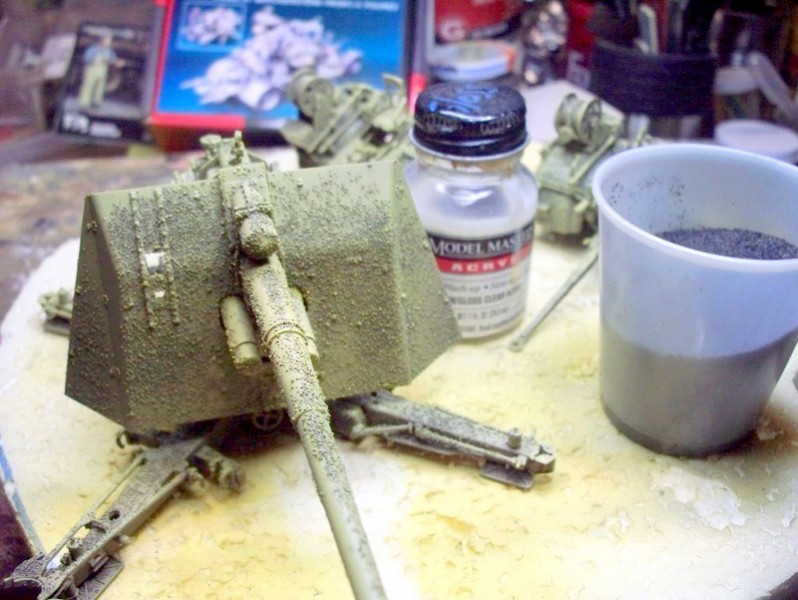
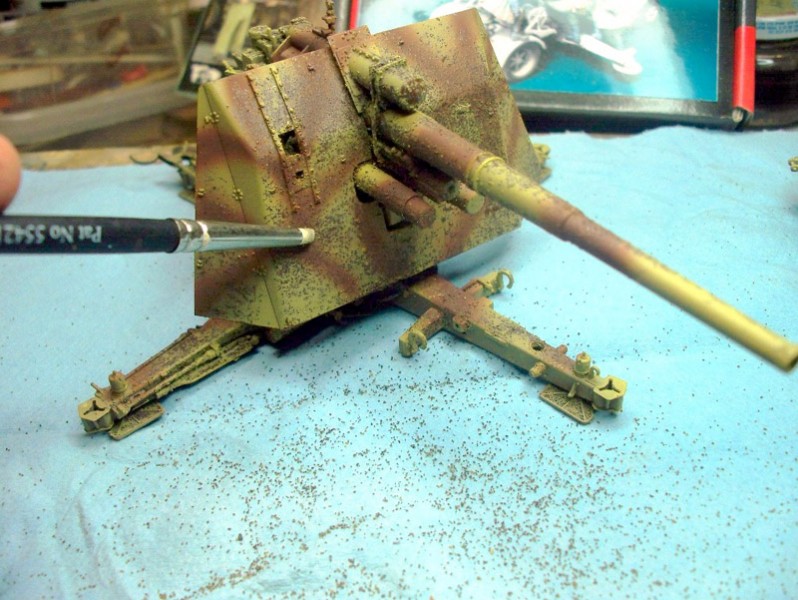
The painting and weathering of the FLAK 37 started with a layer Tamiya Fine Primer followed up by a shading coat of Tamiya Flat Black XF-1 followed up by Tamiya Red Brown XF-64. Tamiya Desert Yellow XF-59 was used as the base coat with camo provided by Tamiya Red Brown XF-64. But, before either of those were applied I decided to try something new. I wanted to show a very scale-true type of weathering and chipping and so forth. I used to use Sea Salt which was scattered over a water-misted surface of the model which looked great but produced the side effect of a sweating model. This time I used Tamiya Clear XF-22 air brushed onto small areas onto which I sprinkled Woodland Scenics Small Ballast. I applied the base coat and camo layers over this material and picked off the tiny bits of rock with a rubber mold tool.Next the entire model was airbrushed with Tamiya Clear XF-22 and the decals were applied with the aid of Microsol and Microset. The entire model was then given four washes of Rembrant Raw Umber Oil paint and underside of the model was airbrushed with Tamiya XF-52 Flat Earth. The entire works was then airbrushed with Model Master Flat.
Figures
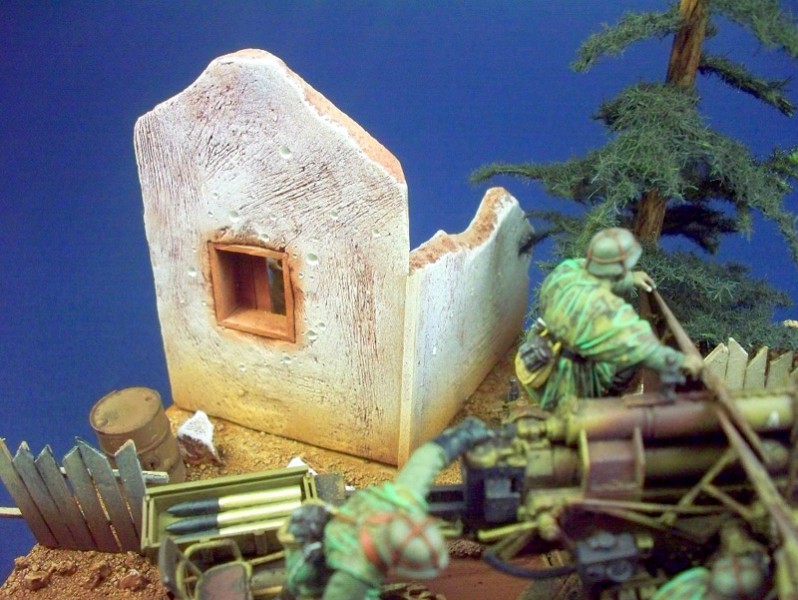
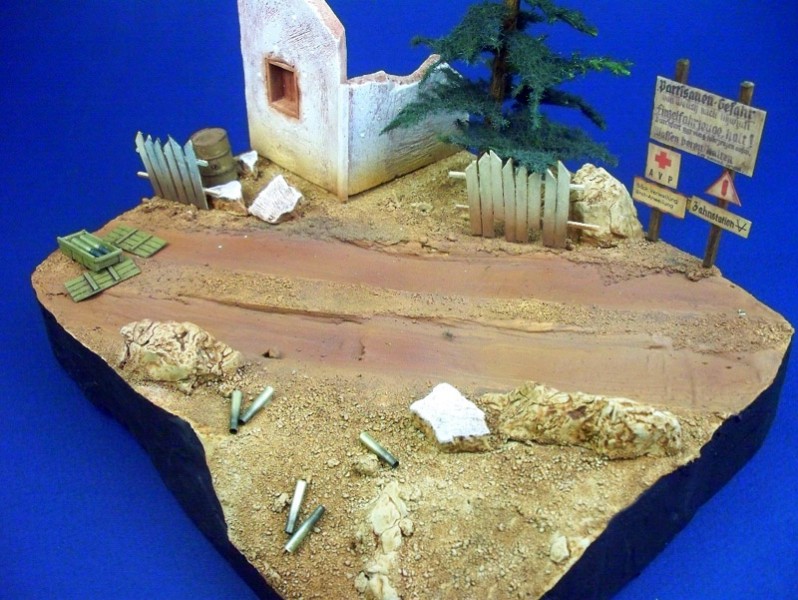
The figures received the same base coating and shading aside from a wash of Rembrant Raw Umber Oil paint were completely done with Vallejo Acrylics in the eye-dropper-style bottles. The base coat for the German Zeltbahn was Vallejo Khaki 988 with camo areas composed of Vallejo Mahogany Sand 846 and Vallejo US Tan Earth 874. The Zeltbahn, or German shelter quarter, is an item of basic military equipment that was produced in the millions and was an innovative military garment inspiring many variants across the world. The base uniform was Vallejo German Uniform 920 with no highlighting. The boots, belts, and gloves were painted with Rembrant Lamp Black Oil paint. The faces of all the figures were first basecoated with Vallejo Brown Sand 876 and subsequently highlighted with Vallejo Light Sand 928. The US Tanker was similarly painted with Vallejo Dark Gray 994 shirt and Vallejo Tan Yellow 912 overalls.As for the base, the building ruin was scratch built from plaster with wood stock for flooring. The evergreen made from a stained wooden dowel and Rustoleum Dark Green Enamel painted plastic ferns from the Floral Department. The base itself was made of standard styrofoam coated with Winsor Newton Modelling Paste and covered with some resin molded boulders and assorted small rocks. The road sign was scratch built with use of Verlinden No. 20 German Road Signs Russia.
Overall, the effect of the server crew on the 88mm FLAK 37 is a very effective and action-packed scene and I was very pleased with the results. The kits were really a pleasure to build and the improvisation of scratch building was great fun.

About the Author


FROM: TEXAS, UNITED STATES
Semi-Amateur modeler. Write for Scale Military Modeler International magazine free-lance. Produce commission work for a few select clients. Judged several IPMS events. Work almost exclusively in WW2 Scale Armor (preferably 1:35 scale). Dioramic subject that I enjoy the most involves tying Air/Ar...
Comments

Click where it says 'Link to Item' - the link is there, it's just not highlighted.
John
MAR 06, 2010 - 02:07 AM

Rob I am glad to see that my pushing you to provide features has now got to this stage, Great diorama this is your best yet, keep up the good work.
APR 06, 2010 - 04:44 PM

Hi Ron,
Excellent job, I like the split level view and your troops and the 88mm look exceptionally well done. The setting is small but adequetly shows off the main items of the build whilst still having other interesting things to look at.
Excellent stuff.
Al
APR 07, 2010 - 06:38 AM

Thank you guys. I really appreciate the input. I have taken to placing my dios on a wood stained base. A bit more polished look. 
APR 19, 2010 - 01:28 PM
Hi Rob,
Great little dio.
I like especially the composition and layout with the little slope.
You should replace the fir.For me it nearly breaks the whole thing. If this is your choosen height, it should be thinner at the base and thinned a lot more on the top or it should be really higher and correctly thinned down at the top.
Cheers
Claude
APR 19, 2010 - 06:34 PM

Very nice diorama Rob. I particularily like the camo on the German zeltbahn.
APR 19, 2010 - 07:23 PM

Well Done ! I especially like your scenic and gun detailing . The figures painting, (Camo) is also Very Well Done. milvehfan
APR 19, 2010 - 08:18 PM
Good advice on the evergreen. I have been working on realism and that will help.
APR 21, 2010 - 06:12 PM

first off, i have to say it looks great. and definately better than i have done. i do have some constructive criticism on a couple things that really stick out to me. take it for what its worth, but i figured i would throw it out there so you may use it in the future.
im a firm believer in a diorama telling someone a story without any words.
my number 1 thing that made me post to this was to ask, what in the world is the guy doing off in left field, in the building? doesnt really make any sense to me. i would "assume" he was placed to show a local staking and protecting his ground? may just be me, but he is just a little out of place.
second, the figures, even though they are well done, there is an uncommon mix of action and relaxed. not really sure if they are prepping to fire, or just kinda hanging out. you placed 3 soldiers gawking over the soldier of someone aiming the weapon. then the commander enjoying the view. again, it makes me confused as to what is happening in the scene?
lastly, even though there wasnt much of an option, and it almost may seem nitpicky....but the shells would be on the wrong side. well, "wrong" is kind of a harsh word. but i noticed the breach opening is on the inner side. most appropriate location for the spent shells would be on the breach opening side of the weapon. as far as that goes, i can understand that could have been done the way it is to break up some blank terrain. also, the rock on the foreside of the cannon looks "placed". may be shadows, but it looks like i can see the bottom of the rock?
hopefully no bad feelings. just wanted to throw in my observations to hopefully help you out in future builds.
overall, i think it looks great. i love the color and weathering of the weapon and its platform. great work on the terrain. i especially admire the road work and the tree work
AUG 23, 2010 - 04:59 PM
Copyright ©2021 by Rob Liles. Images and/or videos also by copyright holder unless otherwise noted. The views and opinions expressed herein are solely the views and opinions of the authors and/or contributors to this Web site and do not necessarily represent the views and/or opinions of Armorama, KitMaker Network, or Silver Star Enterrpises. All rights reserved. Originally published on: 2010-03-06 00:00:00. Unique Reads: 29281

WEB HOSTING BY


Copyright ©2021 Armorama and Kitmaker Network, a subsidiary of Silver Star Enterprises
All Rights Reserved. Please read our Conditions of Use and Privacy Policy.
All Rights Reserved. Please read our Conditions of Use and Privacy Policy.