

1⁄35The Diary of a Winter Diorama
The Process
01/19/04: I determined from my reference picture that the decals would need to be added to the Tiger before doing the winter whitewash (which in the reference picture had been roughly brushed on leaving the tank's markings showing). So I brushed MM gloss acrylic coat onto the areas where I would be applying the decals. I allowed that to dry overnight and then applied the kit decals. I then brushed a MM flat acrylic coat back over the decals in preparation for the winter whitewash.Winter Whitewash: First I used white Winsor & Newton (WN) watercolor out of a tube; diluted it with water and brushed it over the surface of the tank. I continued to brush until I got a somewhat white filmy coverage over the tank's surface. I allowed this to dry overnight.
Again using my reference picture as a general guide, I brushed thinned FolkArt Winter White acrylic paint onto the tank. I allowed this to dry for a short time and then took Q-tips dipped in rubbing alcohol and rubbed across the tank's surface to create a worn, somewhat faded look. I did this a couple of times in certain areas. I allowed this to dry for a short time and then sprayed the entire model with MM Acryl Gloss Coat.
Figures: I applied a base coat to the flesh areas using Humbrol 118 (which I believe is U.S. Tan) on top of the grey primer. I allowed this base coat to dry overnight and preceded to use the oil painting technique I learned from Jon Baker, a fellow member of the Houston Armor Club. I quickly brushed on a thick Raw Umber coating, allowed it to sit for a few minutes and then brushed it off. I then mixed up my flesh mix of about 2/3's to 3/4's Oil Flesh to the Yellow Ochre. I added white, then a dash of red until it looked right to me and applied to the flesh areas.
Next I added more white to the mix and did the highlight areas and blended the flesh. I did not attempt the eyes as they seem out of scale and unnecessary for a 1/35 scale diorama.
Overall, this is a quick, effective method for painting the flesh areas for a 1/35 scale diorama, as I was able to complete all of the figures in a single evening's work lasting a couple of hours duration.
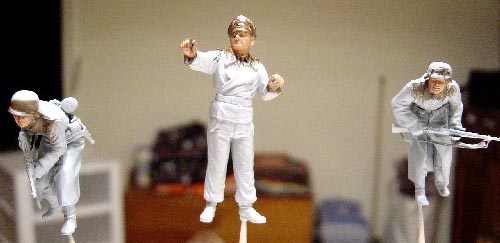
Tank Commander: I used PollyScale (PS) Scale Black for the uniform and hat and painted the shirt with DecoArt Neutral Gray. The photo-etch headphones and throat microphone were painted MM Leather and MM semi-gloss black. The waffenfarbe edges were painted pink using craft acrylic paint. I attached the wires and the photo-etch piece of the headphones using superglue.
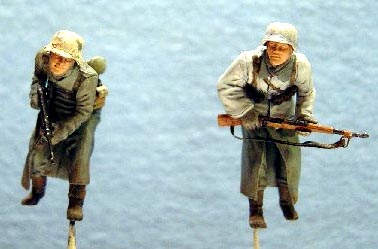
The infantry figures were painted using several different field gray paints. I also varied this within each figure's coats and pants. These were: PS German Uniform Gray; a DecoArt mix consisting of French Grey Blue and Hauser Medium Green (60% to 40% approximate); and MM German Uniform Feldgrau. Gloves and sweaters on all figures are DecoArt Neutral Gray. Smock and Helmet Cover are both PS RLM 63 Lt. Grey. All leather items were base coated Humbrol Brown Bess and were eventually given a black oil wash. Kit Bags were painted PS Panzer Dark Yellow. Map Case is MM Leather. Binoculars are MM Semi-gloss Black. Canteen is MM Panzer Schokoladenbraun. Canteen Cups are MM Olive Drab. Gas Mask Cannisters are also MM Olive Drab. Shovel Handles were painted Nutmeg Brown. Shovel blades were painted with PS RLM 62 Green. PS Scale Black for Helmet. Applied Kosher Salt to helmet with water and allowed to dry for a day and then brush painted PS Dirty White and knocked off the salt for the chipped look. Painted rifle with MM Wood then went over it again with Nutmeg Brown.


About the Author


Comments


All Rights Reserved. Please read our Conditions of Use and Privacy Policy.