

1⁄35Building a Ruined Farm House
15
Comments
here are the vines....
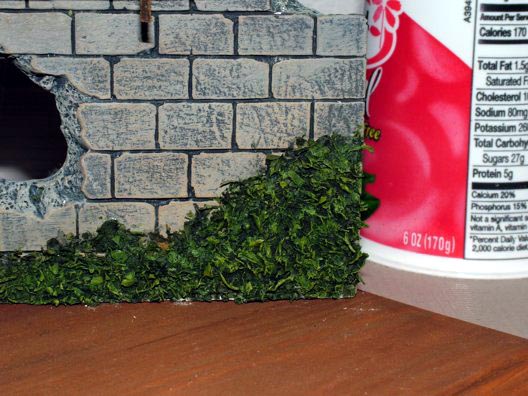
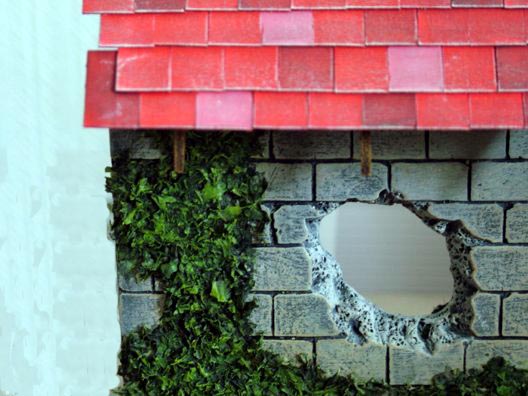
Next came the vines. Now that was fun. Since I have never done one of those, I was very excited to give it a go. Here is the basic technique:- Spread some white glue on the spot where the vines are to go
- Sprinkle dried parsley flakes over the glue and let that dry for a little bit
- Apply more glue over the previously sprinkled parsley and sprinkle some more flakes (this is to give it some depth) and let that dry completely
- Paint the flakes dark green - this is more like a thick wash then actual paint
- Apply a couple more washes (lighter green) over the newly created vines but stay away from the edges. You want to keep them darker
- Dry brush entire vine with lighter shades of green and in some places yellow.
here is the roof...
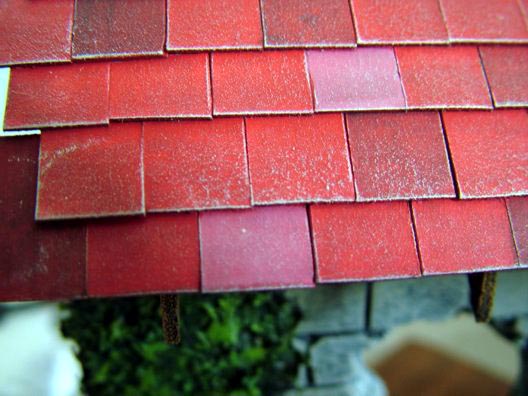
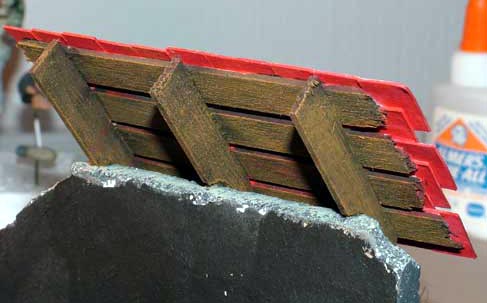
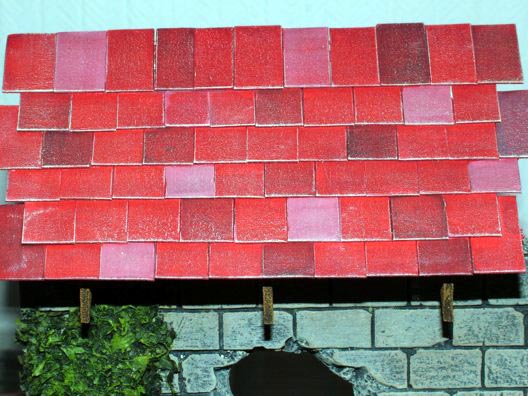
Construction of the roof presented a problem to me as I am not an architect. I did a bit of research concerning that aspect of my project and in the end decided on a steep angle sloped roof covered in clay shingles. The frame for this roof was constructed from three wider and four thinner pieces of balsa wood. The wider pieces are what is giving the roof its pitch and the thinner pieces are laid across the roof to give support to all the shingles. I used the same technique painting the roof frame as I did the fence. Shingles themselves were made out of thin cardboard. I cut it into rectangles, glued them individually to the roof frame and then painted them with acrylic paints. After the paint dried I gave it several dark brown and black washes and then dry brushed with beige.When the roof was done I glued it into place with 5 minute epoxy.
About the Author


FROM: MASSACHUSETTS, UNITED STATES
I have been building models since I was about ten years old. My uncle, who a the time lived in Holland, introduced me to model-building by giving me some of his unbuilt kits. They were mostly Tamiya's German Armor and figures. I immediately caught the bug so to speak. Like many others, I put my ...
Comments

Marty - your woodwork and vines are EXCELLENT.... the nail holes and aging of the wood was particulary good, and is often something overlooked.
My only problem is the roof shingles... they appear to be FAR too large... in scale, wouldn't they be far smaller? They look like plywood sheets rather than shingles.
JUL 12, 2004 - 12:05 PM

Keith, you are probably right. I had nothing to go by so I sort of eyeballed them and they do seem a bit big. This entire project was just a way for me to test a whole bunch of new techniques and to be honest I never actually intended for it to end up as diorama. I certainly didn't think it would be good enough for a Feature Article but I am glad it did. I have learned a lot during this project and now know what not to do next time.
JUL 12, 2004 - 12:18 PM

Your work is excelent. Thanks for sharing this little beauty with us , The roof tiles can be corrected easily, but it's not so necesary.
JUL 12, 2004 - 06:54 PM

Marty: your practice diorama looks great, particularly the grass and wall. A quick question: in your article you just said you painted the wall, did you use a brush or airbrush for that painting?
Thanks,
Keith
JUL 13, 2004 - 05:55 AM
Thanks Marty. I am in the middle of a diorama and I have been trying to decide how to paint a wall made out of cork as well as a Verlinden building. You have added some additional food for thought.
Keith
JUL 13, 2004 - 09:33 AM

I must echo all the praises already stated by my fellows here at Armorama. The only criticism I have is in regard to the bricks of the building where the damage has occurred. The way the work has eben scribed, the bricks appear to be almost like a veneer placed over a solid concrete wall. What I mean is the mortar gap between the bricks appears only on the surface and does not appear to continue through the brick wall. Does this make sense? The damage also is very regular giving the appearance of a whole punched through a solid object rather than a hole blasted through an aggregate of individual bricks held by mortar. This is the impression I get from the pics anyway. Otherwise it looks very good.
JUL 13, 2004 - 10:23 AM
Scott,
Your point about the mortar lines is valid and has been brought up several weeks ago when I first introduced my project to Armorama community. I contemplated making necessary modifications but at that point in time I was too far into this project. I was afraid that I would possibly do some unnecessary damage to the wall and surrounding area if I started to mess with it. I decided to keep it the way it is but will definitely pay attention next time I build a wall with a big'ol hole in it.
JUL 14, 2004 - 12:40 AM
Hey Marty!
I hope you know my comments were not intended to be negative, but encouraging. I didn't see the previous comments on this. I think overall you've done a fabulous job on the piece. It turned out very well and it will only be improved by the addition of some figures or AFVs!
JUL 14, 2004 - 03:22 AM
Yes I know, although all comments are welcome. Things need to be criticized so that they can be improved. I appreciate both, negative and positive comments.
JUL 14, 2004 - 03:54 AM
Copyright ©2021 by Martin Wasiak. Images and/or videos also by copyright holder unless otherwise noted. The views and opinions expressed herein are solely the views and opinions of the authors and/or contributors to this Web site and do not necessarily represent the views and/or opinions of Armorama, KitMaker Network, or Silver Star Enterrpises. All rights reserved. Originally published on: 2004-07-11 00:00:00. Unique Reads: 16455

WEB HOSTING BY


Copyright ©2021 Armorama and Kitmaker Network, a subsidiary of Silver Star Enterprises
All Rights Reserved. Please read our Conditions of Use and Privacy Policy.
All Rights Reserved. Please read our Conditions of Use and Privacy Policy.