

1⁄72Hasegawa Sherman in Operation Ripper
11
Comments
COLORS AND MARKINGS
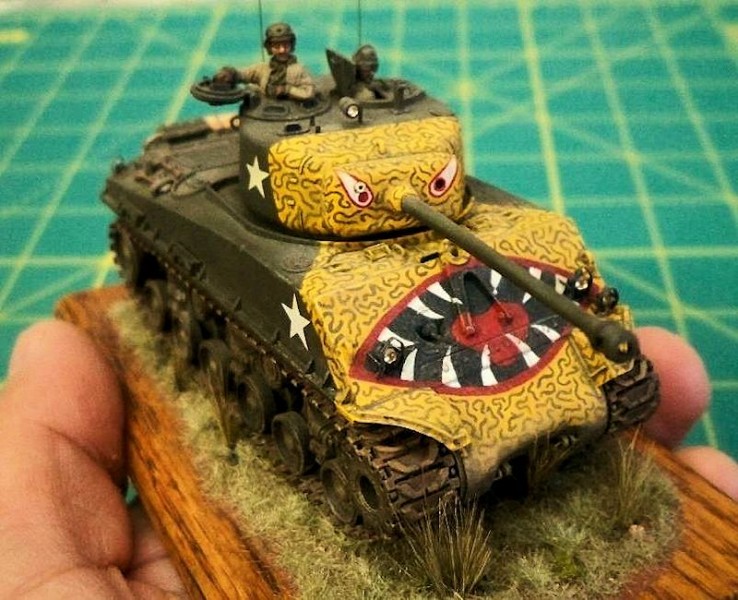
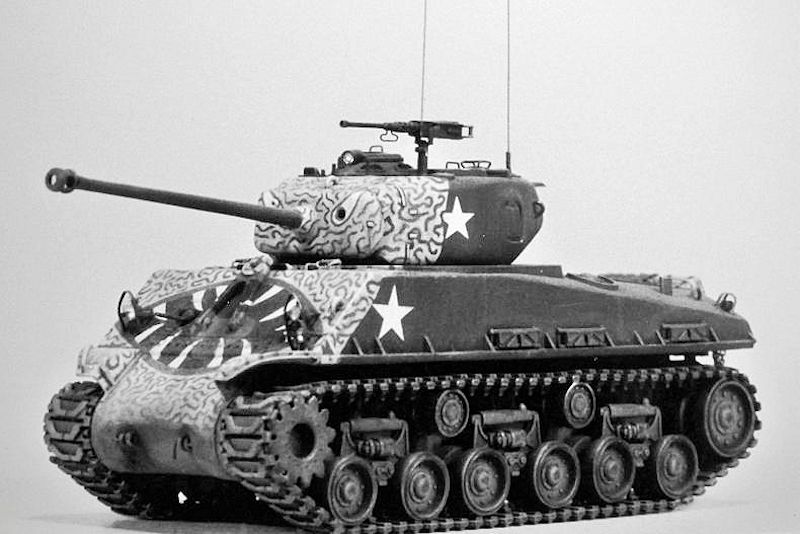
I built this tank to represent one of the famous tiger face Shermans of Company C, 89th Tank Battalion, U.S. 2nd Infantry Division near the Han River, Korea during Operation Ripper in March, 1951. According to Zaloga and Balins Tank Warfare in Korea 1950-53, This was one of the first examples of the tiger faces and was designed by Lt. Fred Wilkins and painted by Sgt. Joe McCoy. The scheme included a basic yellow background with small squiggles in olive drab or black. The yellow extended a short way back on the turret (about 18-24 inches) and about 18 inches on the hull sides. The outlandish paint schemes seen on many vehicles participating in Operation Ripper were apparently intended to both spook the supposedly superstitious Chinese and Koreans and boost the morale of their own crews. The idea may have been to take advantage of Chinese astrology, 1950-51 being a Metal Tiger year. If so, they got it wrong; 1951 was indeed a Metal Tiger year, but Chinese astrology is based upon the lunar year which ran from February 17, 1950 through February 5, 1951. By the time Operation Ripper was launched on March 6 the lunar year had moved onto the Year of the Rabbit! Of course they could have adjusted the schemes, but somehow rabbit-painted tanks just wouldnt have been quite as intimidating... Applying the dramatic tiger face was not as difficult as it may appear. There are aftermarket decal sheets available to accomplish this and other Korean War tigers, but applying decals over large surfaces tends to cause no end of problems (at least for me). Besides, the simpler schemes such as this really arent that hard to paint freehand. So, as with the original, this tiger face was hand painted. Theres no trick to it, just work slowly with well thinned paints. Following a base coat of Model Master Olive Drab (FS34087) and applying the kit decal stars, I airbrushed a coat of flat yellow over the fronts of the hull and turret. Next, the black mouth was applied by brush, followed by the white eyes and teeth, then the red tongue, mouth, and eye outlines. Olive drab squiggles applied with a fine brush over the remaining yellow completed the scheme. Weathering was minimal since the tiger faces were painted immediately before Ripper, and photos of these tanks at the time show fairly clean vehicles with just a light covering of road grime and dust. I contented myself with a thin dark gray wash and some tan paint dust.FINAL CONSTRUCTION
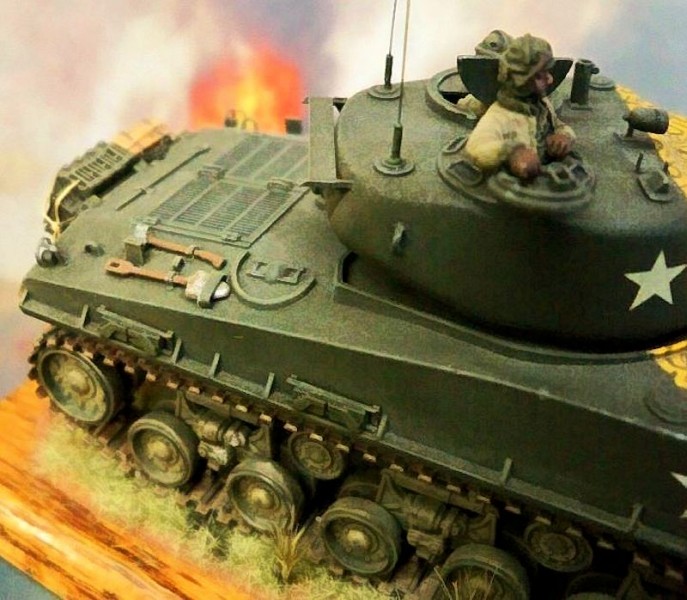
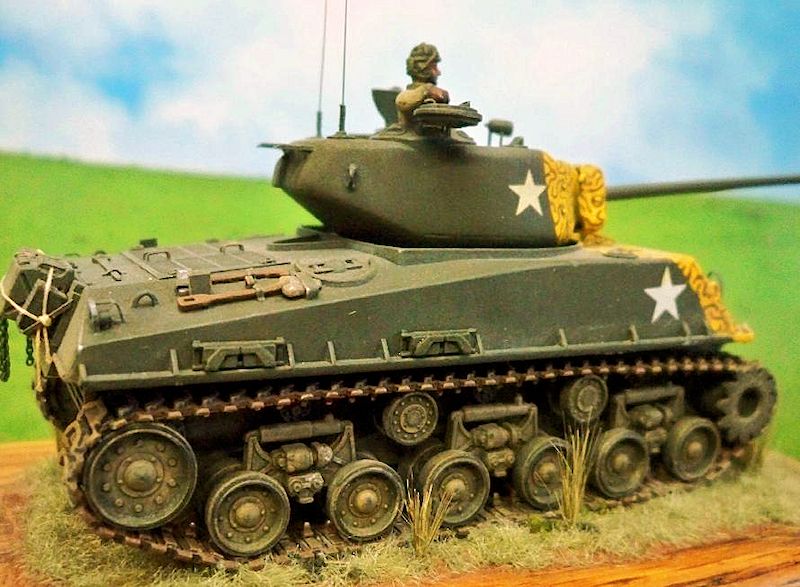
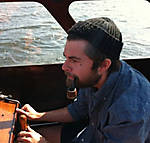
The kit supplied crew figures were crudely done, so I tossed them and initially completed the tank with the hatches buttoned up. I later picked up a set of Milicasts resin American AFV Crew in Casual Poses #2 whose World War Two-era uniforms also work well for Korea. Labeled as 1/76th scale, the figures measure 25mm high, making them about 5 feet 11 inches tall in 1/72nd scale... or 5 feet 10 inches in 1/71, or 5 feet 9 inches in 1/70, depending on how you scale the vehicle! The excellent but slightly exaggerated sculpting of these tankers suits them well to this overscale Sherman, so I opened up the turret hatches and dropped them in. The weird scaling of this model makes it look odd next to my other, more accurate, 1/72 Shermans, so to make the difference less conspicuous I put it on its own base. The wood is a decorative oak wall light switchplate which (to the dismay of my wife) I liberated from its former use and covered with Das Pronto modeling clay. Woodland Scenics model railroad static grass and weeds, along with a bit of sand and few small pebbles, complete the groundwork.CONCLUSIONS
Hasegawas 1/72 Sherman is a well detailed, inexpensive, and readily available kit, but it suffers from scale/proportion issues and poor tracks. The only M4A3E8 Sherman available in the scale when I built this one way back in the early 1990s, it has since been eclipsed by more accurate M4A3E8 releases by Trumpeter, Dragon, and UM (Unimodel). Any of these would be a better starting point today for a late model M4. Still, if you arent too hung up on accuracy and are willing to do some extra work, Hasegawas venerable kit can be built into a good looking little Sherman.REFERENCES
- Armour of the Korean War 1950-53 Simon Dunstan, Osprey Vanguard No. 27, London, 1982.
- Sherman History of the American Medium Tank R.P. Hunnicutt, Presidio Press, Novato, CA, 1978.
- Tank Warfare in Korea 1950-53 Steven J. Zaloga and George Balin, Concord Publications, Hong Kong, 1994.


About the Author


FROM: CALIFORNIA, UNITED STATES
I am married with three daughters and a son, and I oversee the team of regional workforce policy advisors for the State of California. My wife is an elementary school teacher. Ive been building models since I was five years old (my first model was a NASA lunar module bought for a dime from a mag...
Comments


Very nice, Tim!
Why did you remove the .50 cal M2 MG? It looked pretty good in the b&w images.
SEP 22, 2012 - 04:46 PM

Amazing detail and such clean lines for something so small! Plus your backgrounds on the first page are just awesome.
SEP 22, 2012 - 09:27 PM

Very nice work Tim. I'm impressed with all the detailed work and corrections performed on this smaller scale which brings it up to par with most larger kits.
Thanks SO MUCH for showing us how it's done!
~ Jeff
SEP 23, 2012 - 12:58 AM

Thanks, guys, I appreciate all your kind comments. In answer to your question, Jeff, I originally built the tank with the .50 cal MG on the turret, but when I went back to open up the hatches and add the crew I found that the big MG interfered with the gunner figure. Couldn't figure out a way to position it or him so it didn't block his face, so I took it off.
It was a bit vexing to remove it since I had put a good deal of work into the thing (drilling vent holes in the sleeve, hollowing out the muzzle, wire and plastic details, etc.), but it won't go to waste; I'll reuse it on a Vietnam-era M48A3 Patton build I plan to do eventually.
SEP 23, 2012 - 01:56 AM
0
Doh!
Hi Roy,
Thanks for the heads-up. It is annoying that I got those details wrong, but I do appreciate your advice. (I had wondered why there were TWO headlights on the left side...!) Guess next time I'll do my research a little more carefully.
By the way, it was kind of you to point these oversights out to me in a personal message, but I wouldn't mind at all if you reposted this on the forum. No sense anyone else repeating my dumb mistakes!
regards,
Tim
--------------------------------------------------------------------------------
JAN 09, 2013 - 03:44 AM
(forgot to post ericadeane message to which I responded)!:
Great paint job there Tim. Fun to look over pics of your completed model. May I make two suggestions?
1) the spotlight atop the turret has its lens too far forward. The cylinder to which you attached the (MV?) lens is actually a shroud. The glass, on the real thing, would have been about 4 inches inset from the end of the shroud. The cylinder was to focus the spotlight beam.
2) the item on the glacis below and to the left of the left headlight was a siren and not something that would require another MV lens.
Hope these help.
JAN 09, 2013 - 03:46 AM


Just found this over your profile....absolutely stunning Sir!!!! Congrats on a tiny beauty!! Cheers Romain
JUN 18, 2014 - 07:49 PM
oh wow, very nice! That paint job is really cool, especially in this scale
JUN 18, 2014 - 08:19 PM
Copyright ©2021 by Tim Reynaga. Images and/or videos also by copyright holder unless otherwise noted. The views and opinions expressed herein are solely the views and opinions of the authors and/or contributors to this Web site and do not necessarily represent the views and/or opinions of Armorama, KitMaker Network, or Silver Star Enterrpises. All rights reserved. Originally published on: 2012-09-23 00:00:00. Unique Reads: 17011

WEB HOSTING BY


Copyright ©2021 Armorama and Kitmaker Network, a subsidiary of Silver Star Enterprises
All Rights Reserved. Please read our Conditions of Use and Privacy Policy.
All Rights Reserved. Please read our Conditions of Use and Privacy Policy.