1⁄35Dragon Wagon Soft-Cab Conversion
In Brief
This conversion was intended to fit the Tamiya model kit, so I didn't pay as much to critical measurements of the real vehicle as I did on proper assembly in mating it to the receipent kit. When done, it does measure out correctly and is visually appealing. I measured and photographed a real example housed at the Military Vehicle Technology Foundation collection where I perform Docent duties to supplement the Trakz instruction sheet. This was helpful to me during assembly to clear up some vague areas. I consulted my copies of TM 9-767 on the M25 40-ton Tank Transporter, Ampersand Publishing's Dragon Wagon - A Visual History of the US Army's Heavy Tank Transporter 1941-1955, and The Military Machine's coverage in Dragon Wagon - Pacific Can and Foundry TR-1 M25 Tank Transporter. I recommend all of these though coverage on the Soft-Cab is scant.Basic Construction
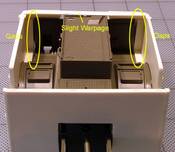
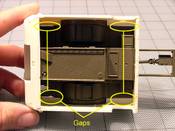
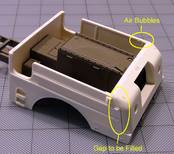
I experienced minor warpage and a couple of bubbles in the example I received for review. It is of note, however, that I purchased a second conversion to compare against - and the warpage and bubbling did not occur in the same parts. I also entered into basic assembly to give the reader a sense of what they might encounter in working with their conversion.Four panels make up the basic Cab - front, two sides, and a rear panel. The front and leading portions of the side panels carry heavy "steps" cast into them for alignment. My rear and side panels were slightly warped - but easily straightened out with a dip in warm water and clamping between a couple of heavy R.P. Hunnicutt books to cool. My front panel wasn't warped, but it called for a little preplanning and photos from references to figure out where I should begin cutting to remove the pour gate. It wasn't too tough to get them all together properly, though you will need a generous amount of your favorite putty/filler to close the gap between the front and side panels. The rear panel doesn't call for much, and if you trim it properly, the seam runs along a weld seam line on the real vehicle.
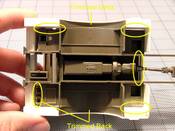
With the basic Cab walls put together - I went straight to mating it to the Tamiya M26 Tractor (Chassis - Part #D22). I recommend this because of the amount of handling you might have to do while fitting the two parts together. As cited on the PMMS Website Review, you'll need to trim 1mm of plastic from the outer edges of Tamiya's Chassis' Fenders. Likewise for the footboards ahead and behind the Fenders. Engine Compartment Walls (Parts #D15 and #D15) and the forward panels (Parts #D24 and #D26) call for slight trimming on their outside-facing edges too to make room for the Trakz Cab. After test-fitting and trimming, I wound up removing the same amount of material as suggested by Terry Ashley's Review.
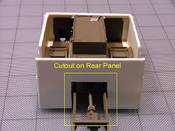
In both examples of the Trakz Conversion I had, the cutout on the Rear Cab Wall was not centered, requiring some careful trimming to allow the Cab subassembly to sit squarely on the Tamiya Chassis. Not a major problem to deal with - but something to be aware of in your kit if you begin to have fit difficulties.
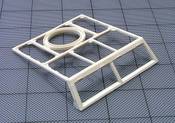
In both examples of my conversion kit, the tubular "cage" that fits over the open-topped Cab was warped. Both called for careful and dedicated cleanup exercises to not remove any of the wonderful details cast into the part. Mine were also cast out of round, calling for some judicious use of the old Flex-i-File to round them back out. If you do not have this aircraft modeler's tool - consider getting one. It works wonders on AFV gun barrels too.
I addressed the warpage of the "cage" during attachment to the Windshield Frame. This corrected the problem in both examples of the conversion kit. I did not attach my Windshield Frame/Cage assembly to the Cab until after all filling and sanding was complete. The rest of the resin parts and photoetch attach without problem. The detail present on the Trakz conversion matches what's present in the Tamiya parts - so you're not compelled to go out and purchase another set to detail both.
More to Come - Later
Overall, the Trakz conversion is a good value and does indeed capture the subtle essence of the real vehicle. I do not recommend the kit, however, for modelers unfamiliar with the techniques successfully getting resin miniature subjects together properly. The master for this conversion, done by Michael Kalbfleisch, is excellent, and is not found wanting for detail. Mike is covering constructing this conversion and adding some of his thoughts that went into creating it over at VLS Corp's Planet Armor Website at the time of this writing. I do recommend purchasing this conversion for your modeling efforts.The Trakz Dragon Wagon Soft-Cab Conversion reviewed here was graciously provided to Armorama by VLS Corp. A second conversion for comparison was provided for review here on Armorama by GunTruck Studios. I will follow this Review with a full-buildup of the Trakz/Tamiya combination in the near future.


