

1⁄35Die Pressung
33
Comments
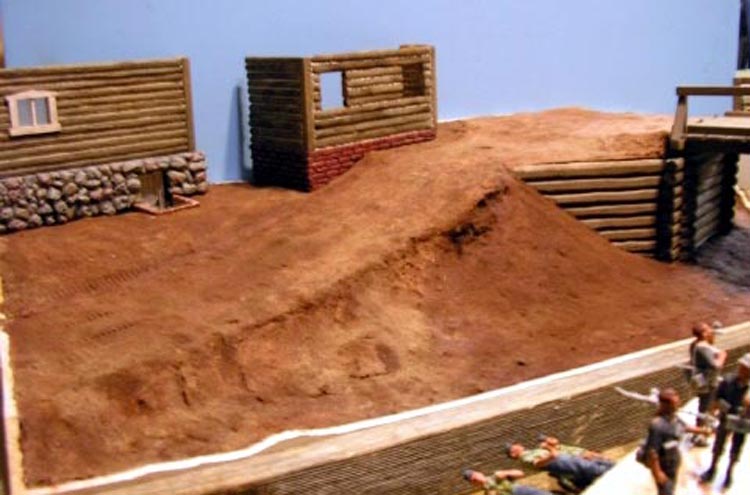
Breaking Ground

Ok now that the Celluclay is all dry it was time to lay out or "map" out the locations of things like the road and houses. For this I cut cardboard templates to lay on the ground where the houses would be located. After finding the proper locations I cut straight into the groundwork for the foundations of the houses. Basically digging out the ground for the basements. After adjusting the roads position to allow for having some yard for the houses it was time to do a little more Celluclay work to get the final contours and to also lay the tracks for the vehicles so I spread the Celluclay building a thin layer where the roads were and then pressing the tracks into it to show the vehicle paths. Again do not forget to add the fine sand after this step. After this dried I started to paint the dirt with a cheap acrylic dark brown color that was thinned some. This is just to soak in to the Celluclay and give it some color so it doesn't soak up the good paint as much. When this dried I applied Pollyscale earth paint to everything that was dirt. This is my favorite color for doing groundwork, it always comes out great. After this is dry I do an oil paint wash with burnt sienna, followed by a wash of raw umber about 20 minutes later. This was left to sit for about 1-2 hours and repeat the wash steps. Then allowing it to dry over night I drybrush it with the Pollyscale earth paint again. I do not lighten the colors at this time and dry brush more as in this case after it was dry I decided to give it a dirty wash of burnt seine and raw umber mixed, coat the entire ground work. This was drybrushed again later with successive lighter shades of the base color.
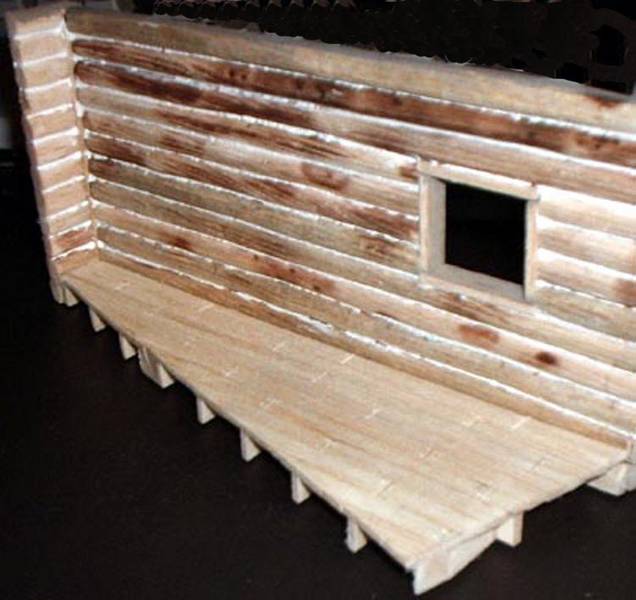
House 1

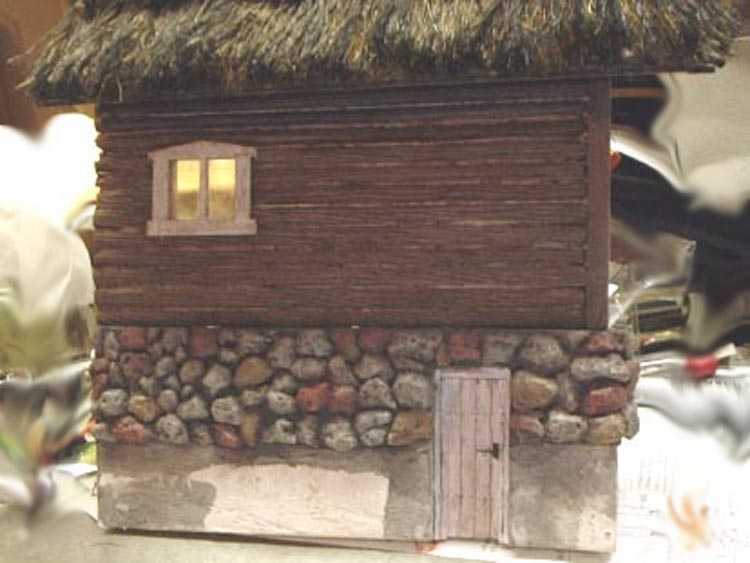
The first house I decided I wanted to have a basement with stone walls for the lower level. This was accomplished using foam board and Woodland Scenics talus. For the stairs leading to the outside basement door I used balsawood and Tamiya brick set that I am sure everyone has around but doesn't know what to do with. The door was made from balsa strips and uses dollhouse hinges. The door handle was constructed using a round headed pin. For the upper floor of the house I wanted it to be log construction. Again as the bridge foundation I rounded balsa strip stock on opposite sides so it was round facing forward and backward but flat on the top and bottoms surfaces. After this step came something new to me, I textured the wood logs with a hacksaw blade to give them a nice grain. Now this ran me into troubles as balsa wood gets "fuzzy" so I had to roll the strips over a candle carefully so as not to catch them on fire but to also burn off the fuzz and hairs. After building up the walls a floor was made of balsa strips and also a thatch roof, which was made of unraveled hemp twine. There are some interior goodies such as curtains, table, chair, books, vase, photos, broom, and other items but the thing I like most inside is the rugs by Robert Blokker(FAUST) He had designed some very fine rugs and I added one wrinkle of my own, I printed them on iron on transfers then onto t shirt material instead of paper. Robert, thank you again!!!
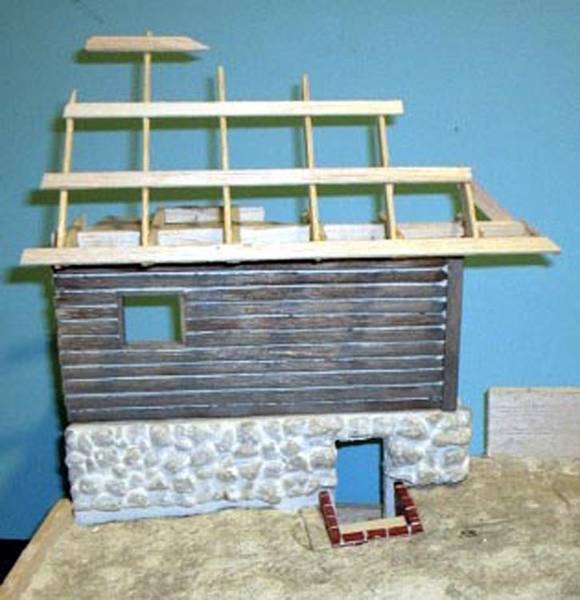
House 2

The second house again used foam board to build the foundation or basement. With the ground cut out in the base, I inserted the basement walls into place. Then I took a pencil and marked off the height of the groundwork on the walls. I then took cork sheet and cut off little strips and squares to make bricks. After following directions from an article on cork bricks in another article in Armorama, I started from the top of the foundation working my way down to the ground level line on the walls covering this area with brick. The upper walls were constructed in the same manner as in building number one, with the exception of two window openings. Once this was all completed, I painted the stone foundation on the first house in natural rock colors and drybrushed them. After that I did the brick colors random shades of brick on the second house. Moving on to the wood timbers, I first made a gray highly thinned wash and applied to all the outer surfaces of the wood. When I had the desired color, I wiped the excess away. Then I took a syringe and filled it with white caulking and filled it between the cracks in the timbers. After this dried I went about doing standard washes using burnt sienna and raw umber oil washes. The interior wood floors and walls for both buildings were treated to a burnt sienna was and then an oil varnish. I then set the houses aside. Then back to groundwork.
Groundwork 2

I decided that the yards needed a fence. For the yard of the first house I decided on wood board fence. I outlined on the groundwork and measured to space the fence post and then drilled the holes, inserting square toothpicks as the fence posts. The boards were put up and finished in the same method as the timbers on the house. Now its time to start the yard!! I had started to add flowerbeds in front of the house with the basement, so I marked off how big I wanted the flowerbeds so I wouldn't cover the natural dirt color with grass. So for the yard inside this fence, I first laid down a layer of PVA glue. To this I put on Hudson and Allen dark green turf. When this had dried I sprayed Woodland Scenics glue over the grass or turf and applied Verlinden static grass. Then moving onto the flowerbeds where different shades of purple candy tuft, dried flowers, and baby's breath were used to make the flower garden. To this I added Woodland Scenics field grass as during wartime, no garden is impeccably cared for. With this, I moved on to the second yard. Again I used toothpicks for the fence posts, but with this fence, I chose a wattled fence woven from the branches of tumble weeds. In this yard, the grass was made of the same mix as the previous yard. And this time I planted two Aber photo etched sunflowers in the yard. I decided to plant some taller Woodland Scenics field grass among the fence on both fences for taller weedier grass, and with this tall grass, intermixed babysbreath flowers that I had dyed with inks.
Heki Heki Heki !!!

I came across a new product that I believe models tall grass very realistically. This product is Heki wild grass. I used this grass along the edge of the long boarded fence and on each side of the drainage ditch at the lower portion of the diorama. This was laid overtop of the Woodland Scenics burnt static grass. The plant life in this drainage ditch was courtesy of Bragdon Enterprises miniature plants. I also planted more of the Aber sunflowers. At this time, I was thinking on the riverbed. And I wanted lots of color in this diorama.. So I took talus and cat litter and dyed it with different colors to make the medium and small rocks along the riverbed. These I glued down when they were dry, then coated with the white Woodland Scenics glue. After this dried, I painted the different colors I wanted in the depths of the river. I then came back and covered the slopes down to the river with the Woodland Scenics burnt static grass and the Heki wild grass. I felt it needed more than just plants and rocks along this river, so I decided to sculpt a fallen tree trunk and some tree stumps out of Sculpey and they were added to the base. Also to stick with the theme of having a bright summer day, I decided that along the slope I would have a daisy patch. So I added Aber photo etch Daisies, and another dried flower from a DIY store to make the flower patches. If you look closely, you may even notice a butterfly or two among the flowers. I added tree roots and other dried plants from a DIY store as well as Bragdon Enterprises miniature plants to fill out the plant work. With the exception of a sapling made from a twig and photo etch leaves.


About the Author


FROM: NEBRASKA, UNITED STATES
When I was a kid I built my first tank at around 10 years old it was a 1/48 scale tamiya m60 motorized. I did a few 1/48 bandai kits as well. then I jumped to model cars for the next few years, around the age of 15 I started back into armor and mostly did the 1/32 monogram stuff. I quit modeling whe...
Comments

Again thanks for the wonderful words everyone. I am very glad you seem to find it informative. Costas, bro I am glad you have been there every step helping me out, thanks!!! Arvin, the next project is for the Ardennes campaign. So far I have about fifteen figures, tamiya sherman 105, DML hetzer, and a Tamiya schwimmwagen. Its going to be a scene with a knocked out sherman and the germans are taking the fuel from it. I am going to try my hand at another river or stream with it being half covered with ice this time and a stone bridge for the dio. Again thanks for the comments. Cheers Kevin
FEB 08, 2005 - 02:34 AM

Sorry to chime in so late here, but, having followed this diorama from the beginning, what a wonderful way to finish off a fantastic project: with a very informative article. Also, thanks to Slodder for making all the extra photos available for viewing.
Keith
FEB 08, 2005 - 03:26 AM
Kevin, that diorama is superb. I love the composition and the details just like everyone else here. Best of all, I love the "contrasting" atmosphere....war machines going through a peaceful village.
It's fantastic. I wish I can make something like yours. It's simply one of the best dioramas I have ever seen. Congratulations.
Angela
FEB 08, 2005 - 01:53 PM


Kevin, that is one heckuva dio guy! Something little and normal going on everywhere you look on it.The contrast is perfect for alot of the affected countries,war material passing through serene and peacefull villages.I especially like the tanker peeking out the turret side hatch and the way you made what I think are Italeri and ESCI figures look very good.Very ironic since Italeri figs got a pretty good bashing here the other day! :-) Really great job and outstanding write-up.
Cheers lad!
FEB 08, 2005 - 05:14 PM

The deeper I get into this fine past time we call modelling, the more I appreciate this calibre of workmanship. This dio makes the viewer search out all the details and all the little stories, which are done so well.You have both alot of patience & talent. You've done a great job with this one Kevin, and somehow it looks like it was a blast to build. I'm not sure if it's a inspiration or if I want to throw away my brush and sit back and enjoy............Nah it's an inspiration!
Cheers to a job well done
Bruce
FEB 08, 2005 - 06:51 PM
Hi everyone, I am glad everyone is liking this dio and finding it interesting. It warms my heart that something I have created has this kind of impact on people. I had a blast making it and documenting the build, and am glad it has given inspiration. Cheers Kevin
FEB 09, 2005 - 12:53 AM

Graywolf:
Graywolf, I couldn't disagree more....this diorama could BE an entire book!
He has everything: models, scratch building, scenicing that would bring praise from model railroaders, composition, a story...
To redundantly mix superlatives, this diorama is absolutely extraordinary!
This is work I strive for.
FEB 17, 2005 - 02:55 PM
Kevin,
All I can say is....SWEET! Everything about this work of art is superb, my friend.
FEB 20, 2005 - 06:44 AM
Hi Guys, thank you for the kind words. I am really glad that you like this dio Thanks again. Kevin
FEB 20, 2005 - 01:13 PM
Copyright ©2021 by Kevin Gardner. Images and/or videos also by copyright holder unless otherwise noted. The views and opinions expressed herein are solely the views and opinions of the authors and/or contributors to this Web site and do not necessarily represent the views and/or opinions of Armorama, KitMaker Network, or Silver Star Enterrpises. All rights reserved. Originally published on: 2005-02-07 00:00:00. Unique Reads: 52569

WEB HOSTING BY


Copyright ©2021 Armorama and Kitmaker Network, a subsidiary of Silver Star Enterprises
All Rights Reserved. Please read our Conditions of Use and Privacy Policy.
All Rights Reserved. Please read our Conditions of Use and Privacy Policy.