

1⁄35It's A Jungle Out There (Part II)
20
Comments
Wild bananas
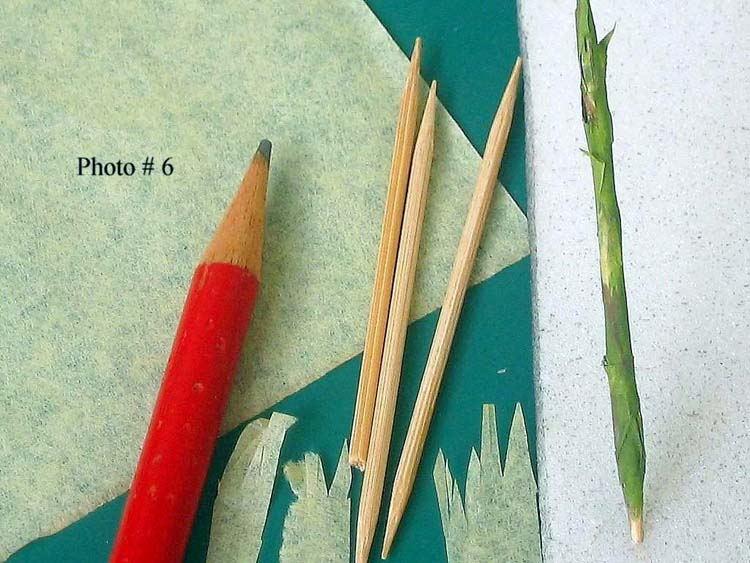
While not a very common jungle sight, there will be the odd small clump of wild banana plants. Physically their similar to their cultivated counterparts with the main differences being in their relatively smaller fruit sizes which also contain seeds. Bananas like bamboo propagate largely by runners which sprout not to far from their base of the parent plant. These sprouts or suckers (honestly thats what theyre called) number anywhere from 1-4 or more plantlets surround the parent plant and thus give rise to the clump.One of the methods of creating a banana is the use of a bamboo toothpick as the stem and preserved ferns for leaves. The method for the stem which is elegantly simple comes from one of our Armorama members whom I have not been able to trace. My sincerest apologies for not mentioning your name but I came across it sometime back in the Diorama forum and havent been able to find it since.
Just glue thin strips of jaggedly cut paper around the toothpick as ones seen in Photo # 6 with the jagged end pointed upwards. We have used kite paper as it takes paint well without warping. Stick the paper all round but leave the pointed end free of glue. Stick the paper in a spiral manner making it thick at the bottom. The paper represents the papery bark of the stem.
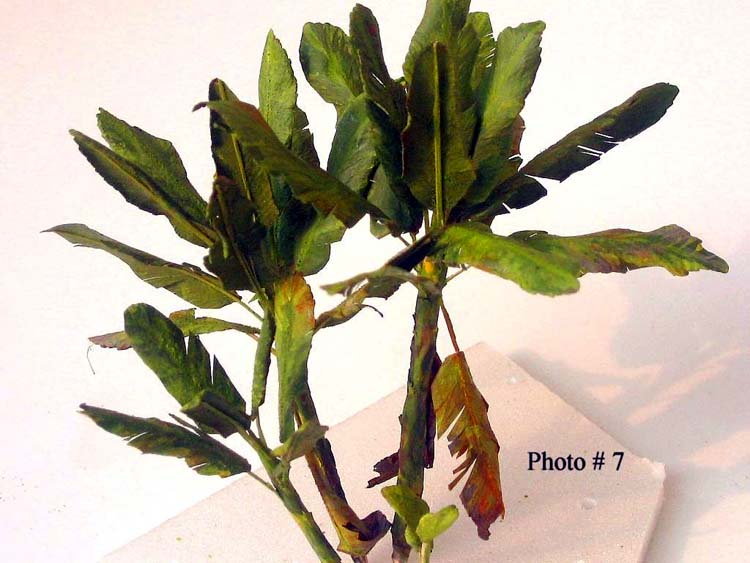
Leaves are made from fern leaves preserved with glycerin:water as in Part I. Aluminum baking foil can also be used. Theyre attached with strips of bamboo split off a thicker bamboo skewer. These splints have been used as stems because theyre flexible and allow for shaping a natural bend in the stems. An average banana plant has anywhere from 6 (unhealthy or juvenile plant) to 12 or more leaves (healthy plant). Realism is achieved with the following:
(i) Make almost perpendicular cuts to the leaf portion on both side of the leaf stem, (photo #7) as banana leaves tear easily from wind damage. (ii) Having some grayish brown decaying leaves hanging down. (iii) Painting. The stem varies from a basecoat of light green to yellowish tips at the jagged ends of the strips of paper to grayish dark brown for the decayed portions at the bottom. The older leaves have yellowish to light brown edges. (iv) Modeling them as a clump with suckers at various heights.
Coconut
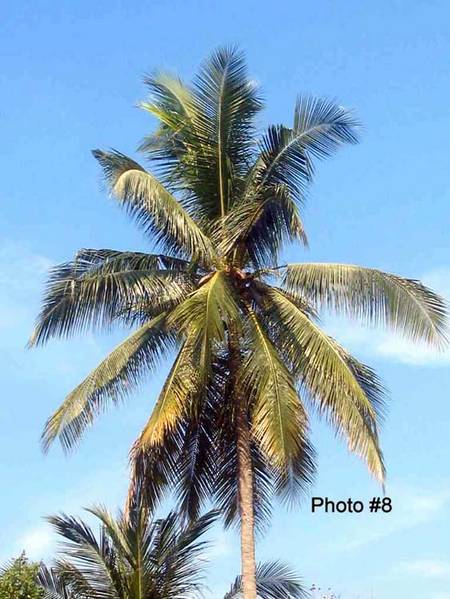
Unlike bananas, coconut palms tend to be restricted to cultivated areas such as farms and villages with wild coconuts occurring largely at beaches. While palms abound in a jungle coconuts tend to be pretty rare. Coconuts are in reality palms and like their cousins, date palms and jungle ones, share certain similarities. One shoot, straight singular trunk (rough due to leaf bases or smooth) with no branches. Photo #8 shows a canopy of a coconut. Take note of the arrangement of the fronds and their color as this will come into play when creating the canopy.Ive used a modified combo of Demodelbouwers method of making the stem and Vikings way of making the fronds. The stem is a kebab skewer but of much larger diameter than that used for bananas. Coconuts sometimes have a gently bent trunk and by fashioning 1-2 of them in this manner especially in a group improves the realism. The skewer was bent by soaking it in boiling water for a few minutes and raising it at both ends with a heavy weight in the middle. Sag the skewer with the weight for an hour or so.
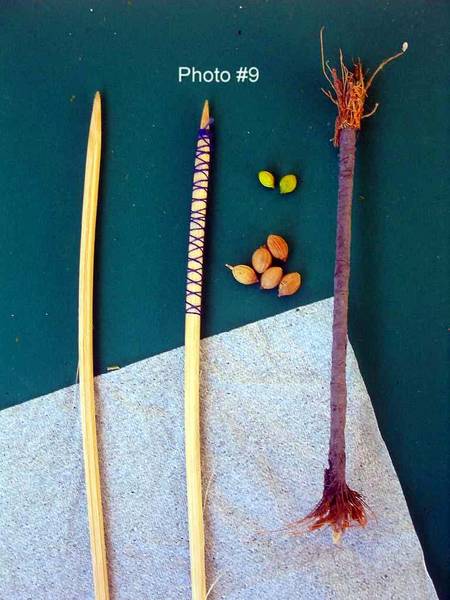
Photo #9 shows both the slightly bent skewer (left) and the skewer with string wound round (middle). The cotton string is tied at the top of the skewer, wound downwards and then up again with roughly equal spacing. Apply diluted PVA glue (30 PVA: 70 water) over the entire strung trunk and wrap with tissue. Facial tissues are the best. Use only 1 layer (single ply). Apply more PVA mix over the paper once its glued to the trunk. The finished trunk as seen to the right of the photo has bits of coconut husk fibers at both ends to simulate the feeder roots and leaf fibers respectively. The round peppercorn looking materials in the center are coriander seeds that will be painted as coconuts.
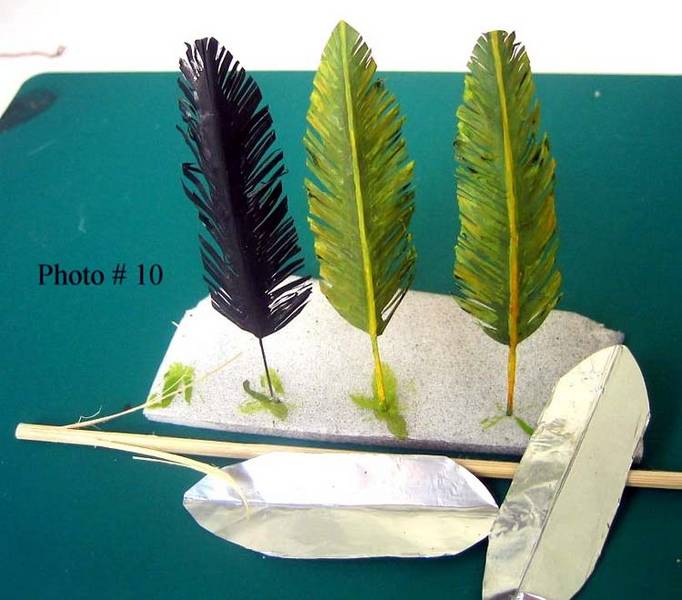
Here comes the tedious portion, the fronds. I favor the aluminum baking foil leaves used by Viking. As seen in Photo #10, the various stages of frond construction from left to right. Frond on the right has primer applied. There are also Photo-Etch fronds available but I kind of prefer these homemade ones as there are variations. That and mainly because they too expensive. Coconut fronds lengths average around 2-3m or 5-9cm in 1:35 scale. You can stack about 3-4 layers of foil to cut the individual leaflets (pinnae) easing the work. I wouldnt stack more as it gets hard to separate the cut fronds after cutting the leaflets. Use a scissors instead of a blade as no matter how sharp a blade is it will tear the foil. Make sure you scribe the middle a bit where with a blunt instrument (i.e. blunt pencil) as seen at the bottom right. This will be where the leaf stems (racchis) sits. For leaf stems I usethe good ole flexible bamboo strips.
The disadvantages of foil or any material other than PE is that you can never cut the individual leaflets fine enough and sharp ended to truly resemble the leaflets. But then as with most things in life its a compromise.
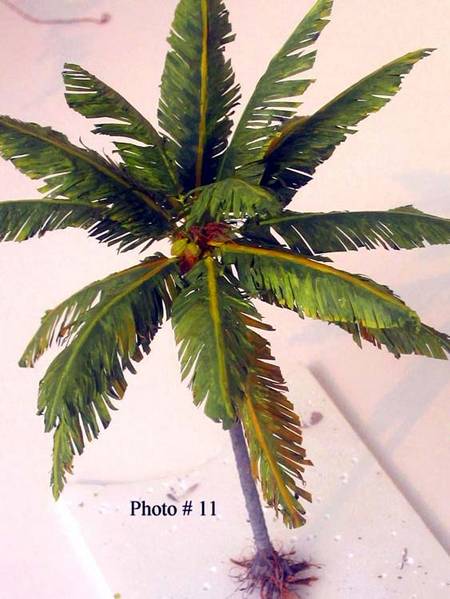
Photo #11 is the finished palm with a couple of additional touches for realism. Coconuts can be added by appropriately painting Coriander seeds. Add some real coconut husks fibers to the top of the trunk and the slighty chunky bits of the same material to the base. The latter is to represent exposed feeder roots that sometimes can be seen when palms get taller and lean a bit due to the weight.
Painting again lends realism. Lower fronds tend towards shades of grey and yellow as the die. The midline of frond where the leaf stem is found underneath the frond is generally yellowish green tending to orange yellow in older fronds. Coconut trunks are in reality grayish light brown and a darker wash can be used to bring out the rings around the trunk. Tips of leaflets can be highlighted with a bit of yellow.
As in photo #8, fronds are arranged with lower fronds tending downwards while fronds located in mid-canopy dip slightly down from a horizontal plane (an imaginary plane parallel to the ground). Fronds at the top of canopy arch upwards at a 45-60 degree slope from the horizontal.
About the Author


FROM: KUALA LUMPUR, MALAYSIA
Like most forum members here I started with Airfix, Frog & Matchbox at a time when there was no Internet. From the first time I saw a photo of a vignette on a Ford GPA in a swamp (from Monogram I think), I knew dioramas was the thing for me. However, it took more than a 25-year layoff from modelling...
Comments

Many Thanks Guys. Sorry I didn't reply earlier as I was away mucking around the plantations.
Scott, I'm really sorry about leaving out Photos #12 and #13. Will be sending them immediately to the address you PM me. I usually blame it on the old block between my ears but I think the little woman at home usually subscribes my poor memory to as an excuse to avoid any real work.
Thanks again guys and sorry for the missing photos.
APR 07, 2005 - 08:56 PM

CK - don't worry about the images, not a big deal.
I have updated page 3 and added the two images. Really nice pictures.
APR 08, 2005 - 03:42 AM

This is an excellant article you have shared with us. This will help me in my Nam dios. Thanks alot.
APR 08, 2005 - 03:24 PM
Thanks Keenan. Actually Costas was also involved in Part II and we shared a fair bit of info on preserving plants and he had more experience than me on using PE alternatives.
Scott thanks for the addition and the offer.
APR 08, 2005 - 04:38 PM

Dear CK i think that the combined thing of 2 parts is the best article on tropical foliage for dios i have ever read. And thats why its written from someone with practical knowlwdge on the subject , and it involves cheap and easy materials and methods. And thats what a modeller needs. Thanks u so much for taking all this time to do it . Its really a gem. Keep safe my friend.
p.s. Thanks a lot for mentioning my name , but all the glory belongs to u !!!!!!!!!
APR 12, 2005 - 05:58 PM
Actually Costas I mentioned your name coz in case anyone sues US for slander, plagarism, etc. it would be my "bum" and your "goose" that would get it. Its always good to share the blame. :-)
Jokes aside, the second part does reflect your contribution. Anybody who has seen your dios knows the work & research you put into your vegetation.
APR 12, 2005 - 06:22 PM

This going to be very helpfully when I do a dio with tree's.
Happy Modeling
Tom
JUN 12, 2008 - 08:47 PM

Thanks a lot, CK. One of the most useful tutorials here. I'm looking at tropical vegetation everyday, and your stuff's perfect.
JUN 13, 2008 - 03:44 AM

Although late to this party, I'd like to say thank you to the author(s) for all this work. I haven't built a plastic armour kit for 3 decades now. However I have started a 1/4" scale Cuban sugar narrow gauge railway. Living in the Great White North palm trees are hard to find (except in the City Conservatory). Thanks to you I now have a place to start modelling the jungle and savanna of Cuba.
SEP 24, 2013 - 04:18 AM
Copyright ©2021 by CK Tang. Images and/or videos also by copyright holder unless otherwise noted. The views and opinions expressed herein are solely the views and opinions of the authors and/or contributors to this Web site and do not necessarily represent the views and/or opinions of Armorama, KitMaker Network, or Silver Star Enterrpises. All rights reserved. Originally published on: 2005-04-06 00:00:00. Unique Reads: 25151

WEB HOSTING BY


Copyright ©2021 Armorama and Kitmaker Network, a subsidiary of Silver Star Enterprises
All Rights Reserved. Please read our Conditions of Use and Privacy Policy.
All Rights Reserved. Please read our Conditions of Use and Privacy Policy.